Mamona is a lightweight ransomware strain that is widely available and primarily targets Windows endpoints. Unlike more sophisticated ransomware families, it operates entirely offline, encrypting files locally without any command-and-control (C2) communication or data exfiltration. This absence of network activity makes it harder to detect using network traffic analysis alone.
Mamona ransomware uses custom encryption routines and employs basic evasion tactics like leveraging the Windows ping utility as a timing delay. It also self-deletes after execution to reduce forensic artifacts. Despite its simplicity, Mamona ransomware’s plug-and-play nature lowers the barrier for cybercriminals, contributing to the broader commoditization of ransomware.
In this blog post, we demonstrate how to detect Mamona ransomware on a Windows endpoint using Wazuh.
Mamona ransomware behaviour
Mamona ransomware performs the following actions when it infects a Windows endpoint.
- Executes a ping-delay and self-deletion routine: It issues the command below to delay execution for three seconds and then deletes itself from disk.
cmd.exe /C ping 127.0.0.7 -n 3 > Nul & Del /f /q
The use of 127.0.0.7 instead of the more common 127.0.0.1 helps it bypass detection rules that specifically look for the default loopback address.
- Creates a ransom note: It creates a ransom note
README.HAes.txtin multiple folders on the endpoint. - Encrypts files: Mamona ransomware encrypts files on the affected endpoint and appends the extension
.HAesto the names of the encrypted files.
Analyzed samples
| Hash (SHA256) |
| c5f49c0f566a114b529138f8bd222865c9fa9fa95f96ec1ded50700764a1d4e7 |
| b6c969551f35c5de1ebc234fd688d7aa11eac01008013914dbc53f3e811c7c77 |
Infrastructure
We use the following infrastructure to demonstrate the detection of Mamona ransomware with Wazuh:
- A pre-built, ready-to-use Wazuh OVA 4.12.0, which includes the Wazuh central components (Wazuh server, Wazuh indexer, and Wazuh dashboard). Follow this guide to download and set up the Wazuh virtual machine.
- A Windows 11 victim endpoint with the Wazuh agent 4.12.0 installed and enrolled to the Wazuh server.
Detection with Wazuh
Configuration
We use Sysmon to monitor several system events and create custom detection rules on the Wazuh server to detect the malicious behavior of Mamona ransomware.
Windows endpoint
Perform the following steps to configure the Wazuh agent to capture logs with Sysmon and send them to the Wazuh server for analysis.
1. Download Sysmon from the Microsoft Sysinternals page.
2. Extract the compressed Sysmon file to your preferred directory.
3. Download the Sysmon configuration file – sysmonconfig.xml using PowerShell as an administrator. Replace <SYSMON_EXECUTABLE_PATH> with the directory path to your Sysmon executable.
> wget -Uri https://wazuh.com/resources/blog/emulation-of-attack-techniques-and-detection-with-wazuh/sysmonconfig.xml -OutFile <SYSMON_EXECUTABLE_PATH>\sysmonconfig.xml
4. Switch to the folder with the Sysmon executable. Run the command below to install and start Sysmon using PowerShell with Administrator privileges:
> .\Sysmon64.exe -accepteula -i sysmonconfig.xml
5. Add the following configuration to the C:\Program Files (x86)\ossec-agent\ossec.conf file within the <ossec_config> block to capture and forward Sysmon event logs to the Wazuh server:
<localfile>
  <location>Microsoft-Windows-Sysmon/Operational</location>
  <log_format>eventchannel</log_format>
</localfile>
6. Restart the Wazuh agent to apply the configuration changes:
> Restart-Service -Name wazuh
Wazuh server
We create custom rules to detect the activities of the Mamona ransomware on the monitored Windows endpoint.
- Create a rules file
mamona_ransomware_rules.xmlin the/var/ossec/etc/rules/directory:
# touch /var/ossec/etc/rules/mamona_ransomware_rules.xml
- Add the rules below to the
/var/ossec/etc/rules/mamona_ransomware_rules.xmlfile:
<group name="mamona,ransomware,">
  <!-- Ransom note creation -->
  <rule id="100901" level="15" timeframe="100" frequency="2">
    <if_sid>61613</if_sid>
    <field name="win.eventdata.targetFilename" type="pcre2">(?i)README\d*\.HAes\.txt</field>
    <description>Possible Mamona ransomware detected: Mamona ransom note 'README.HAes.txt' detected in $(win.eventdata.targetFilename).</description>
    <mitre>
      <id>T1486</id>
    </mitre>
  </rule>

  <!-- Detect multiple ransom note creation + ping delay and self-deletion command-->
  <rule id="100902" level="15" frequency="2" timeframe="300">
    <if_matched_sid>100901</if_matched_sid>
    <if_sid>61603</if_sid>
    <field name="win.eventdata.commandLine" type="pcre2">(?i)ping</field>
    <field name="win.eventdata.commandLine" type="pcre2">127\.0\.0\.7</field>
    <field name="win.eventdata.commandLine" type="pcre2">Del</field>
    <description>Mamona ransomware activity confirmed. Multiple ransom notes dropped and suspicious command detected (Ping delay + self deletion): $(win.eventdata.commandLine)</description>
    <mitre>
      <id>T1490</id>
      <id>T1059.003</id>
    </mitre>
  </rule>
</group>
Where:
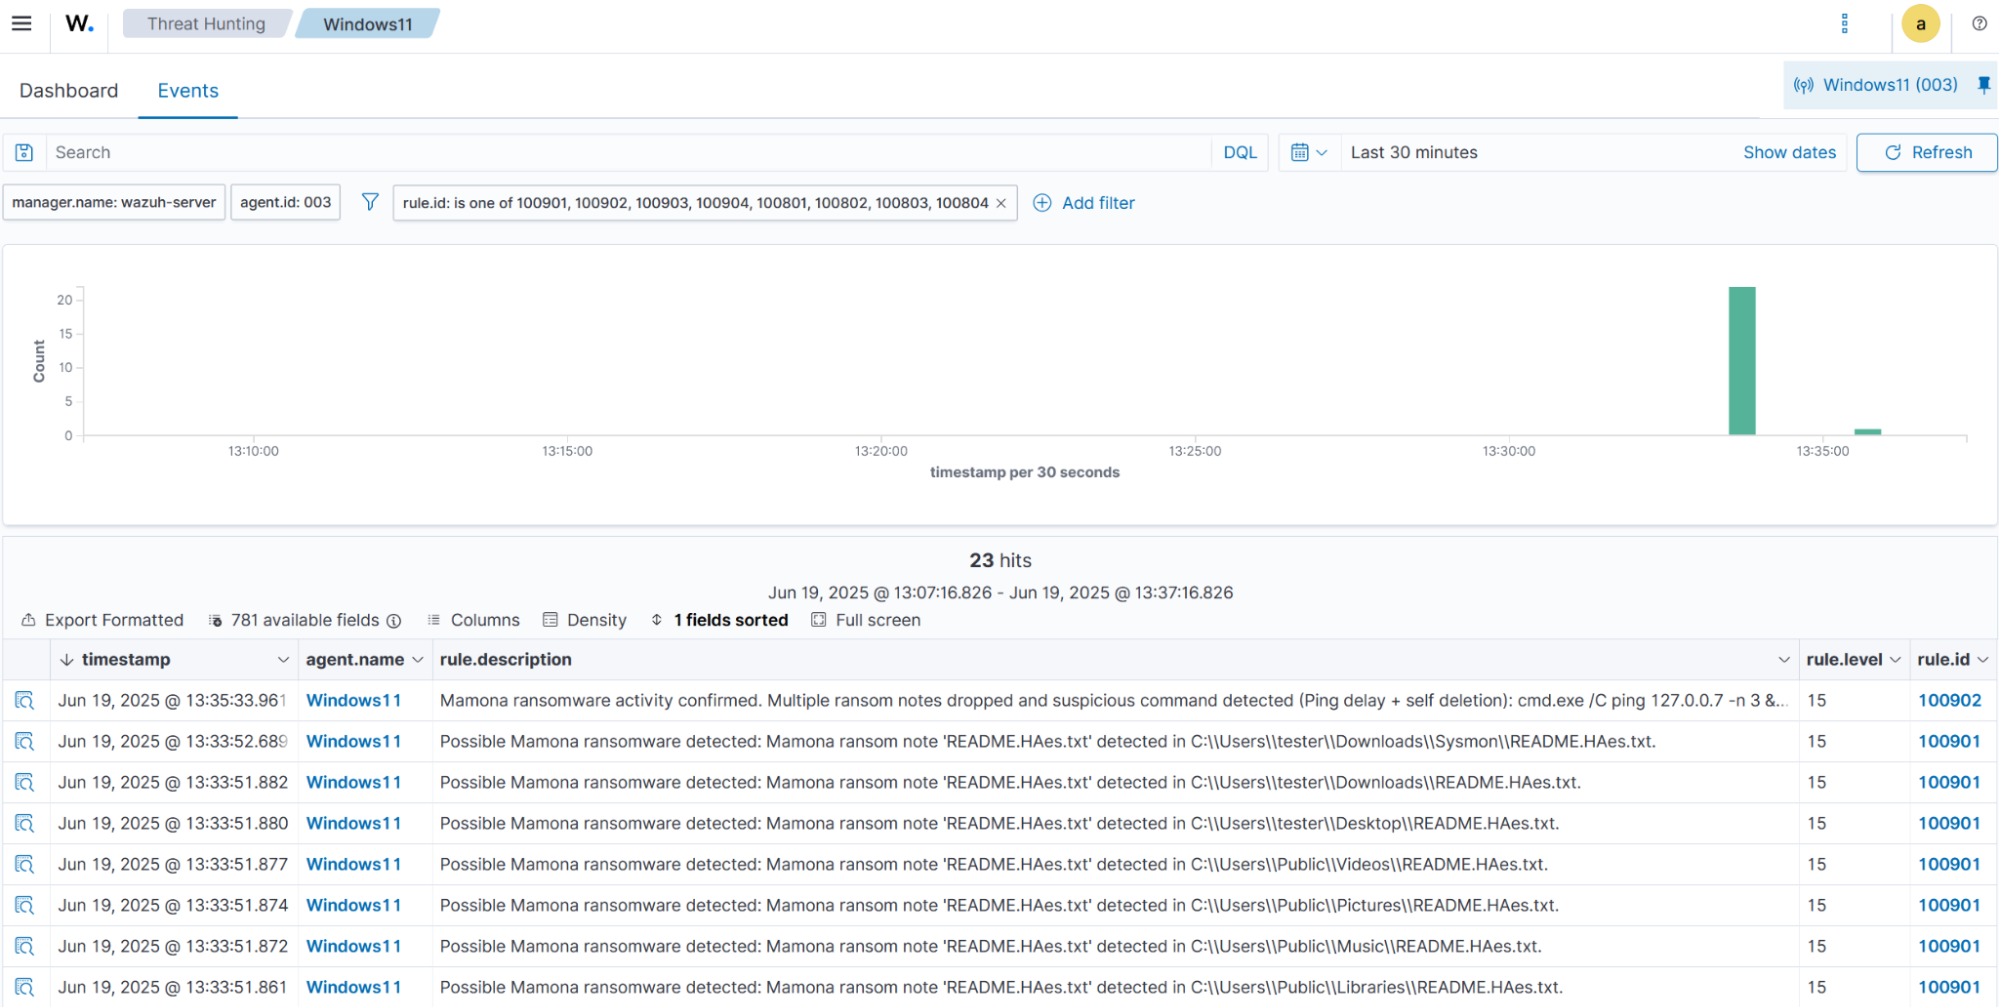
- Rule ID
100901is triggered when a Mamona ransomware ransom noteREADME.HAes.txtis created. - Rule ID
100902is triggered when multiple Mamona ransom notes are detected along with a command combining both a ping delay pattern and self-deletion command.
- Restart the Wazuh manager to apply changes:
# systemctl restart wazuh-manager
Detection results
The alerts below are generated on the Wazuh dashboard when Mamona ransomware is executed on a Windows endpoint. Perform the following steps to view the alerts on the Wazuh dashboard.
1. Navigate to Agents management > Summary and select the Windows agent.
2. Click on Threat Hunting and select the Events tab.
3. Click + Add filter. Then filter for rule.groups in the Field field. Select is one of in the Operator field.
4. Add the filters mamona and ransomware in the Values field.
5. Click Save.
Removing malicious files with YARA integration
Early detection and removal of malware is an important defense strategy that stops malicious files before they can execute on endpoints. The Wazuh File Integrity Monitoring (FIM) module provides real-time scanning to detect file additions, modifications, or deletions across monitored systems. Integrating Wazuh with threat intelligence platforms like YARA and VirusTotal helps organizations promptly identify and respond to potential threats.
In this section, we demonstrate how to configure the Wazuh FIM module to monitor a specific directory for changes. When the Wazuh FIM module detects a modification or a new file, the Wazuh Active Response module automatically triggers a YARA scan against the file. If the file matches predefined malicious signatures, it is immediately removed, thereby mitigating the threat before it can impact the system.
Windows endpoint
Perform the steps below to configure the monitored endpoint.
- Install the following prerequisites:
- Python 3.12.2 or later (with
pippre-installed). Ensure you check the box Add python.exe to PATH, which places the Python interpreter in the execution path. - Microsoft Visual C++ 2015 Redistributable.
Note
Run PowerShell as an administrator
- Download YARA:
> Invoke-WebRequest -Uri https://github.com/VirusTotal/yara/releases/download/v4.5.4/yara-master-v4.5.4-win64.zip -OutFile v4.5.4-win64.zip
- Extract the downloaded zipped YARA file:
> Expand-Archive v4.5.4-win64.zip
- Create a folder
C:\Program Files (x86)\ossec-agent\active-response\bin\yara\and copy the YARA binary into it:
> mkdir 'C:\Program Files (x86)\ossec-agent\active-response\bin\yara\'
> cp .\v4.5.4-win64\yara64.exe 'C:\Program Files (x86)\ossec-agent\active-response\bin\yara\'
- To download the YARA rules, use the
piputility to installvalhallaAPI. This API retrieves the public signature-based YARA ruleset:
> pip install valhallaAPI
- Create a file
download_yara_rules.py, and paste the below script into it:
from valhallaAPI.valhalla import ValhallaAPI
v = ValhallaAPI(api_key="1111111111111111111111111111111111111111111111111111111111111111")
response = v.get_rules_text()
with open('yara_rules.yar', 'w') as fh:
    fh.write(response)
- Run the
download_yara_rules.pyscript file to download YARA rules:
> python download_yara_rules.py
- Create a folder
C:\Program Files (x86)\ossec-agent\active-response\bin\yara\rulesand copy the rules into it:
> mkdir 'C:\Program Files (x86)\ossec-agent\active-response\bin\yara\rules\'
> cp yara_rules.yar 'C:\Program Files (x86)\ossec-agent\active-response\bin\yara\rules\'
- Edit the downloaded YARA rule file
C:\Program Files (x86)\ossec-agent\active-response\bin\yara\rules\yara_rules.yarand add the following Mamona ransomware rule:
rule Mamona_ransomware {
	meta:
    	description = "Detects Mamona ransomware or similar variants"
    	author = "Oluwaseyi Soneye"
    	reference = "Strings output analysis"
    	date = "2025-05-22"

	strings:
    	$s1 = "YOUR FILES HAVE BEEN ENCRYPTED!" nocase
    	$s2 = "CHECK README." nocase
    	$s3 = "README." nocase
    	$s4 = "password OK" nocase
    	$s5 = "wrong pass" nocase
    	$s6 = "provide pass" nocase
    	$s7 = "encryption mode" nocase
    	$s8 = "Mamona" nocase
    	$s9 = "cleared event logs" nocase
    	$s10 = "WinDefend" nocase
    	$s11 = "SecurityHealthService" nocase
    	$s12 = "TerminateProcess" nocase
    	$s13 = "killed process" nocase
    	$s14 = "killed service" nocase
    	$s15 = "WNetAddConnection2W" nocase
    	$s16 = "NetShareEnum" nocase
    	$s17 = "\\%s\\IPC$" nocase
    	$s18 = "encrypting file" nocase
    	$s19 = "encrypting directory" nocase
    	$s20 = "Del /f /q" nocase
    	$s21 = "cmd.exe /C ping 127.0.0.7 -n 3 > Nul & Del /f /q" nocase
    	$s22 = "PrintMe22" nocase
    	$s23 = "printed note to printer" nocase

	condition:
    	(uint16(0) == 0x5A4D) and  // PE header check
    	(
        	any of ($s*) or
        	(3 of ($s1, $s2, $s3, $s4, $s5, $s6, $s7, $s8)) or
        	(2 of ($s9, $s10, $s11, $s12, $s13, $s14)) or
        	(2 of ($s15, $s16, $s17)) or
        	(2 of ($s18, $s19, $s20, $s21, $s22, $s23))
    	)
}
- Monitor the
Downloadsfolder of all users in real-time by adding the below configuration within the<syscheck>block of theC:\Program Files (x86)\ossec-agent\ossec.conffile:
<directories realtime="yes">C:\Users\*\Downloads</directories>
Note
We only monitored the Downloads folder of all users in this blog post. You can configure other folders you wish to monitor.
- Create a batch file
yara.batin theC:\Program Files (x86)\ossec-agent\active-response\bin\folder and copy the below script into it. The Wazuh Active Response module runs this script to perform YARA scans for malware detection and removal:
:: This script deletes Mamona ransomware executable and other malicious files matched by the YARA Rules

@echo off
setlocal enableDelayedExpansion
reg Query "HKLM\Hardware\Description\System\CentralProcessor\0" | find /i "x86" > NUL && SET OS=32BIT || SET OS=64BIT
if %OS%==32BIT (
    SET log_file_path="%programfiles%\ossec-agent\active-response\active-responses.log"
)
if %OS%==64BIT (
    SET log_file_path="%programfiles(x86)%\ossec-agent\active-response\active-responses.log"
)
set input=
for /f "delims=" %%a in ('PowerShell -command "$logInput = Read-Host; Write-Output $logInput"') do (
    set input=%%a
)
set json_file_path="C:\Program Files (x86)\ossec-agent\active-response\stdin.txt"
set syscheck_file_path=
echo %input% > %json_file_path%
FOR /F "tokens=* USEBACKQ" %%F IN (`Powershell -Nop -C "(Get-Content 'C:\Program Files (x86)\ossec-agent\active-response\stdin.txt'|ConvertFrom-Json).parameters.alert.syscheck.path"`) DO (
SET syscheck_file_path=%%F
)
set yara_exe_path="C:\Program Files (x86)\ossec-agent\active-response\bin\yara\yara64.exe"
set yara_rules_path="C:\Program Files (x86)\ossec-agent\active-response\bin\yara\rules\yara_rules.yar"
echo %syscheck_file_path% >> %log_file_path%
for /f "delims=" %%a in ('powershell -command "& \"%yara_exe_path%\" \"%yara_rules_path%\" \"%syscheck_file_path%\""') do (
    echo wazuh-yara: INFO - Scan result: %%a >> %log_file_path%
    :: Deleting the scanned file.
	del /f "%syscheck_file_path%" >nul 2>&1
if exist "%syscheck_file_path%" (
    echo wazuh-yara: INFO - Error removing threat: %%a >> %log_file_path%
) else (
    echo wazuh-yara: INFO - Successfully deleted: %%a >> %log_file_path%
)
 )
exit /b
- Restart the Wazuh agent to apply the changes:
> Restart-Service -Name wazuh
Wazuh server
Perform the following steps to configure custom decoders, rules, and the Wazuh Active Response module on the Wazuh server.
- Add the custom rules below to the
/var/ossec/etc/rules/local_rules.xmlfile:
<group name= "syscheck,">
  <rule id="100911" level="7">
    <if_sid>550</if_sid>
    <field name="file" type="pcre2">(?i)C:\\Users.+Downloads</field>
    <description>File modified in the Downloads folder.</description>
  </rule>

  <rule id="100912" level="7">
    <if_sid>554</if_sid>
    <field name="file" type="pcre2">(?i)C:\\Users.+Downloads</field>
    <description>File added to the Downloads folder.</description>
  </rule>
</group>

<!--  Rule for the decoder (yara_decoder) -->
<group name="yara,">
  <rule id="100913" level="0">
    <decoded_as>yara_decoder</decoded_as>
    <description>Yara grouping rule</description>
  </rule>

<!--  YARA scan detects a positive match -->
  <rule id="100914" level="12">
    <if_sid>100913</if_sid>
    <match type="pcre2">wazuh-yara: INFO - Scan result: </match>
    <description>File "$(yara_scanned_file)" is a ransomware. Yara rule: $(yara_rule)</description>
  </rule>

<!--  Wazuh successfully deletes malware with a positive match -->
  <rule id="100915" level="12">
    <if_sid>100913</if_sid>
    <match type="pcre2">wazuh-yara: INFO - Successfully deleted: </match>
    <description>Successfully removed "$(yara_scanned_file)" by active response due to YARA rule $(yara_rule) positive match</description>
  </rule>

<!--  Wazuh encounters an error when deleting malware with a positive match -->
  <rule id="100916" level="12">
    <if_sid>100913</if_sid>
    <match type="pcre2">wazuh-yara: INFO - Error removing threat: </match>
    <description>Error removing "$(yara_scanned_file)". YARA rule: $(yara_rule)</description>
  </rule>
</group>
Where:
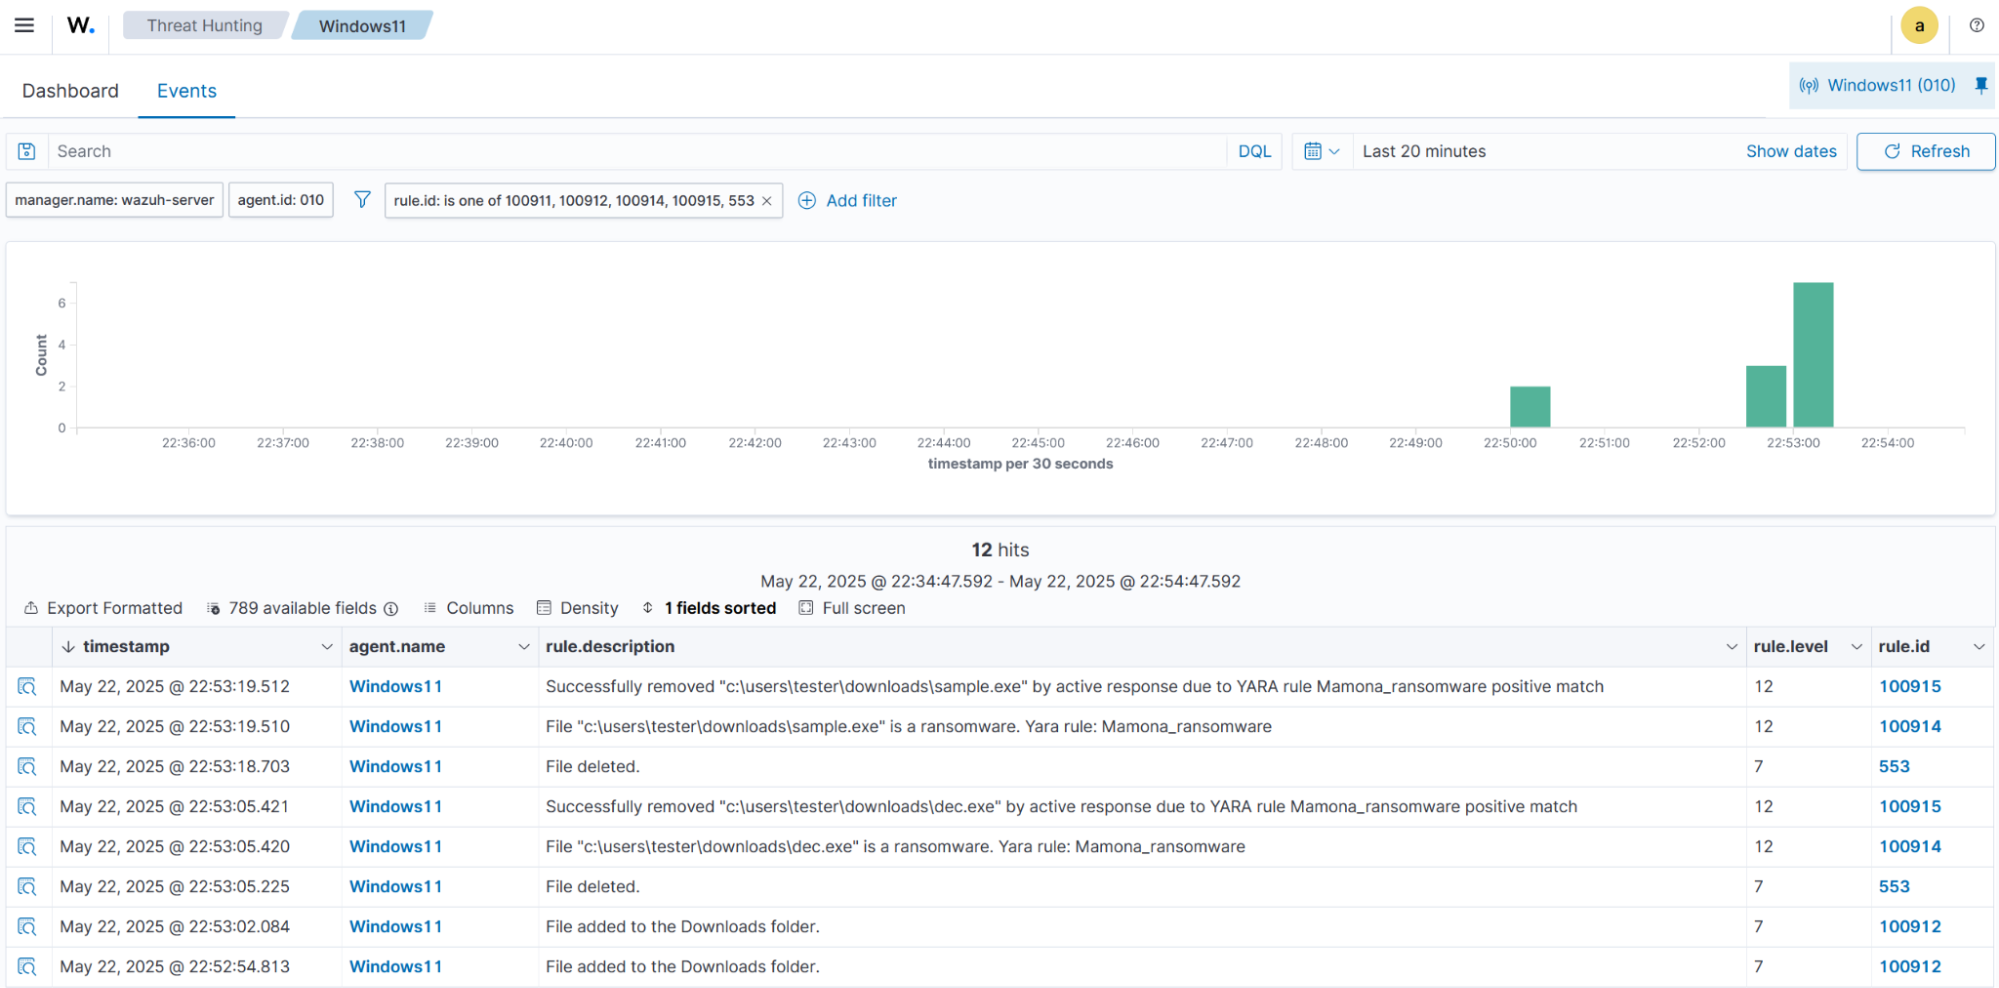
100911is triggered when a file is modified in theDownloadsfolder.100912is triggered when a file is added to theDownloadsfolder.100913is the base rule for detecting YARA-related events.100914is triggered when YARA scans and detects a malicious file.100915is triggered when the executable has been successfully removed by the Wazuh Active Response module.100916is triggered when the executable is not removed successfully by the Wazuh Active Response module.
- Add the following decoders to the
/var/ossec/etc/decoders/local_decoder.xmlfile to decode the logs generated by the Active Response script:
<decoder name="yara_decoder">
    <prematch>wazuh-yara:</prematch>
</decoder>

<decoder name="yara_decoder1">
    <parent>yara_decoder</parent>
    <regex>wazuh-yara: (\S+) - Scan result: (\S+) (\S+)</regex>
    <order>log_type, yara_rule, yara_scanned_file</order>
</decoder>

<decoder name="yara_decoder1">
    <parent>yara_decoder</parent>
    <regex>wazuh-yara: (\S+) - Successfully deleted: (\S+) (\S+)</regex>
    <order>log_type, yara_rule, yara_scanned_file</order>
</decoder>

<decoder name="yara_decoder1">
    <parent>yara_decoder</parent>
    <regex>wazuh-yara: (\S+) - Error removing threat: (\S+) (\S+)</regex>
    <order>log_type, yara_rule, yara_scanned_file</order>
</decoder>
- Add the following configuration within the
<ossec_config>block of the/var/ossec/etc/ossec.conffile:
<command>
  <name>yara</name>
  <executable>yara.bat</executable>
  <timeout_allowed>no</timeout_allowed>
</command>

<active-response>
  <command>yara</command>
  <location>local</location>
  <rules_id>100911,100912</rules_id>
</active-response>
The Wazuh Active Response module runs the yara.bat script when a file is added or modified in the Downloads folder.
Where:
<name>specifies thatyarais the name of the command being called in the<active-response>block.<executable>specifies thatyara.batis the executable file to run.<command>specifies the command that the Active Response module will use.- The
<active response>block calls the<command>block when the rule ID100911or100912is triggered. <location>specifies where the Active Response script is executed.
- Restart the Wazuh manager for the changes to take effect:
# systemctl restart wazuh-manager
Visualizing detection alerts on the Wazuh dashboard
Alerts are generated on the Wazuh dashboard when a Mamona ransomware executable is added to the Downloads folder of the monitored endpoint and removed by the Wazuh Active Response module.
Perform the following steps to view the alerts on the Wazuh dashboard:
1. Navigate to Threat intelligence > Threat Hunting.
2. Click + Add filter. Then, filter for rule.id in the Field field.
3. Select is one of in the Operator field.
4. Filter for 100912, 100914, 100915, and 553, in the Values field.
5. Click Save.
Conclusion
Wazuh provides various capabilities for detecting and responding to malware. This blog post highlighted how to detect Mamona ransomware activities on a Windows endpoint with Wazuh. We integrated Sysmon with Wazuh to enrich logs from the infected endpoint and created Wazuh detection rules to identify malicious behaviour associated with Mamona ransomware. We also demonstrated how to use the Wazuh FIM and Active Response capabilities with YARA integration to respond to threats.
Consult the Wazuh documentation to refine your setup or explore the capabilities of Wazuh. Feel free to join our community, where our team and other Wazuh users are available to assist you with any questions related to Wazuh.