Auto-color is a stealthy Linux backdoor used in cyberattacks targeting government institutions and universities across North America and Asia. Attributed to an unknown threat actor, Auto-color is specifically designed for persistence and evasion, allowing it to remain undetected on infected systems for extended periods. The malware disguises itself as a harmless color-enhancement utility to avoid raising suspicion. The name Auto-color comes from the file name that the initial payload assigns itself during post-installation.
While the initial infection vector for Auto-color remains unclear, it is known that the malware requires manual execution by the victim on a Linux endpoint, typically with root privileges. Once executed, Auto-color installs a malicious library implant named “libcext.so.2“, renames itself to /var/log/cross/auto-color, and modifies the /etc/ld.preload file to achieve persistence. By abusing the ld.preload mechanism, the implant ensures that its malicious library is loaded into system processes, making detection and removal more challenging.
Given its recent resurgence and evasive characteristics, detecting Auto-color is critical for protecting Linux environments. In this blog post, we demonstrate how to detect Auto-color infections on Linux endpoints using Wazuh, an open source unified XDR and SIEM.
Auto-color malware behavior
Below are some of the behaviors observed after Auto-color malware is successfully executed on a Linux endpoint:
- It duplicates itself as “
/var/log/cross/auto-color” when it obtains root privileges. - It installs “
libcext.so.2” to mimic legitimate “libcext.so.0,” written to “/etc/ld.preload” for hooking libc functions. - It hooks
open()functions to manipulate “/proc/net/tcp,” hiding C2 (command and control) connections by filtering specific local ports or remote IP addresses to “/tmp/cross/<user_id>/tcp“. - It uses a custom encryption method for its command-and-control (C2) communications, and connects to IP addresses that are generated dynamically. These IPs are typically stored in files with names like “/tmp/cross/config-err-XXXXXXXX” or “/var/log/cross/config-err-XXXXXXXX.”
- It opens a reverse shell, executes arbitrary commands, modifies/creates files, acts as a proxy, and dynamically modifies configuration.
- It prevents uninstallation by protecting “
/etc/ld.preload“, uses root privileges for deeper system integration, and includes rootkit-like features by hooking libc functions. - It deletes infection traces to impede investigations, such as removing files or modifying logs.
Analyzed samples
| Hash type | Value |
| SHA256 | 270fc72074c697ba5921f7b61a6128b968ca6ccbf8906645e796cfc3072d4c43 |
| 815b74947d3a78a1b7d2aece43596ddc0ffc264e26092f1f9b6409c62e1437d6 |
Infrastructure
We use the following infrastructure to demonstrate the detection of Auto-color malware with Wazuh:
- A pre-built, ready-to-use Wazuh OVA 4.12.0, which includes the Wazuh central components (Wazuh server, Wazuh indexer, and Wazuh dashboard). Follow this guide to download and set up the Wazuh virtual machine.
- An Ubuntu 24.04 victim endpoint with the Wazuh agent 4.12.0 installed and enrolled to the Wazuh server.
Detection with Wazuh
We use Wazuh to detect the malicious behavior of the Auto-color malware. We use Wazuh Security Configuration Assessment (SCA) to scan for Auto-color malware artifacts to confirm an infection. Additionally, we leverage the integration with SysmonForLinux to enrich logs used for our custom detection rules.
Security Configuration Assessment
Wazuh SCA is used to perform scans that test system hardening and configuration policies. We create an SCA policy to scan for files and directories that are associated with the execution of Auto-color on Linux and Unix systems.
Ubuntu endpoint
Perform the following steps to configure the SCA policy for detecting Auto-color.
- Create a new directory to store your custom policy file:
# mkdir /var/ossec/etc/custom-sca-files/
- Create a new policy file,
autocolor_check.yml, in the/var/ossec/etc/custom-sca-files/directory:
# touch /var/ossec/etc/custom-sca-files/autocolor_check.yml
- Copy the below configuration into
/var/ossec/etc/custom-sca-files/autocolor_check.yml:
# Security Configuration Assessment
# Auto-color Malware Detection for Linux Systems
# Copyright (C) 2025, Wazuh Inc.
#
# This program is free software; you can redistribute it
# and/or modify it under the terms of the GNU General Public
# License (version 2) as published by the FSF - Free Software
# Foundation

policy:
  id: "autocolor_check"
  file: "autocolor_check.yml"
  name: "Auto-color malware check"
  description: "Checking Auto-color malware infection for Unix/Linux-based systems."


requirements:
  title: "Checking Auto-color on Unix/Linux based systems."
  description: "Check that the system is Unix/Linux based."
  condition: any
  rules:
    - 'f:/etc/passwd'


checks:
  - id: 10001
    title: "Check for Auto-color malware duplication in the /var/log/cross directory."
    description: "Detects the presence of /var/log/cross/auto-color, a duplicate created by Auto-color malware."
    rationale: "Auto-color duplicates itself to /var/log/cross/auto-color to masquerade as a legitimate file."
    remediation: "Investigate /var/log/cross/auto-color. If confirmed malicious, delete with: sudo rm /var/log/cross/auto-color. Verify no legitimate use."
    compliance:
      - mitre_attack: ["T1036.005 - Masquerading: Match Legitimate Name or Location"]
      - mitre_attack: ["T1059 - Command and Scripting Interpreter"]
    condition: all
    rules:
     - 'not f:/var/log/cross/auto-color'


  - id: 100002
    title: "Auto-color C2 Configuration Files"
    description: "Detects config-err-* files in /var/log/cross/, /tmp/, or /tmp/cross/0/,created by Auto-color for C2 communication."
    rationale: "Auto-color creates files like config-err-XXXXXXXX for encrypted C2 communication."
    remediation: "Investigate $cross_dir for config-err-* files. If malicious, delete with: sudo rm -f $cross_dir/config-err-*. Delete directories if empty."
    compliance:
      - mitre_attack: ["T1071.001 - Application Layer Protocol: Web Protocols"]
      - mitre_attack: ["T1008 - Fallback Channels"]
      - mitre_attack: ["T1568 - Dynamic Resolution"]
    condition: none
    rules:
      - 'c:find /var/log/cross -type f -name "config-err-*"'
      - 'c:find /tmp -type f -name "config-err-*"'
      - 'c:find /tmp/cross/0 -type f -name "config-err-*"'
      - 'c:find /var/log/cross/0 -type f -name "config-err-*"'


  - id: 100003
    title: "Auto-color Network Activity Hiding Files in /tmp/cross"
    description: "Detects the presence of the /tmp/cross directory and any files within it, used by Auto-color to hide C2 network activity by filtering /proc/net/tcp data."
    rationale: "Auto-color hooks file access functions (open, openat64, fopen, fopen64) to block reading of /proc/net/tcp, which lists TCP connections. It filters C2-related IPs and ports, saving cleaned-up data in temporary files under /tmp/cross to evade detection by tools like netstat."
    remediation: "Investigate /tmp/cross for suspicious files. If malicious, delete with: sudo rm -f /tmp/cross/*; sudo rmdir /tmp/cross. Verify no legitimate use before deletion."
    compliance:
      - mitre_attack: ["T1071.001 - Application Layer Protocol: Web Protocols"]
      - mitre_attack: ["T1008 - Fallback Channels"]
      - mitre_attack: ["T1568 - Dynamic Resolution"]
      - mitre_attack: ["T1562.001 - Impair Defenses: Disable or Modify Tools"]
    condition: none
    rules:
      - 'f:/tmp/cross/0/tcp'
      - 'c:find /tmp/cross -type f -name "*"'
- Change the permissions and ownership of the policy file as shown below:
# chmod 660 /var/ossec/etc/custom-sca-files/autocolor_check.yml
# chown wazuh:wazuh /var/ossec/etc/custom-sca-files/autocolor_check.yml
- Add the SCA block to
/var/ossec/etc/ossec.confwithin the<ossec_config>to enable the policy:
  <sca>
    <policies>
      <policy>/var/ossec/etc/custom-sca-files/autocolor_check.yml</policy>
    </policies>
  </sca>
- Restart the Wazuh agent to effect changes:
# systemctl restart wazuh-agent
Note
Remote commands are disabled by default for security reasons and have to be explicitly enabled by users if using the centralized configuration for multiple agents. This modification is not necessary when the SCA policies are local to the agent.
Visualizing the scan results
Navigate to the Configuration Assessment page on the Wazuh dashboard. Select the monitored Linux endpoint, and then select Auto-color malware check to view the scan results.
The screenshot below shows the SCA alerts generated on the Wazuh dashboard when the Wazuh SCA detects artifacts associated with Auto-color malware.
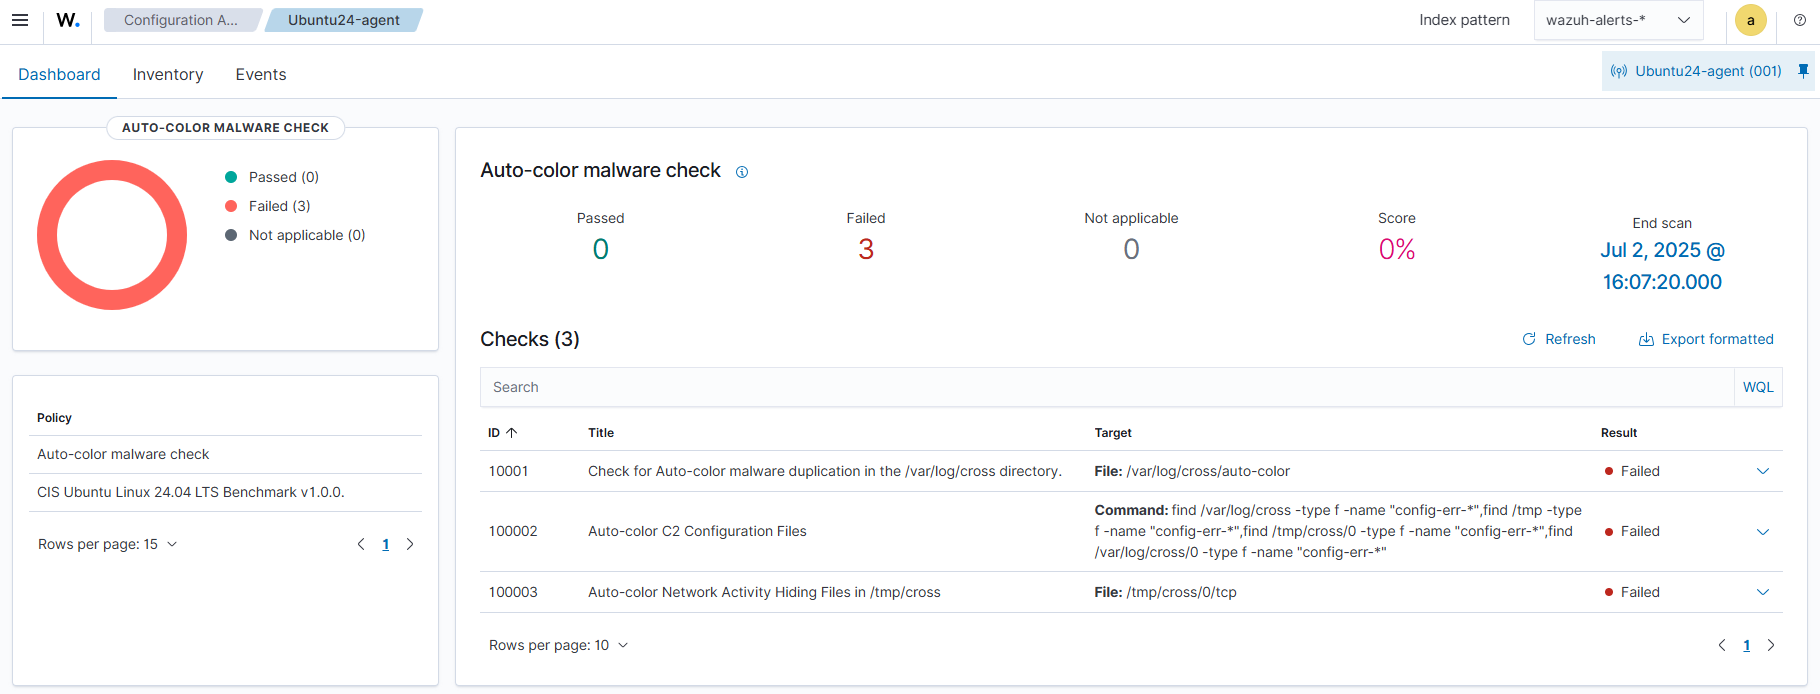
A Failed result indicates that the Auto-color malware artifacts are detected on the endpoint. Conversely, a Passed result indicates that the Auto-color malware artifacts are not detected and that the endpoint meets the SCA policy criteria.
Detection rules
We use SysmonForLinux to monitor several system events and create custom detection rules on the Wazuh server to detect the malicious behavior of Auto-color malware.
Ubuntu endpoint
We install SysmonForLinux to enrich the event logs generated on the Ubuntu endpoint. This approach provides detailed information about events such as process creations, network connections, and changes to the file system.
Note
Execute all the commands below as the root user. If you are using a non-root (normal) user, prepend sudo to each command.
- Install SysmonForLinux. SysmonForLinux can be installed in various ways depending on the Linux distribution and OS version. Installation steps can be found here.
- Download the SysmonForLinux configuration file after installation:
# wget https://wazuh.com/resources/blog/detecting-sysjoker-backdoor-malware-with-wazuh/sysmonforlinux-config.xml
- Use the SysmonForLinux configuration file:
# sysmon -accepteula -i
# sysmon -i sysmonforlinux-config.xml
- Enable Sysmon to run at startup:
# systemctl enable sysmon
# systemctl start sysmon
- Add the following configuration within the
<ossec_config>block of the/var/ossec/etc/ossec.conffile to forward Sysmon events to the Wazuh server for analysis:
  <localfile>
    <log_format>syslog</log_format>
    <location>/var/log/syslog</location>
  </localfile>
- Restart the Wazuh agent to apply the changes:
# systemctl restart wazuh-agent
Wazuh server
Decoders
Wazuh utilizes decoders to extract information from received log messages. Follow these steps to download the decoders that can extract information from SysmonForLinux logs.
- Download the SysmonForLinux decoders:
# wget https://wazuh.com/resources/blog/detecting-sysjoker-backdoor-malware-with-wazuh/sysmonforlinux-decoders.xml.txt
- Create a new decoder file
/var/ossec/etc/decoders/sysmonforlinux_decoder.xmland copy the content to the file:
# cat sysmonforlinux-decoders.xml.txt >> /var/ossec/etc/decoders/sysmonforlinux_decoder.xml
- Change the permissions and ownership of the file as shown below:
# chmod 660 /var/ossec/etc/decoders/sysmonforlinux_decoder.xml
# chown wazuh:wazuh /var/ossec/etc/decoders/sysmonforlinux_decoder.xml
Rules
Wazuh uses rules to analyze decoded log data and trigger alerts. Follow these steps to download the rules that can trigger alerts from the SysmonforLinux logs.
- Download the SysmonForLinux base rules detecting generic Sysmon events:
# wget https://wazuh.com/resources/blog/detecting-sysjoker-backdoor-malware-with-wazuh/sysmonforlinux-base-rules.xml
- Create a rule file
/var/ossec/etc/rules/sysmonforlinux_rule.xmlfor the SysmonForLinux rules:
# touch /var/ossec/etc/rules/sysmonforlinux_rule.xml
- Add the rules to the
/var/ossec/etc/rules/sysmonforlinux_rule.xmlfile. Since these are base rules, the rule levels are set to 1.
# cat sysmonforlinux-base-rules.xml >> /var/ossec/etc/rules/sysmonforlinux_rule.xml
- Change the permissions and ownership of the file as shown below:
# chmod 660 /var/ossec/etc/rules/sysmonforlinux_rule.xml
# chown wazuh:wazuh /var/ossec/etc/rules/sysmonforlinux_rule.xml
- Add the rules below to the
/var/ossec/etc/rules/sysmonforlinux_rule.xmlfile to detect Auto-color malware behavior:
<group name="autocolor, malware,">

 <!-- Post malware execution -->
  <rule id="100401" level="12" frequency="2" ignore="120">
    <if_sid>200155</if_sid>
    <field name="eventdata.Image" type="pcre2">(?i).elf</field>
    <field name="eventdata.targetFilename" type="pcre2">\/var\/log\/cross\/auto-color</field>
    <description>Auto-color malware duplicates itself as $(eventdata.targetFilename).</description>
    <mitre>
      <id>T1036.005</id>
      <id>T1059</id>
    </mitre>
  </rule>


  <rule id="100402" level="12" frequency="2" ignore="120">
    <if_sid>200155</if_sid>
    <field name="eventdata.Image" type="pcre2">(?i).elf</field>
    <field name="eventdata.targetFilename" type="pcre2">\/usr\/lib\/[^\/]+\/libcext\.so\.2</field>
    <description>Auto-color malware created file $(eventdata.TargetFilename) to enable malicious library hooking of libc functions.</description>
    <mitre>
      <id>T1574.006</id>
      <id>T1036.005</id>
    </mitre>
  </rule>


  <rule id="100403" level="12" frequency="2" ignore="120">
    <if_sid>200155</if_sid>
    <field name="eventdata.Image" type="pcre2">(?i).elf</field>
    <field name="eventdata.targetFilename" type="pcre2">\/etc\/ld\.so\.preload</field>
    <description>Auto-color malware created file $(eventdata.targetFilename) to load a malicious library for persistence and libc function hooking.</description>
    <mitre>
      <id>T1574.006</id>
      <id>T1546.015</id>
      <id>T1098</id>
    </mitre>
  </rule>


    <!-- Rule for File Deletion (Event ID 23)-->
  <rule id="100404" level="12" frequency="2" ignore="120">
    <if_sid>200157</if_sid>
    <field name="eventdata.Image" type="pcre2">(?i).elf</field>
    <field name="eventdata.targetFilename" type="pcre2">(?i).elf</field>
    <description>Possible Auto-color malware behavior: deletes its original $(eventdata.targetFilename).</description>
    <mitre>
      <id>T1070.004</id>
    </mitre>
  </rule>


  <!-- Rule for File Creation /var/log/cross/config-err-* -->
  <rule id="100405" level="12" frequency="2" ignore="120">
    <if_sid>200155</if_sid>
    <field name="eventdata.Image" type="pcre2">(?i).elf</field>
    <field name="eventdata.targetFilename" type="pcre2">\/var\/log\/cross\/(?:.*\/)?config-err-.+</field>
    <description>Auto-color malware created file $(eventdata.targetFilename) to facilitate enecrypted C2 communication.</description>
    <mitre>
      <id>T1071.001</id>
      <id>T1008</id>
      <id>T1568</id>
    </mitre>
  </rule>


</group>
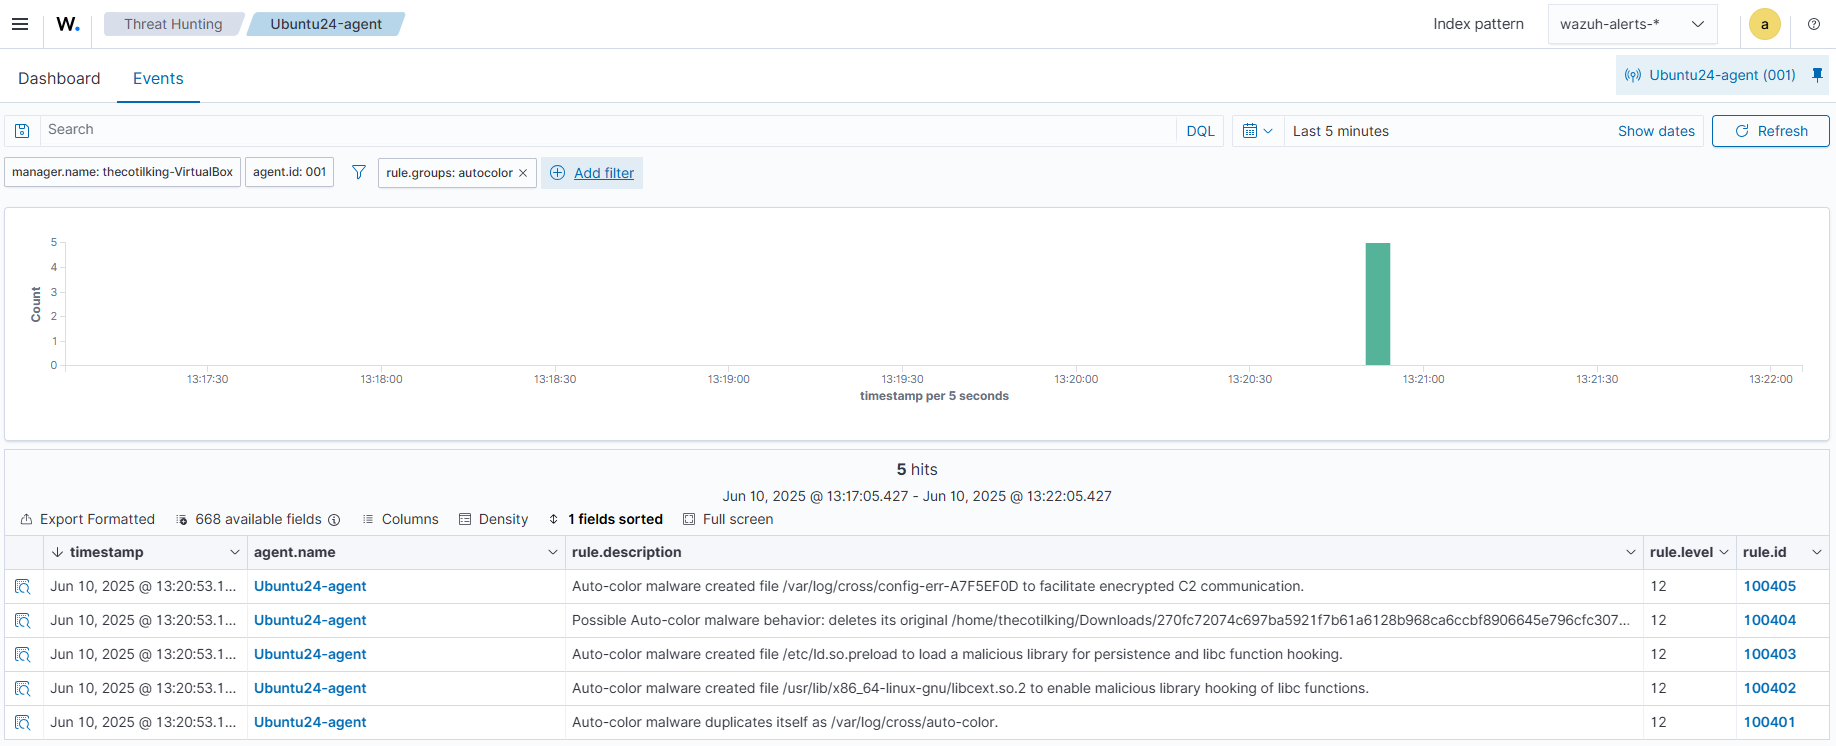
Where:
- Rule ID
100401is triggered when Auto-color malware replicates itself as/var/log/cross/auto-color. - Rule ID
100402is triggered when Auto-color malware creates the file/usr/lib/x86_64-linux-gnu/libcext.so.2to enable malicious library hooking of libc functions. - Rule ID
100403is triggered when Auto-color malware modifies/etc/ld.so.preloadto load a malicious library for persistence and to hook libc functions. - Rule ID
100404is triggered when Auto-color deletes its original executable to impede investigation. - Rule ID
100405is triggered when Auto-color malware creates a file/var/log/cross/config-err-XXXXXXXXor /var/log/cross/0/config-err-XXXXXXXXto facilitate encrypted C2 communication with dynamically generated IP addresses.
- Restart the Wazuh manager for the changes to take effect:
# systemctl restart wazuh-manager
Detection results
Follow the steps below to view the alerts generated on the Wazuh dashboard when the Auto-color malware is executed on the Linux endpoint.
- Navigate to Threat intelligence > Threat Hunting and click the Events tab.
- Click + Add filter. Then filter by
rule.groups. - In the Operator field, select
is. - Search and select the rule group
autocolorin the Values field. - Click Save.
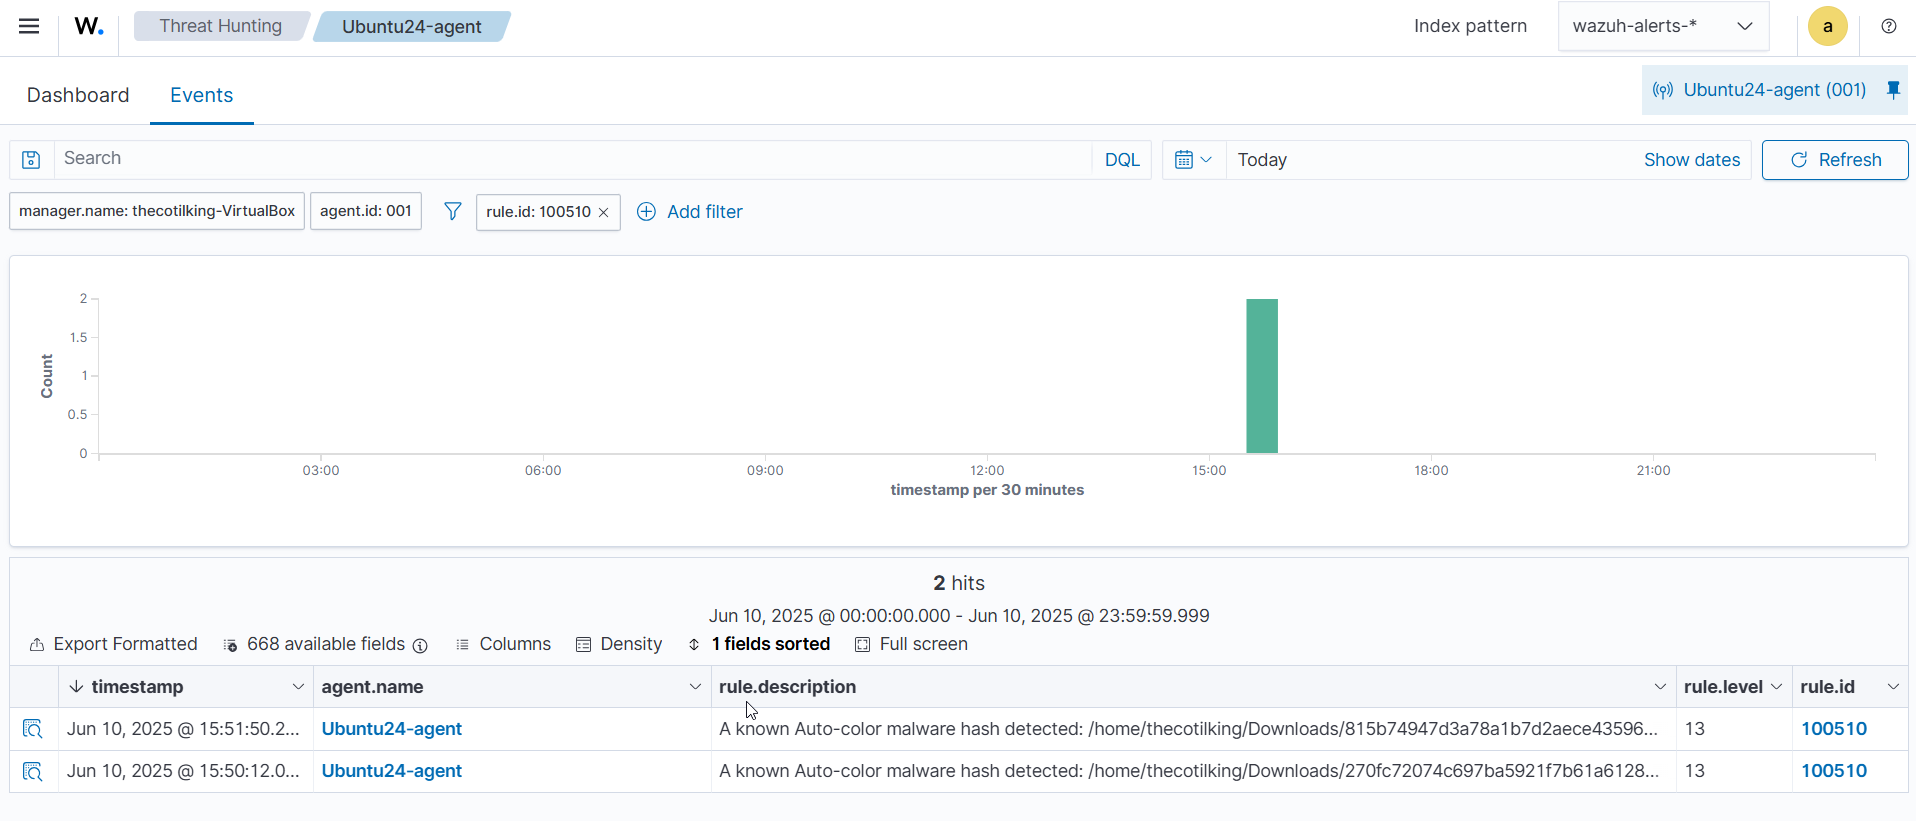
Detecting Auto-color using file hashes in a CDB list (constant database)
A CDB list is a text file that stores key:value pairs, allowing you to track users, file hashes, IP addresses, domain names, or other relevant data. To detect the Auto-color malware, you must add its known hashes to a CDB list. The Wazuh File Integrity Monitoring (FIM) module tracks file changes within monitored directories, generating alerts when files are created, modified, or deleted. These alerts include the MD5, SHA1, and SHA256 checksums of the file. By comparing the SHA256 checksums from the FIM module against the entries in the CDB list, Wazuh identifies the presence of the malware.
Follow the steps below to set up FIM, create a CDB list, and set up the detection mechanism.
Ubuntu endpoint
- Add the configuration below within the
<syscheck>block of the/var/ossec/etc/ossec.conffile to monitor theDownloadsdirectory of all regular users in real-time:
<directories check_all="yes" report_changes="yes" realtime="yes">/home/*/Downloads</directories>
Note
In this blog post, we monitored only the Downloads directory of all regular users. However, you can configure Wazuh to monitor any directory of your choice.
- Restart the Wazuh agent to apply the changes:
# systemctl restart wazuh-agent
Wazuh server
- Create a file
malware-hashesin the/var/ossec/etc/listsdirectory. This is the CDB list that will contain the known file hashes associated with the Auto-color malware.
# touch /var/ossec/etc/lists/malware-hashes
- Add the known hashes of Auto-color malware to the
/var/ossec/etc/lists/malware-hashesfile askey:valuepairs:
270fc72074c697ba5921f7b61a6128b968ca6ccbf8906645e796cfc3072d4c43:autocolor
815b74947d3a78a1b7d2aece43596ddc0ffc264e26092f1f9b6409c62e1437d6:autocolor
65a84f6a9b4ccddcdae812ab8783938e3f4c12cfba670131b1a80395710c6fb4:autocolor
83d50fcf97b0c1ec3de25b11684ca8db6f159c212f7ff50c92083ec5fbd3a633:autocolor
a1b09720edcab4d396a53ec568fe6f4ab2851ad00c954255bf1a0c04a9d53d0a:autocolor
bace40f886aac1bab03bf26f2f463ac418616bacc956ed97045b7c3072f02d6b:autocolor
e1c86a578e8d0b272e2df2d6dd9033c842c7ab5b09cda72c588e0410dc3048f7:autocolor
- Edit the
/var/ossec/etc/ossec.conffile and include the/etc/lists/malware-hasheslist within the<ruleset>configuration block:
<list>etc/lists/malware-hashes</list>
- Add the custom rule below to the
/var/ossec/etc/rules/local_rules.xmlfile to trigger alerts on the Wazuh dashboard whenever a SHA256 hash from the CDB list is detected:
<group name="autocolor,">
  <rule id="100510" level="13">
    <if_sid>554, 550</if_sid>
    <list field="sha256" lookup="match_key">etc/lists/malware-hashes</list>
    <description>A known Auto-color malware hash detected: $(file)</description>
    <mitre>
      <id>T1204.002</id>
    </mitre>
  </rule>
</group>
- Restart the Wazuh manager to apply the changes:
# systemctl restart wazuh-manager
Visualizing alerts on the Wazuh dashboard
Perform the following on the Wazuh dashboard to view the alerts generated when the Auto-color malware files are added to the Downloads directory.
- Navigate to Threat intelligence > Threat Hunting and click the Events tab.
- Click + Add filter. Then filter by
rule.id. - In the Operator field, select
is. - Search and select
100510in the Values field. - Click Save.
Conclusion
In this blog post, we demonstrated how to detect Auto-color malware activities on monitored Linux endpoints. We used Wazuh SCA to scan for Auto-color malware artifacts. We enriched logs from the victim endpoint by integrating SysmonForLinux and created Wazuh detection rules to identify malicious behavior associated with Auto-color malware.
Wazuh is a free, open source security platform that provides a wide range of capabilities to monitor and safeguard your infrastructure against malicious activities. If you have any questions about this blog post or Wazuh, we invite you to join our community, where our team is available to assist you.