Cephalus ransomware surfaced in mid-August 2025 and quickly attracted attention for its stealth and operational precision. The threat actors demonstrate a clear financial motivation and rely on initial access vectors. They exploit weak or exposed Remote Desktop Protocol (RDP) configurations, particularly targeting accounts lacking Multi-Factor Authentication (MFA) protection, to gain unauthorized access.
Cephalus ransomware targets Windows environments and employs a series of anti-defense and anti-recovery actions to limit the victim’s ability to respond. It deletes Volume Shadow Copies and uses custom obfuscation techniques to hide its encryption keys in memory. Cephalus ransomware encrypts files locally, exfiltrates data to external storage, and pressures victims through ransom notes, typically recover.txt, that reference previous attacks to reinforce credibility.
In this blog post, we show how Wazuh detects and responds to Cephalus ransomware on infected Windows endpoints using its ruleset, File integrity monitoring, and Active response capabilities.
Cephalus ransomware behavior
Below are some behaviors observed when Cephalus ransomware is successfully executed on a Windows endpoint:
- Cephalus ransomware creates an encryption key file
encrypted_key.bin, before encrypting data. This encryption key file is stored in theC:\Windows\Temp\folder. - The ransomware creates a stealthy staging file in a publicly accessible user location using a hidden filename. This is evident when the ransomware creates the file
.system_cachein theC:\Users\Public\Documents\directory. - The ransomware encrypts files by appending a
.sssextension to the encrypted files. - It creates a ransom note
recover.txtand drops it in each folder where files are encrypted. In this case, multiple folders such asDownloads,Desktop, andDocuments, among others. - It deletes Volume Shadow Copy Service (VSS) to prevent recovery after file encryption. This is done by running a shell command that launches
VSSADMIN.EXEwith the/alland/quietoptions.
vssadmin delete shadows /all /quiet
Analyzed IOC
a34acd47127196ab867d572c2c6cf2fcccffa3a7a87e82d338a8efed898ca722
Infrastructure
We use the following infrastructure to demonstrate the detection of Cephalus ransomware with Wazuh:
- A pre-built, ready-to-use Wazuh OVA 4.14.1, which includes the Wazuh central components (Wazuh server, Wazuh indexer, and Wazuh dashboard). Follow this guide to download and set up the Wazuh virtual machine.
- A Windows 11 endpoint with Wazuh agent 4.14.1 installed and enrolled in the Wazuh server. This endpoint is monitored for ransomware activity.
Detection with Wazuh
We use the following techniques to detect the Cephalus ransomware behavior on an infected Windows endpoint:
- Detection rules to identify activities related to the Cephalus ransomware.
- Detecting and removing malicious files with YARA integration and the Wazuh Active Response module.
Detection rules
We monitor system events on the Windows endpoint using Sysmon and create custom rules on the Wazuh server to detect the malicious behavior of Cephalus ransomware.
Windows endpoint
Follow the steps below to configure Sysmon on the monitored endpoint and forward logs in the Sysmon event channel to the Wazuh server for analysis.
- Download Sysmon from the Microsoft Sysinternals page.
- Extract the compressed Sysmon file to your preferred location.
- Run PowerShell as an administrator to download the Sysmon configuration file (sysmonconfig.xml). Replace
<SYSMON_EXECUTABLE_PATH>with the path to your Sysmon executable.
> wget -Uri https://wazuh.com/resources/blog/emulation-of-attack-techniques-and-detection-with-wazuh/sysmonconfig.xml -OutFile <SYSMON_EXECUTABLE_PATH>\sysmonconfig.xml
- Switch to the folder containing the Sysmon executable. Run the command below to install and start Sysmon:
> .\Sysmon64.exe -accepteula -i sysmonconfig.xml
- Add the following configuration within the
<ossec_config>block of theC:\Program Files (x86)\ossec-agent\ossec.conffile to forward Sysmon events to the Wazuh server:
<localfile>
  <location>Microsoft-Windows-Sysmon/Operational</location>
  <log_format>eventchannel</log_format>
</localfile>
- Add the below configuration within the
<syscheck>block of theC:\Program Files (x86)\ossec-agent\ossec.conffile to monitor theDownloadsfolder of all users:
<directories realtime="yes">C:\Users\*\Downloads</directories>
Note
This is to capture and show the encryption behavior of this ransomware when it adds the .sss extension to encrypted files. In this blog post, we monitored only the Downloads folder of all users. However, you can configure Wazuh to monitor any directory of your choice.
- Restart the Wazuh agent to apply the changes:
> Restart-Service -Name wazuh
Wazuh dashboard
Perform the steps below to add rules to the Wazuh server to detect the activities related to Cephalus ransomware.
- Click on the upper left menu ☰ and navigate to Server management > Rules.
- Click + Add new rules file.
- Add the following detection rules:
<group name="Cephalus,ransomware,malware,">

<!-- Malware creates encryption key file -->
  <rule id="107011" level="12">
    <if_sid>61613</if_sid>
    <field name="win.eventdata.image" type="pcre2">\.exe</field>
    <field name="win.eventdata.targetFilename" type="pcre2">(?i)[C-Z]:\\\\Windows\\\\Temp\\\\encrypted_key.bin$</field>
    <description>File $(win.eventdata.targetFilename) created. Potential Cephalus ransomware detected.</description>
    <mitre>
      <id>T1047</id>
    </mitre>
  </rule>

<!-- Malware creates staging file -->
  <rule id="107012" level="12">
    <if_sid>61613</if_sid>
    <field name="win.eventdata.image" type="pcre2">\.exe</field>
    <field name="win.eventdata.targetFilename" type="pcre2">(?i)[C-Z]:\\\\Users\\\\Public\\\\Documents\\\\.system_cache$</field>
    <description>File $(win.eventdata.targetFilename) created. Potential Cephalus ransomware detected.</description>
    <mitre>
      <id>T1047</id>
    </mitre>
  </rule>

<!-- Malware creates ransom note file -->
  <rule id="107013" level="12" timeframe="100" frequency="2">
    <if_sid>61613</if_sid>
    <field name="win.eventdata.image" type="pcre2">\.exe</field>
    <field name="win.eventdata.targetFilename" type="pcre2">(?i)[C-Z]:.*.\\recover.txt</field>
    <description>File $(win.eventdata.targetFilename) has been created in multiple directories. Potential Cephalus ransomware detected.</description>
    <mitre>
      <id>T1059</id>
    </mitre>
  </rule>

<!-- Malware inhibits system recovery -->
  <rule id="107014" level="12">
    <if_sid>61603</if_sid>
    <field name="win.eventdata.CommandLine" type="pcre2">(?i)vssadmin\sdelete\sshadows\s\/all\s\/quiet</field>
    <description>Volume shadow copy deleted using $(win.eventdata.originalFileName). Potential ransomware activity detected.</description>
    <mitre>
      <id>T1490</id>
    </mitre>
  </rule>

<!-- Malware encrypts files across the system by appending .sss extension -->
  <rule id="107015" level="10">
    <if_sid>550,554</if_sid>
    <field name="File" type="pcre2">\.sss$</field>
    <description>File created with .sss extension. Potential Cephalus ransomware encryption activity detected.</description>
  </rule>

</group>
Where:
107011is triggered when the ransomware creates its encryption key file,encrypted_key.bin, in theC:\Windows\Temp\folder.107012is triggered when the ransomware creates its staging file.system_cache.107013is triggered when the ransomware creates its ransom note,recover.txt.107014is triggered when the ransomware inhibits system recovery by deleting VSS.107015is triggered when the ransomware encrypts files and appends the.sssextension to them.
- Name the file
Cephalus_ransomware_rules.xml - Click Save and then Reload to apply the changes.
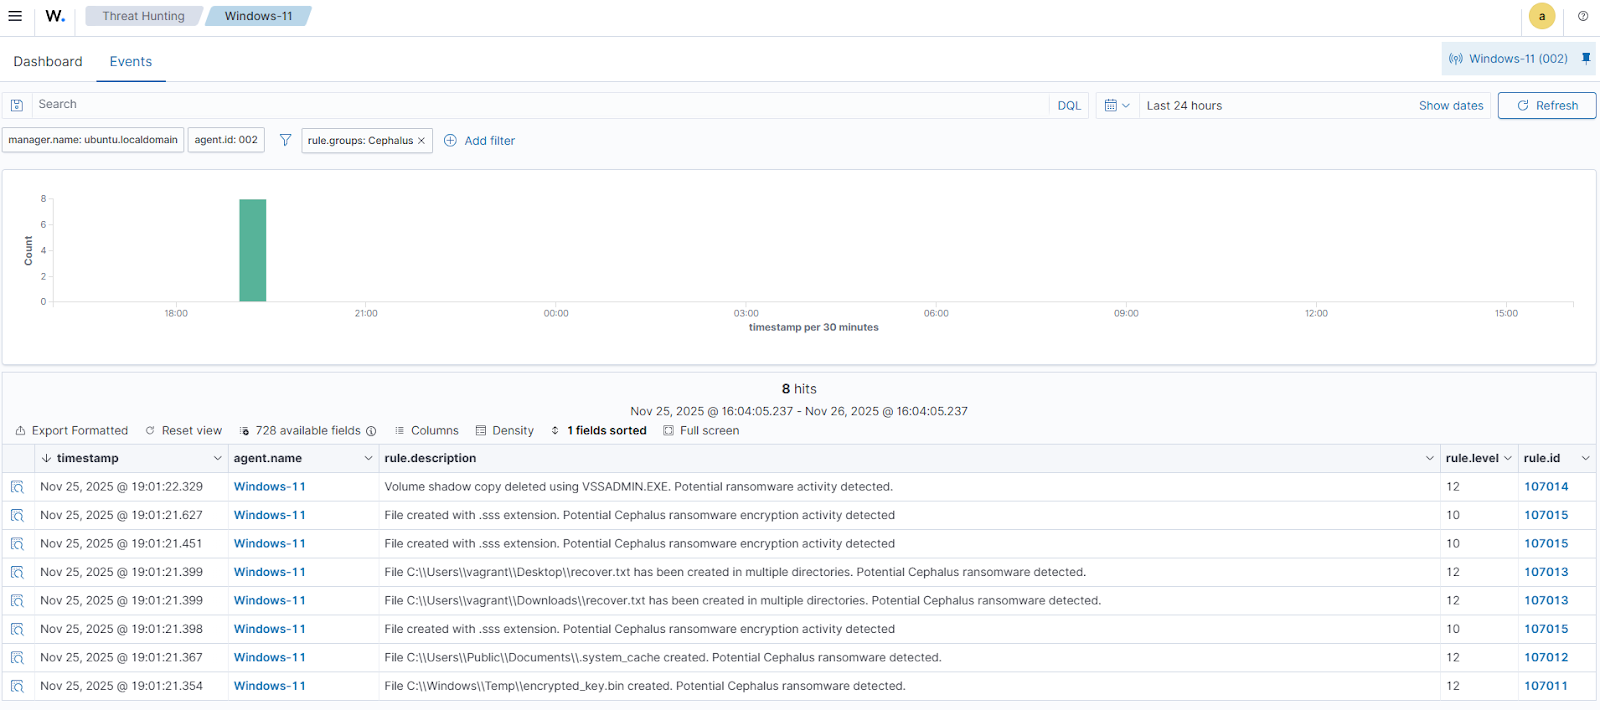
Wazuh dashboard detection alerts
Follow the steps below to view the alerts generated on the Wazuh dashboard when Cephalus infects the monitored Windows endpoint.
- Click on the upper left menu ☰ and navigate to Threat intelligence > Threat Hunting.
- Switch to the Events tab.
- Click + Add filter. Then filter by
rule.groups. - Select
isin the Operator field. - Search and select
Cephalusin the Values field. - Click Save.
Removing malicious files using YARA integration
Effective malware defense starts with catching threats the moment they appear. By keeping a close watch on file activity across endpoints, security teams can spot unusual changes and intervene before malicious code executes. The Wazuh File Integrity Monitoring (FIM) module supports this by continuously scanning designated directories at set intervals. This flags new or altered files, highlighting activity that may signal the early stages of an attack.
This capability becomes even more powerful when paired with external intelligence sources and analysis engines such as YARA and VirusTotal. These integrations provide access to up-to-date signatures and detection logic, enabling automated identification of known and emerging threats. When a suspicious file is detected, the Wazuh Active Response module can be configured to automatically trigger a YARA scan, classify the file, and remove it if malicious. With this in place, organizations shift from cleaning up after infections to preventing them, building a proactive defense framework that disrupts threats before they gain traction.
In this section, we illustrate how to remove malicious files by leveraging Wazuh integration with YARA.
Windows endpoint
Perform the steps below to configure the monitored endpoint.
- Install the following prerequisites:
- Python 3.12.2 or later (with
pippre-installed). Ensure Add Python.exe to PATH option is checked during installation. - Microsoft Visual C++ 2015 Redistributable
Note
Run PowerShell as an Administrator.
- Download YARA:
> Invoke-WebRequest -Uri https://github.com/VirusTotal/yara/releases/download/v4.5.5/yara-4.5.5-2368-win64.zip -OutFile yara-v4.5.5-win64.zip
- Extract the downloaded YARA file:
> Expand-Archive yara-v4.5.5-win64.zip
- Create a yara folder in the
C:\Program Files (x86)\ossec-agent\active-response\bin\folder and copy the YARA binary into it:
> mkdir 'C:\Program Files (x86)\ossec-agent\active-response\bin\yara\'
> cp .\yara-v4.5.5-win64\yara64.exe 'C:\Program Files (x86)\ossec-agent\active-response\bin\yara\'
- To download the YARA rules, use the
piputility to installvalhallaAPI. This API retrieves the public signature-based YARA ruleset:
> pip install valhallaAPI
- Create a file
download_yara_rules.py, and paste the below script into it:
from valhallaAPI.valhalla import ValhallaAPI
v = ValhallaAPI(api_key="1111111111111111111111111111111111111111111111111111111111111111")
response = v.get_rules_text()
with open('yara_rules.yar', 'w') as fh:
    fh.write(response)
- Run the
download_yara_rules.pyscript file to download YARA rules:
> python download_yara_rules.py
- Create
C:\Program Files (x86)\ossec-agent\active-response\bin\yara\rules\folder and copy the rules into it:
> mkdir 'C:\Program Files (x86)\ossec-agent\active-response\bin\yara\rules\'
> cp yara_rules.yar 'C:\Program Files (x86)\ossec-agent\active-response\bin\yara\rules\'
- Edit the downloaded YARA rule file
C:\Program Files (x86)\ossec-agent\active-response\bin\yara\rules\yara_rules.yarand add the following Cephalus ransomware rule:
rule Cephalus_ransomware {
   meta:
      description = "Detects Cephalus ransomware"
      author = "Aishat Awujola"
      reference = "https://github.com/Neo23x0/yarGen"
      date = "2025-11-20"

   strings:
      $x1 = "pacer: assist ratio=workbuf is not emptybad use of bucket.mpbad use of bucket.bpruntime: double waitpreempt off reason: forcegc:" ascii
      $x2 = "_cgo_pthread_key_created missingruntime: sudog with non-nil elemruntime: sudog with non-nil nextruntime: sudog with non-nil prev" ascii
      $x3 = "runtime: bad notifyList size - sync=accessed data from freed user arena runtime: wrong goroutine in newstackruntime: invalid pc-" ascii
      $x4 = "lock: sleeping while lock is availableP has cached GC work at end of mark terminationfailed to acquire lock to start a GC transi" ascii
      $x5 = " (types from different scopes)notetsleep - waitm out of syncfailed to get system page sizeruntime: found in object at *( in prep" ascii
      $x6 = ", locked to threadruntime.semacreateruntime.semawakeupCuba Standard TimeOmsk Standard TimeArab Standard TimeIran Standard TimeRu" ascii
      $x7 = "tried to trace goroutine with invalid or unsupported statussync: WaitGroup is reused before previous Wait has returnedecdsa: int" ascii
      $x8 = "runtime.Pinner: object already unpinnedsuspendG from non-preemptible goroutineruntime: casfrom_Gscanstatus failed gp=stack growt" ascii
      $x9 = " runqueue= stopwait= runqsize= gfreecnt= throwing= spinning=atomicand8float64nanfloat32nanException  ptrSize=  targetpc= until p" ascii
      $x10 = "lock: lock countbad system huge page sizearena already initialized to unused region of span bytes failed with errno=runtime: Vir" ascii
      $x11 = "internal error: polling on unsupported descriptor typemheap.freeSpanLocked - invalid free of user arena chunkcasfrom_Gscanstatus" ascii
      $x12 = "stopm spinning nmidlelocked= needspinning=randinit twicestore64 failedsemaRoot queuebad allocCountbad span statestack overflow u" ascii
      $x13 = "unlock: lock countprogToPointerMask: overflow/gc/cycles/forced:gc-cycles/memory/classes/other:bytes/memory/classes/total:bytesfa" ascii
      $x14 = "runtime.newosprocruntime/internal/internal/runtime/thread exhaustionlocked m0 woke upentersyscallblock spinningthreads=gp.waitin" ascii
      $x15 = "time: bad [0-9]*exec: no commandinvalid exchangeno route to hostinvalid argumentmessage too longobject is remoteremote I/O error" ascii
      $x16 = "ckWSAGetOverlappedResultexit hook invoked exit%SystemRoot%\\system32\\sha3: Write after ReadC:\\ProgramData\\temp.datDEFGHIJKLMN" ascii
      $x17 = "DetECDSA P-256 SHA2-512 signinvalid P224Element encodinginvalid P384Element encodinginvalid P521Element encodingC:\\Windows\\Tem" ascii
      $x18 = "Value.SetIntGetAdaptersAddressesNtSetInformationFileGetProcessMemoryInfobcryptprimitives.dllhttplaxcontentlengthsha3: Sum after " ascii
      $x19 = "orC:\\Windows\\Tempx509usepoliciesGetProcessTimesDuplicateHandleallocmRInternalGC (fractional)write heap dumpasyncpreemptoffforc" ascii
      $x20 = "span set block with unpopped elements found in resetruntime: GetQueuedCompletionStatusEx failed (errno= runtime: NtCreateWaitCom" ascii
   condition:
      uint16(0) == 0x5a4d and filesize < 9000KB and
      1 of ($x*)
}
- Monitor the
Downloadsfolder of all users in real-time by adding the below configuration within the<syscheck>block of theC:\Program Files (x86)\ossec-agent\ossec.conffile:
<directories realtime="yes">C:\Users\*\Downloads</directories>
Note
In this blog post, we only monitored the Downloads folder of all users. However, you can configure other directories you wish to monitor.
- Create a batch file
yara.batin theC:\Program Files (x86)\ossec-agent\active-response\bin\folder and copy the below script into it. The Wazuh Active Response module runs this script to perform YARA scans for malware detection and removal:
Note
This script is a proof of concept (PoC). Review and validate it to ensure it meets the operational and security requirements of your environment.
:: This script deletes Cephalus ransomware executable and other malicious files matched by the YARA Rules

@echo off
setlocal enableDelayedExpansion
reg Query "HKLM\Hardware\Description\System\CentralProcessor\0" | find /i "x86" > NUL && SET OS=32BIT || SET OS=64BIT
if %OS%==32BIT (
    SET log_file_path="%programfiles%\ossec-agent\active-response\active-responses.log"
)
if %OS%==64BIT (
    SET log_file_path="%programfiles(x86)%\ossec-agent\active-response\active-responses.log"
)
set input=
for /f "delims=" %%a in ('PowerShell -command "$logInput = Read-Host; Write-Output $logInput"') do (
    set input=%%a
)
set json_file_path="C:\Program Files (x86)\ossec-agent\active-response\stdin.txt"
set syscheck_file_path=
echo %input% > %json_file_path%
FOR /F "tokens=* USEBACKQ" %%F IN (`Powershell -Nop -C "(Get-Content 'C:\Program Files (x86)\ossec-agent\active-response\stdin.txt'|ConvertFrom-Json).parameters.alert.syscheck.path"`) DO (
SET syscheck_file_path=%%F
)
set yara_exe_path="C:\Program Files (x86)\ossec-agent\active-response\bin\yara\yara64.exe"
set yara_rules_path="C:\Program Files (x86)\ossec-agent\active-response\bin\yara\rules\yara_rules.yar"
echo %syscheck_file_path% >> %log_file_path%
for /f "delims=" %%a in ('powershell -command "& \"%yara_exe_path%\" \"%yara_rules_path%\" \"%syscheck_file_path%\""') do (
    echo wazuh-yara: INFO - Scan result: %%a >> %log_file_path%
    :: Deleting the scanned file.
	del /f "%syscheck_file_path%" >nul 2>&1
if exist "%syscheck_file_path%" (
    echo wazuh-yara: INFO - Error removing threat: %%a >> %log_file_path%
) else (
    echo wazuh-yara: INFO - Successfully deleted: %%a >> %log_file_path%
)
 )
exit /b
- Restart the Wazuh agent to apply the changes:
> Restart-Service -Name wazuh
Wazuh dashboard
Perform the following steps on the Wazuh dashboard to configure custom decoders, rules, and the Wazuh Active Response module on the Wazuh server.
- Click on the upper left menu ☰ and navigate to Server management > Decoders.
- Click Manage decoders files
- Search for and edit the
local_decoder.xmlfile.

- Add the following decoders to the
local_decoder.xmlfile to decode the logs generated by the Active Response script:
<decoder name="yara_decoder">
    <prematch>wazuh-yara:</prematch>
</decoder>

<decoder name="yara_decoder1">
    <parent>yara_decoder</parent>
    <regex>wazuh-yara: (\S+) - Scan result: (\S+) (\S+)</regex>
    <order>log_type, yara_rule, yara_scanned_file</order>
</decoder>

<decoder name="yara_decoder1">
    <parent>yara_decoder</parent>
    <regex>wazuh-yara: (\S+) - Successfully deleted: (\S+) (\S+)</regex>
    <order>log_type, yara_rule, yara_scanned_file</order>
</decoder>

<decoder name="yara_decoder1">
    <parent>yara_decoder</parent>
    <regex>wazuh-yara: (\S+) - Error removing threat: (\S+) (\S+)</regex>
    <order>log_type, yara_rule, yara_scanned_file</order>
</decoder>
- Click Save and Reload to apply the changes.
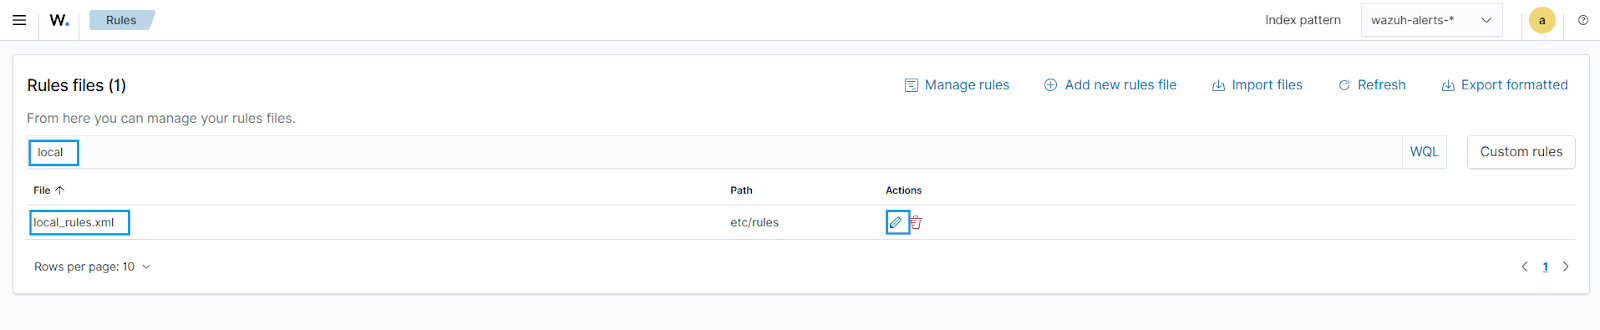
- Click on the upper left menu ☰ and navigate to Server management > Rules.
- Click Manage rules files
- Search for and edit the
local_rules.xmlfile.
- Add the custom rules below to it:
<group name= "syscheck,">
  <rule id="117001" level="7">
    <if_sid>550</if_sid>
    <field name="file" type="pcre2">(?i)C:\\Users.+Downloads</field>
    <description>File modified in the Downloads folder.</description>
  </rule>

  <rule id="117002" level="7">
    <if_sid>554</if_sid>
    <field name="file" type="pcre2">(?i)C:\\Users.+Downloads</field>
    <description>File added to the Downloads folder.</description>
  </rule>
</group>

<!--  Rule for the decoder (yara_decoder) -->
<group name="yara,">
  <rule id="117003" level="0">
    <decoded_as>yara_decoder</decoded_as>
    <description>Yara grouping rule</description>
  </rule>

<!--  YARA scan detects a positive match -->
  <rule id="117004" level="12">
    <if_sid>117003</if_sid>
    <match type="pcre2">wazuh-yara: INFO - Scan result: </match>
    <description>File "$(yara_scanned_file)" is a ransomware. Yara rule: $(yara_rule)</description>
  </rule>

<!--  Wazuh successfully deletes malware with a positive match -->
  <rule id="117005" level="12">
    <if_sid>117003</if_sid>
    <match type="pcre2">wazuh-yara: INFO - Successfully deleted: </match>
    <description>Successfully removed "$(yara_scanned_file)" by active response due to YARA rule $(yara_rule) positive match</description>
  </rule>

<!--  Wazuh encounters an error when deleting malware with a positive match -->
  <rule id="117006" level="12">
    <if_sid>117003</if_sid>
    <match type="pcre2">wazuh-yara: INFO - Error removing threat: </match>
    <description>Error removing "$(yara_scanned_file)". YARA rule: $(yara_rule)</description>
  </rule>
</group>
Where:
117001is triggered when a file is modified in theDownloadsfolder.117002is triggered when a file is added to theDownloadsfolder.117003is the base rule for detecting YARA-related events.117004is triggered when YARA scans and detects a malicious file.117005is triggered when the executable has been successfully removed by the Wazuh Active Response module.117006is triggered when the executable is not removed successfully by the Wazuh Active Response module.
- Click Save and then Reload to apply the changes.
- Click on the upper left menu ☰ and navigate to Server management > Settings.
- Click Edit configuration to edit the
ossec.confof the Wazuh manager. - Add the following configuration within the <ossec_config> block to trigger an active response to rule ID
117001or117002:
<command>
  <name>yara</name>
  <executable>yara.bat</executable>
  <timeout_allowed>no</timeout_allowed>
</command>

<active-response>
  <command>yara</command>
  <location>local</location>
  <rules_id>117001,117002</rules_id>
</active-response>
The Wazuh Active Response module runs the yara.bat script when a file is added or modified in the Downloads folder.
Where:
<name>specifies that yara is the name of the command being called in the<active-response>block.<executable>specifies thatyara.batis the executable file to run.<command>specifies the command that the Active Response module will use.- The
<active response>block calls the<command>block when the rule ID117001or117002is triggered. <location>specifies where the active response script is executed.
- Click Save and then Restart Manager to apply the changes.
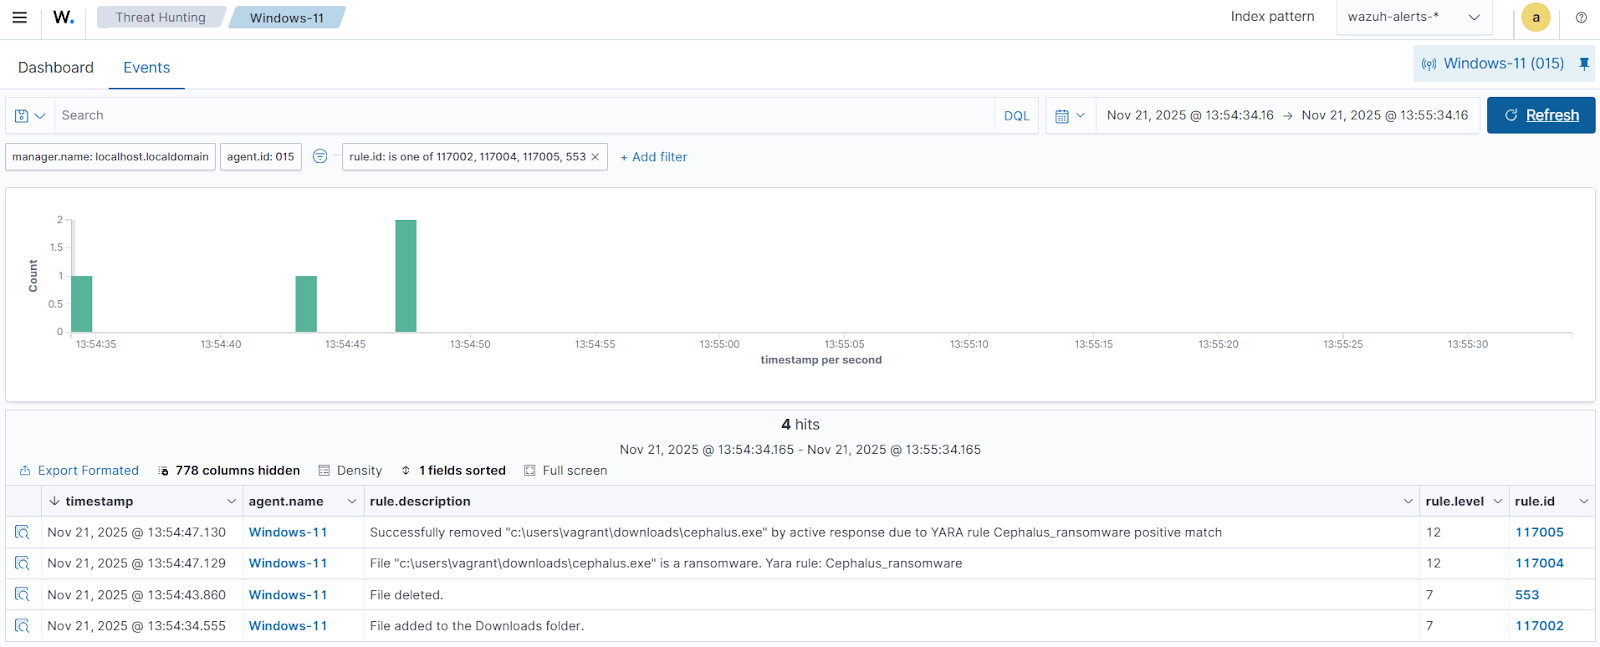
Alerts visualization
When the Cephalus ransomware executable is added to the Downloads folder of the monitored Windows endpoint, the Wazuh Active Response module removes it successfully. This action generates alerts on the Wazuh dashboard.
To view these alerts:
- Navigate to Threat intelligence > Threat Hunting.
- Switch to the Events tab.
- Click + Add filter. Then filter by
rule.id - Select
is one ofin the Operator field. - Search and select rule IDs
117002,117004,117005, and553in the Values field. - Click Save.
Conclusion
In this blog post, we demonstrated how to detect and respond to Cephalus ransomware on a monitored Windows endpoint. We enriched logs from the Windows endpoint by integrating Sysmon and created Wazuh detection rules to identify the malicious behaviors linked to the Cephalus ransomware. We also showed how to remove the malicious files by leveraging YARA integration and the Wazuh Active Response module.
Wazuh is a free open source security platform providing a wide range of defensive capabilities to safeguard your infrastructure. If you have questions about this blog post or Wazuh, join our community; our team actively engages there and is ready to help.