
Centralized configuration management offers a unified approach for organizing, controlling, and modifying configurations within a large infrastructure. They mitigate the challenges associated with manual configuration management, such as human errors, inconsistencies, and time-consuming updates. Wazuh, the unified XDR and SIEM platform, offers a feature for streamlining agent configuration and enhancing security management: Wazuh agent groups and centralized configuration.
By leveraging Wazuh agent groups, you can separate your monitored endpoints within a large infrastructure into distinctive subsets, each with tailored security configurations. This enables you to apply specific security configurations to different groups of agents, ensuring that each endpoint receives the appropriate level of protection. Wazuh centralized configuration further simplifies the process by allowing you to define and distribute configuration settings to agents within a group.
In this blog post, we explore the Wazuh agent group functionality, its configuration and demonstrate how to utilize it to enhance your security posture effectively.
Wazuh centralized configuration
To effectively utilize centralized configuration, you’ll need to create and manage agent groups. This involves defining group criteria, creating or deleting agent groups, and adjusting group configurations based on changing requirements.
Infrastructure
To demonstrate Wazuh agent group functionality, we set up the following infrastructure:
1. A pre-built ready-to-use Wazuh OVA 4.7.2. Follow this guide to download the virtual machine. This endpoint hosts the Wazuh central components (Wazuh server, Wazuh indexer, and Wazuh dashboard).
2. Windows 11 endpoint with Wazuh agent 4.7.2 installed and enrolled to the Wazuh server. To install the Wazuh agent, refer to the following installation guide.
3. macOS endpoint with Wazuh agent 4.7.2 installed and enrolled to the Wazuh server. To install the Wazuh agent, refer to the following installation guide.
4. Ubuntu endpoint running Ubuntu 22.04 with Wazuh agent 4.7.2 installed and enrolled to the Wazuh server. To install the Wazuh agent, refer to the following installation guide.
5. CentOS endpoint running CentOS 7 with Wazuh agent 4.7.2 installed and enrolled to the Wazuh server. To install the Wazuh agent, refer to the following installation guide.
Defining group criteria
Establish a criteria for assigning agents to specific groups, such as operating system (OS) type, function, or security profile. Establishing clear criteria ensures that agents are grouped logically and configuration changes are applied effectively.
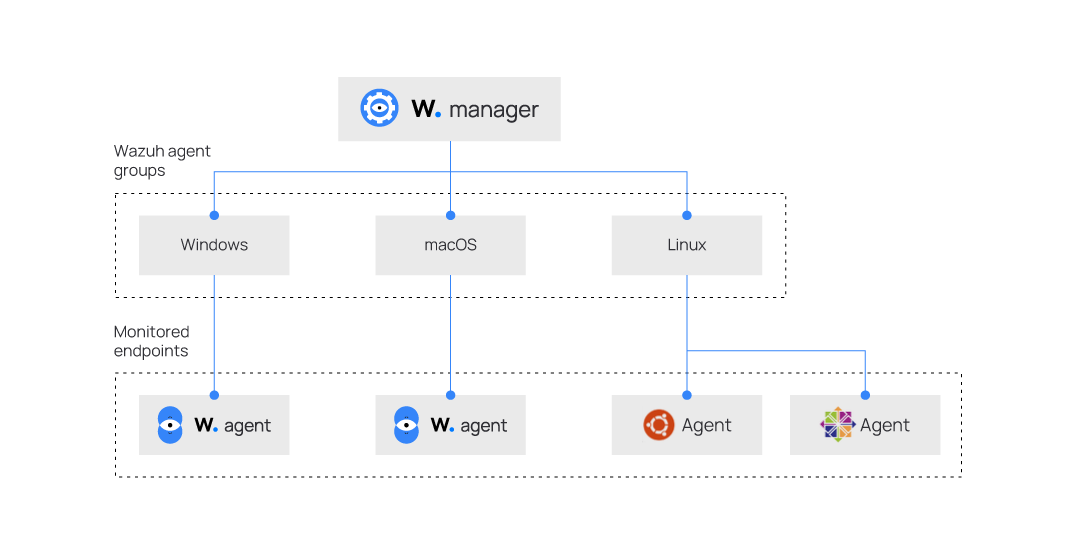
For this blog post, we define four groups based on the endpoint’s operating systems:
Windowsgroup, which consists of a Windows 11 endpoint.macOSgroup, which consists of macOS endpoint.Linuxgroup, which consists of endpoints running Ubuntu and CentOS.
Note: An agent group name can only contain upper/lower case letters, numbers, dots, underscores, and hyphens.
Once you finish creating the groups, grouping the agents, and modifying the configuration files, the agents will be grouped as follows:
Creating agent groups
Wazuh provides three main methods for creating agent groups which include:
The Wazuh dashboard
Creating agent groups from the Wazuh dashboard is a convenient way to manage the configuration of your agents remotely and dynamically.
To create agent groups from the Wazuh dashboard:
1. Navigate to Management > Groups and click the Add new group button.
2. Enter a name for the agent group and click on the Save new group button.
The agent_groups tool
The agent_groups tool offers you the ability to create and manage Wazuh agent groups directly from the command line. The tool is used as follows to create a group:
Note: You need root user privileges to execute the commands below.
# /var/ossec/bin/agent_groups -a -g <GROUP_ID> -q
Where:
- The flag
-aadds a group or an agent. In this case a group. - The flag
-gdefines a group ID. - The variable
<GROUP_ID>indicates a unique group name to create. - The flag
-qtriggers the silent or no confirmation mode.
Run the following commands on the Wazuh server to create the agent groups Windows, macOS, and Linux:
# /var/ossec/bin/agent_groups -a -g Windows -q
# /var/ossec/bin/agent_groups -a -g macOS -q
# /var/ossec/bin/agent_groups -a -g Linux -q
An example output is as follows:
Group Windows created.
To ensure the groups are created correctly, run the following command to list all existing groups:
# /var/ossec/bin/agent_groups -l
An example output is as follows:
Groups (4):
  Windows (0)
  macOS (0)
  Linux (0)
  default (4)
Unassigned agents: 0.
The Wazuh API
Using the Wazuh API to create and manage groups programmatically is effective for automating group management tasks and integrating centralized configuration with existing workflows.
Connect to the Wazuh dashboard, navigate to Tools, and select API Console. On the console, run the queries below to create the agent groups Windows, macOS, and Linux:
POST /groups {"group_id": "Windows"}
POST /groups {"group_id": "macOS"}
POST /groups {"group_id": "Linux"}
You can also use the command line interface to create agent groups via the Wazuh API. The equivalent command to run from the console with root user privileges to create the Linux group would be:
# curl -k -X POST "https://<WAZUH_MANAGER_IP>:55000/groups?pretty=true" -H "Content-Type: application/json" -d '{"group_id": "Linux"}' -H "Authorization: Bearer $(curl -u <API_USER>:<API_PASSWORD> -k -X POST 'https://<WAZUH_MANAGER_IP>:55000/security/user/authenticate?raw=true')"
Replace:
- The
<WAZUH_MANAGER_IP>variable with the IP address of your Wazuh server. In case you have a distributed deployment, use the IP address of the master node. - The
<API_USER>variable with your Wazuh API username. - The
<API_PASSWORD>variable with the password of your Wazuh API user.
The output of the command is as follows:
{
   "message": "Group 'Linux' created.",
   "error": 0
}
Adding Wazuh agents to groups
Once you create agent groups, you can dynamically add or remove agents based on changing requirements. This flexibility ensures that your group memberships reflect the current state of your infrastructure.
Similarly to creating agent groups, Wazuh provides 3 ways to add agents to an agent group which include:
Using the Wazuh dashboard
To add an agent to a group or groups using the Wazuh dashboard:
1. Navigate to Management > Groups and select the group you want to add agents to.
2. Click on the Manage agents button at the top right corner.
3. Select the agent(s) to be added, click on Add selected items, then click Apply changes to save the changes.
Using the agent_groups tool
Here, we’ll be adding an agent to each of the previously created groups. The tool is used as follows to add agents to an agent group:
Note: You need root user privileges to execute the commands below.
# /var/ossec/bin/agent_groups -a -i <AGENT_ID> -g <GROUP_ID> -q
Where:
- The flag
-aadds a group or an agent. In this case an agent. - The flag
-idefines an agent ID. - The variable
<AGENT_ID>indicates the agent ID to add to a group. - The flag
-gdefines a group ID. - The variable
<GROUP_ID>indicates a unique group name to create. - The flag
-qtriggers the silent or no confirmation mode.
Run the following steps on the Wazuh server to add the agents to the previously created agent groups:
1. List the agents registered to the Wazuh server:
# /var/ossec/bin/manage_agents -l
An example output is as follows:
Available agents:
   ID: 001, Name: Ubuntu, IP: any
   ID: 002, Name: centOS, IP: any
   ID: 003, Name: macOS, IP: any
   ID: 004, Name: Windows, IP: any
1. Add the Wazuh agents to the different agent groups:
# /var/ossec/bin/agent_groups -a -i 001 -g Linux -q
# /var/ossec/bin/agent_groups -a -i 002 -g Linux -q
# /var/ossec/bin/agent_groups -a -i 003 -g macOS -q
# /var/ossec/bin/agent_groups -a -i 004 -g Windows -q
An example output is as follows:
Group 'Windows' added to agent '004'.
Display the list of groups with the number of agents assigned to ensure each group has the correct number of agents:
# /var/ossec/bin/agent_groups -l
The output should be similar to the following:
Groups (4):
  Windows (1)
  macOS (1)
  Linux (2)
  default (4)
Unassigned agents: 0.
Note: The default group appears with 4 Wazuh agents, this is because when enrolling a new agent it is automatically assigned to the default group. To remove agents from the default group to have them only in the created group, follow the instructions in the Removing Wazuh agent from groups section below.
Using the Wazuh API
Adding an agent to a group or groups can also be done using the Wazuh API endpoint: PUT /agents/{agent_id}/group/{group_id}.
Connect to the Wazuh dashboard, navigate to Tools, and select API Console. On the API console, run the queries below:
PUT /agents/001/group/Linux
PUT /agents/002/group/Linux
PUT /agents/003/group/macOS
PUT /agents/004/group/Windows

You can also use the command line interface to add agents to agent groups via the Wazuh API. The equivalent command to run from the console to add agent 001 (Ubuntu) to the Linux group would be:
# curl -k -X PUT "https://<WAZUH_MANAGER_IP>:55000/agents/001/group/Linux?pretty=true" -H "Authorization: Bearer $(curl -u <API_USER>:<API_PASSWORD> -k -X POST 'https://<WAZUH_MANAGER_IP>:55000/security/user/authenticate?raw=true')"
Replace:
- The
<WAZUH_MANAGER_IP>variable with the IP address of your Wazuh server. If you have a distributed deployment, use the IP address of the Master node. - The
<API_USER>variable with your Wazuh API username - The
<API_PASSWORD>variable with the password of your Wazuh API user
The output of the command would be as follows
{
   "data": {
      "affected_items": [
         "001"
      ],
      "total_affected_items": 1,
      "total_failed_items": 0,
      "failed_items": []
   },
   "message": "All selected agents were assigned to Linux",
   "error": 0
}
Modifying the configuration files
Each group has a configuration file /var/ossec/etc/shared/<GROUP_NAME>/agent.conf located on the Wazuh server replacing <GROUP_NAME> with the name of the group. This file is empty by default, and here, you can define centralized agent configurations. After creating a group, you can modify the groups configuration file to apply configs to all agents in that group.
Changing configuration from the Wazuh dashboard
Modifying the agent.conf file could be done via the dashboard as follows:
1. Navigate to Management > Groups and view the list of available groups
2. Click on the Edit icon from the action column of the corresponding group to which you want to apply the configuration
3. Insert the configuration text in between the <agent_config> block.
4. Click on Save to apply the configuration.
Changing configuration from CLI
To implement a central configuration to agents from the command line interface, edit the shared configuration file /var/ossec/etc/shared/<GROUP_NAME>/agent.conf on the Wazuh server to insert your config.
For example, to monitor changes made to the Wazuh agent configuration file C:\Program Files (x86)\ossec-agent\ossec.conf on the Windows endpoint, add the FIM configuration below to the /var/ossec/etc/shared/Windows/agent.conf file on the Wazuh server.
<agent_config>
   <syscheck>
     <frequency>300</frequency>
     <directories check_all="yes" report_changes="yes" whodata="yes">
C:\Program Files (x86)\ossec-agent\ossec.conf</directories>

   </syscheck>
</agent_config>
You could check from the Wazuh server that the configuration is successfully pushed to an agent by running the following command:
# var/ossec/bin/agent_groups -S -i 004
The output of the command will indicate the Wazuh server and agent are synchronized.
Agent '004' is synchronized.
To ensure the configuration was pushed to the agent, check the file C:\Program Files (x86)\ossec-agent\shared\agent.conf file located on the agent.
<!-- Source file: default/agent.conf -->
<agent_config>

  <!-- Shared agent configuration here -->

</agent_config>
<!-- Source file: Linux/agent.conf -->
<agent_config>
   <syscheck>
     <frequency>300</frequency>
     <directories check_all="yes" report_changes="yes" whodata="yes">C:\Program Files (x86)\ossec-agent\ossec.conf</directories>
   </syscheck>
</agent_config>
The highlighted section above shows the configuration blocks received from the Wazuh server.
Removing Wazuh agents from groups
While managing your infrastructure, you may want to remove agents from groups for various reasons, such as changing the configuration settings, reorganizing the agents, or decommissioning the agents. There are different methods to remove agents from groups.
Using the Wazuh dashboard
Follow the steps below to remove an agent from the dashboard.
1. Navigate to Management > Groups and select the group you want to remove agents from.
2. Click on the delete button to the right of the agent you want to delete, then click on Confirm to confirm the agent deletion.
Using the agent_groups tool
To remove agents from a group, run the following command:
# /var/ossec/bin/agent_groups -r -i <AGENT_ID> -g <GROUP_ID> -q
Where:
<AGENT_ID>with the ID of the agent you wish to remove.<GROUP_ID>with the group name from which you wish to remove the agent.
Using the Wazuh API
To remove agents from a group, run the following from the API console:
DELETE /agents/<AGENT_ID>/group<GROUP_ID>
Replace:
- The
<AGENT_ID>variable with the ID of the agent you wish to remove. - The
<GROUP_ID>variable with the group name from which you wish to remove the agent.
You can also use the command line interface to remove agents from agent groups via the Wazuh API. The equivalent command to run from the console to remove an agent from a group would be:
# curl -k -X DELETE "https://<WAZUH_MANAGER_IP>:55000/agents/<AGENT_ID>/group/<GROUP_ID>?pretty=true" -H "Authorization: Bearer $(curl -u <API_USER>:<API_PASSWORD> -k -X POST 'https://<WAZUH_MANAGER_IP>:55000/security/user/authenticate?raw=true')"
Replace:
- The
<WAZUH_MANAGER_IP>variable with the IP address of your Wazuh server. In case you have a distributed deployment, use the IP of the Master node. - The
<AGENT_ID>variable with the ID of the agent you wish to remove. - The
<GROUP_ID>variable with the group name from which you wish to remove the agent. - The
<API_USER>variable with your Wazuh API username. - The
<API_PASSWORD>variable with the password of your Wazuh API user.
Use case
In the following use case, we configure the Wazuh agents added to the Linux agent group to execute commands to monitor network and disk metrics.
We make use of the Wazuh Logcollector module which is responsible for collecting logs from different sources, such as text files, Windows event logs, or syslog messages. It monitors the configured sources for new log messages and forwards them to the Wazuh server for analysis. The module also supports running commands or scripts on the endpoints and processing their outputs as logs.
Note: By default, the Wazuh agents can not accept remote commands configured on the Wazuh server. If not yet enabled, to implement this use case, we need to enable remote commands on each agent.
To enable the remote commands on your agent, perform the following steps:
- Edit the file
/var/ossec/etc/local_internal_options.confto add the following lines:
logcollector.remote_commands=1
- Restart the Wazuh agent service to apply the changes:
# systemctl restart wazuh-agent
Agent group configuration
Edit the agent group configuration file /var/ossec/etc/shared/Linux/agent.conf as explained above to add the following:
<agent_config>
  <!-- disk metrics -->
  <localfile>
    <log_format>full_command</log_format>
    <command>echo $(df -h | awk '$NF=="/"{print $5}'|sed 's/%//g')</command>
    <alias>disk_health</alias>
    <out_format>$(timestamp) $(hostname) disk_health_check: $(log)</out_format>
    <frequency>300</frequency>
  </localfile>
  <!-- Network metrics -->
  <localfile>
    <log_format>full_command</log_format>
    <command>sudo iftop -B -t -s 1 -n -N 2>/dev/null | awk '/Total (send|receive) rate/ {size_send=$6; unit_send=$(NF-1); scale_send=1; if (unit_send=="KB") scale_send=1024; else if (unit_send=="MB") scale_send=1024*1024; else if (unit_send=="GB") scale_send=1024*1024*1024; getline; size_receive=$6; unit_receive=$(NF-1); scale_receive=1; if (unit_receive=="KB") scale_receive=1024; else if (unit_receive=="MB") scale_receive=1024*1024; else if (unit_receive=="GB") scale_receive=1024*1024*1024; printf "%.0f %.0f\n", size_receive*scale_receive, size_send*scale_send}' | xargs -n2</command>
    <alias>network_metrics</alias>
    <out_format>$(timestamp) $(hostname) network_check: $(log)</out_format>
    <frequency>300</frequency>
  </localfile>
</agent_config>
Note: Make sure that iftop utility is installed on all Linux agent nodes to enable collection of network metrics.
Configuring the Wazuh server
To properly decode and report on the different monitored Linux metrics, we need to create some custom decoders and alerting rules.
1. Edit the file /var/ossec/etc/decoders/local_decoder.xml and paste the following decoders to decode the logs from the Wazuh Logcollector module:
<!-- Disk health metric -->
<decoder name="disk_health_check">
     <program_name>disk_health_check</program_name>
</decoder>

<decoder name="disk_health_sib">
  <parent>disk_health_check</parent>
  <prematch>ossec: output: 'disk_health':\.</prematch>
  <regex offset="after_prematch">(\S+)</regex>
  <order>disk_usage_%</order>
</decoder>


<!-- Network metric -->
<decoder name="network_check">
     <program_name>network_check</program_name>
</decoder>

<decoder name="network_check_sib">
  <parent>network_check</parent>
  <prematch>ossec: output: 'network_metrics':\.</prematch>
  <regex offset="after_prematch">(\S+) (\S+)</regex>
  <order>network_in, network_out</order>
</decoder>
2. Add the following rules to the /var/ossec/etc/rules/local_rules.xml:
<group name="performance_metric,">
<!-- Network traffic sent/received -->
 <rule id="100100" level="3">
  <decoded_as>network_check</decoded_as>
  <description>Network metrics: $(network_in) bytes inbound | $(network_out) bytes outbound</description>
 </rule>

<!-- Disk usage -->
 <rule id="100200" level="3">
  <decoded_as>disk_health_check</decoded_as>
  <description>Disk usage metrics: $(disk_usage_%)% of storage is in use</description>
 </rule>
</group>
Where:
- Rule ID
100100is triggered when the network traffic sent and received is checked. - Rule ID
100200is triggered when the disk usage percentage is checked.
3. Restart the Wazuh server to apply these changes:
# systemctl restart wazuh-manager
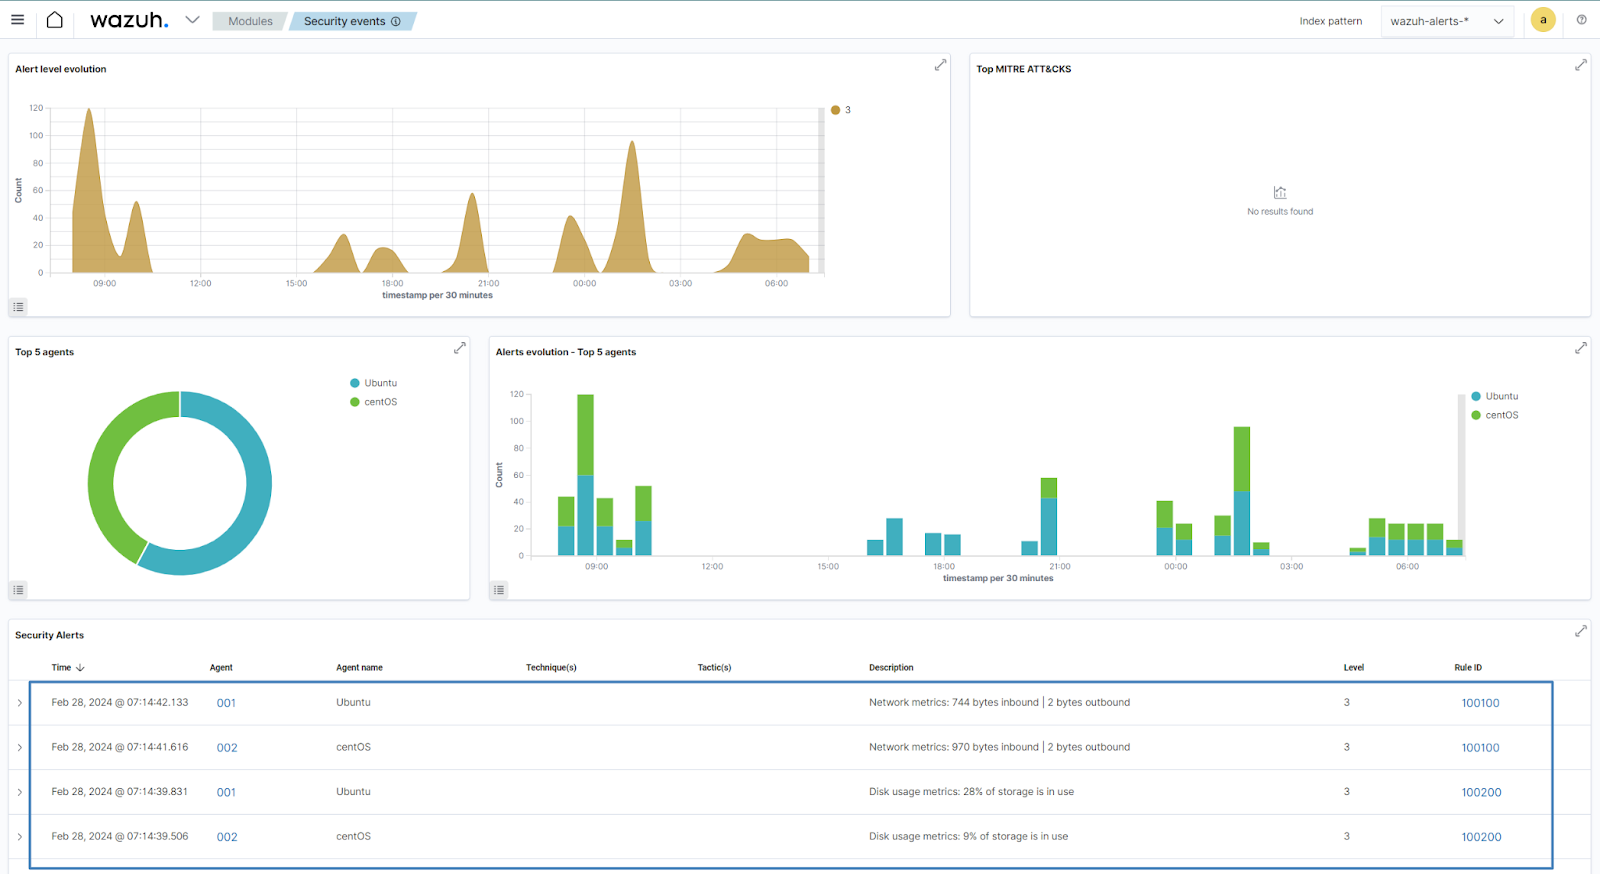
Testing the configuration
To check the results of the configurations, connect to your Wazuh dashboard and navigate to Security events.
If the events are not directly visible:
1. Click + Add filter. Then filter for rule.id in the Field field.
2. Filter for is one of in the Operator field.
3. Filter for 100100 and 100200 in the Values field.
4. Click Save.
Conclusion
In conclusion, utilizing agent groups in Wazuh offers a streamlined approach to security management, providing granular control and targeted monitoring capabilities. By organizing agents based on specific criteria, organizations can enhance their resilience against cyber threats while simplifying administration and promoting consistency across their environment. Leverage the power of the agent group functionality in Wazuh to optimize your security operations and fortify your organization’s defenses in today’s evolving threat landscape.
References