To get started using Wazuh, take a look at Wazuh’s official Docker image.
Docker Hub and Github can be used to quickly deploy a complete working environment with a Wazuh Manager, Wazuh API, Elasticsearch, Nginx, Kibana and the Wazuh app plugin.
You can also use those images as a starting point for developing more complex environments such as an auto-scalable Wazuh cluster environment.
Advantages of using Docker Containers
Running Wazuh with Docker allows for a fast and easy deployment and offers an isolated working environment. That isolation allows for easy rollback and deployment fixes for the application. Separating the execution of different applications ensures that a potential failure in one service does not affect the others.
Docker ensures consistency between running environments and standardization of the service architecture. It also offers portability and ease in replication and scaling services, which are essential for the purpose of this entry.
First steps with Wazuh Docker
If you’re not familiar with Docker and Docker Compose, you should start by installing Docker and Docker Compose . Then, run the environment by downloading the wazuh-docker repository, and execute docker-compose up to raise a working environment. After that, you can access the Kibana web interface at http://localhost/ with the username foo and password bar. The Kibana Wazuh app plugin will be available (https://localhost/app/wazuh), and you will have access to the Wazuh API (https://localhost/app/wazuh#/wazuh-dev) through the Kibana interface.
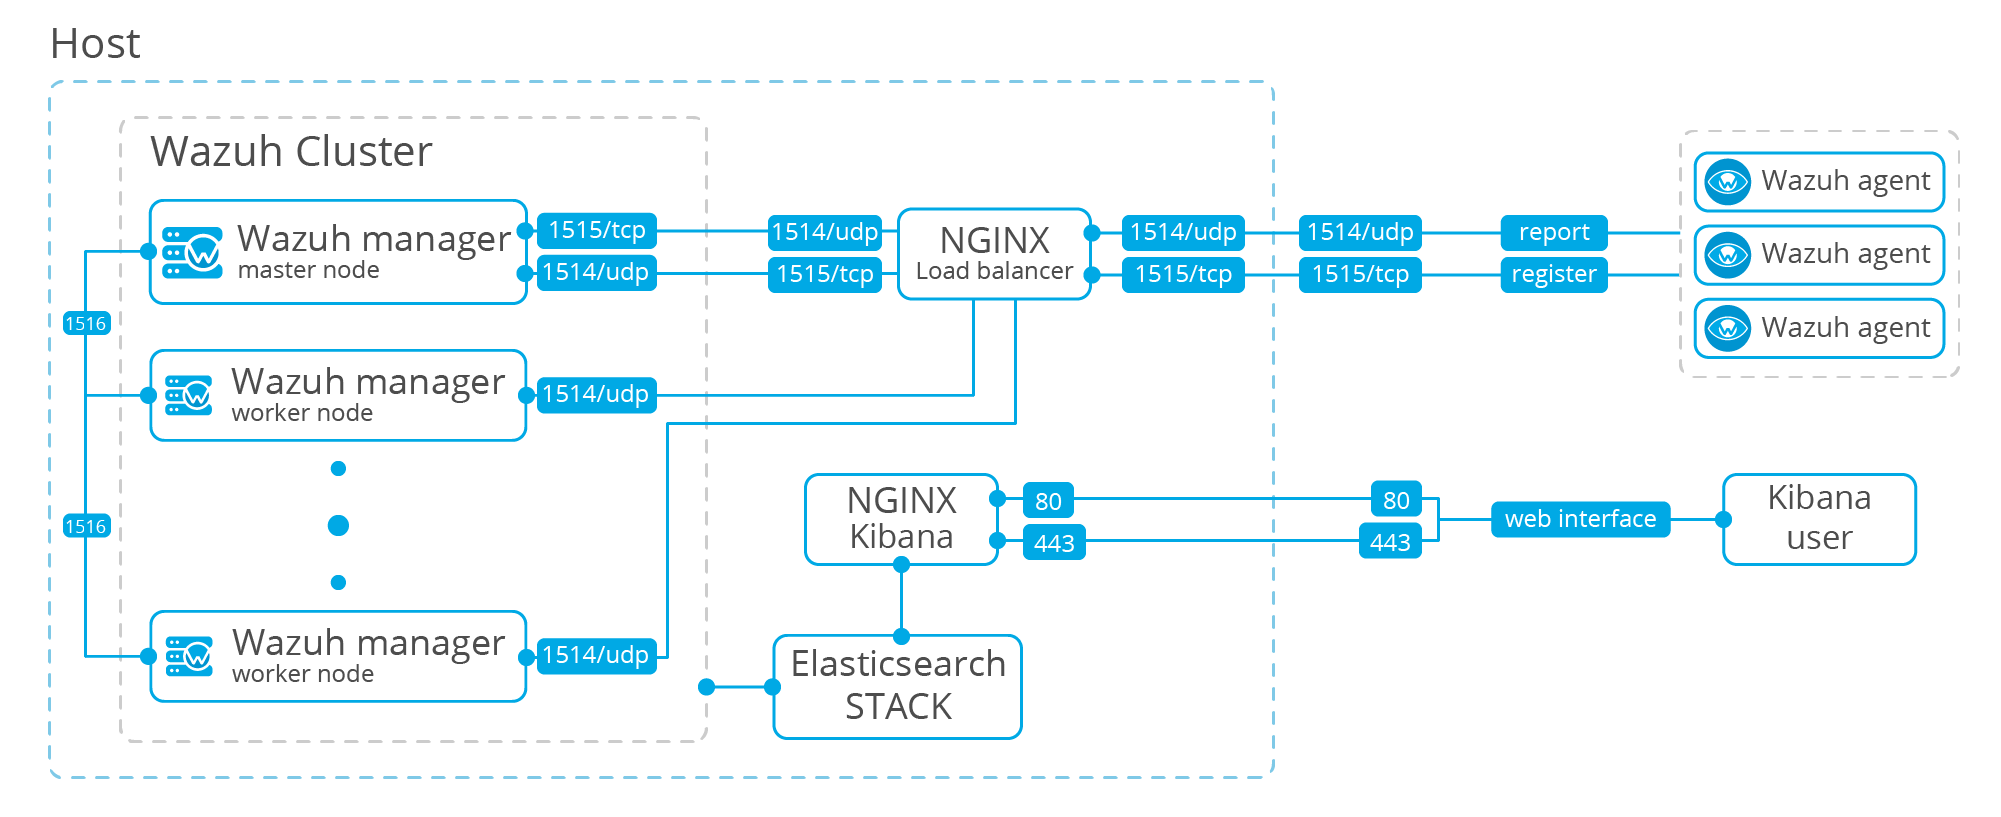
Wazuh Cluster Using Docker-Compose.
The cluster places the managers into a group to enhance the availability and scalability of the service. The cluster will have a set of worker nodes, responsible for synchronizing integrity files from the master node and forwarding agent status updates. The cluster will also have a master node which will centralize and coordinate the workers and will ensure agent registration and deletion, the synchronization of rules, decoders and CDB, and agent grouping configuration.
The cluster is made scalable because it is possible to add additional worker nodes. In our docker environment, we will use Docker Compose to create various instances of one service: wazuh-worker, based on the default wazuh-manager service, which will be used as a master node in our cluster.
Add wazuh-worker to the docker-compose.yml file
To start creating a Wazuh cluster with Docker, clone the Wazuh Docker repository
git clone git@github.com:wazuh/wazuh-docker.git && cd wazuh-docker
and modify the docker-compose.yml file to add the following changes:
- Add a new service for the
wazuh-worker; it will be similar to thewazuh-managerbut with some modifications. - Manually bind the ports that we want to be accessible from outside of the cluster (for example 1515, for agent registration), and automatically bind those that will be accessed through the load balancer (1514 and 1515).
- Both services will use the port 1516 which is necessary for cluster communications.
- The worker hostname must be different from the manager hostname.
- Each worker must have a unique name. To do that automatically, we will use a configuration script that will be executed when the instance is created.
- As the agent messages will reach the managers through a load balancer, we need to configure the master manager to register the agents with IP “any” so they accept messages from any IP. That will be done by setting
use_source_iptonoon the auth configuration (only required for the master manager because it will be the one that registers the agents).
Here is the full code for the two services. It is necessary to do all of this for version 3.9.3_7.2.0, and you should not edit the others services.
wazuh:
  image: wazuh/wazuh:3.9.3_7.2.0
  hostname: wazuh-manager
  restart: always
  ports:
    - "1516:1516"
    - "514:514/udp"
    - "1514/udp"
    - "1515"
    - "55000"
  volumes:
    - ./master_configuration.sh:/entrypoint-scripts/master_configuration.sh

wazuh-worker:
  image: wazuh/wazuh:3.9.3_7.2.0
  hostname: wazuh-worker
  restart: always
  ports:
    - "1514/udp"
    - "514/udp"
    - "1515"
    - "1516"
    - "55000"
  volumes:
    - ./worker_configuration.sh:/entrypoint-scripts/worker_configuration.sh
Configuration scripts.
Scripts listed in a shared volume and located in the entrypoint-scripts folder will be automatically executed in the Docker instance generation.
We need those scripts to modify the ossec.conf to introduce the cluster configuration. That can be done by establishing a custom configuration file, but there’s a reason not to do so. Because the established volumes are shared by all the instances of one service, if we have a custom configuration file for the worker service, it will be the same for all the instances we raise. In the cluster configuration, there is a naming field that must be unique for each worker in the cluster, so our cluster would not work properly with the custom configuration. By using a script and modifying the configuration for each instance, we can add a custom name based on the node IP to make sure it is unique. This is one way to do it.
In the root folder of the docker repository, create the following two files:
#!/bin/bash

DIRECTORY="/var/ossec"

id=$(hostname -i | tr -d ".")

start_config="$(grep -n "<cluster>" ${DIRECTORY}/etc/ossec.conf | cut -d':' -f 1)"
end_config="$(grep -n "</cluster>" ${DIRECTORY}/etc/ossec.conf | cut -d':' -f 1)"

# remove previous configuration
sed -i "${start_config},${end_config}d" ${DIRECTORY}/etc/ossec.conf

# use any source for registration process
sed -i "s/<use_source_ip>yes/<use_source_ip>no/g" ${DIRECTORY}/etc/ossec.conf


cat >> ${DIRECTORY}/etc/ossec.conf <<- EOM
<ossec_config>
  <cluster>
    <name>wazuh</name>
    <node_name>WAZUH_MASTER</node_name>
    <node_type>master</node_type>
    <key>c98b62a9b6169ac5f67dae55ae4a9088</key>
    <port>1516</port>
    <bind_addr>0.0.0.0</bind_addr>
    <nodes>
        <node>wazuh</node>
    </nodes>
    <hidden>no</hidden>
    <disabled>no</disabled>
  </cluster>
 </ossec_config>

EOM
#!/bin/bash

DIRECTORY="/var/ossec";

id=$(hostname -i | tr -d ";.";)

start_config=";$(grep -n ";<cluster>"; ${DIRECTORY}/etc/ossec.conf | cut -d':' -f 1)";
end_config=";$(grep -n ";</cluster>"; ${DIRECTORY}/etc/ossec.conf | cut -d':' -f 1)";

sed -i ";s/${client_config}//g"; ${DIRECTORY}/etc/ossec.conf

cat >> ${DIRECTORY}/etc/ossec.conf <<- EOM
 <ossec_config>
   <cluster>
    <name>wazuh</name>
    <node_name>WAZUH_WORKER-${id}</node_name>
    <node_type>worker</node_type>
    <key>c98b62a9b6169ac5f67dae55ae4a9088</key>
    <port>1516</port>
    <bind_addr>0.0.0.0</bind_addr>
    <nodes>
        <node>wazuh</node>
    </nodes>
    <hidden>no</hidden>
    <disabled>no</disabled>
  </cluster>
 </ossec_config>

EOM
Deploying the cluster environment
After configuring the required files, we can raise an environment with the desired number of workers using Docker Compose. You will probably need to run sudo sysctl -w vm.max_map_count=262144 before raising the dockers. See the Wazuh’s Docker documentation for more information.
docker-compose up --scale wazuh-worker=3
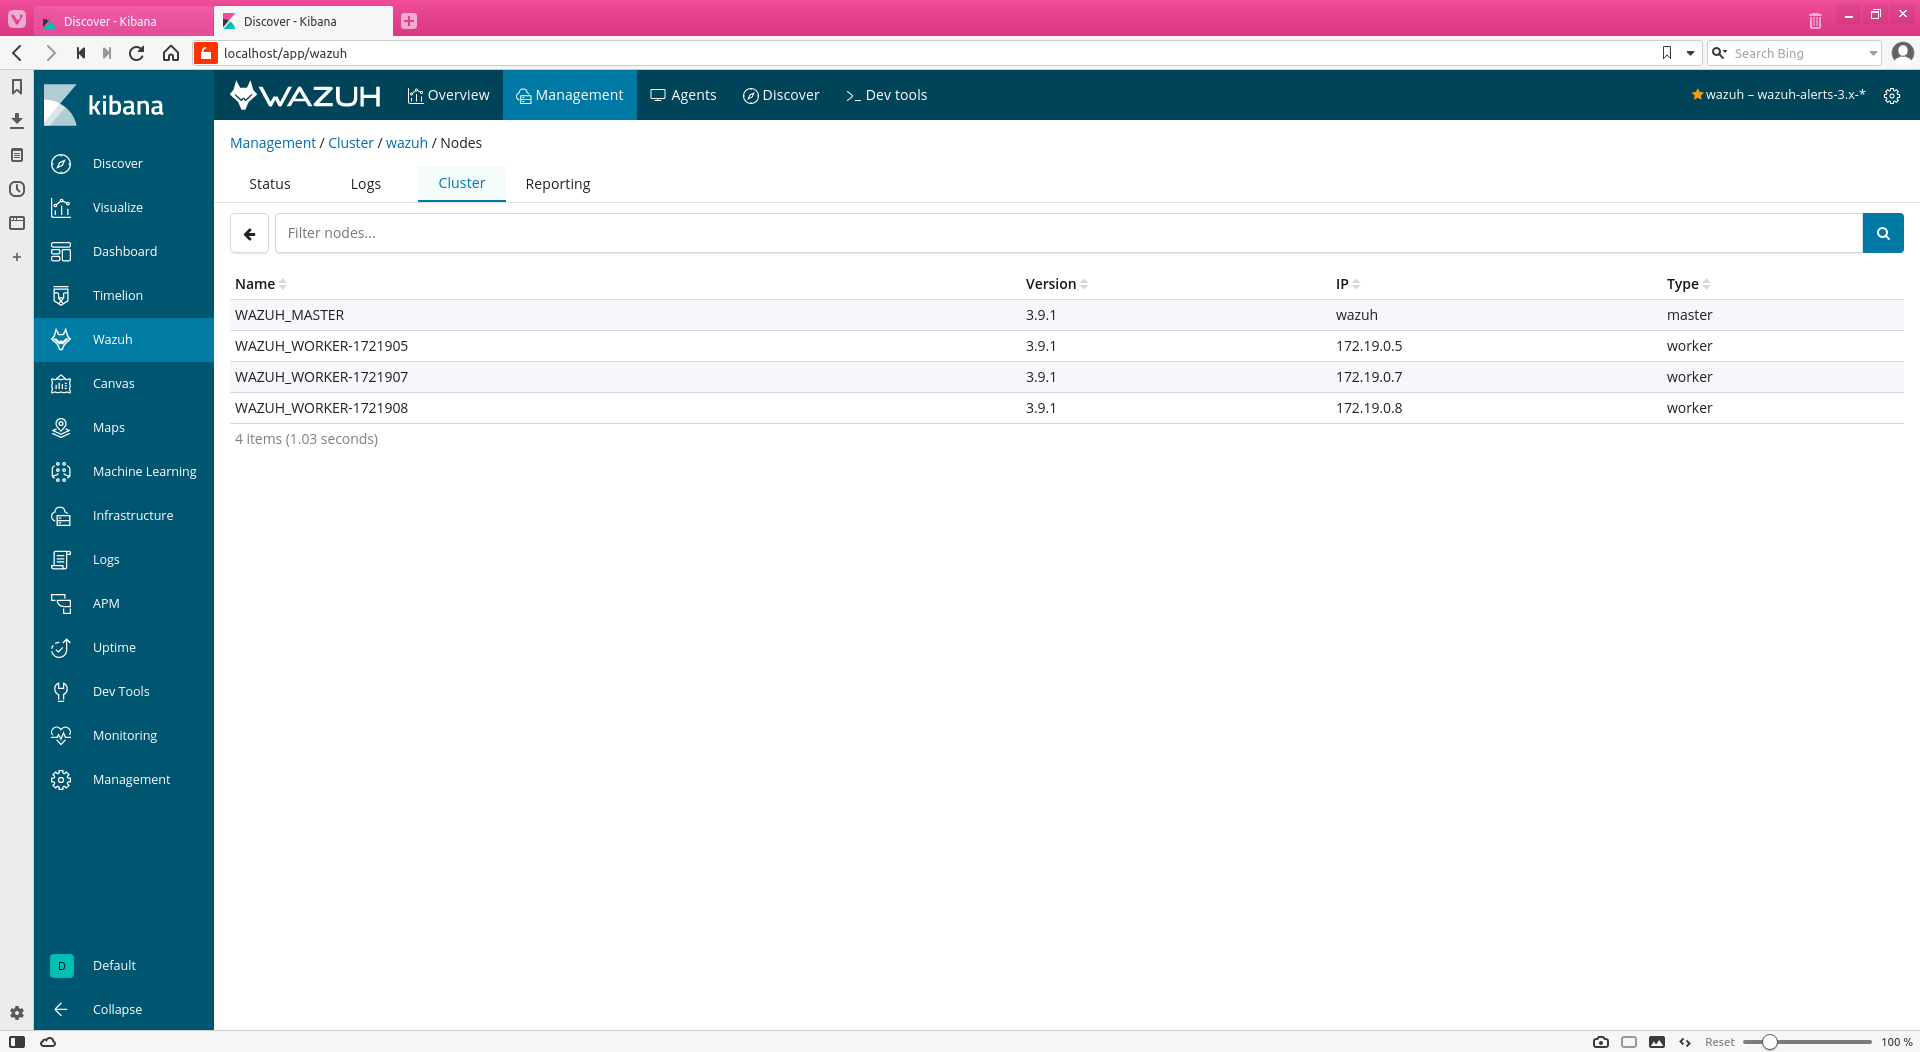
Now, we can use Kibana at https://localhost. In order to check that the cluster is correctly configured, you should go to the Wazuh app, open the management window and select the cluster tab. Here you can verify if all the workers are visible from the app and check the assigned IPs.
With just these small changes, we already have a Wazuh cluster running with a Docker and we can scale it to our whim. However, it does not make sense to have a cluster without a load balancer. For this reason, we would recommend using a tool such as Kubernetes or swarm to ease scaling and load balancing of the cluster. Nevertheless, since we want to keep this post simple, I will explain how to create a load balancer using the same Docker-Compose and Nginx image.
Load balancing with Nginx in docker.
As mentioned in our cluster documentation, Nginx could be a perfect tool to do load balancing. We already use Nginx in our Docker environment to secure Kibana access. Maybe, we can use the same image for both purposes, but it would be easier to simply add another service to the docker-compose with an official Nginx image, a custom configuration file, and a simple run command.
Add this code to your docker-compose.yml file:
load-balancer:
  image: nginx
  ports:
    - "1514:1514/udp"
    - "1515:1515"
  volumes:
    - ./nginx.conf:/etc/nginx/nginx.conf:ro
  command: [nginx-debug, '-g', 'daemon off;']
We don’t know the number of workers and their assigned IPs for each service in advance. For this reason, we cannot write a configuration file for the load balancer statically. We have to generate it dynamically. Another good alternative would be to use Kubernetes for managing load balancing.
We will create an empty nginx.conf file and another one, nginx_default.conf with the following content:
stream {
    upstream cluster {
        hash $remote_addr consistent;
        server <WAZUH-MASTER-IP>:1514;
        NEXT_SERVER
    }
    upstream master {
        server <WAZUH-MASTER-IP>:1515;
    }
    server {
        listen 1514 udp;
        proxy_pass cluster ;
    }
    server {
        listen 1515;
        proxy_pass master;
    }
}

events {

}
That configuration does the following: each time the load balancer service receives information through the 1515 port (agent registration, TCP protocol), it will send it to the master machine (using TCP and port 1515 as well). If the received message goes to the 1514 port (with UDP protocol), it will be redirected to one of the cluster machines using the same port and protocol.
So we need to change that configuration file to store the IP of each cluster node dynamically (as the IP of each service is different each time we execute docker-compose and depends on the number of workers).
Dynamically allocate services’ IPs
We will use the following script. It allows us to generate the Nginx configuration after bringing up the rest of the services and obtaining their IPs dynamically. Then it will raise up the load-balancer service.
#!/bin/bash

function clean_up {

    # Perform program exit housekeeping
    kill $CHILD_PID
    exit
}

trap clean_up SIGHUP SIGINT SIGTERM

rm -f nginx.conf

cp nginx_default.conf nginx.conf

docker-compose up --scale wazuh-worker=$1 --scale load-balancer=0 > services.logs &

CHILD_PID=$!

echo ";Waiting for services start.";

sleep 10

echo ";Creating load-balancer configuration";

MASTER_IP=$(docker-compose exec wazuh hostname -i  )

sed -i -e ";s#<WAZUH-MASTER-IP>#${MASTER_IP::-1}#g"; nginx.conf


for i in $(seq 1 $1)
do
    WORKER_IP=$(docker-compose exec --index=$i wazuh-worker hostname -i)
    sed -i -e ";s#NEXT_SERVER#server ${WORKER_IP::-1}:1514;\n\tNEXT_SERVER#g"; nginx.conf
done

sed -i -e ";s#NEXT_SERVER##g"; nginx.conf

echo ";Running load-balancer service";

docker-compose up load-balancer > load-balancer.logs

wait $CHILD_PID
Now, just run
./run-cluster.sh 5
It will raise the cluster with 5 workers. The logs from all the services will be available at services.logs, except the load balancer, that will store their logs (if needed) at load-balancer.logs.
Checking the correct functioning of the load balancer.
The best method to check if the load balancer is working correctly is to register some agents and check the cluster information in the Kibana app. It is important to notice that we’ve bound the default registration port (1515) to the Nginx load balancer service. That service will forward the registration requests to the master node and all the other requests to the cluster. That doesn’t require any special configuration in the agent. You only have to configure the master IP in the agents to the host IP.
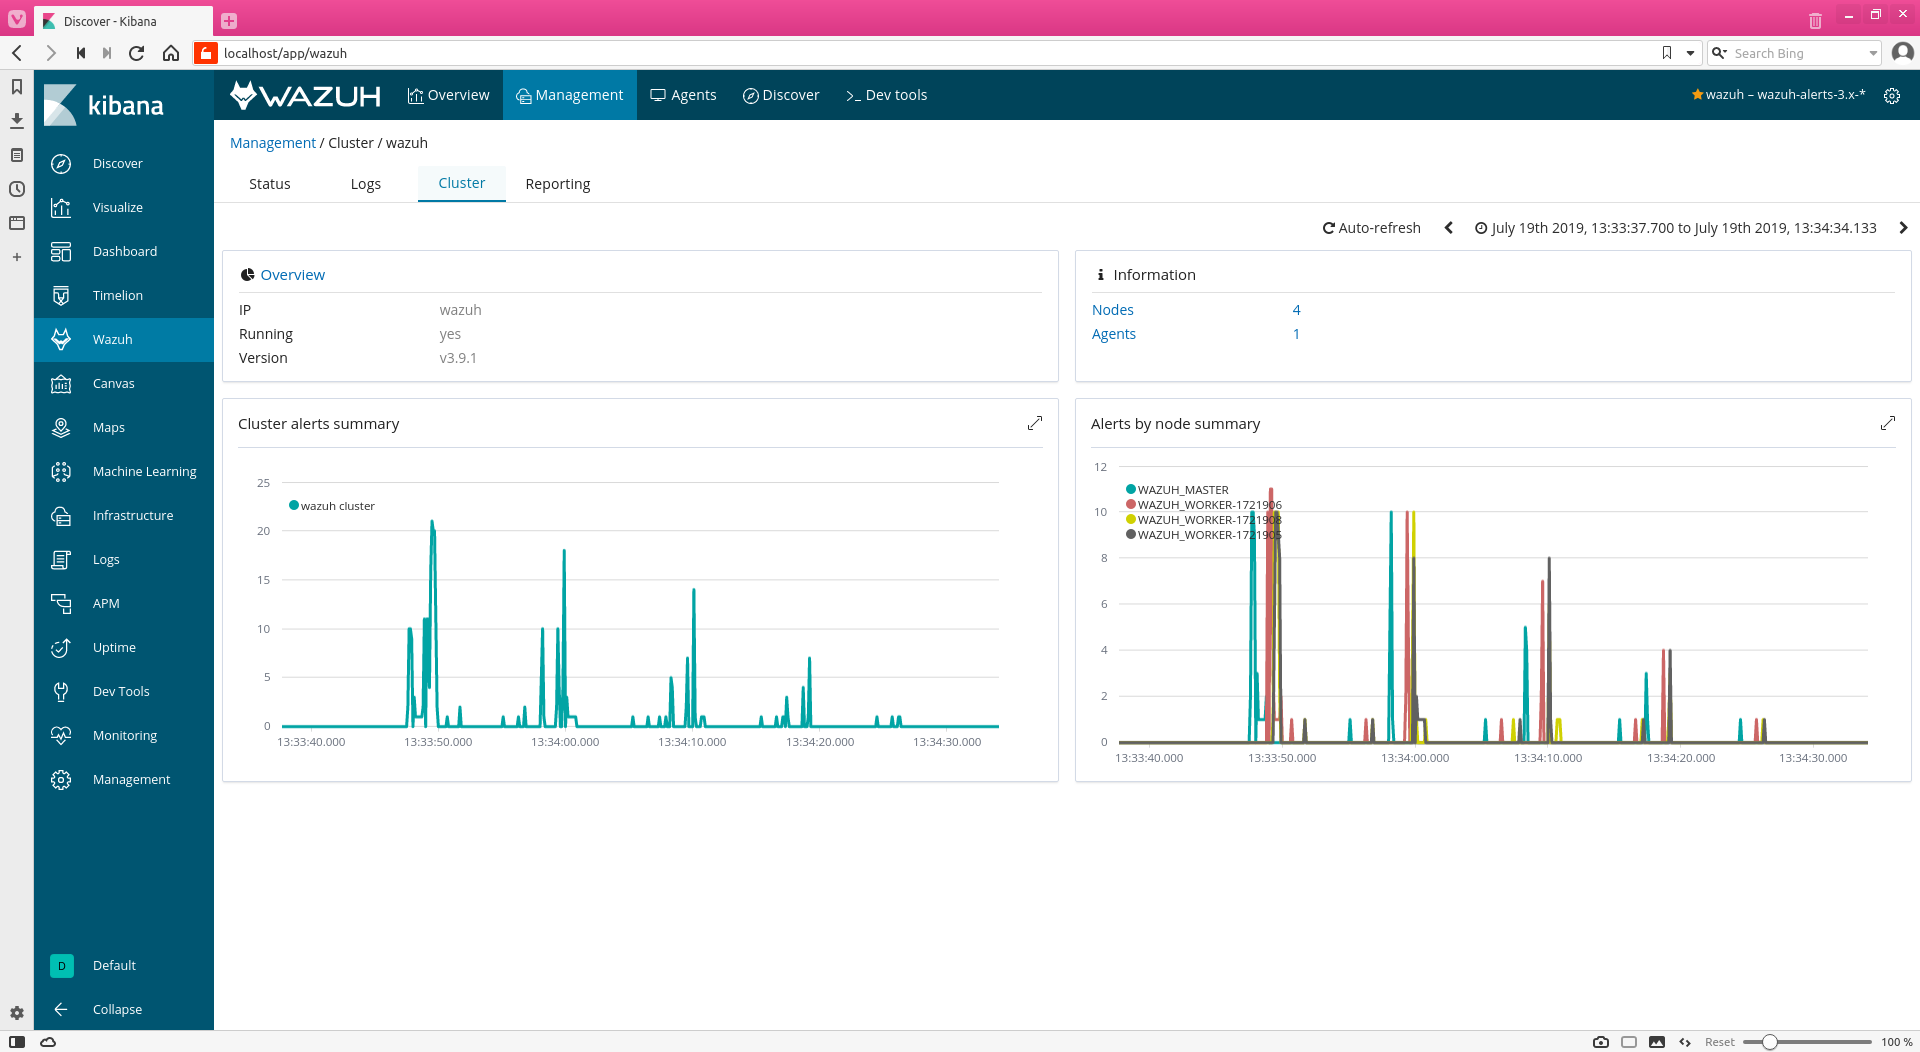
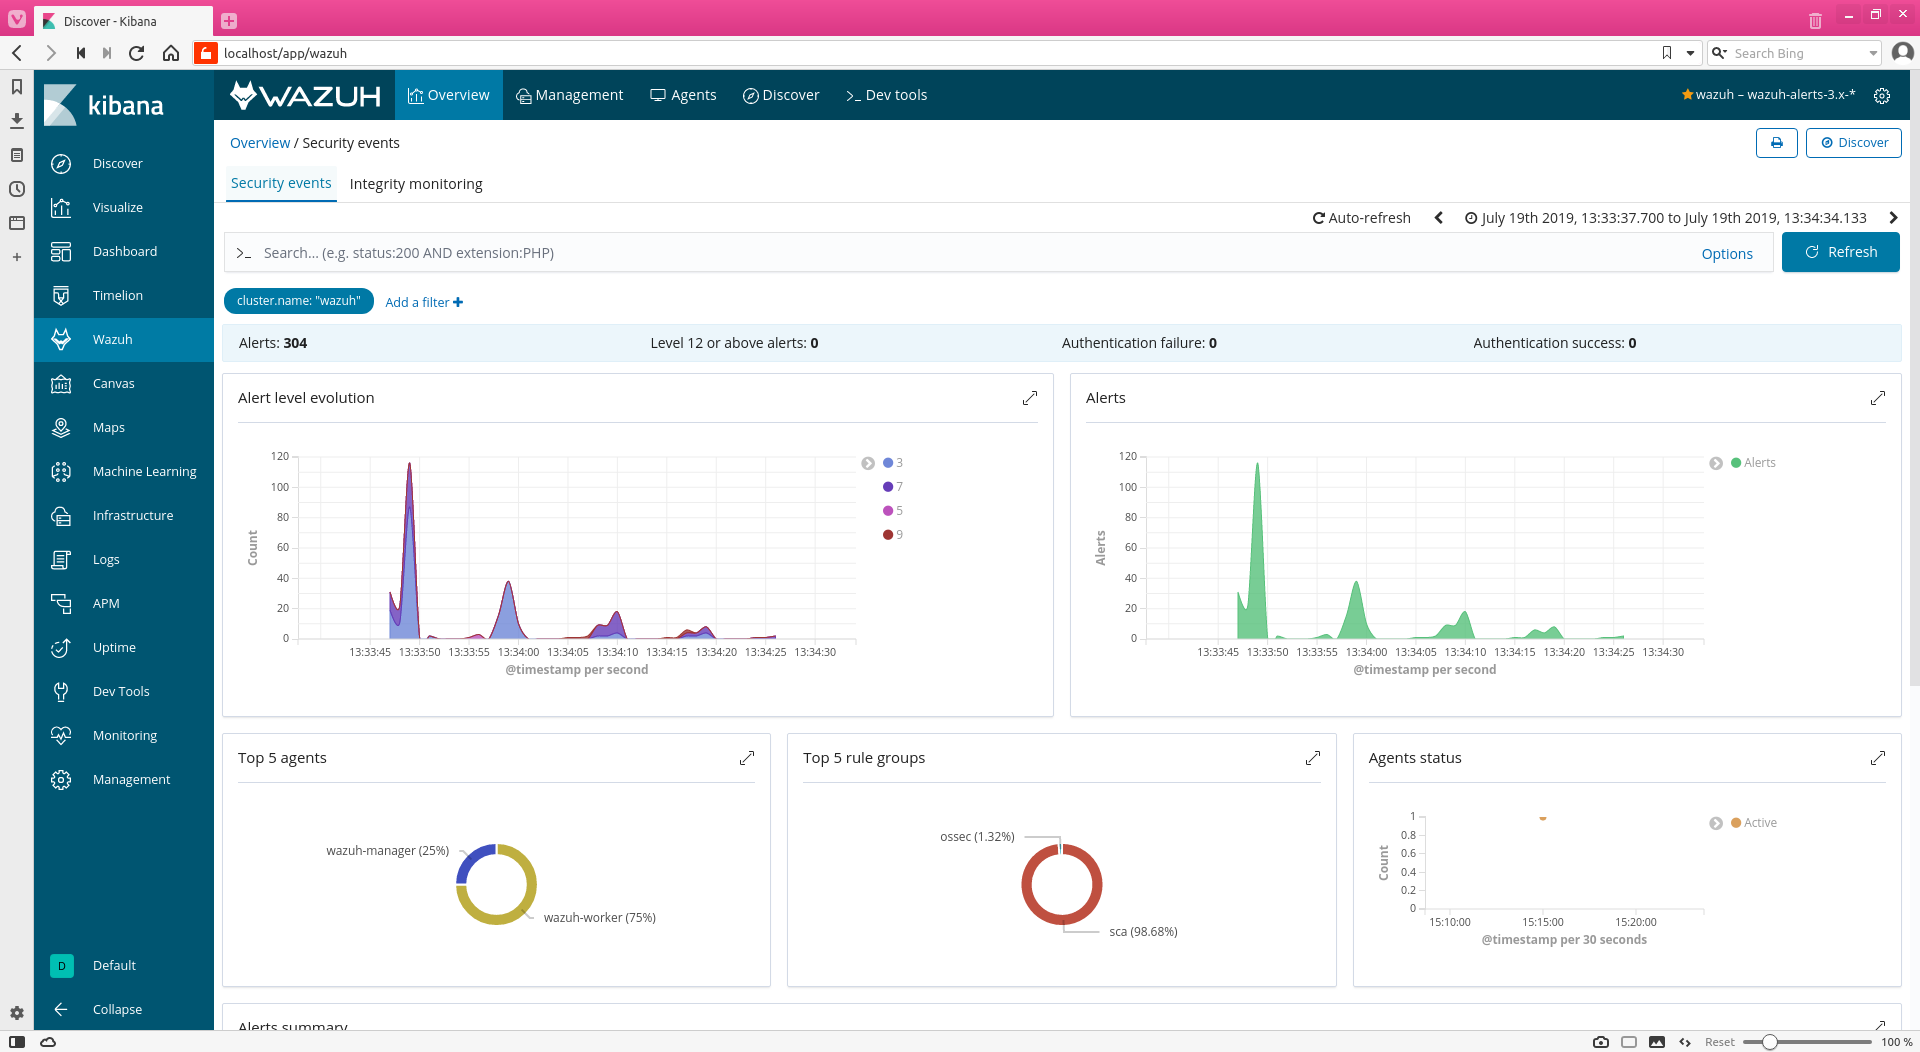
After adding the agents and waiting for them to generate some alerts, we can see that graphic in the Wazuh Kibana app with the number of alerts generated by each node of the cluster. If all the workers are reporting alerts, then it seems that our cluster environment is working properly.
If you have any questions about this, don’t hesitate to check out our documentation to learn more about Wazuh or join our community where our team and contributors will help you.