Kubernetes (K8s) is an open-source system for automating deployment, scaling, and management of containerized applications which has become the de-facto industry standard for container orchestration. In this post, we describe how to deploying Wazuh on Kubernetes with AWS EKS.
Managed Kubernetes cluster by AWS
Before you start, you will need a Kubernetes cluster where the containers will be deployed. We will use Amazon EKS, a hosted Kubernetes service that helps you run your container workloads in AWS without having to manage the Kubernetes control plane for your cluster. Like other similar hosted Kubernetes services (e.g. Azure Kubernetes service or Google Kubernetes Engine), the advantage of AWS EKS is taking away all the operational tasks related to the control plane. Just deploy your Kubernetes worker nodes, and EKS will do the rest for you, ensuring high availability, security, and scalability.
This diagram shows a quick overview of the AWS EKS architecture:

Wazuh containers setup
This is how our Wazuh containers will look once they are deployed:
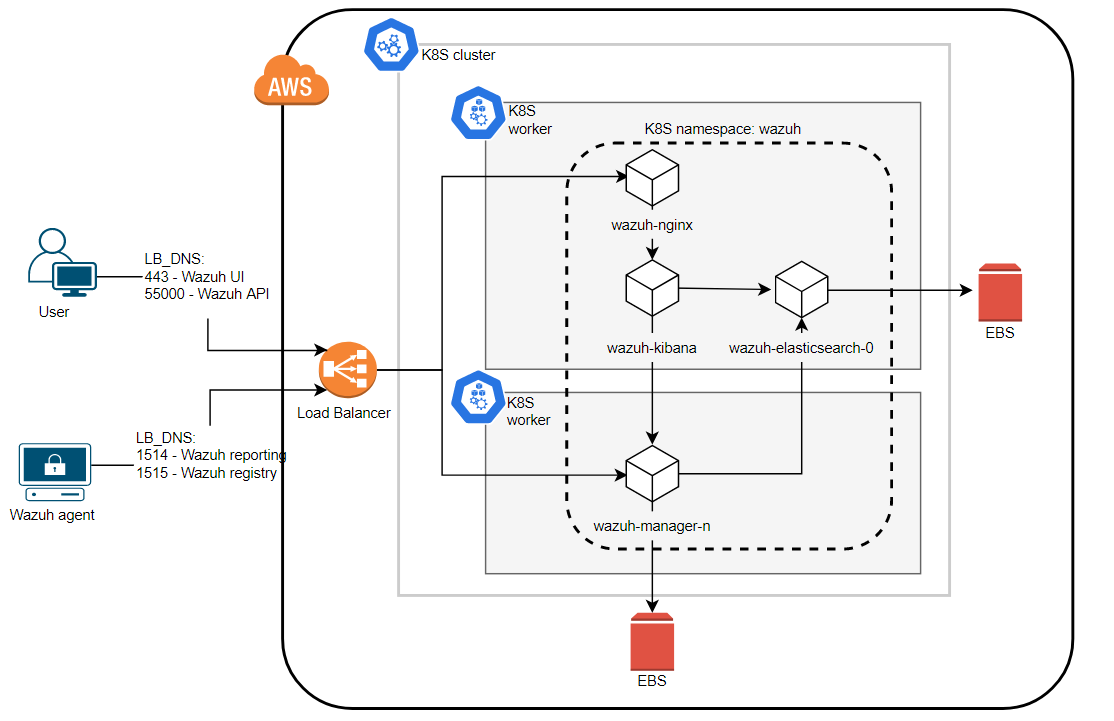
Let’s review each component of the deployment.
Wazuh cluster
Our Wazuh cluster consists of one master and two worker nodes. Here the objects that we will use:
- StatefulSets: Since Wazuh managers are a stateful application, we implement StatefulSet objects to manage the pods with persistent storage (EBS volume). This allows to restart our manager pods without data loss.
- StorageClass: This is the way to administer the dynamic volume provisioning in our case EBS volumes.
- ConfigMaps: This allows to decouple configuration artifacts from image content to keep containerized applications portable. It will be used to handle the manager configuration.
Services
The services allow us access to the Kubernetes Pods. There are 3 services:
- API/Registration: The API and the registration service authd are located in the Wazuh master node. Both services must be accessible externally since our Wazuh agents will be outside the Kubernetes cluster. So, we will use a NodePort service.
- Reporting: Wazuh agents must be able to communicate with Wazuh manager workers to send their events no matter where they are deployed. Therefore we must make this service accessible from outside the Kubernetes cluster. For this, the service type will be NodePort.
- Cluster: Wazuh worker nodes must communicate with each other, but we don’t need to access this service externally. So, we use a ClusterIP service.
Elastic Stack
The Elastic Stack deployment is composed of one Elasticsearch node and one Kibana node.
- StatefulSet: Elasticsearch is a stateful application. As we mentioned earlier, the persistent storage trough dynamic creation of volumes allows us to maintain our indexes without losing data regardless of pod restarts.
- Deployment: Since Kibana stores the information in Elasticsearch indices, it is not necessary to maintain its status. So, we can use a Deployment object.
Services
There are 3 services:
- Elasticsearch API: As we do not want to expose Elasticsearch API, this service type will be ClusterIP.
- Kibana: We will access Kibana locally through Nginx so this service is created as a ClusterIP.
- Elasticsearch Cluster: Like the Wazuh cluster, it is not necessary to access to this service externally. So, we use a ClusterIP service.
Nginx proxy
We deploy an Nginx proxy to access the Kibana web interface using credentials.
- Deployment: Nginx, like Kibana, will be created by means of deployment, since it is not necessary for us to maintain its status or store its data.
- Services: The Nginx service will be of the NodePort type since we want to access it from outside the Kubernetes cluster.
External access
In order to access our Wazuh cluster, we will use a Load Balancer. AWS offers three types:
- Classic LB (ELB): This is the default option we use in the Wazuh-Kubernetes repository (the service type is LoadBalancer). This means that an ELB will be created for each service. Since we want to use the same load balancer for all the services, we decided not to use this kind of load balancer and Kubernetes services for purposes of this post.
- ALB: This is designed for HTTP/HTTPS traffic. Our agents don’t report to the manager using this protocol so we can’t use it.
- NLB: Operating at the connection level (Layer 4), this meets all the requirements to expose our services, so we will use this type of load balancer for this deployment.
Wazuh deployment
In this section, we will learn how to deploying Wazuh in Kubernetes using the kubectl tool.
Step 1: Prepare files.
First, we need to download the Wazuh Kubernetes repository and change the Load Balancer services for Node Port services:
git clone https://github.com/wazuh/wazuh-kubernetes.git
curl https://wazuh.com/resources/blog/wazuh-cluster-on-eks/nginx-svc.yaml -o wazuh-kubernetes/elastic_stack/kibana/nginx-svc.yaml
curl https://wazuh.com/resources/blog/wazuh-cluster-on-eks/wazuh-master-svc.yaml -o wazuh-kubernetes/wazuh_managers/wazuh-master-svc.yaml
curl https://wazuh.com/resources/blog/wazuh-cluster-on-eks/wazuh-workers-svc.yaml -o wazuh-kubernetes/wazuh_managers/wazuh-workers-svc.yaml
Step 2: Kubernetes deployment
Once we have the Kubernetes templates ready, we will apply them:
cd wazuh-kubernetes

# Wazuh Namespace and StorageClass

kubectl apply -f base/wazuh-ns.yaml
kubectl apply -f base/aws-gp2-storage-class.yaml

# Elasticsearch deployment

kubectl apply -f elastic_stack/elasticsearch/elasticsearch-svc.yaml
kubectl apply -f elastic_stack/elasticsearch/single-node/elasticsearch-api-svc.yaml
kubectl apply -f elastic_stack/elasticsearch/single-node/elasticsearch-sts.yaml

# Kibana and Nginx deployment

kubectl apply -f elastic_stack/kibana/kibana-svc.yaml
kubectl apply -f elastic_stack/kibana/nginx-svc.yaml

kubectl apply -f elastic_stack/kibana/kibana-deploy.yaml
kubectl apply -f elastic_stack/kibana/nginx-deploy.yaml

# Wazuh cluster deployment

kubectl apply -f wazuh_managers/wazuh-master-svc.yaml
kubectl apply -f wazuh_managers/wazuh-cluster-svc.yaml
kubectl apply -f wazuh_managers/wazuh-workers-svc.yaml

kubectl apply -f wazuh_managers/wazuh-master-conf.yaml
kubectl apply -f wazuh_managers/wazuh-worker-0-conf.yaml
kubectl apply -f wazuh_managers/wazuh-worker-1-conf.yaml

kubectl apply -f wazuh_managers/wazuh-master-sts.yaml
kubectl apply -f wazuh_managers/wazuh-worker-0-sts.yaml
kubectl apply -f wazuh_managers/wazuh-worker-1-sts.yaml
Step 3: Verify deployment
Now, we will verify that everything is working as expected.
Pods
The following command allows us to check the pod status. Wait until all the pods are in Running status.
kubectl -n wazuh get pods
NAME                            READY   STATUS    RESTARTS   AGE
wazuh-elasticsearch-0           1/1     Running   0          2m8s
wazuh-kibana-7c7c5b87dd-qgvvt   1/1     Running   0          116s
wazuh-manager-master-0          1/1     Running   0          72s
wazuh-manager-worker-0-0        1/1     Running   0          68s
wazuh-manager-worker-1-0        1/1     Running   0          63s
wazuh-nginx-869f588f5d-qqt28    1/1     Running   0          111s
Services
Take a look at the services to review how they are exposed.
kubectl -n wazuh get services
NAME                  TYPE        CLUSTER-IP       EXTERNAL-IP   PORT(S)                          AGE
elasticsearch         ClusterIP   172.20.9.85              9200/TCP                         104s
kibana                ClusterIP   172.20.190.118           5601/TCP                         87s
wazuh                 NodePort    172.20.155.222           1515:30405/TCP,55000:32250/TCP   67s
wazuh-cluster         ClusterIP   None                     1516/TCP                         63s
wazuh-elasticsearch   ClusterIP   None                     9300/TCP                         108s
wazuh-nginx           NodePort    172.20.84.91             443:32748/TCP                    83s
wazuh-workers         NodePort    172.20.138.150           1514:30544/TCP                   58s
Wazuh cluster check
Finally, we can access the manager container to check the Wazuh cluster:
kubectl -n wazuh exec -it wazuh-manager-master-0 bash
/var/ossec/bin/cluster_control -l
NAME                    TYPE    VERSION  ADDRESS
wazuh-manager-master    master  3.11.2   wazuh-manager-master-0.wazuh-cluster.wazuh.svc.cluster.local
wazuh-manager-worker-0  worker  3.11.2   10.2.93.45
wazuh-manager-worker-1  worker  3.11.2   10.2.122.53
These are some other useful commands to check the resources created:
- List namespaces:
kubectl get namespaces - List persistent volume claims:
kubectl -n wazuh get pvc - List configuration maps:
kubectl -n wazuh get configmap - List deployments:
kubectl -n wazuh get deployments - List statefulsets:
kubectl -n wazuh get sts
Step 4: Configuring the access to Wazuh
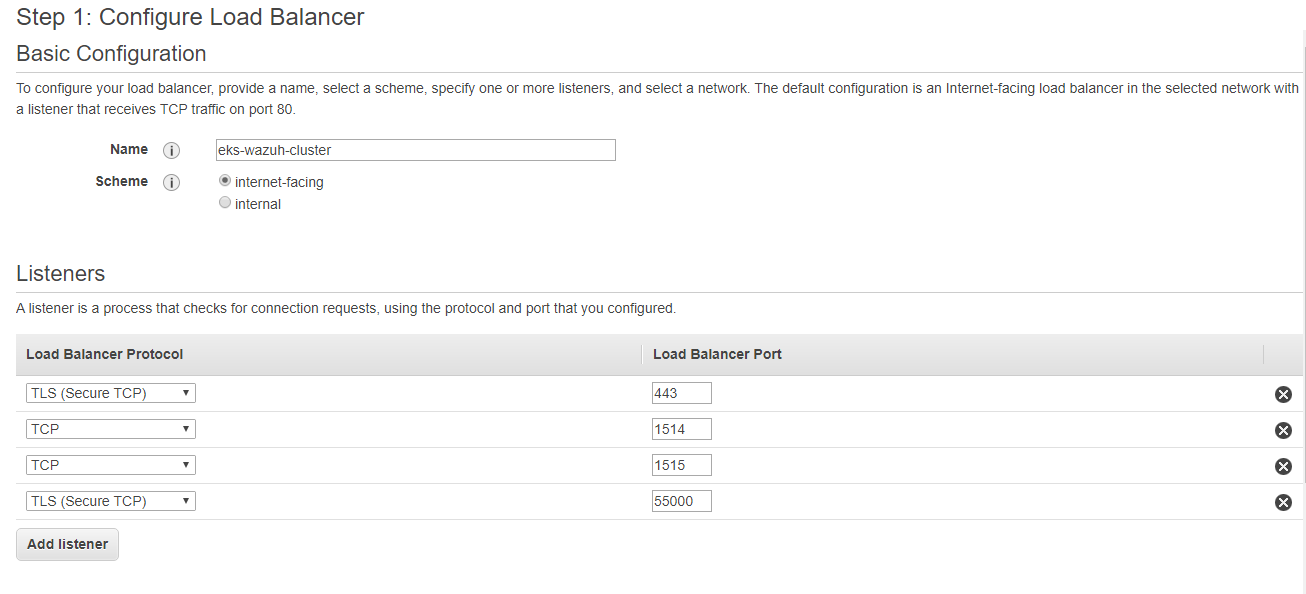
At this point, our environment is ready for us to continue with the access configuration. We are going to create a Network Load Balancer in AWS with the following configuration:
- TLS Listener with port 443 forwarding to nginx service NodePort
32748target group - TCP Listener with port 1514 forwarding to wazuh workers service NodePort
30544target group - TCP Listener with port 1515 forwarding to wazuh master service NodePort
30405target group - TLS Listener with port 55000 forwarding to wazuh master service NodePort
32250target group
Go to your AWS Console > EC2 > Load balancers. Then click on Create Load Balancer and follow the next steps.
Select the VPC where our EKS cluster is deployed. Then, configure the Listeners with the proper port and protocol:
After creating our Listeners, we will set the security settings, choosing the certificate we want for each TLS Listener.
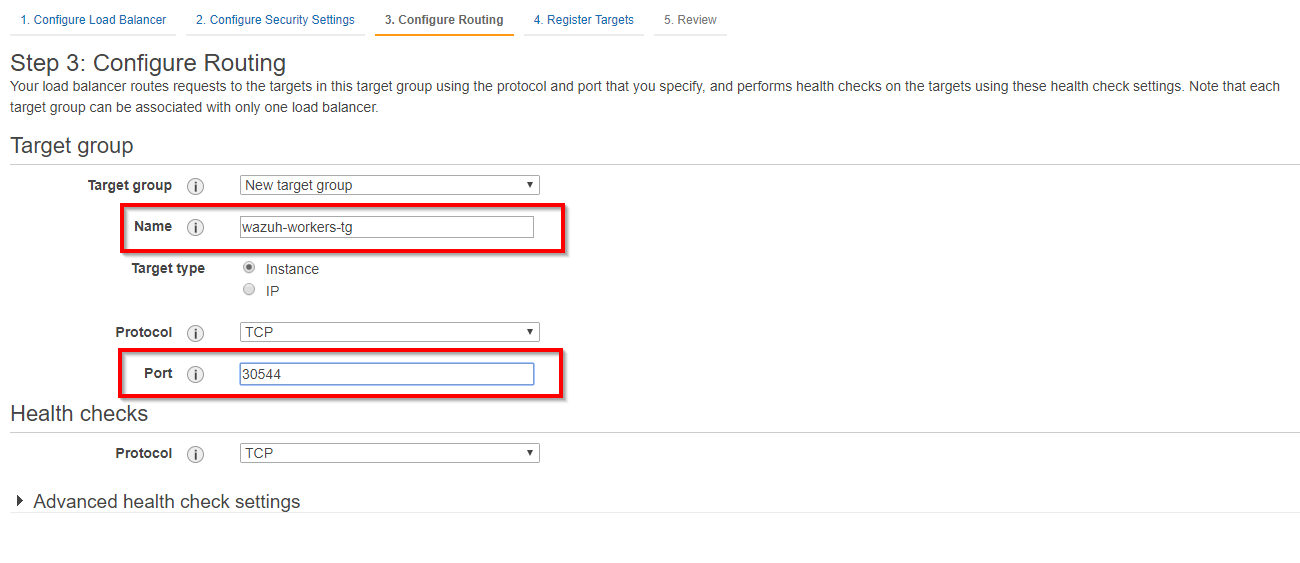
The next step is to configure the communication routes through target groups. We will assign an identifying name to each target group, select instances as target type, set the appropriate protocol according to the Listener and finally add the port of the NodePort service.
Here an example for the Wazuh workers service (listener port 1514, target group port 30544):
The last step is to register the instances of our Kubernetes cluster for the target group.
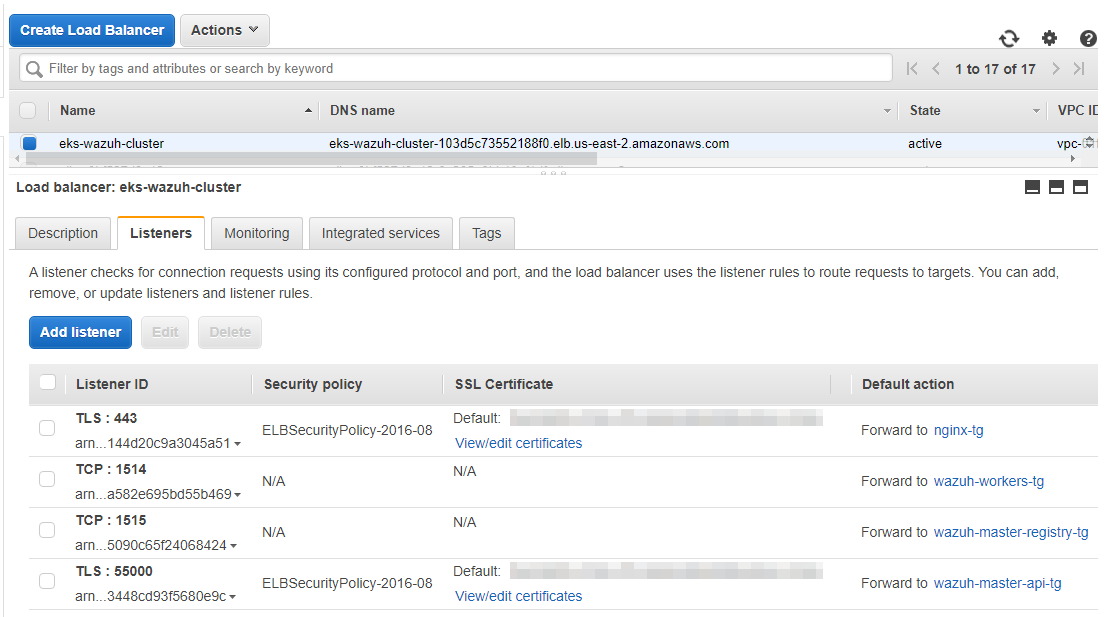
Repeat the previous steps for the rest of the listeners and target groups. The NLB that was created should look like this:
Testing our deployment
In order to test our deployment, we are going to register a Wazuh agent and we will look for it in the Wazuh WUI.
Agent registration
For the purposes of this post, we will install a Wazuh agent in an Ubuntu server (you may use any other operating system). The NLB DNS will be used as an address for the Wazuh manager, and we will change the protocol to TCP. The Load Balancer will send the registration to the Wazuh manager master and the events to the Wazuh manager workers.
WAZUH_MANAGER="eks-wazuh-cluster-103d5c73552188f0.elb.us-east-2.amazonaws.com" WAZUH_PROTOCOL="tcp" apt-get install wazuh-agent
As we have made the Wazuh API accessible, we can check if our agent has been added using the following API call:
curl -u foo:bar "https://eks-wazuh-cluster-103d5c73552188f0.elb.us-east-2.amazonaws.com:55000/agents/summary?pretty"
{
   "error": 0,
   "data": {
      "Total": 2,
      "Active": 2,
      "Disconnected": 0,
      "Never connected": 0,
      "Pending": 0
   }
}
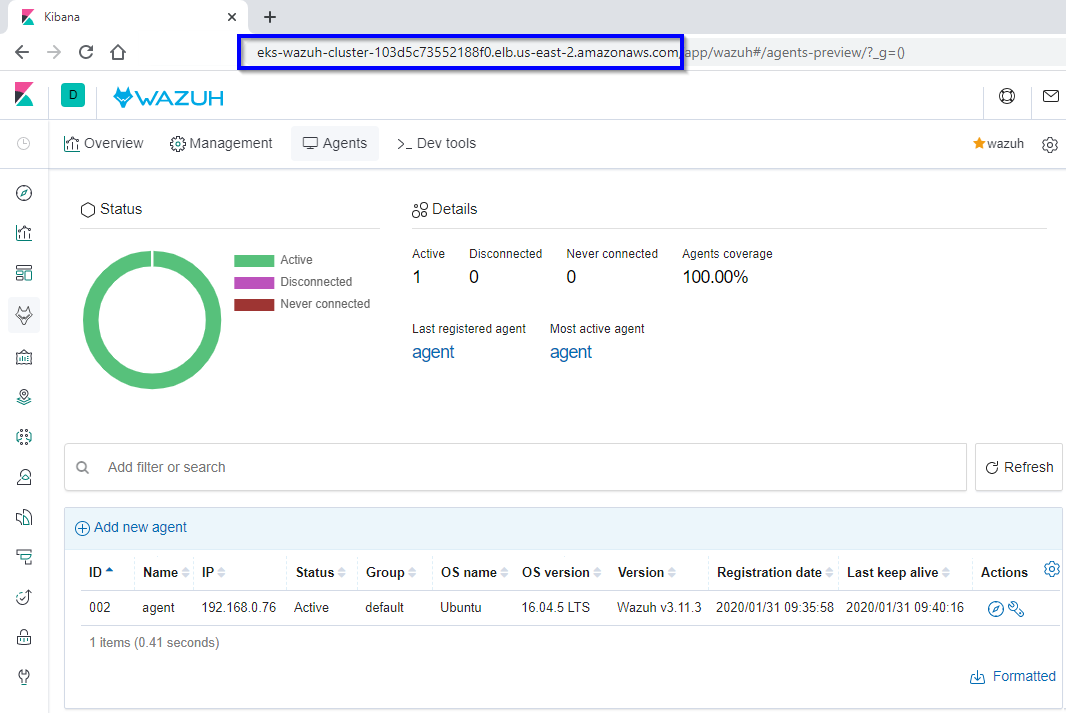
Wazuh WUI access
Just type the NLB DNS in your browser using HTTPS and enter the credentials established in Nginx.
Conclusion
We have seen a simple design to run Wazuh on Kubernetes, the orchestration tool designed by Google to run containerized applications at scale in public and private clouds. We also used AWS EKS to simplify our work. This is just the beginning, and we will explain different designs to run Wazuh on Kubernetes painlessly and smoothly in future posts.
Interesting links
- Kubernetes documentation
- AWS EKS
- AWS deploy Kubernetes application
- Elastic Load Balancing
- Wazuh-Kubernetes repository
- Installing Wazuh agent
- Wazuh Kubernetes documentation
If you have any questions about how to deploying Wazuh on Kubernetes with AWS EKS, join our community. Our team and contributors will help you.