
BlackCat, also known as ALPHV ransomware, is a sophisticated ransomware that analysts first observed in November 2021. It operates as a Ransomware-as-a-Service (RaaS), where affiliates pay for software that enables them to launch ransomware attacks.
The ransomware operators allow affiliates to customize payloads, which makes it possible for them to target different corporate environments and operating systems (Windows and Linux variants). BlackCat is written in Rust programming language, and this presents a challenge for traditional security solutions to analyze and parse binaries generated by it.
This blog shows how to detect and respond to BlackCat ransomware on Windows endpoints using Wazuh.
BlackCat ransomware behavior
BlackCat is a command-line driven, human-operated, flexible malware and has the ability to employ a range of encryption techniques. Below are some of the notable behaviors of the ransomware:
- Blackcat ransomware uses an
access-tokento execute. The access token is a 32-byte token randomly chosen. Below is an example of a command that executes BlackCat.
BlackCat.exe --access-token 12345
- BlackCat bypasses user access control (UAC) when a user account without administrative privileges executes it. It runs a secondary process under
dllhost.exewith the necessary permissions to encrypt a large number of files on a compromised endpoint. - BlackCat discovers other endpoints on the same network as the victim host by sending a NetBIOS Name Service (NBNC) broadcast message. The malware then uses
PsExecto try to infect responding servers. - BlackCat increases the number of outstanding SMB client requests allowed. It sets the maximum client connection limit to
65535by modifying the registry to changeMaxMpxCtsettings. It uses the command below to set theMaxMpxCtto65535:
reg add HKEY_LOCAL_MACHINE\SYSTEM\CurrentControlSet\Services \LanmanServer\Parameters /v MaxMpxCt /d 65535 /t REG_DWORD /f
- BlackCat terminates processes and stops services that are specified in its embedded configuration. It also enumerates and terminates any dependent services of the target service. For example, it uses the command
cmd.exe /c "iisreset.exe /stop"to stop the internet information service on the server. - BlackCat modifies the boot loader to prevent recovery and automatic repair on the Windows endpoint. It disables the boot recovery mode using the following command:
C:\Windows\system32\cmd.exe” /c “bcdedit /set {default} recoveryenabled No
- BlackCat uses
wevtutil.exeto clear Windows event logs to prevent analysis. It executes the following command to clear the event logs:
“C:\Windows\system32\cmd.exe” /c “cmd.exe /c for /F \”tokens=*\” %1 in (‘ wevtutil.exe el ‘) DO wevtutil.exe cl \”%1\””
- It disables and deletes
Volume Shadow CopyService andHyper-V Volume Shadow CopyRequestor Service. BlackCat uses thewmic.execommand to delete the shadow copies on all volumes. It uses the following command:
“C:\Windows\system32\cmd.exe” /c “wmic.exe Shadowcopy Delete”
Requirements
To demonstrate the detection of BlackCat ransomware with Wazuh, we use the following infrastructure:
- A pre-built ready-to-use Wazuh OVA 4.3.10 Follow this guide to download the virtual machine
- A Windows 10 endpoint with the Wazuh agent installed. This Wazuh guide is used to install the Wazuh agent.
Detection techniques
In this blog post, we use the following techniques to detect the presence of BlackCat ransomware:
- Using custom detection rules: This technique alerts about malicious activities in an infected endpoint.
- Using constant database (CDB) list and active response: This technique alerts about and removes malicious files in an endpoint.
Using custom detection rules
We show how you can use Sysmon and custom detection rules to detect the malicious activities of BlackCat ransomware on an infected Windows endpoint.
Install Sysmon on the monitored endpoint
1. Download Sysmon from the Microsoft Sysinternals page.
2. Download the configuration file sysmonconfig.xml.
3. Run the following command with administrative privilege to install Sysmon with the downloaded configuration file via command prompt:
.\Sysmon64.exe -accepteula -i sysmonconfig.xml
Configure the Wazuh agent to collect Sysmon events
1. Configure the agent to collect Sysmon events by adding the following settings to the Wazuh agent configuration file C:\Program Files (x86)\ossec-agent\ossec.conf:
<localfile>
  <location>Microsoft-Windows-Sysmon/Operational</location>
  <log_format>eventchannel</log_format>
</localfile>
2. Run the following command with administrative privilege to restart the Wazuh agent via command prompt:
NET STOP WazuhSvc
NET START WazuhSvc
Configure detection rules on Wazuh server
1. Add the following rules to the /var/ossec/etc/rules/local_rules.xml file on the Wazuh server:
<group name="blackcat,">
<!-- Detects when BlackCat deletes shadow copies -->
   <rule id="100104" level="12">
     <if_sid>61603</if_sid>
     <field name="win.eventdata.CommandLine" type="pcre2">(?i)wmic.exe\s\sShadowcopy\sDelete</field>
     <description>Shadow copies have been deleted. Possible ransomware detected.</description>
     <mitre>
       <id>T1490</id>
     </mitre>
  </rule>

<!-- Detects when BlackCat prevents autorecovery-->
  <rule id="100105" level="12">
     <if_sid>61603</if_sid>
     <field name="win.eventdata.CommandLine" type="pcre2">(?i)bcdedit\s\s\/set {default} recoveryenabled No</field>
     <description>System recovery disabled. Possible ransomware detected.</description>
     <mitre>
       <id>T1490</id>
     </mitre>
  </rule>

<!-- Detects when BlackCat clears event logs-->
  <rule id="100106" level="12">
    <if_sid>61603</if_sid>
    <field name="win.eventdata.CommandLine" type="pcre2">(?i)\C:.*\('wevtutil.exe el'\) DO wevtutil.exe cl.*</field>
    <description>Event logs cleared. BlackCat ransomware detected.</description>
    <mitre>
      <id>T1070.001</id>
    </mitre>
  </rule>

<!-- Detects when BlackCat creates ransom notes -->
  <rule id="100107" level="12" timeframe="100" frequency="2">
    <if_sid>61613</if_sid>
    <field name="win.eventdata.targetFilename" type="pcre2">(?i)\C:.*.RECOVER-.*-FILES.txt</field>
    <description>The file $(win.eventdata.targetFilename) has been created in multiple directories. Possible BlackCat ransomware detected.</description>
    <mitre>
      <id>T1486</id>
    </mitre>
  </rule>

<!-- Detects when BlackCat modifies the registry to change MaxMpxCt settings -->
  <rule id="100108" level="12">
    <if_sid>61615</if_sid>
    <field name="win.eventdata.eventType" type="pcre2" >^SetValue$</field>
    <field name="win.eventdata.targetObject" type="pcre2" >HKLM\\\\\System\\\\CurrentControlSet\\\\Services\\\\LanmanServer\\\\Parameters\\\\MaxMpxCt</field>
        <description>Changes were made to MaxMpxCt settings on $(win.system.computer). BlackCat ransomware detected.</description>
    <mitre>
      <id>T1543</id>
    </mitre>
  </rule>
</group>
2. Restart the Wazuh manager to apply changes.
# systemctl restart wazuh-manager
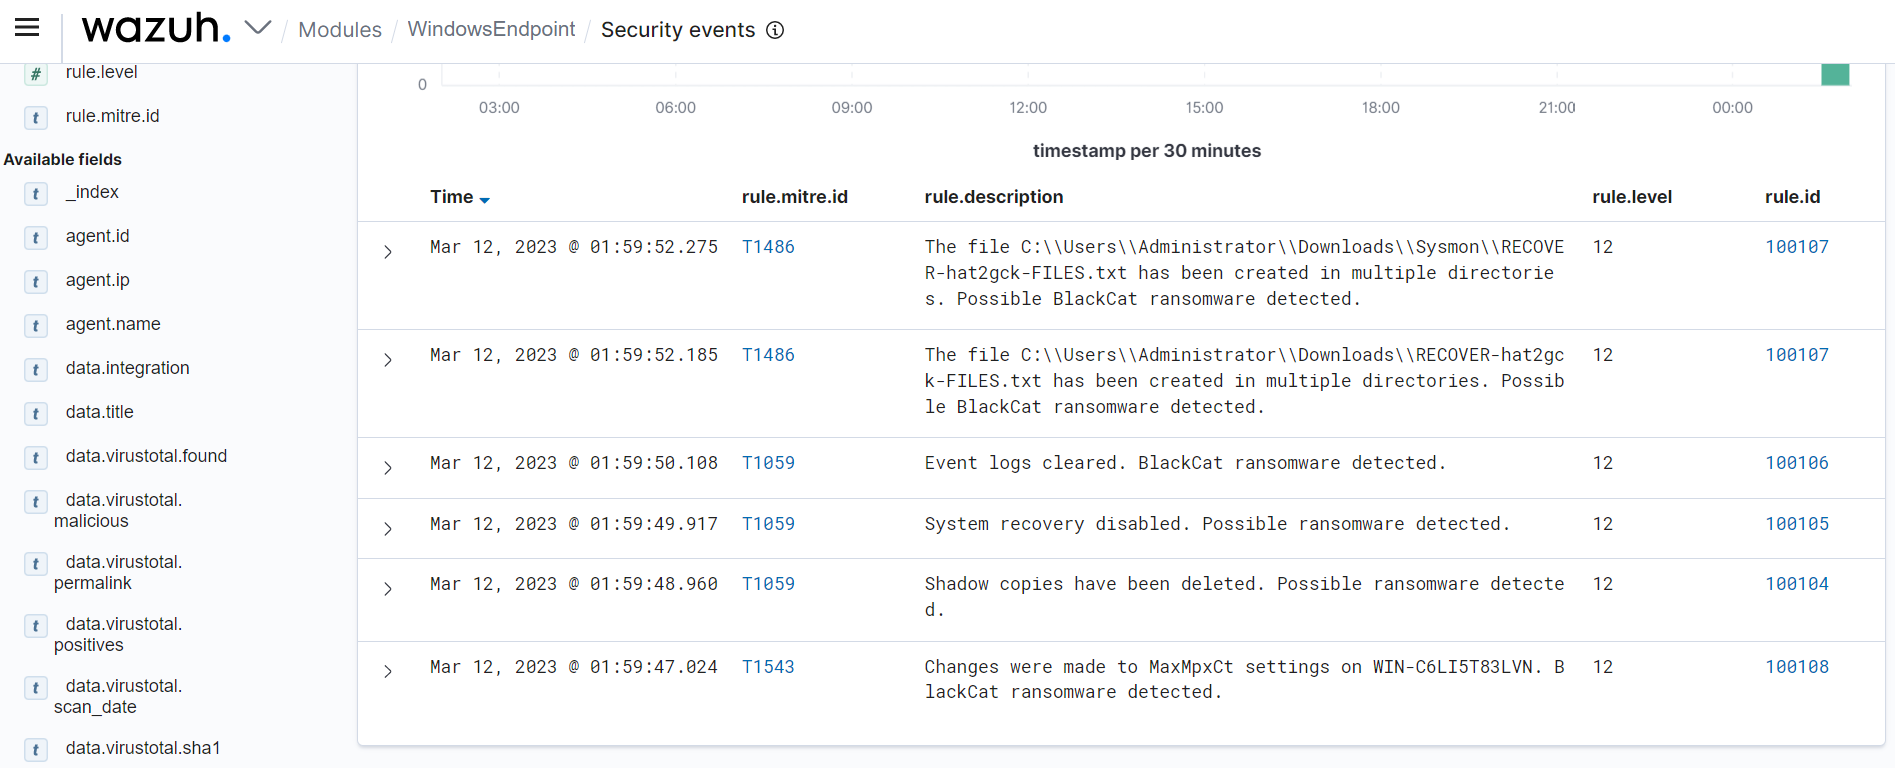
After running the ransomware sample on the Windows endpoint, the alerts are generated on the Wazuh dashboard.
Using CDB list and active response to detect and remove BlackCat ransomware
You can configure Wazuh to detect malicious files by checking the presence of their signatures in a CDB list of known malware signatures. The CDB list is a text file that you can use to save a list of users, file hashes, IP addresses, or domain names. You add entries to a CDB list in key:value pairs. Learn more about CDB lists in our documentation.
Detecting malware using file hashes in a CDB list
Using the known file hashes for BlackCat ransomware, you can detect the ransomware by adding the file hashes to a CDB list. Wazuh has a file integrity monitoring (FIM) module that detects and alerts when files are created, modified, or deleted in a monitored directory. The alerts generated by the FIM module contain the file MD5, SHA1, and SHA256 checksums in their metadata. To detect the malware using the CDB list, the SHA256 checksums generated by the FIM module are cross-checked against the hash entries in the CDB list.
Follow the steps below to create a CDB list and configure a malware detection rule using CDB list.
Wazuh server
1. Create a CDB list malware-hashes that will contain known BlackCat ransomware hashes and save it to the /var/ossec/etc/lists directory on the Wazuh server:
# touch /var/ossec/etc/lists/malware-hashes
2. Add the known BlackCat ransomware hashes to the malware-hashes file as key:value pairs:
c50bca08a8e80850ec18d258ff937b7b72a500d9027c730c86b05aa73c938b5d:Blakcat
79802d6a6be8433720857d2b53b46f8011ec734a237aae1c3c1fea50ff683c13:Blakcat
aae77d41eba652683f3ae114fadec279d5759052d2d774f149f3055bf40c4c14:Blakcat
f2b3f1ed693021b20f456a058b86b08abfc4876c7a3ae18aea6e95567fd55b2e:Blakcat
7154fdb1ef9044da59fcfdbdd1ed9abc1a594cacb41a0aeddb5cd9fdaeea5ea8:Blakcat
5bdc0fb5cfbd42de726aacc40eddca034b5fa4afcc88ddfb40a3d9ae18672898:Blakcat
5a604a8f0e72f3bf7901b7b67f881031a402ab8072269c00233a554df548f54d:Blakcat
6660d0e87a142ab1bde4521d9c6f5e148490b05a57c71122e28280b35452e896:Blakcat
b588823eb5c65f36d067d496881d9c704d3ba57100c273656a56a43215f35442:Blakcat
658e07739ad0137bceb910a351ce3fe4913f6fcc3f63e6ff2eb726e45f29e582:Blakcat
72f0981f18b969db2781e874d249d8003c07f99786e217f84cf54a148de259cc:Blakcat
c72ff0fb83a92ac66e9b5f2affabee37807a7b3995bb45aa12d9f3cee967f839:Blakcat
2587001d6599f0ec03534ea823aab0febb75e83f657fadc3a662338cc08646b0:Blakcat
f815f5d6c85bcbc1ec071dd39532a20f5ce910989552d980d1d4346f57b75f89:Blakcat
7e363b5f1ba373782261713fa99e8bbc35ddda97e48799c4eb28f17989da8d8e:Blakcat
3d7cf20ca6476e14e0a026f9bdd8ff1f26995cdc5854c3adb41a6135ef11ba83:Blakcat
0c6f444c6940a3688ffc6f8b9d5774c032e3551ebbccb64e4280ae7fc1fac479:Blakcat
2cf54942e8cf0ef6296deaa7975618dadff0c32535295d3f0d5f577552229ffc:Blakcat
cefea76dfdbb48cfe1a3db2c8df34e898e29bec9b2c13e79ef40655c637833ae:Blakcat
bacedbb23254934b736a9daf6de52620c9250a49686d519ceaf0a8d25da0a97f:Blakcat
67d1f4077e929385cfd869bf279892bf10a2c8f0af4119e4bc15a2add9461fec:Blakcat
3c8ad2dae0b1bb536925b4e8d5a87e77c6134371eada2c7628358d6c6d3083dc:Blakcat
17fdc00239e9048f7e3199a913e41236344f54cba6df376556ccee879ca21328:Blakcat
The keys are the SHA256 hashes of the ransomware.
3. Edit the Wazuh server /var/ossec/etc/ossec.conf configuration file and add the etc/lists/malware-hashes list to the <ruleset> section as shown below:
<ruleset>
  <list>etc/lists/malware-hashes</list>
<ruleset>
4. Create a custom rule in the /var/ossec/etc/rules/local_rules.xml file on the Wazuh server. The rule generates alerts on the Wazuh dashboard when any of the SHA256 hash in the CDB list is detected:
<group name="blackcat,">
  <rule id="110002" level="13">
    <if_sid>554, 550</if_sid>
    <list field="sha256" lookup="match_key">etc/lists/malware-hashes</list>
    <description>File with known BlackCat malware hash detected: $(file)</description>
    <mitre>
      <id>T1204.002</id>
    </mitre>
  </rule>
</group>
Note
Wazuh triggers rule 554 when a user or process adds a new file to a monitored directory and rule 550 when a user or process modifies a file.
5. Restart the Wazuh manager to apply changes.
# systemctl restart wazuh-manager
Windows endpoint
1. Add the following setting within the <syscheck> block of the Wazuh agent /var/ossec/etc/ossec.conf configuration file. This configures the Wazuh FIM module to monitor the Downloads directory for all users.
<directories check_all="yes" realtime="yes">C:\Users\*\Downloads</directories>
Note
The check_all option ensures Wazuh checks all file attributes including the file size, permissions, owner, last modification date, inode, and hash.
2. Restart the Wazuh agent to apply the changes:
NET STOP WazuhSvc
NET START WazuhSvc
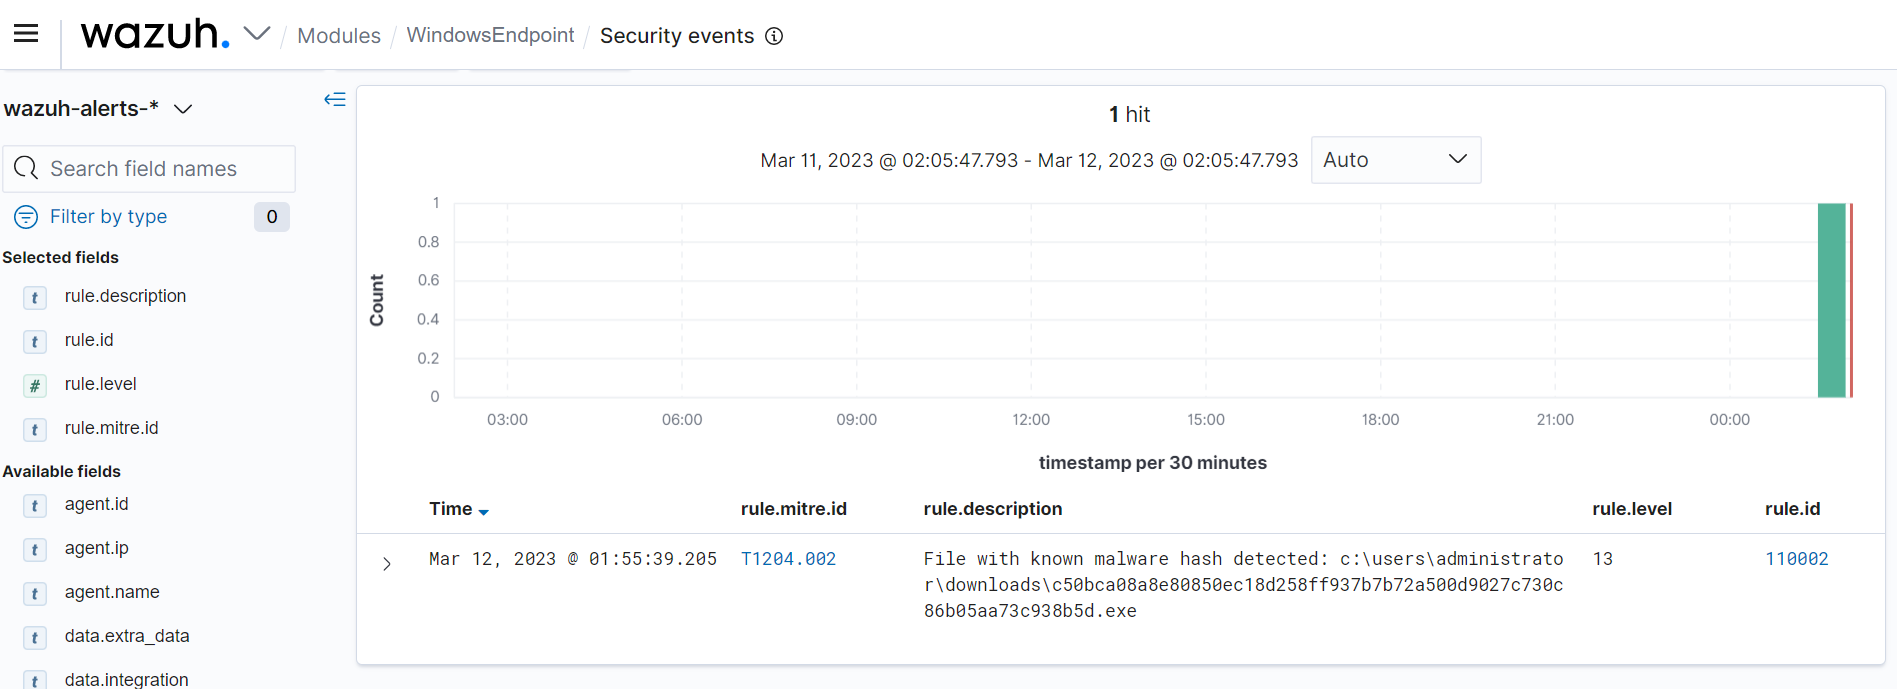
To test the detection rule, download a sample of the BlackCat ransomware to the monitored directory. The alert below shows that the downloaded file hash is in the CDB list.
We have shown how to detect BlackCat ransomware using a CDB list by matching the checksums (SHA256) of files with a CDB list of known malicious hashes. You can take this further by configuring the active response module to delete any file with the hashes in our CDB list.
Configuring active response to remove BlackCat ransomware files
The Wazuh active response module performs various countermeasures to address detected threats. Active responses execute a script on an endpoint in response to certain triggers. For example, if a specific rule is triggered and it generates an alert, an active response script will run on the endpoint that generated that alert. In this case, we show how you can configure a Python script on the Windows endpoint to remove the BlackCat ransomware files as soon as the Wazuh detects them. To achieve this, Python and Pyinstaller are required on the Windows endpoint to convert the Python script to an executable file.
Follow the steps below to configure the active response script to remove all BlackCat ransomware files immediately after the Wazuh detects them on a monitored endpoint.
Windows endpoint
1. Download Python.
2. Run the Python installer and select the following checkboxes during installation:
- Use admin privileges when installing py.exe
- Add Python.exe to PATH.
3. Run the following command with administrative privilege to install Pyinstaller via command prompt:
pip install -U pyinstaller
4. Create a remove-threat.py script with the contents below:
| Warning: This script is a proof of concept (PoC). Review and validate it to ensure it meets the operational and security requirements of your environment. |
# Copyright (C) 2015-2025, Wazuh Inc.
# All rights reserved.

import os
import sys
import json
import datetime
import stat
import tempfile
import pathlib

if os.name == 'nt':
    LOG_FILE = "C:\\Program Files (x86)\\ossec-agent\\active-response\\active-responses.log"
else:
    LOG_FILE = "/var/ossec/logs/active-responses.log"

ADD_COMMAND = 0
DELETE_COMMAND = 1
CONTINUE_COMMAND = 2
ABORT_COMMAND = 3

OS_SUCCESS = 0
OS_INVALID = -1

class message:
    def __init__(self):
        self.alert = ""
        self.command = 0

def write_debug_file(ar_name, msg):
    with open(LOG_FILE, mode="a") as log_file:
        log_file.write(str(datetime.datetime.now().strftime('%Y/%m/%d %H:%M:%S')) + " " + ar_name + ": " + msg +"\n")

def setup_and_check_message(argv):
    input_str = ""
    for line in sys.stdin:
        input_str = line
        break

    msg_obj = message()
    try:
        data = json.loads(input_str)
    except ValueError:
        write_debug_file(argv[0], 'Decoding JSON has failed, invalid input format')
        msg_obj.command = OS_INVALID
        return msg_obj

    msg_obj.alert = data
    command = data.get("command")

    if command == "add":
        msg_obj.command = ADD_COMMAND
    elif command == "delete":
        msg_obj.command = DELETE_COMMAND
    else:
        msg_obj.command = OS_INVALID
        write_debug_file(argv[0], 'Not valid command: ' + command)

    return msg_obj

def send_keys_and_check_message(argv, keys):
    keys_msg = json.dumps({"version": 1,"origin":{"name": argv[0],"module":"active-response"},"command":"check_keys","parameters":{"keys":keys}})
    write_debug_file(argv[0], keys_msg)

    print(keys_msg)
    sys.stdout.flush()

    input_str = ""
    while True:
        line = sys.stdin.readline()
        if line:
            input_str = line
            break

    try:
        data = json.loads(input_str)
    except ValueError:
        write_debug_file(argv[0], 'Decoding JSON has failed, invalid input format')
        return OS_INVALID

    action = data.get("command")
    if action == "continue":
        return CONTINUE_COMMAND
    elif action == "abort":
        return ABORT_COMMAND
    else:
        write_debug_file(argv[0], "Invalid value of 'command'")
        return OS_INVALID

def secure_delete_file(filepath_str, ar_name):
    filepath = pathlib.Path(filepath_str)

    # Reject NTFS alternate data streams
    if '::' in filepath_str:
        raise Exception(f"Refusing to delete ADS or NTFS stream: {filepath_str}")

    # Reject symbolic links and reparse points
    if os.path.islink(filepath):
        raise Exception(f"Refusing to delete symbolic link: {filepath}")

    attrs = os.lstat(filepath).st_file_attributes
    if attrs & stat.FILE_ATTRIBUTE_REPARSE_POINT:
        raise Exception(f"Refusing to delete reparse point: {filepath}")

    resolved_filepath = filepath.resolve()

    # Ensure it's a regular file
    if not resolved_filepath.is_file():
        raise Exception(f"Target is not a regular file: {resolved_filepath}")

  # Perform deletion
    os.remove(resolved_filepath)

def main(argv):
    write_debug_file(argv[0], "Started")
    msg = setup_and_check_message(argv)

    if msg.command < 0:
        sys.exit(OS_INVALID)

    if msg.command == ADD_COMMAND:
        alert = msg.alert["parameters"]["alert"]
        keys = [alert["rule"]["id"]]
        action = send_keys_and_check_message(argv, keys)

        if action != CONTINUE_COMMAND:
            if action == ABORT_COMMAND:
                write_debug_file(argv[0], "Aborted")
                sys.exit(OS_SUCCESS)
            else:
                write_debug_file(argv[0], "Invalid command")
                sys.exit(OS_INVALID)

        try:
            file_path = alert["data"]["virustotal"]["source"]["file"]
            if os.path.exists(file_path):
                secure_delete_file(file_path, argv[0])
                write_debug_file(argv[0], json.dumps(msg.alert) + " Successfully removed threat")
            else:
                write_debug_file(argv[0], f"File does not exist: {file_path}")
        except OSError as error:
            write_debug_file(argv[0], json.dumps(msg.alert) + "Error removing threat")
        except Exception as e:
            write_debug_file(argv[0], f"{json.dumps(msg.alert)}: Error removing threat: {str(e)}")
    else:
        write_debug_file(argv[0], "Invalid command")

    write_debug_file(argv[0], "Ended")
    sys.exit(OS_SUCCESS)

if __name__ == "__main__":
    main(sys.argv)
Note
The os.remove() function is the function that handles the removal of the malicious file. The script logs the file removal action’s outcome to C:\ProgramFiles(x86)\ossec-agent\active-response\active-responses.log.
5. Convert the Python script remove-threat.py to an executable file:
pyinstaller -F remove-threat.py
6. Copy the built executable from the \dist folder under your current working directory to C:\Program Files (x86)\ossec-agent\active-response\bin.
Wazuh server
1. Add the following block in the /var/ossec/etc/ossec.conf so that the Wazuh server initiates an active response once an event triggers rule 110002:
<command>
  <name>remove-threat-windows</name>
  <executable>remove-threat.exe</executable>
  <timeout_allowed>no</timeout_allowed>
</command>

<active-response>
  <disabled>no</disabled>
  <command>remove-threat-windows</command>
  <location>local</location>
  <rules_id>110002</rules_id>
</active-response>
Where:
- The
<name>tag specifies the name of the command in the active response section. - The
<executable>tag specifies the executable file to run. In this case,remove-threat.exeexecutable you built earlier. - The
<active response>tag block calls the command block when the rule ID specified triggers an alert. In this case, specify rule ID110002, which is the rule that detects files with malicious hashes we specified in the CDB list.
2. Create rules to alert when the active response file removal succeeds or fails by adding the following rules to the /var/ossec/etc/rules/local_rules.xml:
<rule id="100109" level="7">
  <if_sid>657</if_sid>
    <match>Successfully removed threat</match>
    <description>$(parameters.program): Successfully removed threat $(parameters.alert.syscheck.path) whose MD5 hash appears in a malware blacklist.</description>
</rule>

<rule id="100110" level="7">
  <if_sid>657</if_sid>
    <match>Error removing threat</match>
    <description>$(parameters.program): Error removing threat $(parameters.alert.syscheck.path) whose MD5 hash appears in a malware blacklist.</description>
</rule>
Where:
- Rule ID
100109generates an alert when the active response action successfully removes the threat. - Rule ID
100110generates an alert when the active response action fails to remove the threat.
3. Restart the Wazuh manager to apply changes.
# systemctl restart wazuh-manager
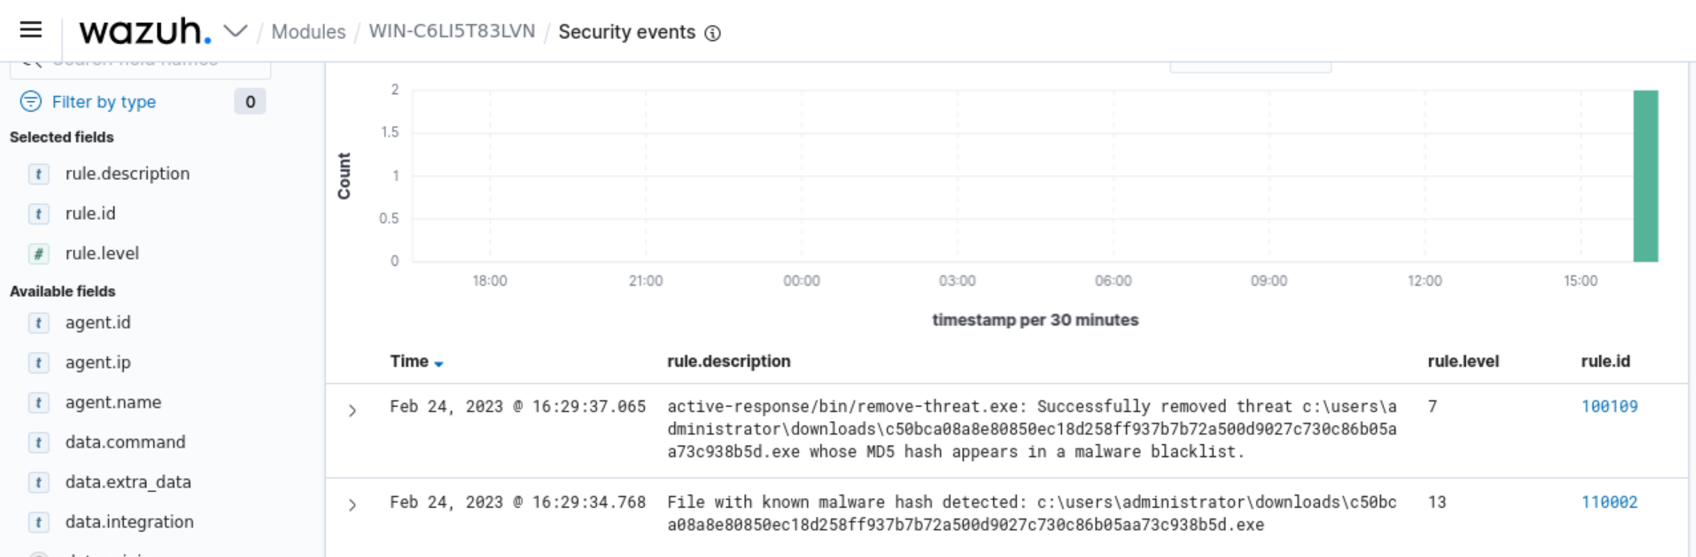
To test the configuration, we download a BlackCat ransomware sample on the Windows endpoint. You can see in the screenshot below that the active response module deletes the file and generates an alert of this event.
Conclusion
In this blog post, we successfully demonstrated the capability of Wazuh to detect and remove BlackCat ransomware on a Windows endpoint. We leveraged the Wazuh constant database (CDB) list and ruleset to detect the BlackCat ransomware based on its signature and behavior. We also showed how to use CDB lists with the active response module to detect and remove the BlackCat ransomware files on the endpoint.