
Lockbit malware is regarded as one of the most notorious and active ransomware in existence since 2019. Lockbit ransomware makes use of a broad range of techniques to target critical infrastructures and organizations worldwide. The threat actors behind Lockbit ransomware operate under the Ransomware as a Service Model (RaaS). Lockbit ransomware attacks are mainly targeted at Windows devices by employing multiple techniques for initial access, including exploiting publicly exposed RDP ports. It also exploits unpatched server vulnerabilities that allow threat actors remote access to the target networks.
Lockbit ransomware has been in existence for three years, and during this period it has been upgraded twice to include new forms of infection and evasion techniques. Lockbit 3.0 is the latest version, released in June 2022. The following are features of Lockbit 3.0 ransomware:
- It uses an access token to decrypt the source code of the ransomware before it is executed on the victim machine, for example:
<Ransomware.exe> -k LocalServiceNetworkRestricted -pass db66023ab2abcb9957fb01ed50cdfa6a. - The ransomware drops the ransom note in multiple folders and then encrypts all the files on the endpoint. The notes usually take the format
<random_string>.README.txt. The extension of the encrypted files is changed to a random string. Examples of the random strings used areHLJkNskOqand19MqZqZ0s. - It proceeds to change the icons of the encrypted files using the
.icofile written into theC:\ProgramData\directory by the ransomware. - It disables Windows Defender and Event Log services.
- It disables and deletes Volume Shadow Copy Service and Hyper-V Volume Shadow Copy Requestor Service.
Requirements
- An installed Wazuh server 4.3.8. The Wazuh server can be installed using the Quickstart guide.
- A Windows 10 endpoint with the Wazuh agent installed, where the ransomware sample is executed. This Wazuh guide is used to install the Wazuh agent.
Detection techniques
- Scanning files with VirusTotal integration
- Using detection rules
- Detecting and removing malicious files with YARA integration
Scanning files with VirusTotal integration
VirusTotal aggregates many antivirus products and online scan engines, offering an API that can be queried by using either URLs, IPs, domains, or file hashes. Wazuh can be configured to automatically send requests to the VirusTotal API with the hashes of files that are created or modified on the monitored endpoint.
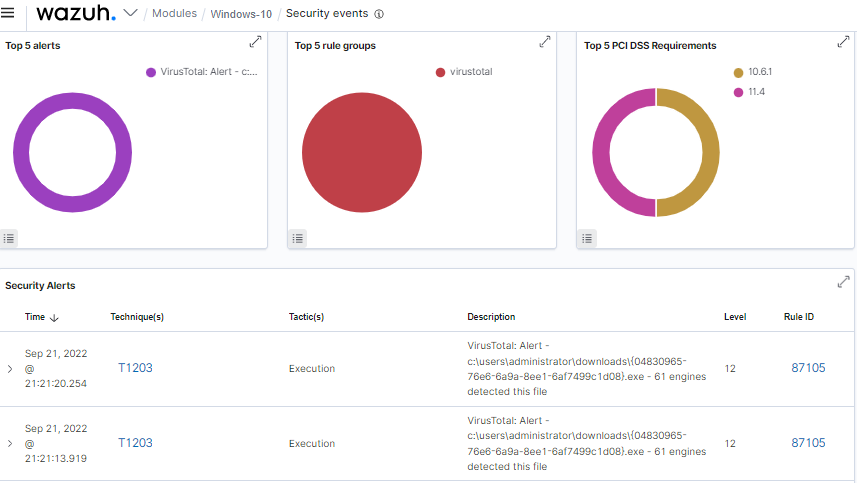
We configured the VirusTotal integration on the Wazuh server and FIM to monitor the Downloads directory using this guide. Alerts are generated on the Wazuh dashboard whenever the malicious Lockbit 3.0 ransomware files are added to the Downloads directory.
Using detection rules
The Lockbit ransomware uses several anti-analysis techniques to evade detection. These techniques make it difficult to carry out static or dynamic analysis of the ransomware. The VirusTotal integration might not be sufficient to detect the ransomware and its variants. We can use Sysmon to monitor several system events and create rules on the Wazuh server to detect the presence of Lockbit ransomware.
These activities are performed prior to the encryption of files on the infected machines. Follow the steps below to detect Lockbit 3.0 ransomware activities with Wazuh:
Install Sysmon on the monitored endpoint
1. Sysmon is downloaded from the Microsoft Sysinternals page and is installed with the configuration file sysmonconfig.xml.
2. The following command is used to install Sysmon with the downloaded configuration file via command prompt (run as administrator):
sysmon.exe -accepteula -i sysmonconfig.xml
Configure the Wazuh agent to collect Sysmon events
1. Configure the agent to collect Sysmon events by adding the following settings to the agent configuration file in "C:\Program Files (x86)\ossec-agent\ossec.conf":
<localfile>

 <location>Microsoft-Windows-Sysmon/Operational</location>
 <log_format>eventchannel</log_format>

</localfile>
2. Apply the changes by restarting the agent using this PowerShell command:
Restart-Service -Name wazuh
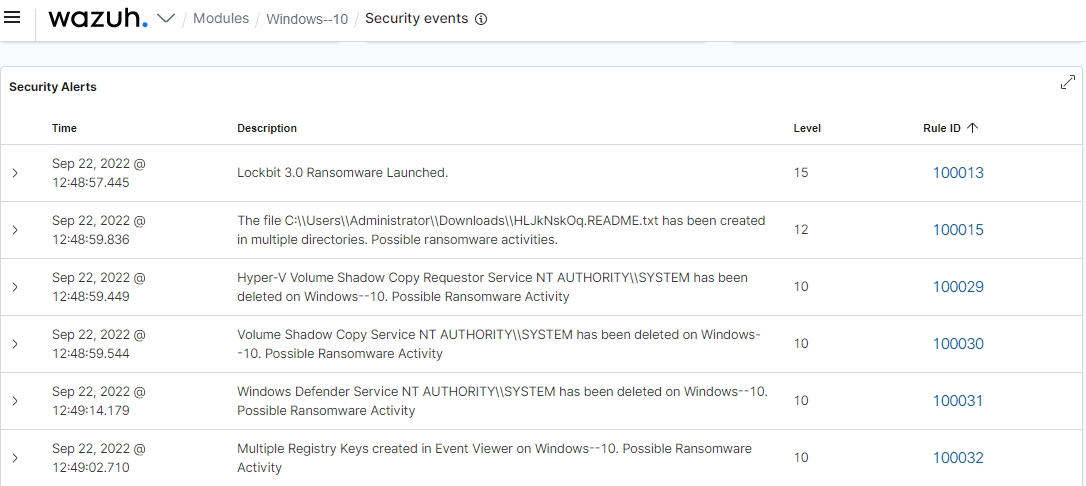
Create ransomware detection rules.
1. To generate the alert, the following rules are added to the /var/ossec/etc/rules/local_rules.xml file on the Wazuh server:
<group name="windows, sysmon,">

  <rule id="100013" level="15">
    <if_sid>61603</if_sid>
    <field name="win.eventdata.commandLine" type="pcre2">(?i)-k LocalServiceNetworkRestricted -pass</field>
    <description>Lockbit 3.0 Ransomware Launched.</description>
    <mitre>
      <id>T1134</id>
    </mitre>
  </rule>

  <rule id="100015" level="12" timeframe="100" frequency="2">
    <if_sid>61613</if_sid>
    <field name="win.eventdata.targetFilename" type="pcre2">(?i)\\\\users</field>
    <field name="win.eventdata.targetFilename" type="pcre2">(?i)\.+readme\.txt</field>
    <description>The file $(win.eventdata.targetFilename) has been created in multiple directories. Possible ransomware activity.</description>
  </rule>

  <rule id="100029" level="10">
    <if_sid>61614</if_sid>
    <field name="win.eventdata.targetObject" type="pcre2" >HKLM\\\\System\\\\CurrentControlSet\\\\Services\\\\vmicvss</field>
    <field name="win.eventdata.eventType" type="pcre2" >^DeleteKey$</field>
    <field name="win.eventdata.user" type="pcre2" >NT AUTHORITY\\\\SYSTEM</field>
    <description>Hyper-V volume shadow copy requestor service $(win.eventdata.user) has been deleted on $(win.system.computer). Possible ransomware activity.</description>
	<mitre>
      <id>T1490</id>
     </mitre>
  </rule>

  <rule id="100030" level="10">
    <if_sid>61614</if_sid>
    <field name="win.eventdata.targetObject" type="pcre2" >HKLM\\\\System\\\\CurrentControlSet\\\\Services\\\\VSS</field>
    <field name="win.eventdata.eventType" type="pcre2" >^DeleteKey$</field>
    <field name="win.eventdata.user" type="pcre2" >NT AUTHORITY\\\\SYSTEM</field>
    <description>Volume shadow copy service $(win.eventdata.user) has been deleted on $(win.system.computer). Possible ransomware activity.</description>
    <mitre>
      <id>T1490</id>
    </mitre>
  </rule>

  <rule id="100031" level="10">
    <if_sid>61614</if_sid>
    <field name="win.eventdata.targetObject" type="pcre2" >HKLM\\\\System\\\\CurrentControlSet\\\\Services\\\\WinDefend</field>
    <field name="win.eventdata.eventType" type="pcre2" >^DeleteKey$</field>
    <field name="win.eventdata.user" type="pcre2" >NT AUTHORITY\\\\SYSTEM</field>
    <description>Windows defender service $(win.eventdata.user) has been deleted on $(win.system.computer). Possible Ransomware Activity.</description>
    <mitre>
      <id>T1562.001</id>
    </mitre>
  </rule>

  <rule id="100032" level="10" ignore="10">
    <if_sid>61614</if_sid>
    <field name="win.eventdata.targetObject" type="pcre2" >HKLM\\\\SOFTWARE\\\\Microsoft\\\\Windows\\\\CurrentVersion\\\\WINEVT\\\\Channels</field>
    <field name="win.eventdata.eventType" type="pcre2" >^CreateKey$</field>
    <description>Multiple Registry Keys created in Event Viewer on $(win.system.computer). Possible Ransomware Activity.</description>
    <mitre>
      <id>T1070.001</id>
    </mitre>
  </rule>

</group>
2. Restart the Wazuh server to apply the configuration changes:
systemctl restart wazuh-manager
After running the ransomware sample, the alerts are generated on the Wazuh dashboard.
Detecting and removing malicious files with YARA integration
Wazuh can be integrated with YARA, a tool used for detecting and classifying malware artifacts. With this integration, we are able to scan files added or modified and check if they contain malware.
The Wazuh File Integrity Monitoring module will be configured to monitor a directory for changes. Then trigger the YARA active response to scan the files in the directory and detect potentially malicious files that match defined rules.
Python and Pip should be installed on the Windows endpoint. They will be used to install necessary libraries and download the needed rules. Ensure Microsoft Visual C++ 2015 Redistributable is also installed on the endpoint, as it is required for the YARA executable to run.
On the monitored endpoint
1. Open PowerShell with administrator privileges and download YARA:
> Invoke-WebRequest -Uri https://github.com/VirusTotal/yara/releases/download/v4.2.2/yara-v4.2.2-2012-win64.zip -OutFile v4.2.2-2012-win64.zip
2. Extract the YARA executable:
> Expand-Archive v4.2.2-2012-win64.zip ; Remove-Item v4.2.2-2012-win64.zip
3. Create a directory called C:\Program Files (x86)\ossec-agent\active-response\bin\yara\ and copy the YARA executable into it:
> mkdir 'C:\Program Files (x86)\ossec-agent\active-response\bin\yara\'
> cp .\v4.2.2-2012-win64\yara64.exe 'C:\Program Files (x86)\ossec-agent\active-response\bin\yara\'
4. Download YARA rules:
- Install the
valhallaAPImodule:
> pip install valhallaAPI
- Copy the following script and save it as
download_yara_rules.py:
from valhallaAPI.valhalla import ValhallaAPI

v = ValhallaAPI(api_key="1111111111111111111111111111111111111111111111111111111111111111")
response = v.get_rules_text()

with open('yara_rules.yar', 'w') as fh:
    fh.write(response)
- Run the following command to download the rules and place them in the
C:\Program Files (x86)\ossec-agent\active-response\bin\yara\rules\directory:
> python.exe download_yara_rules.py
> mkdir 'C:\Program Files (x86)\ossec-agent\active-response\bin\yara\rules\'
> cp yara_rules.yar 'C:\Program Files (x86)\ossec-agent\active-response\bin\yara\rules\'
- Add the below YARA rule to the downloaded
C:\Program Files (x86)\ossec-agent\active-response\bin\yara\rules\yara_rules.yarfile to detect the Lockbit 3.0 Ransomware:
import "console"

rule RANSOM_Lockbit_Black_Packer : Ransomware {

   meta:
      author = "SECUINFRA Falcon Team"
      description = "Detects the packer used by Lockbit Black (Version 3)"
      reference = "https://twitter.com/vxunderground/status/1543661557883740161"
      date = "2022-07-04"
      tlp = "WHITE"
      yarahub_uuid = "de99eca0-9502-4942-a30a-b3f9303953e3"
      yarahub_reference_md5 = "38745539b71cf201bb502437f891d799"
      yarahub_license = "CC BY 4.0"
      yarahub_rule_matching_tlp = "TLP:WHITE"
      yarahub_rule_sharing_tlp = "TLP:WHITE"
      yarahub_author_twitter = "@SI_FalconTeam"
      hash0 = "80e8defa5377018b093b5b90de0f2957f7062144c83a09a56bba1fe4eda932ce"
      hash1 = "506f3b12853375a1fbbf85c82ddf13341cf941c5acd4a39a51d6addf145a7a51"
      hash2 = "d61af007f6c792b8fb6c677143b7d0e2533394e28c50737588e40da475c040ee"

   strings:
      $sectionname0 = ".rdata$zzzdbg" ascii
      $sectionname1 = ".xyz" ascii fullword

      // hash checks
      $check0 = {3d 75 80 91 76 ?? ?? 3d 1b a4 04 00 ?? ?? 3d 9b b4 84 0b}
      $check1 = {3d 75 ba 0e 64}

      // hex/ascii calculations
      $asciiCalc = {66 83 f8 41 ?? ?? 66 83 f8 46 ?? ?? 66 83 e8 37}

   condition:
      uint16(0) == 0x5a4d
      and filesize > 111KB // Size on Disk/1.5
      and filesize < 270KB // Size of Image*1.5
      and all of ($sectionname*)
      and any of ($check*)
      and $asciiCalc
      and for any i in (0..pe.number_of_sections - 1):
      (math.entropy(pe.sections[i].raw_data_offset, pe.sections[i].raw_data_size) > 7.9
      and (pe.sections[i].name == ".text" or pe.sections[i].name == ".data" or pe.sections[i].name == ".pdata")//)
      // console requires Yara 4.2.0. For older versions uncomment closing bracket above und comment out the line below
      and console.log("High Entropy section found:", pe.sections[i].name))
}
5. Create the yara.bat script in the C:\Program Files (x86)\ossec-agent\active-response\bin\ directory. This is necessary for the Wazuh-Yara active response scans, malware detection and removal:
@echo off

setlocal enableDelayedExpansion

reg Query "HKLM\Hardware\Description\System\CentralProcessor\0" | find /i "x86" > NUL && SET OS=32BIT || SET OS=64BIT


if %OS%==32BIT (
    SET log_file_path="%programfiles%\ossec-agent\active-response\active-responses.log"
)

if %OS%==64BIT (
    SET log_file_path="%programfiles(x86)%\ossec-agent\active-response\active-responses.log"
)

set input=
for /f "delims=" %%a in ('PowerShell -command "$logInput = Read-Host; Write-Output $logInput"') do (
    set input=%%a
)


set json_file_path="C:\Program Files (x86)\ossec-agent\active-response\stdin.txt"
set syscheck_file_path=
echo %input% > %json_file_path%

FOR /F "tokens=* USEBACKQ" %%F IN (`Powershell -Nop -C "(Get-Content 'C:\Program Files (x86)\ossec-agent\active-response\stdin.txt'|ConvertFrom-Json).parameters.alert.syscheck.path"`) DO (
SET syscheck_file_path=%%F
)

set yara_exe_path="C:\Program Files (x86)\ossec-agent\active-response\bin\yara\yara64.exe"
set yara_rules_path="C:\Program Files (x86)\ossec-agent\active-response\bin\yara\rules\yara_rules.yar"
echo %syscheck_file_path% >> %log_file_path%
for /f "delims=" %%a in ('powershell -command "& \"%yara_exe_path%\" \"%yara_rules_path%\" \"%syscheck_file_path%\""') do (
    echo wazuh-yara: INFO - Scan result: %%a >> %log_file_path%

    :: Deleting the scanned file.
    del /f %%a
    echo wazuh-yara: INFO - Successfully deleted: %%a >> %log_file_path%
)

exit /b
6. Edit the Wazuh agent configuration file C:\Program Files (x86)\ossec-agent\ossec.conf and add the folder to be monitored. This should be within the <syscheck> block. The configuration should look like this:
<directories whodata="yes">C:\Users\administrator\Downloads</directories>
Note
For this blog post, the C:\Users\administrator\Downloads directory is monitored. You can configure whichever directory you wish to monitor.
7. Apply the changes by restarting the agent using this PowerShell command:
> Restart-Service -Name wazuh
On the Wazuh server
1. Add the following decoders to the /var/ossec/etc/decoders/local_decoder.xml file on the Wazuh server. This is to extract the information from YARA scan results:
<decoder name="yara_decoder">
    <prematch>wazuh-yara:</prematch>
</decoder>

<decoder name="yara_decoder1">
    <parent>yara_decoder</parent>
    <regex>wazuh-yara: (\S+) - Scan result: (\S+) (\S+)</regex>
    <order>log_type, yara_rule, yara_scanned_file</order>
</decoder>
2. Add the following rules to the /var/ossec/etc/rules/local_rules.xml file on the Wazuh server. The rules detect FIM events in the monitored directory, and also alert when malware is detected and removed by the YARA integration:
Note
Rule 100050 and 100051 was configured to monitor the C:\Users\administrator\Downloads directory. However, users can configure whichever directory they wish to monitor.
<group name= "syscheck,">
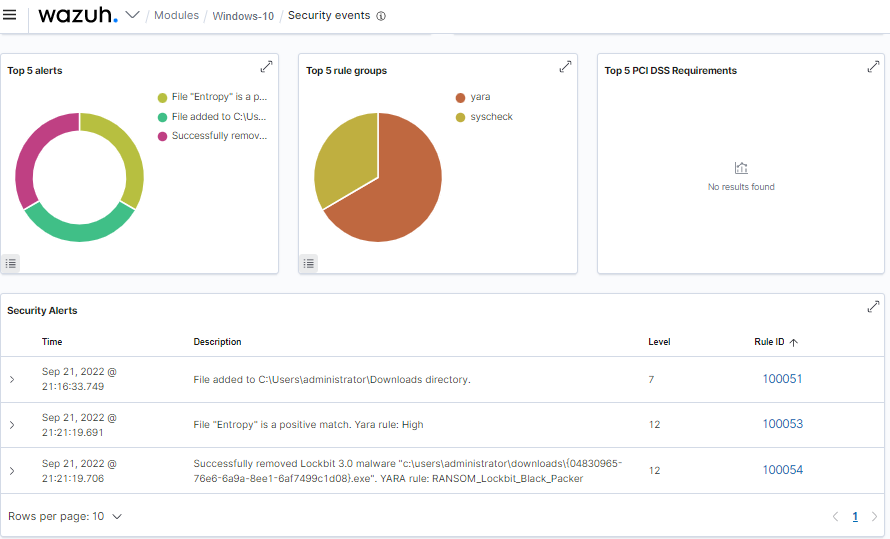
<rule id="100050" level="7">
<if_sid>550</if_sid>
<field name="file">C:\\Users\\administrator\\Downloads</field>
<description>File modified in C:\Users\administrator\Downloads directory.</description>
</rule>
<rule id="100051" level="7">
<if_sid>554</if_sid>
<field name="file">C:\\Users\\administrator\\Downloads</field>
<description>File added to C:\Users\administrator\Downloads directory.</description>
</rule>
</group>
<group name="yara,">
<rule id="100052" level="0">
<decoded_as>yara_decoder</decoded_as>
<description>Yara grouping rule</description>
</rule>
<rule id="100053" level="12">
<if_sid>100052</if_sid>
<match>wazuh-yara: INFO - Scan result: </match>
<description>File "$(yara_scanned_file)" is a positive match. Yara rule: $(yara_rule)</description>
</rule>
<rule id="100054" level="12">
<if_sid>100053</if_sid>
<match>wazuh-yara: INFO - Scan result: RANSOM_Lockbit_Black_Packer</match>
<description>Successfully removed Lockbit 3.0 malware "$(yara_scanned_file)". YARA rule: $(yara_rule)</description>
</rule>
</group>
3. Add the following configuration to the /var/ossec/etc/ossec.conf file within the <ossec_config> block:
<ossec_config>
    <command>
        <name>yara</name>
        <executable>yara.bat</executable>
        <timeout_allowed>no</timeout_allowed>
    </command>

    <active-response>
        <command>yara</command>
        <location>local</location>
        <rules_id>100050,100051</rules_id>
    </active-response>
</ossec_config>
4. Restart the Wazuh server to apply the configuration changes:
systemctl restart wazuh-manager
After downloading the ransomware sample, the alerts are generated on the Wazuh dashboard:
Conclusion
In this blog post, we successfully demonstrated the capability of Wazuh to detect and remove Lockbit 3.0 ransomware on a Windows endpoint. We leveraged the Wazuh VirusTotal integration and ruleset to detect the Lockbit 3.0 malware based on its signature and behavior. The YARA integration technique was also used to detect and remove the Lockbit 3.0 malware once it was downloaded to the endpoint.