XWorm is a .NET-based Remote Access Trojan (RAT) that initially emerged in early 2022 and resurfaced in 2025 with enhanced capabilities and renewed activity in targeted cyberattacks. Designed to compromise Windows endpoints, XWorm is widely adopted by threat actors due to its modular design and low detection rates when obfuscated, making it a persistent threat in the malware landscape. Recent variants of XWorm have demonstrated a broad range of malicious functions such as keylogging, remote desktop control, data theft, and ransomware-like activities.
XWorm is typically distributed through phishing campaigns and malicious email attachments, often leveraging weaponized Word or Excel documents. Other common infection vectors include drive-by downloads from compromised websites and cracked software bundles. The payload is frequently disguised as legitimate executables or embedded within obfuscated scripts, such as VBScript or PowerShell, to evade detection and entice users into execution. These tactics enable XWorm to bypass basic security controls and gain initial access to target systems with minimal user suspicion.
This post explores how XWorm operates on compromised endpoints and demonstrates how to detect and remove XWorm malware using Wazuh.
XWorm behavior
XWorm infects Windows systems by running an obfuscated PowerShell script that decrypts and loads its payload in memory. It ensures persistence via Windows Registry changes and supporting scripts, then connects to a command-and-control server to perform keylogging, data theft, and remote command execution.
The following are the typical behaviors observed when XWorm is executed on a Windows endpoint:
- It executes PowerShell with Execution Policy set to
Bypassand the window set toHiddento evade user visibility. - It runs an obfuscated or Base64-encoded PowerShell payload to hide malicious code from detection.
- It dynamically decrypts a second-stage payload using AES encryption directly in memory.
- It drops additional malicious
.vbs(VBScript) and.bat(batch) files into the directoryC:\Users\<USER>\AppData\Local\Adobe-Hub\. - It executes
wscript.exeto run the malicious VBS script. - It executes
cmd.exeto launch the dropped batch file for further system manipulation and operates primarily in memory to minimize disk artifacts and evade traditional antivirus solutions.
Analyzed IOCs
| File Hash (SHA256) |
| 79d2d27504dba7d5d16a04728bae8eb951aa67d47cf858a8c278537e711682f2 |
| fc51f7fa455614e41628301c8ca91008e183fe2a2b02c0c05daf912afe0d1ee2 |
| 6ae1b3a083f0369cc4e3ef84faae3725866ea071f826c7222103a54ee3b5bfc2 |
| d079d49ce3f1b91ff69ac6a9499fcaa5aa901f50f2c46b3ee20236678d6d6018 |
| 38a88896b098c8508b1ee5a9ccafc772c58ee853c2d3d177c5f0b53868e3a019 |
| 108839851e5f980753cc790d7aeed49ee4f44b8f77528417167e6d7fb9c07640 |
Infrastructure
We use the infrastructure below to demonstrate the detection of XWorm malware with Wazuh.
- A pre-built, ready-to-use Wazuh OVA 4.12.0. Follow this guide to download the virtual machine.
- A Windows 11 victim endpoint with Wazuh agent 4.12.0 installed and enrolled in the Wazuh server. Refer to the installation guide to install the Wazuh agent.
Detection with Wazuh
This section demonstrates how to set up Wazuh to detect the XWorm malware using the following Wazuh capabilities:
- Using custom detection rules to detect XWorm malware activities.
- Removal of XWorm malware by using the Wazuh Constant Database (CBD) list and the Active Response module to identify and delete any detected variant.
Detection rules
We use Sysmon to monitor several system events on the Windows endpoint and create rules on the Wazuh server to detect the malicious activities of XWorm malware.
Windows endpoint
We configure the Windows 11 endpoint to forward Sysmon and PowerShell logs to the Wazuh server.
Forwarding Sysmon logs to the Wazuh server
Perform the following steps to set up Sysmon on the Windows endpoint and forward logs to the Wazuh server:
- Download Sysmon from the Microsoft Sysinternals page.
- Unzip the downloaded Sysmon archive to a directory of your choice.
- Download the Sysmon configuration file sysmonconfig.xml using PowerShell with administrative privileges. Replace
<SYSMON_EXECUTABLE_PATH>with the directory where Sysmon is located:
> wget -Uri
https://wazuh.com/resources/blog/emulation-of-attack-techniques-and-detection-with-wazuh/sysmonconfig.xml -OutFile <SYSMON_EXECUTABLE_PATH>\sysmonconfig.xml
- Navigate to the directory containing the Sysmon executable and run the following command to install and start Sysmon:
> .\Sysmon64.exe -accepteula -i sysmonconfig.xml
- Add the following configuration within the
<ossec_config>block of theC:\Program Files (x86)\ossec-agent\ossec.conffile to forward Sysmon events to the Wazuh server:
<localfile>
 <location>Microsoft-Windows-Sysmon/Operational</location>
 <log_format>eventchannel</log_format>
</localfile>
- Restart the Wazuh agent to apply the new configuration:
> Restart-Service -Name wazuh
Forwarding PowerShell logs to the Wazuh server
XWorm exhibits behaviors such as decrypting and executing encrypted, in-memory .NET payloads from disguised .bat files using PowerShell. We must enable and collect detailed PowerShell logs on the monitored Windows endpoint to identify these activities.
Note
By default, Windows does not capture detailed command execution in PowerShell due to increased system resource usage and storage requirements.
Perform the following steps to forward PowerShell logs to the Wazuh server.
1. Launch PowerShell as an administrator and execute the following commands to enable PowerShell and script block logging:
> function Enable-PSLogging {
   # Define registry paths for ScriptBlockLogging and ModuleLogging
   $scriptBlockPath = 'HKLM:\Software\Policies\Microsoft\Windows\PowerShell\ScriptBlockLogging'
   $moduleLoggingPath = 'HKLM:\Software\Policies\Microsoft\Windows\PowerShell\ModuleLogging'

   # Enable Script Block Logging
   if (-not (Test-Path $scriptBlockPath)) {
       $null = New-Item $scriptBlockPath -Force
   }
   Set-ItemProperty -Path $scriptBlockPath -Name EnableScriptBlockLogging -Value 1

   # Enable Module Logging
   if (-not (Test-Path $moduleLoggingPath)) {
       $null = New-Item $moduleLoggingPath -Force
   }
   Set-ItemProperty -Path $moduleLoggingPath -Name EnableModuleLogging -Value 1

   # Specify modules to log - set to all (*) for comprehensive logging
   $moduleNames = @('*')  # To specify individual modules, replace * with module names in the array
   New-ItemProperty -Path $moduleLoggingPath -Name ModuleNames -PropertyType MultiString -Value $moduleNames -Force
   Write-Output "Script Block Logging and Module Logging have been enabled."
}
> Enable-PSLogging
The expected output is as seen below:
…
Script Block Logging and Module Logging have been enabled.
2. Insert the following configuration within the <ossec_config> block of the C:\Program Files (x86)\ossec-agent\ossec.conf file to send PowerShell logs to the Wazuh server for analysis.
<localfile>
  <location>Microsoft-Windows-PowerShell/Operational</location>
  <log_format>eventchannel</log_format>
</localfile>
3. Restart the endpoint to apply the new configuration:
> Restart-Computer
Wazuh server
Wazuh includes several built-in rules that can detect certain XWorm behaviors. Some of the built-in rules are:
- Rule ID
91809for PowerShell script may be using Base64 decoding method. - Rule ID
92029for PowerShell executed script from a suspicious location. - Rule ID
92213for when an executable file is dropped in a folder commonly used by malware.
We will create additional custom rules to better match relevant events and enhance detection accuracy.
- Create a file
xworm_detection_rules.xmlin the/var/ossec/etc/rules/directory:
# touch /var/ossec/etc/rules/xworm_detection_rules.xml
- Add the following rules to the
/var/ossec/etc/rules/xworm_detection_rules.xmlfile:
<group name="xworm,malware,powershell,">
  <rule id="100015" level="8">
    <if_sid>61603</if_sid>
 <field name="win.eventdata.originalFileName" type="pcre2">(?i)(wscript\.exe|cmd\.exe)</field>
    <field name="win.eventdata.commandLine" type="pcre2">(?i)(AppData\\\\.*\.bat|AppData\\\\.*\.vbs)</field>
    <options>no_full_log</options>
    <description>Possible Staged Xworm Module Executed (.BAT/.VBS)</description>
    <mitre>
      <id>T1059.003</id>
      <id>T1074.001</id>
    </mitre>
  </rule>

  <rule id="100016" level="8">
    <if_sid>60009</if_sid>
    <field name="win.eventdata.payload" type="pcre2">(?i)CommandInvocation</field>
    <field name="win.system.message" type="pcre2">(?i)EncodedCommand|FromBase64String|EncodedArguments|TransformFinalBlock|CreateDecryptor</field>
    <description>Potential Obfuscated Powershell Payload.</description>
    <mitre>
      <id>T1059.001</id>
      <id>T1562.001</id>
    </mitre>
  </rule>


  <rule id="100017" level="5">
    <if_sid>60009</if_sid>
    <field name="win.eventdata.contextInfo" type="pcre2">(?i)ExecutionPolicy bypass|exec bypass</field>
    <description>PowerShell execution policy set to bypass.</description>
    <mitre>
      <id>T1059.001</id>
    </mitre>
  </rule>

</group>
Where:
- Rule ID
100015is triggered when the malware creates and executes a malicious Visual Basic or batch script. - Rule ID
100016is triggered when a potential obfuscated payload is identified. - Rule ID
100017is triggered when XWorm executes a suspicious PowerShell script, using the ExecutionPolicy Bypass flag and a hidden window to evade detection.
- Restart the Wazuh manager for the changes to take effect:
# systemctl restart wazuh-manager
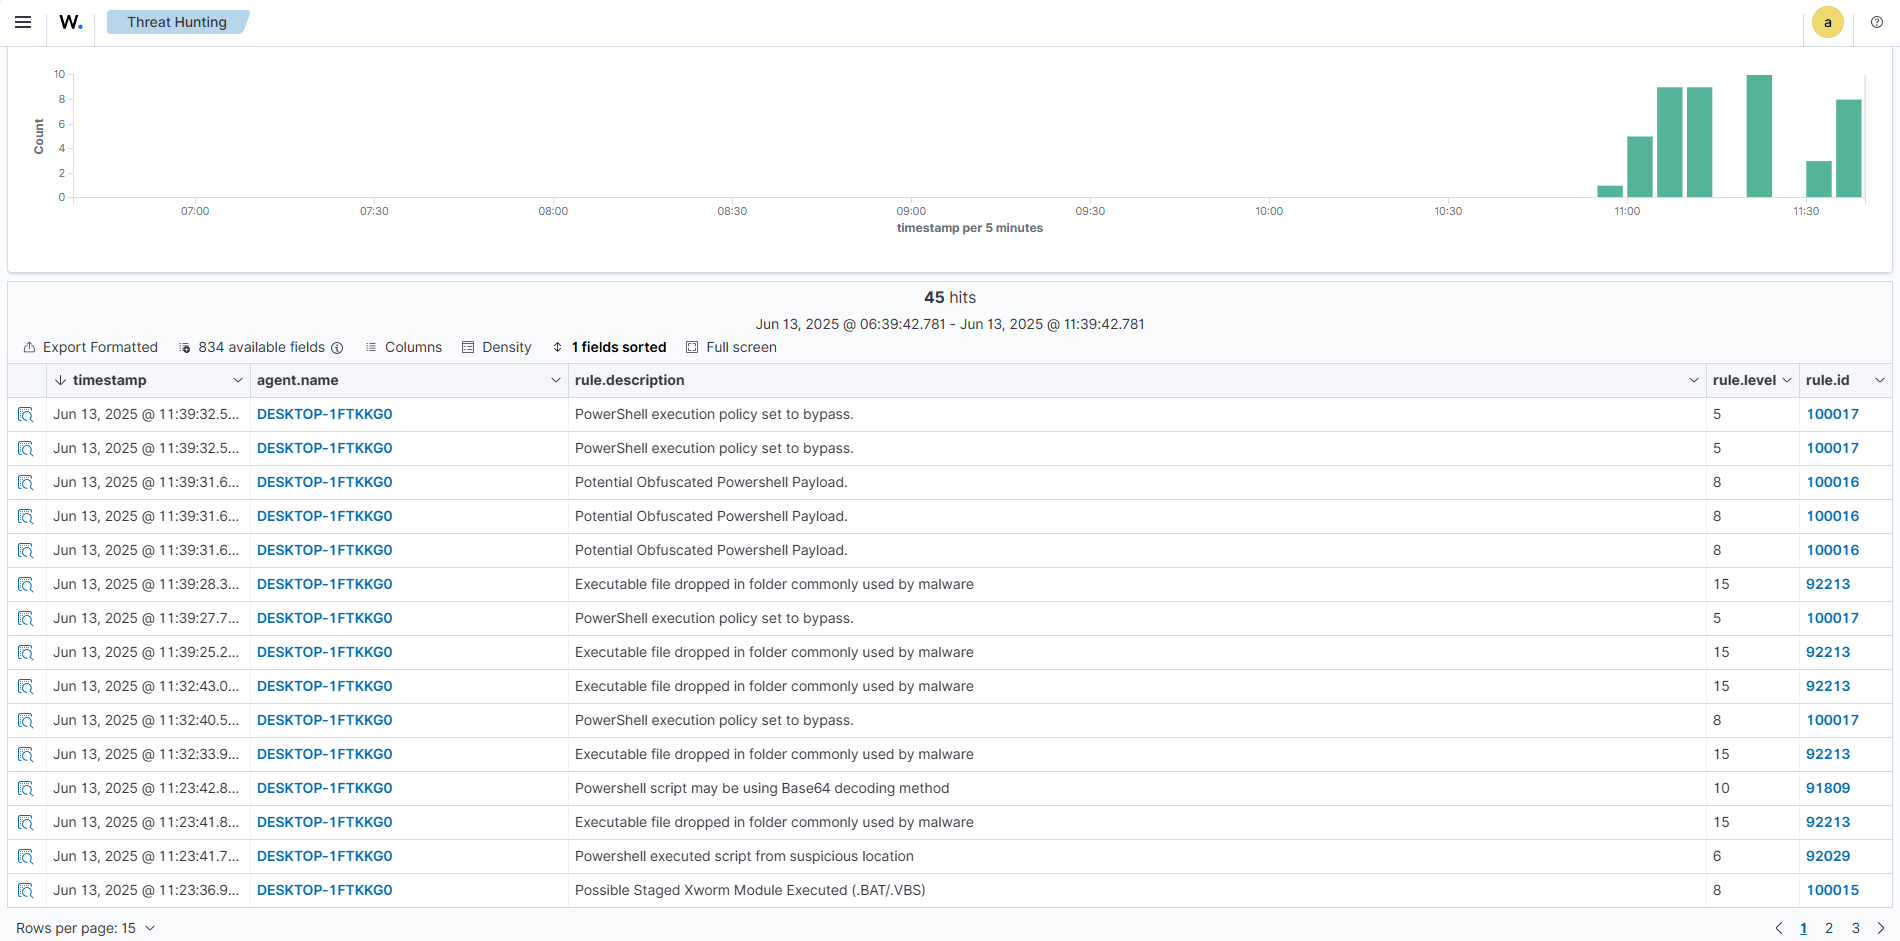
Visualizing alerts on the Wazuh dashboard
The following alerts appear on the Wazuh dashboard when XWorm runs on the victim endpoint. Follow these steps to view them on the dashboard.
- Navigate to Threat intelligence > Threat Hunting and click the Events tab.
- Click + Add filter. Then filter by
rule.id. - In the Operator field, select
is one of. - Select the following rule IDs
100015,100016,100017,92213,92029,91809in the Values field. - Click Save.
Responding to XWorm using the Wazuh CDB list and Active Response module
In this section, we will use the Wazuh Constant Database (CDB) list and Active Response module to detect and respond to XWorm by deleting it.
We configure Wazuh to identify malicious files by comparing their signatures with entries in a CDB list of known malware. This list, formatted as key:value pairs, can track elements like file hashes, IP addresses, users, or domains. Adding relevant entries enhances threat detection. Learn more about CDB lists in our documentation.
Configuring Wazuh CBD list
Using the Wazuh File Integrity Monitoring (FIM) module and CDB list, we can detect XWorm using its known file hashes. The FIM module monitors specified directories and records the cryptographic checksums (MD5, SHA1, SHA256) along with other file attributes whenever files are created, modified, or deleted. It then compares the stored SHA256 values with entries in the CDB list to detect potential malware infections
Follow the steps below to configure FIM on the Windows endpoint, create the CDB list, and configure the detection rule.
Windows endpoint
- Monitor the
DownloadsandAdobe-Hubfolders of all users in real time by adding the below configuration within the<syscheck>block of the/var/ossec/etc/ossec.conf.
<directories realtime="yes" restrict="\Adobe-Hub">C:\Users\*\Appdata\Local</directories>
<directories realtime="yes">C:\Users\*\Downloads</directories>
Note
In this blog post, we monitored only the Downloads and Adobe-Hub folders of all users. However, you can configure Wazuh to monitor any directory of your choice.
- Restart the Wazuh agent to apply the changes:
> Restart-Service -Name wazuh
Wazuh server
- Create a file
malware-hashesin the/var/ossec/etc/listsdirectory. This is the CDB list that will contain the file hashes associated with XWorm:
# touch /var/ossec/etc/lists/malware-hashes
- Add the file hashes of XWorm to the
/var/ossec/etc/list/malware-hashesfile askey:valuepairs:
dc7a3cde0f236d89b09856b4e5f0232c3c613b791c75433992d557c6489ddcbc:xworm
f0b72304c04c20c2fd7656fd43b3c916d92c7c89382a2e9a2ece614a90e61a10:xworm
108839851e5f980753cc790d7aeed49ee4f44b8f77528417167e6d7fb9c07640:xworm
79d2d27504dba7d5d16a04728bae8eb951aa67d47cf858a8c278537e711682f2:xworm
37883f9acd439e989fa665b51fe2b1b46e41a9551c6460c0bbf9c7adcd785023:xworm
19734404d9d8b39b0bca6536c15cfd574911fb9a54f5a769ba75188f803b76a2:xworm
90552991984a06d7ef7ebf68ec386906099595843a90d84cc03b1ea61994fcbd:xworm
613c93738e061f713b1346c1d44fcb3ee1b190a7c4211e0be51fa6dbd2bc731b:xworm
fc51f7fa455614e41628301c8ca91008e183fe2a2b02c0c05daf912afe0d1ee2:xworm
6ae1b3a083f0369cc4e3ef84faae3725866ea071f826c7222103a54ee3b5bfc2:xworm
d079d49ce3f1b91ff69ac6a9499fcaa5aa901f50f2c46b3ee20236678d6d6018:xworm
38a88896b098c8508b1ee5a9ccafc772c58ee853c2d3d177c5f0b53868e3a019:xworm
108839851e5f980753cc790d7aeed49ee4f44b8f77528417167e6d7fb9c07640:xworm
- Add a reference to the CDB list in the Wazuh manager configuration file
/var/ossec/etc/ossec.conf. You can do this by specifying the path to the list within the<ruleset>block:
 <ruleset>
   <!-- Default ruleset -->
   <decoder_dir>ruleset/decoders</decoder_dir>
   <rule_dir>ruleset/rules</rule_dir>
   <rule_exclude>0215-policy_rules.xml</rule_exclude>
   <list>etc/lists/audit-keys</list>
   <list>etc/lists/amazon/aws-eventnames</list>
   <list>etc/lists/security-eventchannel</list>
   <list>etc/lists/malware-hashes</list>
 <ruleset>
- Add the custom rule below to the
/var/ossec/etc/rules/local_rules.xmlfile to trigger alerts on the Wazuh dashboard whenever a SHA256 hash from the CBD list is identified:
<group name="xworm,">
  <rule id="100025" level="13">
    <if_sid>554,550</if_sid>
    <list field="sha256" lookup="match_key">etc/lists/malware-hashes</list>
    <description>A known Xworm malware hash detected: $(file)</description>
    <mitre>
      <id>T1204.002</id>
    </mitre>
    <options>no_full_log</options>
  </rule>
</group>
Where:
- Rule ID
100025triggers when a file hash associated with XWorm is detected.
Note
Rule ID 554 is triggered when a new file is added to a monitored directory, while rule ID 550 is triggered when a file is modified.
- Restart the Wazuh manager to apply the changes:
# systemctl restart wazuh-manager
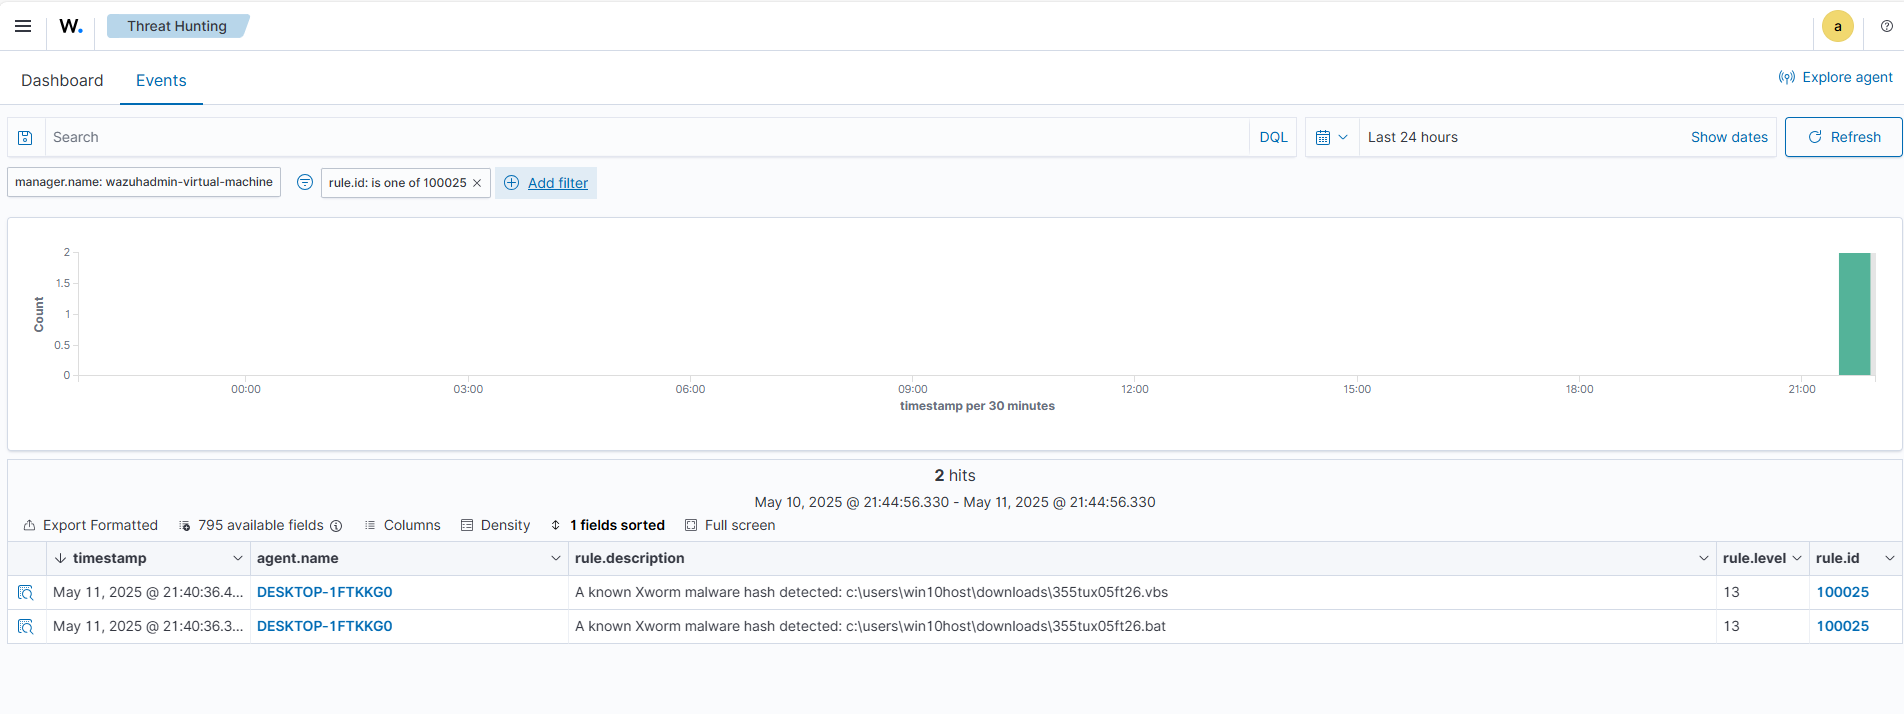
Visualizing alerts on the Wazuh dashboard
Perform the following on the Wazuh dashboard to view the alerts generated when the XWorm malware files are added to the monitored directory.
1. Navigate to Threat intelligence > Threat Hunting.
2. Click + Add filter. Then filter by rule.id.
3. In the Operator field, select is one of.
4. Search and select, 100025 in the Values field.
5. Click Save.
Configuring the Wazuh Active Response module
We implement an Active Response script that automatically deletes any identified XWorm variant as soon as it is flagged.
Windows endpoint
- Create an Active Response script
remove-threat.pywith the following content:
#!/usr/bin/python3
# Copyright (C) 2015-2022, Wazuh Inc.
# All rights reserved.

import os
import sys
import json
import datetime

if os.name == 'nt':
    LOG_FILE = "C:\\Program Files (x86)\\ossec-agent\\active-response\\active-responses.log"
else:
    LOG_FILE = "/var/ossec/logs/active-responses.log"

ADD_COMMAND = 0
DELETE_COMMAND = 1
CONTINUE_COMMAND = 2
ABORT_COMMAND = 3

OS_SUCCESS = 0
OS_INVALID = -1

class message:
    def __init__(self):
        self.alert = ""
        self.command = 0

def write_debug_file(ar_name, msg):
    with open(LOG_FILE, mode="a") as log_file:
        log_file.write(str(datetime.datetime.now().strftime('%Y/%m/%d %H:%M:%S')) + " " + ar_name + ": " + msg +"\n")

def setup_and_check_message(argv):

    # get alert from stdin
    input_str = ""
    for line in sys.stdin:
        input_str = line
        break


    try:
        data = json.loads(input_str)
    except ValueError:
        write_debug_file(argv[0], 'Decoding JSON has failed, invalid input format')
        message.command = OS_INVALID
        return message

    message.alert = data

    command = data.get("command")

    if command == "add":
        message.command = ADD_COMMAND
    elif command == "delete":
        message.command = DELETE_COMMAND
    else:
        message.command = OS_INVALID
        write_debug_file(argv[0], 'Not valid command: ' + command)

    return message


def send_keys_and_check_message(argv, keys):

    # build and send message with keys
    keys_msg = json.dumps({"version": 1,"origin":{"name": argv[0],"module":"active-response"},"command":"check_keys","parameters":{"keys":keys}})

    write_debug_file(argv[0], keys_msg)

    print(keys_msg)
    sys.stdout.flush()

    # read the response of previous message
    input_str = ""
    while True:
        line = sys.stdin.readline()
        if line:
            input_str = line
            break

    # write_debug_file(argv[0], input_str)

    try:
        data = json.loads(input_str)
    except ValueError:
        write_debug_file(argv[0], 'Decoding JSON has failed, invalid input format')
        return message

    action = data.get("command")

    if "continue" == action:
        ret = CONTINUE_COMMAND
    elif "abort" == action:
        ret = ABORT_COMMAND
    else:
        ret = OS_INVALID
        write_debug_file(argv[0], "Invalid value of 'command'")

    return ret

def main(argv):

    write_debug_file(argv[0], "Started")

    # validate json and get command
    msg = setup_and_check_message(argv)

    if msg.command < 0:
        sys.exit(OS_INVALID)

    if msg.command == ADD_COMMAND:
        alert = msg.alert["parameters"]["alert"]
        keys = [alert["rule"]["id"]]
        action = send_keys_and_check_message(argv, keys)

        # if necessary, abort execution
        if action != CONTINUE_COMMAND:

            if action == ABORT_COMMAND:
                write_debug_file(argv[0], "Aborted")
                sys.exit(OS_SUCCESS)
            else:
                write_debug_file(argv[0], "Invalid command")
                sys.exit(OS_INVALID)

        try:
            os.remove(msg.alert["parameters"]["alert"]["syscheck"]["path"])
            write_debug_file(argv[0], json.dumps(msg.alert) + " Successfully removed threat")
        except OSError as error:
            write_debug_file(argv[0], json.dumps(msg.alert) + "Error removing threat")


    else:
        write_debug_file(argv[0], "Invalid command")

    write_debug_file(argv[0], "Ended")

    sys.exit(OS_SUCCESS)

if __name__ == "__main__":
    main(sys.argv)
- Install Python 3.14 (with pip pre-installed). Then select the following checkboxes during installation:
- Add Python.exe to PATH
- Use admin privileges when installing py.exe
Note
This step is optional if the specified version of Python is installed on the victim endpoint.
- Install PyInstaller using the command below in PowerShell with administrative privileges:
> pip install -U pyinstaller
- Navigate to the folder containing the
remove-threat.pyscript and use the command below to convert it into an executable file:
> pyinstaller -F remove-threat.py
- Transfer the
remove-threat.exefile from the\distfolder in your current directory toC:\Program Files (x86)\ossec-agent\active-response\bin. - Run the below command to restart the Wazuh agent and apply the changes:
> Restart-Service -Name wazuh
Wazuh server
Configure the Wazuh manager to initiate a response when a hash associated with XWorm malware is detected by performing the following.
- Append the following block to the Wazuh manager configuration file
/var/ossec/etc/ossec.confto trigger the removal of malicious files when rule ID100025is matched:
<ossec_config>
  <command>
    <name>remove-threat</name>
    <executable>remove-threat.exe</executable>
    <timeout_allowed>no</timeout_allowed>
  </command>

  <active-response>
    <disabled>no</disabled>
    <command>remove-threat</command>
    <location>local</location>
    <rules_id>100025</rules_id>
  </active-response>
</ossec_config>
- Add the following rules to the
/var/ossec/etc/rules/local_rules.xmlfile to generate alerts when the Wazuh Active Response module successfully removes the malicious files.
<group name="xworm-removal,">
  <rule id="100040" level="13">
    <if_sid>657</if_sid>
    <match>Successfully removed threat</match>
    <description>$(parameters.program): Successfully removed threat $(parameters.alert.syscheck.path) whose SHA256 hash appears in a malware blacklist.</description>
  </rule>

  <rule id="100041" level="13">
    <if_sid>657</if_sid>
    <match>Error removing threat</match>
    <description>$(parameters.program): Error removing threat $(parameters.alert.syscheck.path) whose SHA256 hash appears in a malware blacklist.</description>
  </rule>
</group>
Where:
- Rule ID
100040generates an alert when the Wazuh Active Response module successfully removes the XWorm malware. - Rule ID
1000041generates an alert when the Wazuh Active Response module fails to remove the XWorm malware.
- Restart the Wazuh manager to apply configuration changes:
# sudo systemctl restart wazuh-manager
Visualizing alerts on the Wazuh dashboard
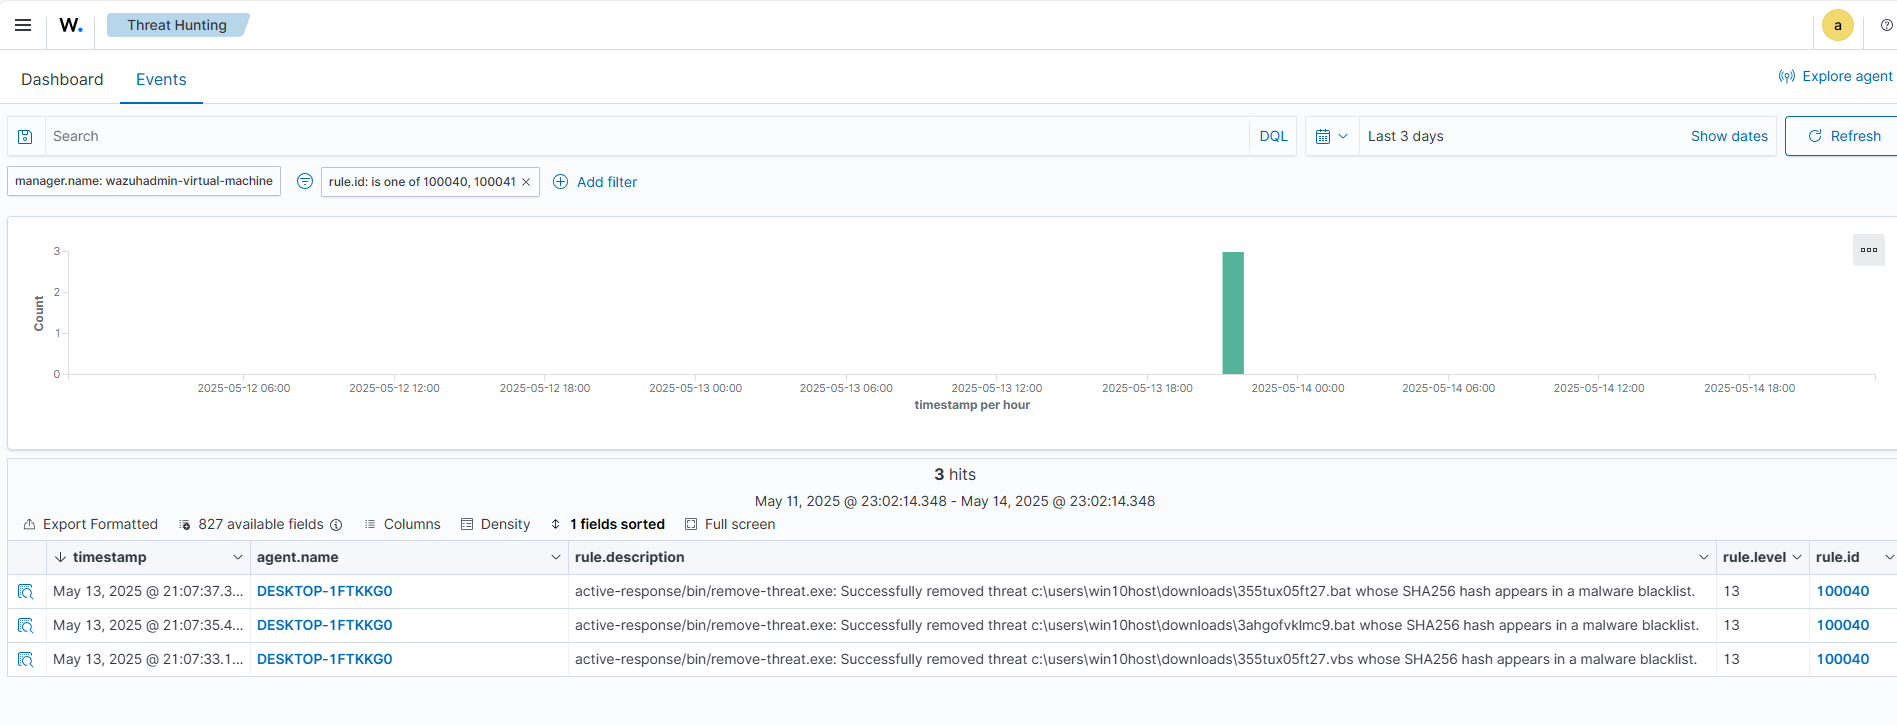
When a variant of the XWorm malware is downloaded into the victim’s Downloads or AppData directory, Wazuh detects it and raises an alert. It then immediately launches an active response action to delete the malicious file. Use the steps below to view the generated alerts:
- Navigate to Threat intelligence > Threat Hunting.
- Click + Add filter. Then filter by
rule.id. - In the Operator field, select
is one of. - Search and select
100040,100041in the Values field. - Click Save.
Conclusion
This blog post demonstrates detecting and responding to XWorm malware using Wazuh. We illustrated this by combining Wazuh custom rules, hash-based detection using CBD lists, and the Active Response module. This approach ensures that XWorm and its malicious activities are detected and removed automatically.
Wazuh is an open source security platform with several capabilities to monitor and protect your infrastructure from various threats. If you have any questions, our active community on Slack is a great place to connect with us, and our team can assist you.
References
The Rise of XWorm RAT: What Cybersecurity Teams Need to Know