The Linux operating system is widely deployed across various systems, from embedded devices to cloud infrastructure. Its popular use makes it a frequent target for threat actors, increasing the importance of enforced security mechanisms. Linux uses the Discretionary Access Control (DAC) permission model by default. In this model, the owner of a file or process defines its permissions, determining who can read, write, or execute it. The DAC model is flexible but has a key weakness: processes running with elevated privileges can access sensitive resources. If such processes are compromised, an attacker inherits the elevated access and can interact with sensitive resources.
Linux supports a stronger model called Mandatory Access Control (MAC) to improve security. MAC is a kernel-enforced security model that restricts the ability of users and processes to access or modify system resources. Unlike DAC, MAC enforces kernel-level policies that even privileged users and processes can not override. The Linux kernel implements MAC through pluggable modules known as Linux Security Modules (LSMs). LSM tools like AppArmor, seccomp, SELinux, and Yama provide different approaches to restrict what processes can do. They can limit file access, block risky system calls, or prevent privilege escalation.
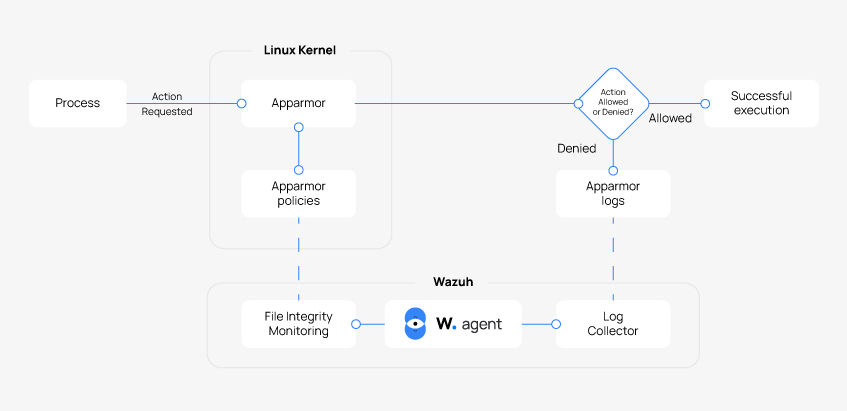
In this blog post, we show how to restrict the activity of a sample application using AppArmor, one of the Linux Security Modules (LSMs). We also integrate Wazuh, a SIEM and XDR platform, to collect and analyze AppArmor events in real-time. This setup enables local policy enforcement with centralized visibility, enabling proactive threat detection, automated alerts, and compliance monitoring across the environment.
Infrastructure
To demonstrate process restriction and real-time monitoring with Apparmor and Wazuh, we set up the following endpoints:
- A pre-built, ready-to-use Wazuh OVA 4.12.0. This virtual machine contains the Wazuh server, indexer, and dashboard components. Follow this guide to set up the virtual machine.
- An Ubuntu 24.04 endpoint with the Wazuh agent 4.12.0 installed and enrolled in the Wazuh server.
Configuration
This section covers how to create a sample application in C, then create and apply a custom AppArmor profile to restrict its file and system access. It also covers configuring the Wazuh File Integrity Monitoring (FIM) capability to alert administrators of changes made to Apparmor profiles.
AppArmor profiles define the permissions and restrictions for individual programs, specifying which files, capabilities, and system resources a process can access.
We perform the following steps on the Ubuntu endpoint:
- Configure the Wazuh FIM.
- Create custom FIM rules.
- Prepare the sample application.
- Configure a default Apparmor profile for the sample application.
Configure the Wazuh FIM
Apparmor profiles are saved in the /etc/apparmor.d directory. To monitor these profiles for changes, follow these steps on the Ubuntu endpoint to configure the Wazuh FIM capability:
- Insert the configuration below in the
/var/ossec/etc/ossec.confunder thesyscheckconfiguration block:
<directories realtime="yes" report_changes="yes">/etc/apparmor.d</directories>
- Restart the Wazuh agent service to apply the changes:
# systemctl restart wazuh-agent
Create custom FIM rules
Follow the steps below on the Wazuh dashboard to create custom FIM rules that generate alerts on the addition, modification, or deletion of AppArmor profiles:
- Navigate to Server management > Rules and click Add new rules file.
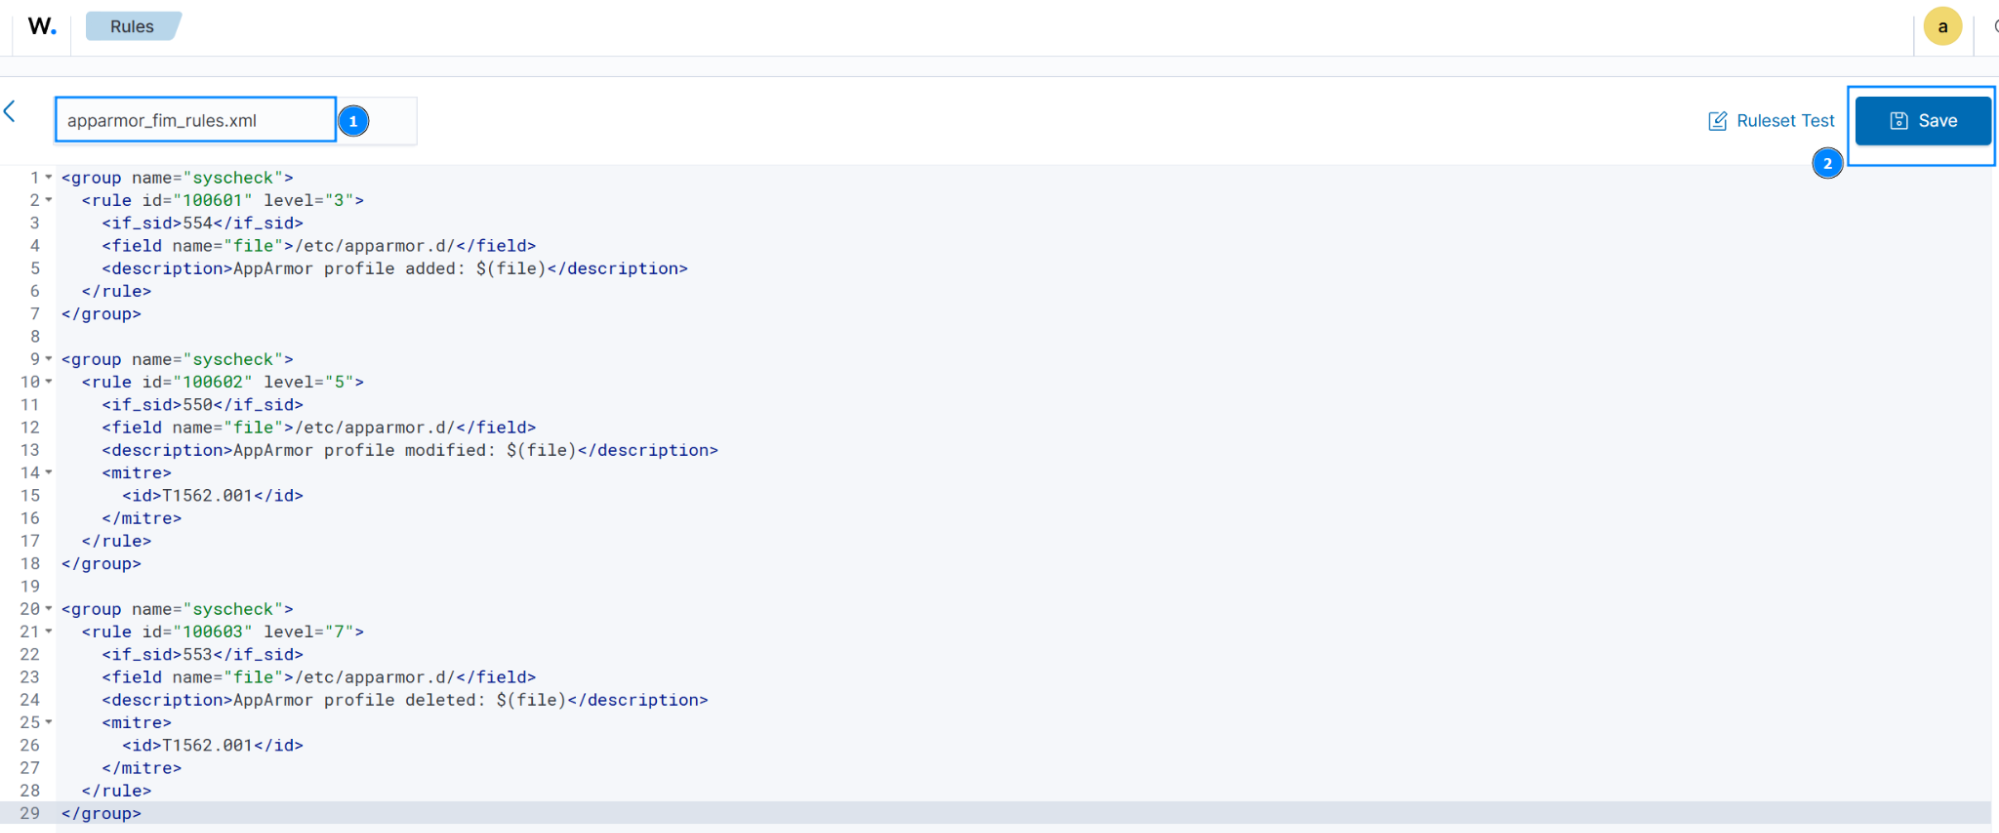
- Fill the code section with the rules below:
<group name="syscheck">
  <rule id="100601" level="3">
    <if_sid>554</if_sid>
    <field name="file">/etc/apparmor.d/</field>
    <description>AppArmor profile added: $(file)</description>
  </rule>
</group>

<group name="syscheck">
  <rule id="100602" level="5">
    <if_sid>550</if_sid>
    <field name="file">/etc/apparmor.d/</field>
    <description>AppArmor profile modified: $(file)</description>
    <mitre>
      <id>T1562.001</id>
    </mitre>
  </rule>
</group>

<group name="syscheck">
  <rule id="100603" level="7">
    <if_sid>553</if_sid>
    <field name="file">/etc/apparmor.d/</field>
    <description>AppArmor profile deleted: $(file)</description>
    <mitre>
      <id>T1562.001</id>
    </mitre>
  </rule>
</group>
Where rule ID:
100601: Triggers an alert when a new file is added to/etc/apparmor.d/directory.100602: Triggers an alert when an existing file in/etc/apparmor.d/directory is modified.100603: Triggers an alert when a file in/etc/apparmor.d/directory is deleted.
- Fill in the rule name as
apparmor_fim_rules.xmland click Save as shown below:
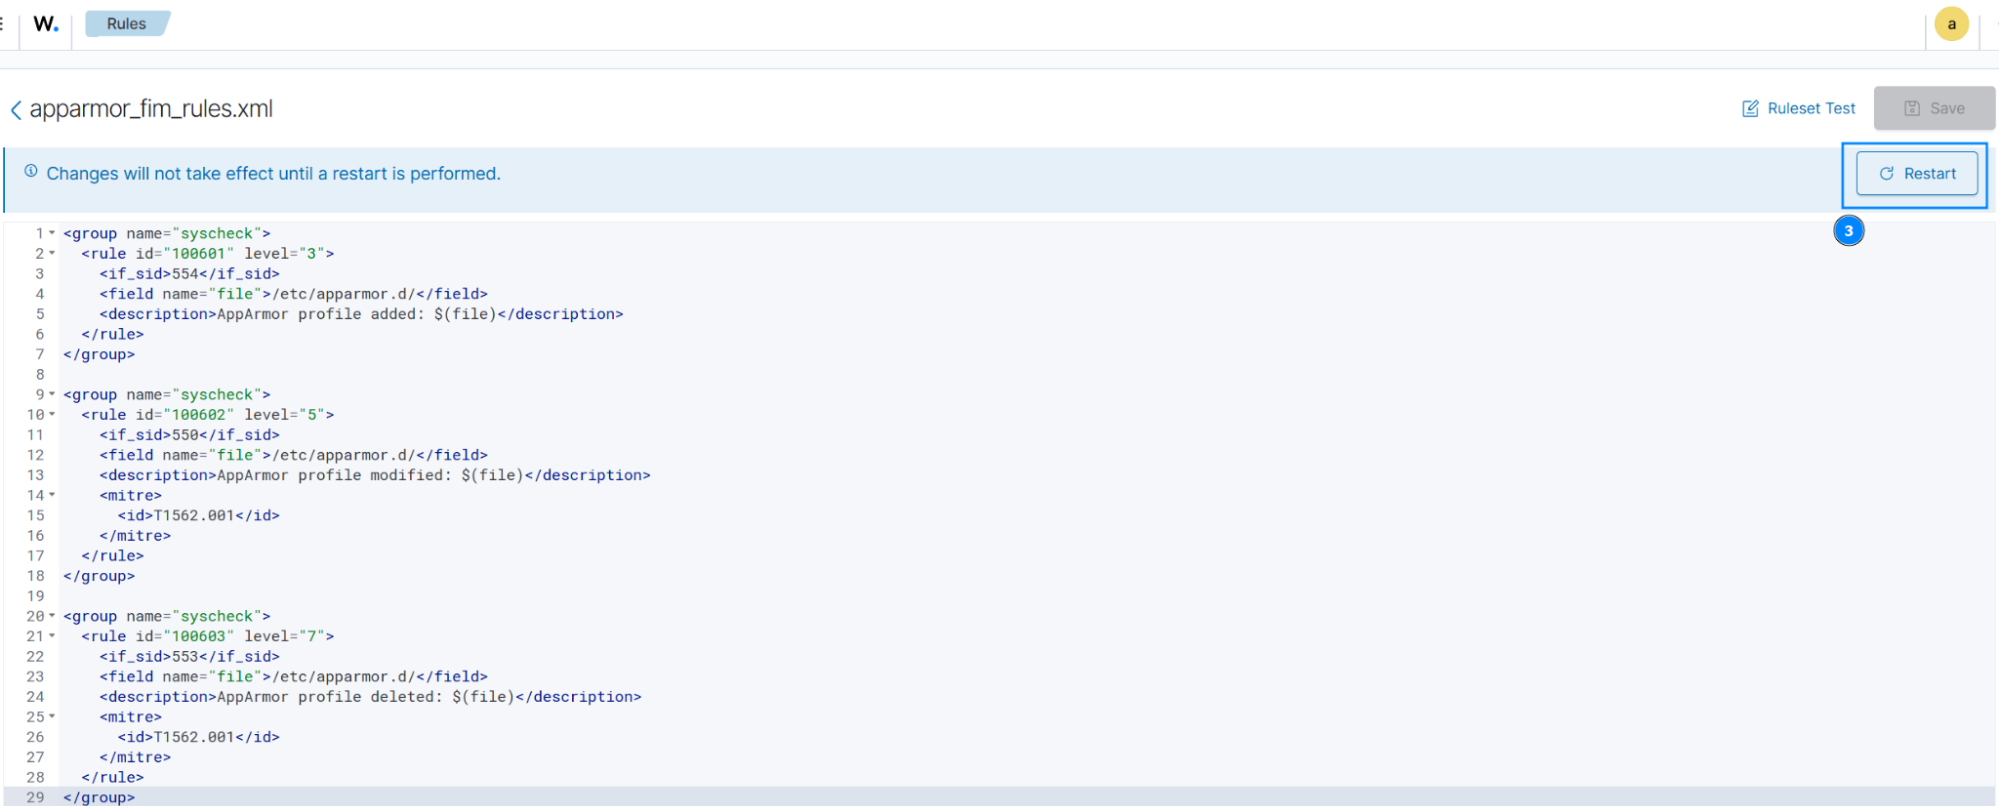
- Click Restart, then Confirm to apply the changes:
Prepare the sample application
Install the GCC compiler and compile the application that will be used for the demonstration:
- Install gcc:
# apt install gcc
- Create a file
$HOME/test-app.cand insert the code snippet below:
#include <stdio.h>
#include <stdlib.h>
#include <unistd.h>
#include <fcntl.h>
#include <sys/syscall.h>
#include <sys/ptrace.h>
#include <netinet/in.h>
#include <string.h>
#include <arpa/inet.h>


//write_to_file
void write_to_file() {
    FILE *fp = fopen("/tmp/demo_output.txt", "w");
    if (fp) {
        fprintf(fp, "This is a sample output.\n");
        fclose(fp);
        printf("[+] write_to_file - Wrote to /tmp/demo_output.txt\n");
    } else {
        perror("[-] write_to_file - Failed to write to file");
    }
}

//read_sensitive_file
void read_sensitive_file() {
    FILE *fp = fopen("/etc/shadow", "r");
    if (fp) {
        printf("[+] read_sensitive_file - Able to read /etc/shadow \n");
        fclose(fp);
    } else {
        perror("[-] read_sensitive_file - Failed to read /etc/shadow");
    }
}

//make_syscall
void make_syscall() {
    pid_t pid = syscall(SYS_getpid);
    printf("[+] make_syscall - Syscall SYS_getpid returned: %d\n", pid);
}

//use_network
void use_network() {
    int sock = socket(AF_INET, SOCK_STREAM, 0);
    if (sock < 0) {
        perror("[-] use_network - Socket creation failed");
        return;
    }

    struct sockaddr_in target;
    target.sin_family = AF_INET;
    target.sin_port = htons(80);  // SMTP
    inet_pton(AF_INET, "1.1.1.1", &target.sin_addr);

    if (connect(sock, (struct sockaddr *)&target, sizeof(target)) == 0) {
        printf("[+] use_network - Network connection established to 1.1.1.1:80\n");
    } else {
        perror("[-] use_network - Network connection failed");
    }

    close(sock);
}

//use_ptrace
void use_ptrace() {
    long ret = ptrace(PTRACE_TRACEME, 0, NULL, NULL);
    if (ret == 0) {
        printf("[+] use_ptrace - ptrace(PTRACE_TRACEME) succeeded\n");
    } else {
        perror("[-] use_ptrace - ptrace failed");
    }
}

int main() {
    printf("=== Demo App Starting ===\n");
    write_to_file();
    read_sensitive_file();
    make_syscall();
    use_network();
    use_ptrace();
    printf("=== Demo App Completed ===\n");

    return 0;
}
Where:
Write_to_filefunction: Creates the file/tmp/demo_output.txtand writes to it using standard file operations.read_sensitive_filefunction: Attempts to open and read the content of the file/etc/shadow.make_syscall function: Retrieves the process ID by using thesyscall()capability.use_networkfunction: Creates aTCPnetwork socket and tries to connect to the IP address1.1.1.1on port80.use_ptracefunction: Invokesptrace(PTRACE_TRACEME)system call to mark the process as traceable by a parent.
- Compile the test application:
# gcc $HOME/test-app.c -o /usr/local/bin/test-app
- Assign execution permissions to the binary:
# chmod +x /usr/local/bin/test-app
Configure a default Apparmor profile for the sample application
AppArmor supports access control for files, network, Linux capabilities, ptrace, DBus, Unix sockets, and mount devices. It has profiles that operate in two main modes:
- Complain (learning) mode: Actions that violate the profile are allowed but logged. This mode is ideal for testing and refining profiles without disrupting application behavior.
- Enforce (confined) mode: Strictly applies the profile’s rules, blocking unauthorized actions and logging any violations.
- Run the command below to install AppArmor and its utilities:
# apt install apparmor apparmor-utils
- Create an AppArmor profile for the application. AppArmor profiles have a default-deny policy:
# aa-autodep /usr/local/bin/test-app
The default profile generated is saved at /etc/apparmor.d/usr.local.bin.test-app and contains the sections below:
include <tunables/global>: This defines environment variables that may be useful for writing profiles. It is located in/etc/apparmor.d/tunables/global./usr/local/bin/test-app flags=(complain): This marks the beginning of the profile for thetest-appbinary. Theflags=(complain)setting flags the profile in complain mode.include <abstractions/base>: This grants access to common system resources, such as shared libraries, which are typically required by most programs. It is essential for normal program execution and is defined in/etc/apparmor.d/abstractions/base./usr/local/bin/test-app mr,: This line allows execution of the binary with memory read (m) and read (r)permissions.
- Load the updated profile into the kernel:
# apparmor_parser -r /etc/apparmor.d/usr.local.bin.test-app
Testing
In the previous section, we created a default AppArmor profile in complain mode. The steps below demonstrate how to observe the application’s behavior, adjust the profile accordingly, and transition it to enforce mode for strict policy enforcement:
- Check the status of AppArmor profiles. Confirm that the sample application’s profile is active and in complain mode:
# aa-status
The command output should be similar to the following:
apparmor module is loaded.
14 profiles are loaded.
13 profiles are in enforce mode.
   /usr/bin/man
   /usr/lib/NetworkManager/nm-dhcp-client.action
   /usr/lib/NetworkManager/nm-dhcp-helper
   /usr/lib/connman/scripts/dhclient-script
   /usr/lib/snapd/snap-confine
   /usr/lib/snapd/snap-confine//mount-namespace-capture-helper
   /{,usr/}sbin/dhclient
   lsb_release
   man_filter
   man_groff
   nvidia_modprobe
   nvidia_modprobe//kmod
   tcpdump
1 profiles are in complain mode.
   /usr/local/bin/test-app
0 profiles are in kill mode.
0 profiles are in unconfined mode.
0 processes have profiles defined.
0 processes are in enforce mode.
0 processes are in complain mode.
0 processes are unconfined but have a profile defined.
0 processes are in mixed mode.
0 processes are in kill mode.
- Run the application using the command below. Since the profile is in complain mode, AppArmor will allow all actions:
# /usr/local/bin/test-app
The command output should be similar to the following:
=== Demo App Starting ===
[+] write_to_file - Wrote to /tmp/demo_output.txt
[+] read_sensitive_file - Able to read /etc/shadow
[+] make_syscall - Syscall SYS_getpid returned: 4467
[+] use_network - Network connection established to 1.1.1.1:80
[+] use_ptrace - ptrace(PTRACE_TRACEME) succeeded
=== Demo App Completed ===
- Switch the profile to enforce mode to strictly apply the previously created profile rules:
# aa-enforce /usr/local/bin/test-app
- Check the status of AppArmor profiles. Confirm that the sample application’s profile is active and in enforce mode:
# aa-status
The command output should be similar to the following:
apparmor module is loaded.
14 profiles are loaded.
14 profiles are in enforce mode.
   /usr/bin/man
   /usr/lib/NetworkManager/nm-dhcp-client.action
   /usr/lib/NetworkManager/nm-dhcp-helper
   /usr/lib/connman/scripts/dhclient-script
   /usr/lib/snapd/snap-confine
   /usr/lib/snapd/snap-confine//mount-namespace-capture-helper
   /usr/local/bin/test-app
   /{,usr/}sbin/dhclient
   lsb_release
   man_filter
   man_groff
   nvidia_modprobe
   nvidia_modprobe//kmod
   tcpdump
0 profiles are in complain mode.
0 profiles are in kill mode.
0 profiles are in unconfined mode.
0 processes have profiles defined.
0 processes are in enforce mode.
0 processes are in complain mode.
0 processes are unconfined but have a profile defined.
0 processes are in mixed mode.
0 processes are in kill mode.
- Run the application using the command below. With the profile in enforce mode, AppArmor will actively deny unauthorized actions according to the defined policy:
# /usr/local/bin/test-app
The command output should be similar to the following:
=== Demo App Starting ===
[-] write_to_file - Failed to write to file: Permission denied
[-] read_sensitive_file - Failed to read /etc/shadow: Permission denied
[+] make_syscall - Syscall SYS_getpid returned: 4500
[-] use_network - Socket creation failed: Permission denied
[+] use_ptrace - ptrace(PTRACE_TRACEME) succeeded
=== Demo App Completed ===
Where:
write_to_file,read_sensitive_file, anduse_networkfunctions return “Permission denied” due to AppArmor default-deny policy. Access to files, network sockets, or capabilities is denied unless explicitly allowed.make_syscallanduse_ptracesucceed because the profile includesinclude<abstractions/base>macro, which grants essential privileges required by most programs, such as basic system calls and library access.
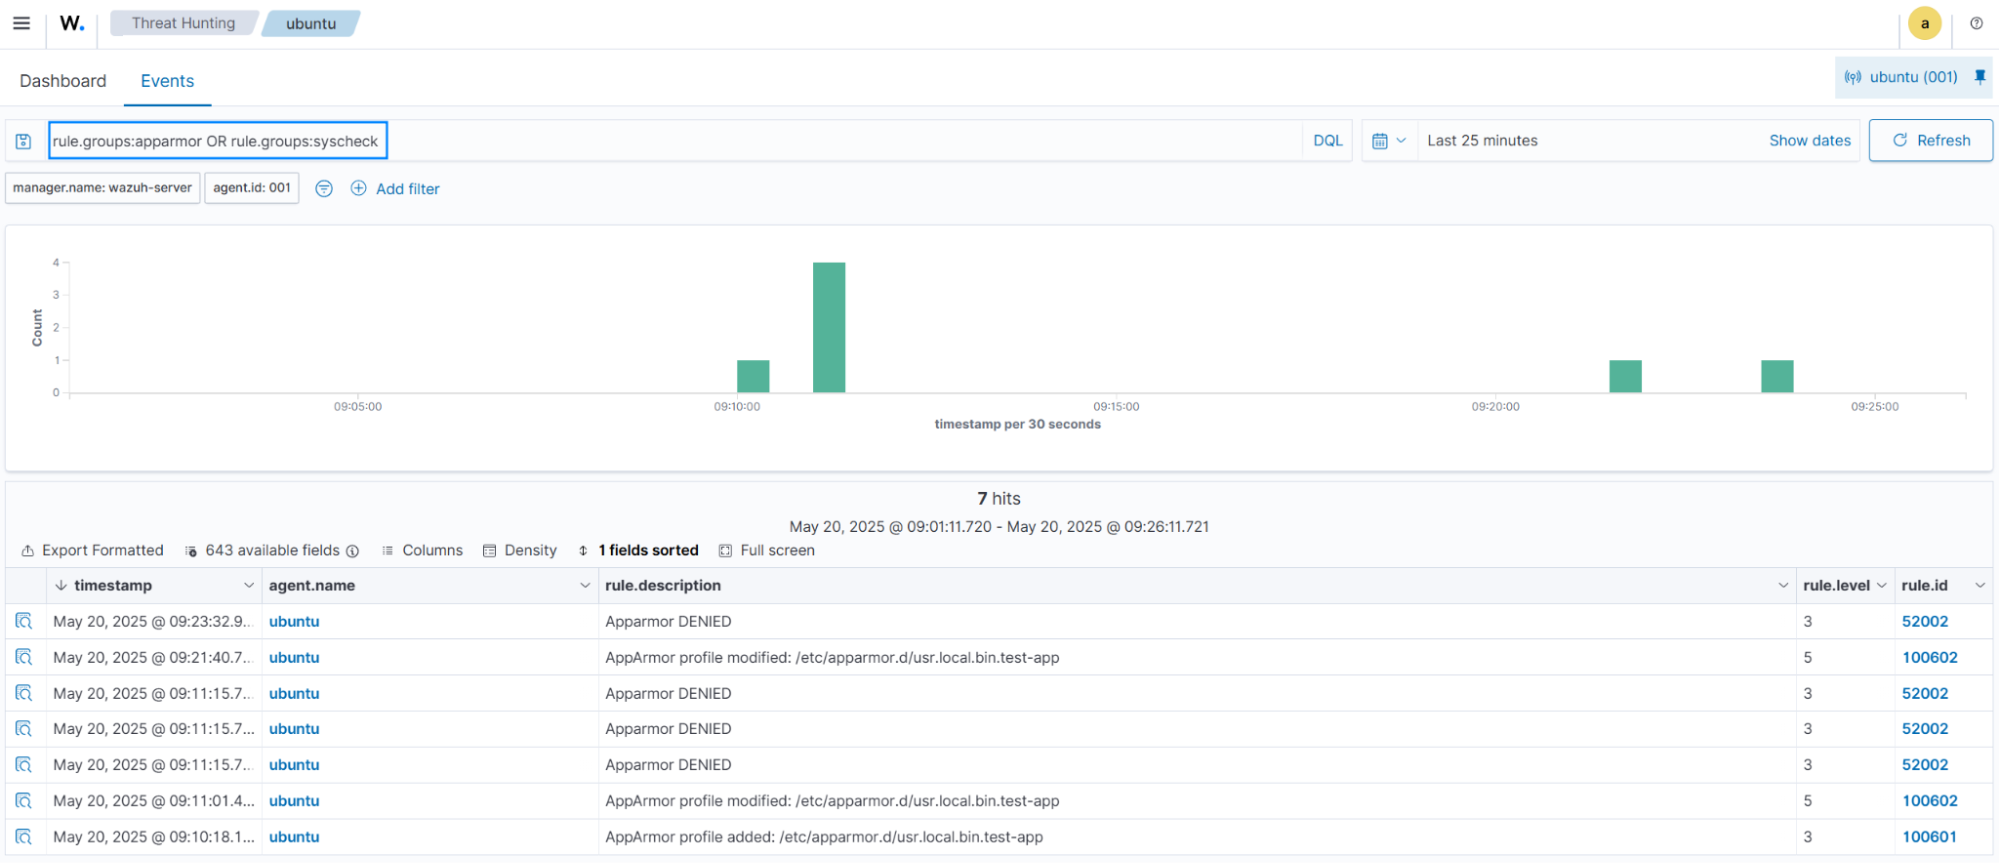
- Navigate to Threat intelligence > Threat Hunting > Events on the Wazuh dashboard. In the search bar, type
rule.groups:apparmor OR rule.groups:syscheck, and click Update.
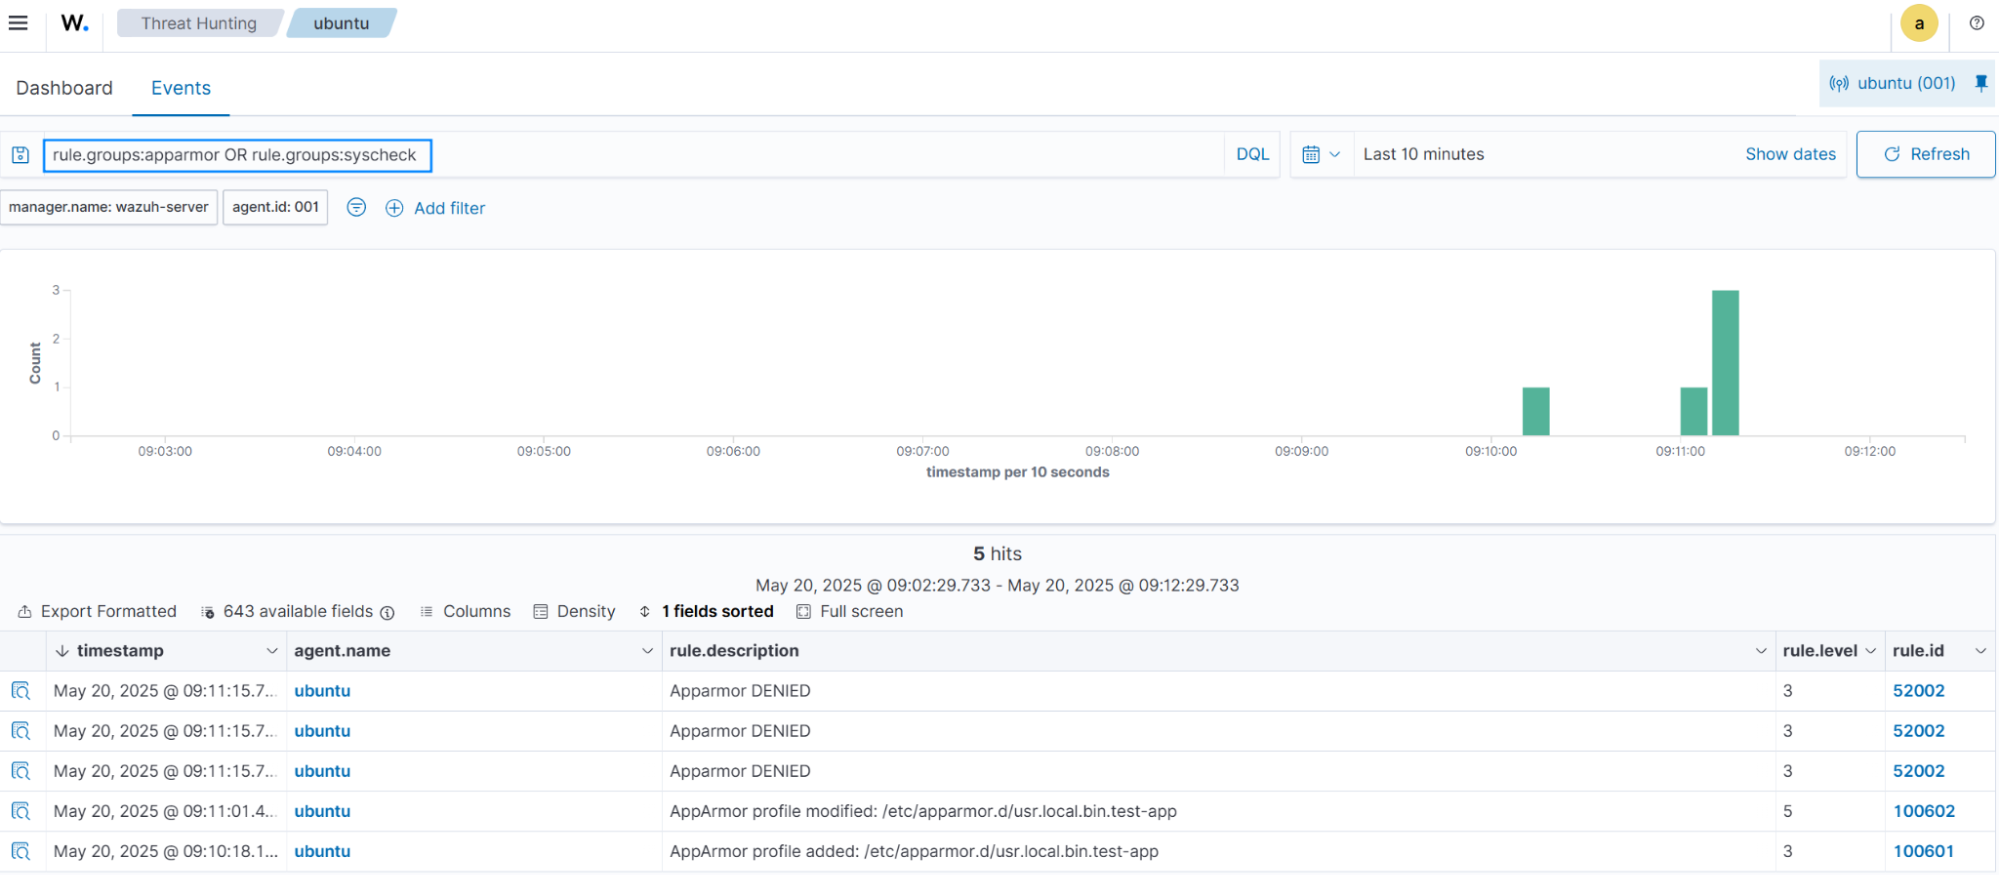
We can observe alerts triggered by actions denied by the AppArmor profile and alerts generated by the Wazuh FIM capability monitoring for changes made to AppArmor profiles.
- Click Inspect document details on an “AppArmor DENIED” alert to view more details:
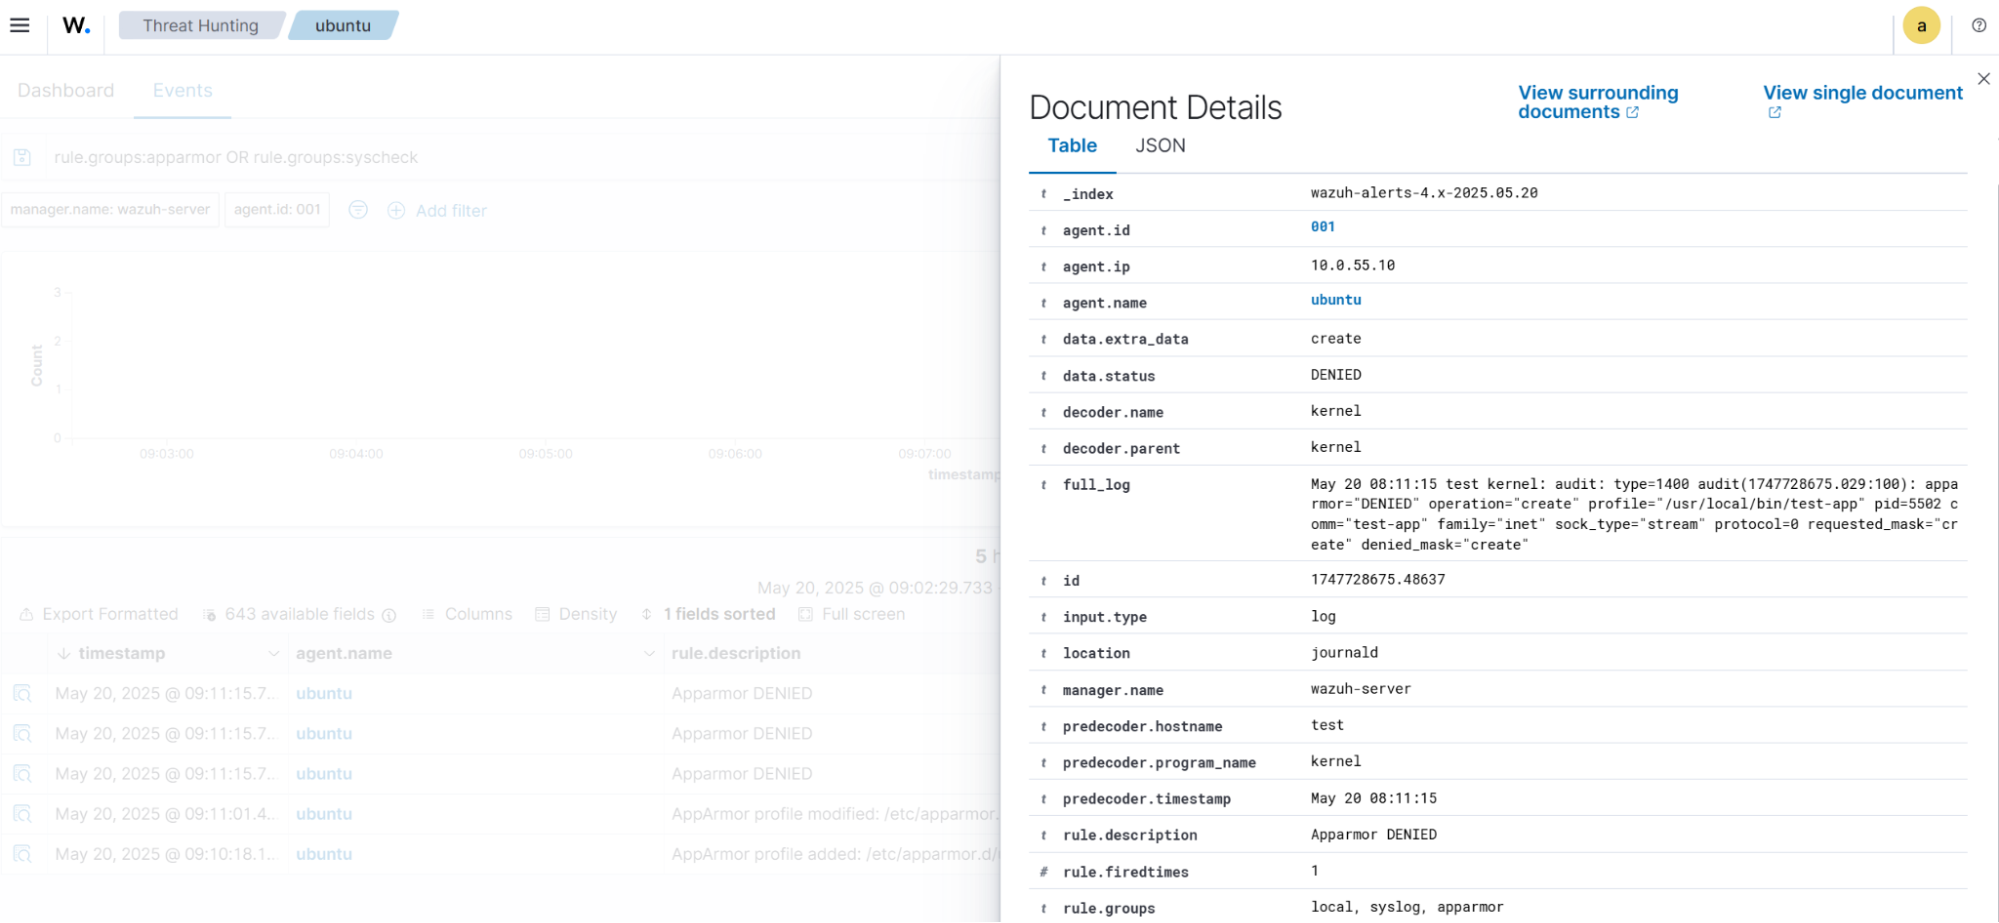
The figure above shows a detailed view of the event generated when Apparmor denies the use_network function.
- Fine-tune the profile by adding the lines below under
include <abstractions/base>in the/etc/apparmor.d/usr.local.bin.test-appprofile file on the Ubuntu endpoint:
  owner /tmp/demo_output.txt w,
  network inet tcp,
Where:
owner /tmp/demo_output.txt w: This grants write permission only if the process owns this file. This is necessary for thewrite_to_filefunction to operate.network inet tcp: Permits the use of TCP over IPv4. This is necessary for theuse_networkfunction to operate.
- Load the updated profile into the kernel:
# apparmor_parser -r /etc/apparmor.d/usr.local.bin.test-app
- Run the application to validate the changes made in the profile:
# /usr/local/bin/test-app
The command output should be similar to the following:
=== Demo App Starting ===
[+] write_to_file - Wrote to /tmp/demo_output.txt
[+] read_sensitive_file - Failed to read /etc/shadow: Permission denied
[+] make_syscall - Syscall SYS_getpid returned: 14884
[+] use_network - Network connection established to 1.1.1.1:80
[+] use_ptrace - ptrace(PTRACE_TRACEME) succeeded
=== Demo App Completed ===
This output validates the changes made to the profile. Where write_to_file and use_network functions are now operational.
- Navigate to Threat intelligence > Threat Hunting > Events on the Wazuh dashboard. In the search bar, type
rule.groups:apparmor OR rule.groups:syscheck, and click Update.
- Click Inspect document details on an “AppArmor profile modified ” alert to view more details:
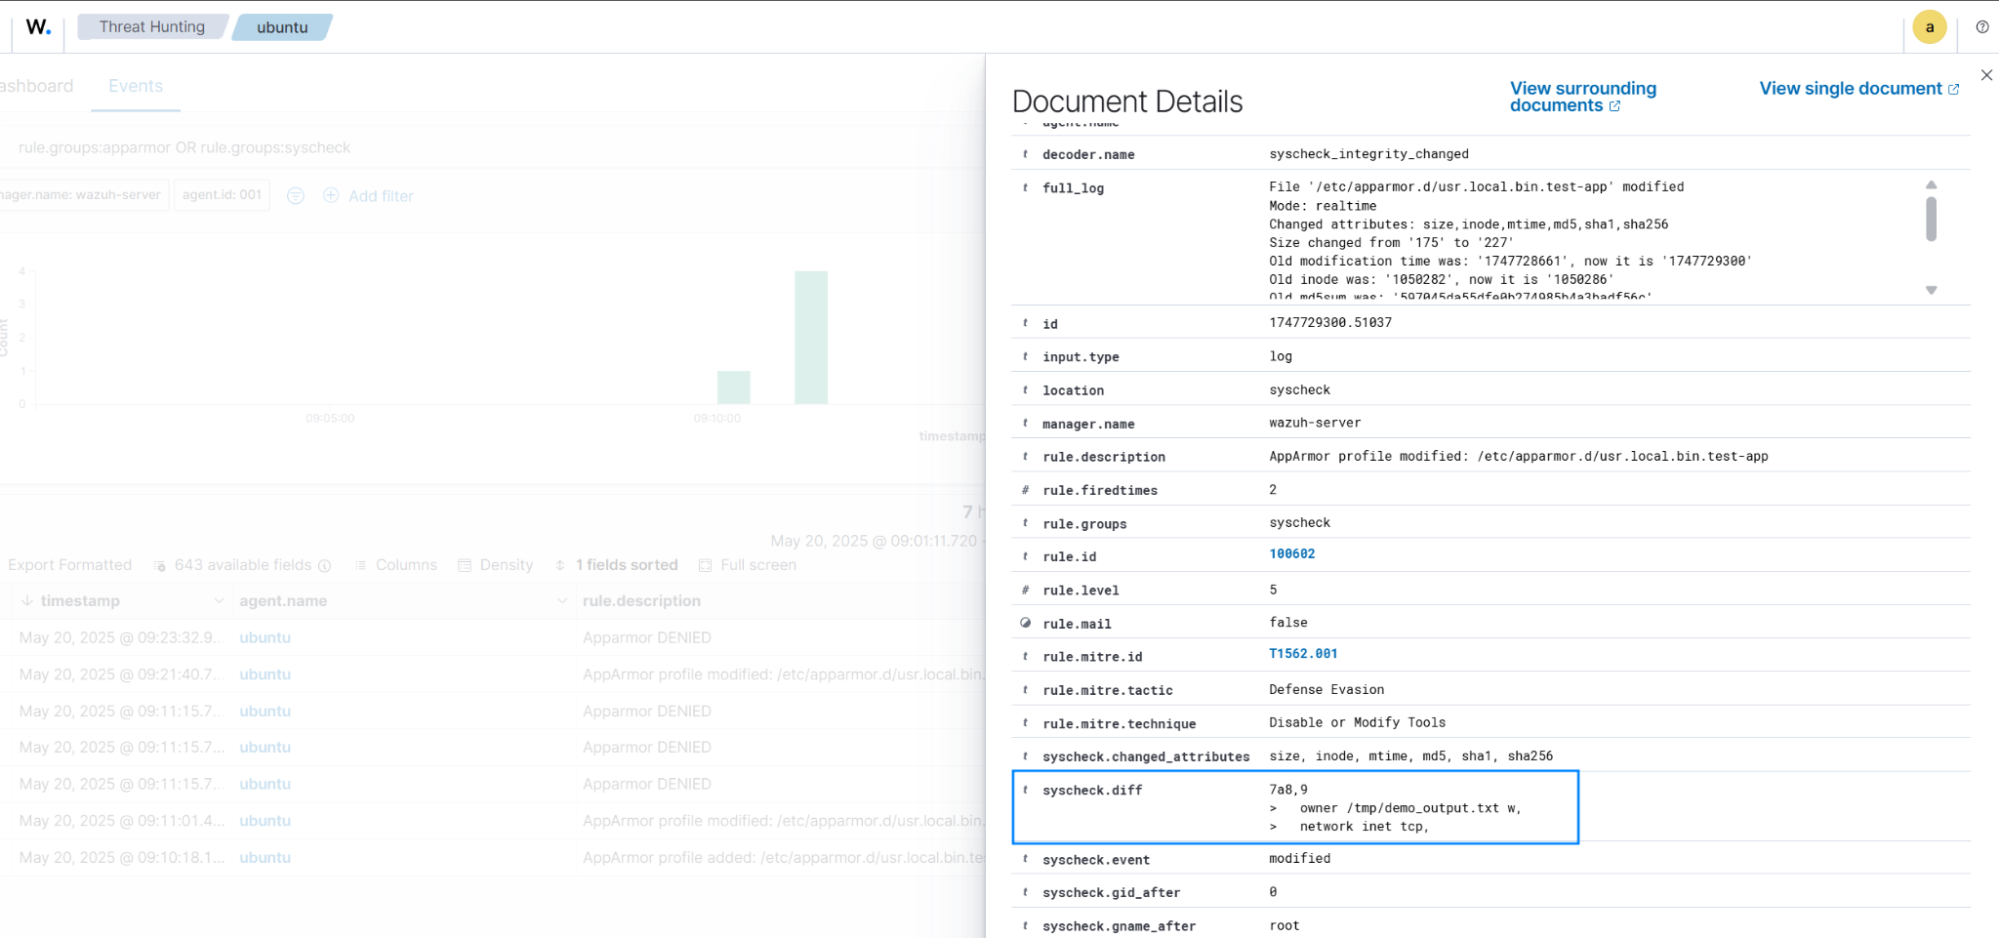
The figure above shows a detailed view of the event generated after modifying our Apparmor profile.
Conclusion
This blog demonstrated how Linux Security Modules, specifically AppArmor, can define and enforce kernel-level restrictions on a Linux endpoint. We created a sample application to show how operations such as unauthorized file access, improper network use, or privileged system calls can be restricted using policy-based enforcement.
These restrictions were monitored using Wazuh to capture and analyze security events at the kernel level. The Wazuh File Integrity Monitoring capability tracks changes in the /etc/apparmor.d directory, ensuring that modification of security profiles triggers alerts. This integration allows centralized visibility of policy violations and system behavior, supporting incident correlation and audit requirements in Linux environments.
Join our community of professionals to interact with and learn more about our product.