In this post, we are going to cover how to configure Wazuh to forward alerts via email. It is a useful way to get notifications about the most important events that occur in our monitored hosts.
To do this, we will describe how the module works and show a practical case of forwarding alerts for a specific purpose:
- Tuning Wazuh to forward alerts
- Use case: Forwarding Apache alerts in real-time
Tuning Wazuh to Forward Alerts
Configuring an SMTP Server Relay
Nowadays, most SMTP servers require authentication. If that is the case, it is necessary to set up a server relay, such as Postfix, to handle it. Later in this post, you will see how to do this through a practical case. However, you can find additional information in the Wazuh documentation.
Once the server relay is working, the next step is to set up the Wazuh manager to include the desired alerts in the email.
Email alert options can be categorized as Generic mail options or Granular mail options.
Email notifications: Generic Mail Options
In order to enable Wazuh email notifications, we must configure the main email settings in the global section of the manager configuration file as follows:
<ossec_config>
  <global>

    <email_notification>yes</email_notification>
    <smtp_server>localhost</smtp_server>
    <email_from>wazuhtest@testserver.com</email_from>
    <email_to>destinationMail@testserver1.com</email_to>
    <email_maxperhour>12</email_maxperhour>
  </global>

  <alerts>
    <email_alert_level>9</email_alert_level>
  </alerts>

</ossec_config>
The SMTP server must be set up according to the email service used: Gmail, Outlook, Live, Yahoo, etc. The smtp_server option is set to localhost because we are using Postfix as the server relay in the same host where the manager is located. The account set in the email_from option must be the same as the account set in Postfix configuration. Email alerts will be sent from this address.
Option email_to sets the default account that receives the configured alerts. Only one destination email is allowed in this section. Nevertheless, we can set more than one recipient for our emails by using the granular options described below.
Next, the option email_maxperhour sets the maximum number of emails we are going to receive within a one-hour interval. Once this limit has been reached, the subsequent alerts are queued and will be sent in a single email during the next time interval. Therefore, a smaller value for this option could lead to losing the real-time alerting if the limit is reached. For this reason, we suggest you set a high value for this option.
Finally, the email_alert_level option sets the minimum alert level that will trigger an email. This means that any event with a criticality level greater than or equal to this level will generate an email alert. However, you can circumvent this filtering by adding the alert_by_email option to a rule. For instance,
<rule id="9800" level="8">
  <match>illegal user|invalid user</match>
  <description>sshd: Attempt to login using a non-existent user</description>
  <options>alert_by_email</options>
</rule>
Even though the rule level is lower than the minimum level previously set by email_alert_level, if this rule is matched, an email alert will be generated.
If a rule with
alert_by_emailoption is matched, it will always generate an email alert, regardless of the minimum level set byemail_alert_level.
Granular Mail Options
The email_alerts section in the manager configuration file allows us to configure email alerts in a more specific way such as filtering by rule ID, level, agent or group. We could even use a combination of them. This way, we can get the most relevant alerts for us while, at the same time, avoiding receiving unnecessary email notifications.
You can get more information about the different granular options available in the Wazuh documentation.
An example of using these options is shown in the following use case.
Use Case: Forwarding Apache Alerts in Real-Time
With a good understanding of the theory, this section aims to help you better understand how email alert notifications work and how useful they can be with a real-world example.
Here we can see the step-by-step procedure for receiving notifications when any of the Apache web servers in our environment suffer unauthorized access attempts.
Setting the Server Relay
As we mentioned at the beginning of this post, the first step is to configure an SMTP Server Relay. We will be using Postfix for that purpose. In our case, it is deployed on the same host as the Wazuh manager, an Ubuntu 18.04.
To install Postfix and its dependencies, the following command is run:
# apt-get install postfix mailutils libsasl2-2 ca-certificates libsasl2-modules
Once the above command execution has finished, the Postfix installation menu should appear.
In this menu, the No configuration option must then be selected.
After Postfix is installed, the next command must be launched:
# cp /usr/share/postfix/main.cf.debian /etc/postfix/main.cf
Now, the configuration file /etc/postfix/main.cf must be edited with the mail server information:
relayhost = [smtp.gmail.com]:587
smtp_sasl_auth_enable = yes
smtp_sasl_password_maps = hash:/etc/postfix/sasl_passwd
smtp_sasl_security_options = noanonymous
smtp_tls_CAfile = /etc/ssl/certs/thawte_Primary_Root_CA.pem
smtp_use_tls = yes
compatibility_level = 2
Once the configuration file has been modified and saved, the next commands are run:
# echo [smtp.gmail.com]:587 wazuhtest@testserver.com:mypassword > /etc/postfix/sasl_passwd
# postmap /etc/postfix/sasl_passwd
# chmod 400 /etc/postfix/sasl_passwd

# chown root:root /etc/postfix/sasl_passwd /etc/postfix/sasl_passwd.db
# chmod 0600 /etc/postfix/sasl_passwd /etc/postfix/sasl_passwd.db

# systemctl restart postfix
Once Postfix has been restarted, we can check whether the configuration is correct by sending a test email.
This command should send an email to destinationmail@testserver1.com
# echo "Hi! We are testing Postfix!" | mail -s "Test Postfix" destinationmail@testserver1.com
Setting the Wazuh Manager Configuration File
At this step, we will configure the ossec.conf file as follows:
<ossec_config>
  <global>

    <email_notification>yes</email_notification>
    <smtp_server>localhost</smtp_server>
    <email_from>wazuhtest@testserver.com</email_from>
    <email_to>wazuhtest@testserver.com</email_to>
    <email_maxperhour>60</email_maxperhour>
  </global>

  <alerts>
    <email_alert_level>12</email_alert_level>
  </alerts>

</ossec_config>
The email_to value can be different from the email_from value. Although, in this example, we want to receive the alerts in the same email.
<email_alerts>
  <email_to>wazuhtest@testserver.com</email_to>
  <email_to>testmail@testserver1.com</email_to>
  <rule_id>30309, 100001</rule_id>
  <do_not_delay />
</email_alerts>
As we can see in the email_alerts section, we added two destination addresses to receive the alerts generated by rules 30309 and 100001.
The email_to addresses specified in the email alerts section do not overwrite the one set by default in the global section. This means the email alert will be sent to the default address and to the granular addresses as well.
The do_not_delay option allows for sending the email for these alerts immediately, without grouping them or waiting for other emails.
To get the alerts generated by Apache Web Server, we have to monitor the Apache log files access.log and error.log. The location of those files depends on your particular Apache configuration.
<localfile>
   <log_format>apache</log_format>
   <location>/var/log/apache2/access.log</location>
</localfile>
<localfile>
   <log_format>apache</log_format>
   <location>/var/log/apache2/error.log</location>
</localfile>
Making your Custom Rules
In this practical case, we are looking to receive email notifications when unusual activity is taking place in our Apache server.
For that purpose, two custom rules have been created or modified. The following content is added to the file /var/ossec/etc/rules/local_rules.xml.
<rule id="30309" level="7" overwrite="yes">
    <if_sid>30301</if_sid>
    <id>AH01618|AH01808|AH01790</id>
    <options>alert_by_email</options>
    <description>Apache: Attempt to login using a non-existent user.</description>
    <group>invalid_login,pci_dss_11.4,pci_dss_10.2.4,pci_dss_10.2.5,gpg13_7.1,gdpr_IV_35.7.d,gdpr_IV_32.2,</group>
</rule>
The rule 30309 can be found in the /var/ossec/ruleset/rules/0250-apache-rules.xml file.
As you can see, the rule is related to unauthorized server access attempts.
It has been edited to add the alert_by_email option to the rule. So, when this rule is triggered, it will always generate an email notification.
<rule id="100001" level="12" frequency="8" timeframe="120">
    <if_matched_sid>30310</if_matched_sid>
    <description>Multiple user authentication failures</description>
    <group>authentication_failed,pci_dss_10.2.4,pci_dss_10.2.5,gpg13_7.1,gdpr_IV_35.7.d,gdpr_IV_32.2,hipaa_164.312.b,nist_800_53_AU.3.1,nist_800_53_IA.10,</group>
</rule>
In addition, the purpose of the above rule is to alert whenever multiple unauthorized access attempts take place within a 2-minute timeframe, as this indicates potential unusual activity.
As we can see, this rule does not need the alert_by_email option, since the rule level matches the email_alert_level previously set.
Finally, the manager is restarted to apply the new rules and new configurations. After that, we are going to check if everything is working as expected by performing an unauthorized access attempt on our Apache server.
Receiving the Alerts in our Email
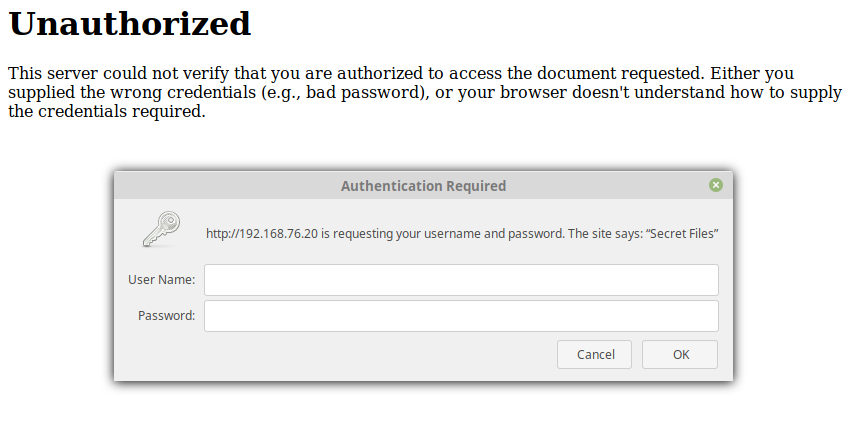
Once we have followed all the steps described below, let’s trigger the unauthorized access alerts so that we receive them in the email as is expected. To do this, we try to access the web server using the wrong credentials:

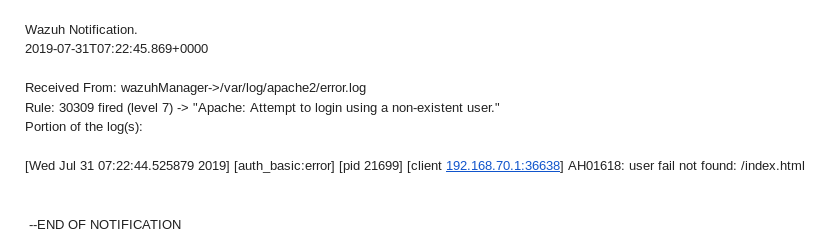
Right away, the email notification is sent to our email address, as we can see below, confirming that everything is working as expected.
To sum it up, in this post we have covered how to configure email alerts, which are a great way to bring attention to those events that are of most interest to the administrators. To illustrate, we have described how to configure the email notification settings, edited one of the Apache rules so that it triggers alerts regardless of its criticality level, created a custom rule, and set an SMTP server to relay the email alerts.
If you have any questions about this, don’t hesitate to check out our documentation to learn more about Wazuh or join our community where our team and contributors will help you.