IT Hygiene is the practice of maintaining clean, consistent, and secure endpoint configurations across your infrastructure. Every endpoint in your environment is a potential entry point for attackers. A forgotten user account, an outdated package, a rogue service, or an unapproved browser extension can silently expose your organization to risk. Consistent visibility and control over system inventory and configurations help to eliminate these security gaps before they are exploited by threat actors.
The Wazuh IT Hygiene module provides a centralized, real-time inventory of system state across all monitored endpoints in your environment. It collects hardware and operating system information, user accounts, installed packages, running processes and services, network ports, users, groups, and browser extensions. All data is aggregated into dedicated indices in the Wazuh indexer and accessible through the Wazuh dashboard, enabling rapid detection and remediation without endpoint-by-endpoint inspection.
This blog post explores utilizing the Wazuh IT hygiene module to improve your organization’s security posture. It examines several use cases and highlights its practical applications in maintaining a secure and compliant IT environment.
Infrastructure
We use the following setup to demonstrate Wazuh IT Hygiene module capabilities on different operating systems. Showcasing its effectiveness across various platforms for a realistic view of endpoint security across your infrastructure.
- A pre-built, ready-to-use Wazuh OVA 4.14.0, including the Wazuh central components (Wazuh server, Wazuh indexer, and Wazuh dashboard). Follow this guide to download the virtual machine.
- An Ubuntu 24 endpoint with the Wazuh agent 4.14.0 installed and enrolled to the Wazuh server.
- A CentOS 9 endpoint with the Wazuh agent 4.14.0 installed and enrolled to the Wazuh server.
- A Debian 11 endpoint with the Wazuh agent 4.14.0 installed and enrolled to the Wazuh server.
- A Windows 11 endpoint with Wazuh agent 4.14.0 installed and enrolled to the Wazuh server.
Getting started with IT hygiene in Wazuh
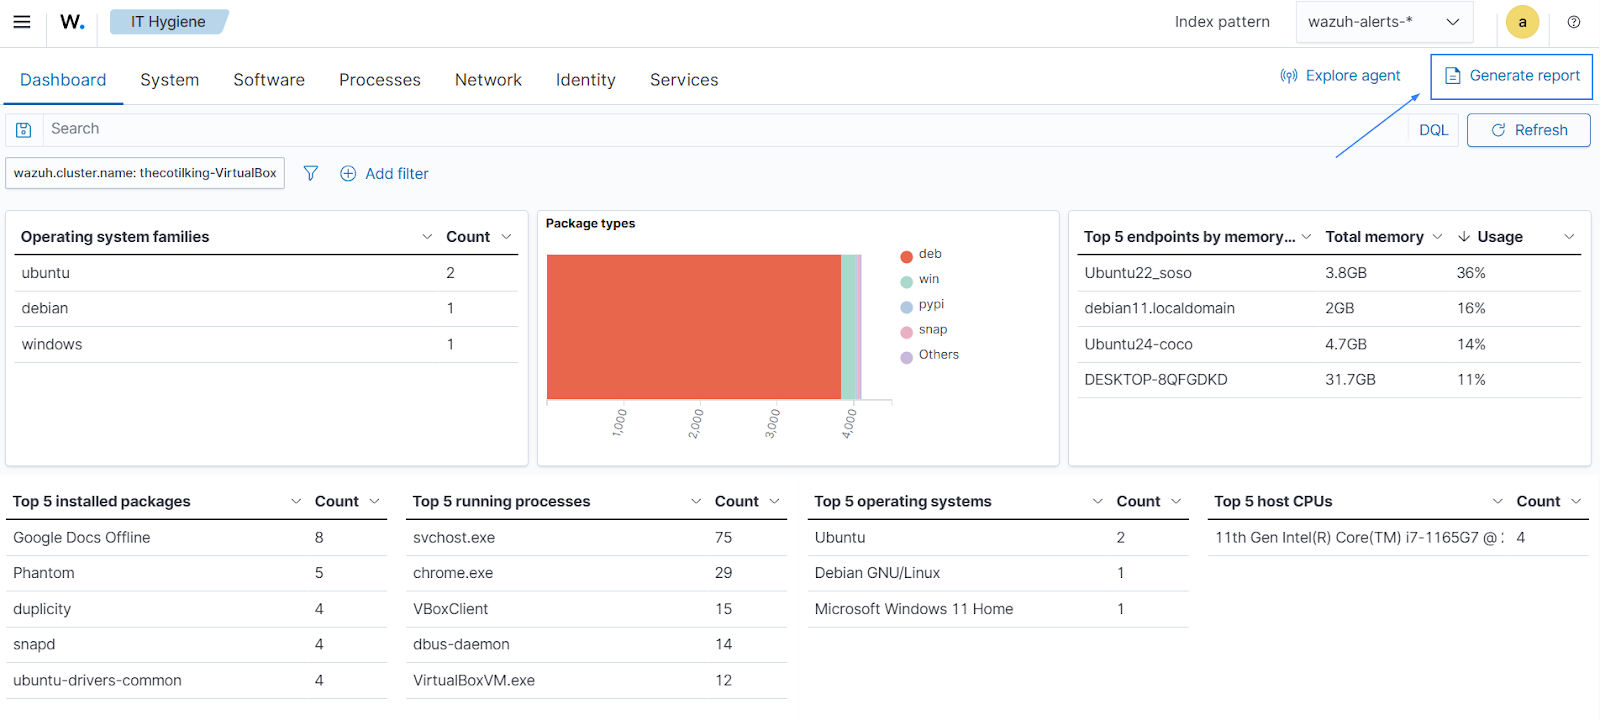
Access and utilize inventory data across multiple endpoints simultaneously using the Wazuh IT hygiene module on the Wazuh dashboard. The Wazuh Syscollector module collects and aggregates system inventory data, enabling near real-time visibility into system states.
Follow these steps to explore and query system inventory data on the Wazuh dashboard:
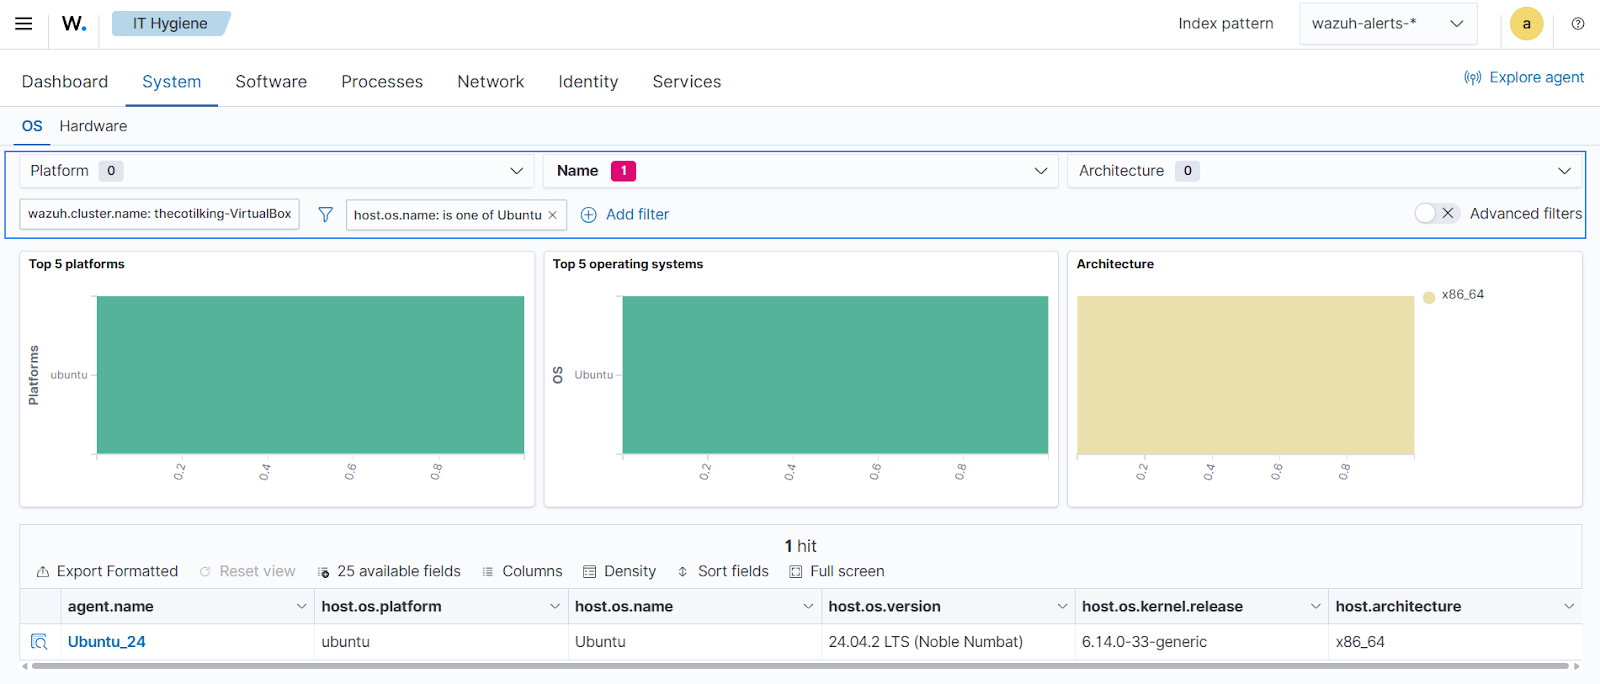
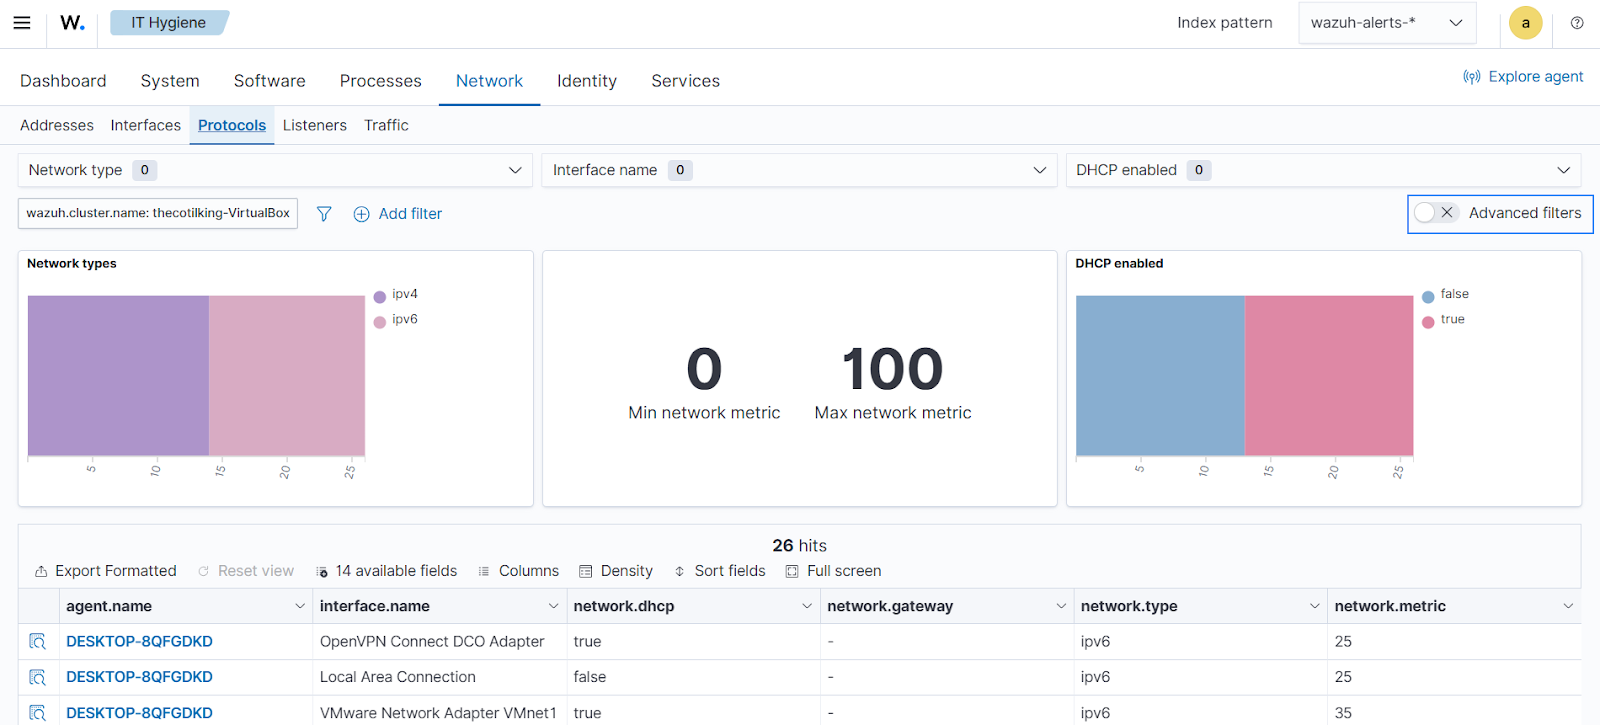
- Navigate to Security operations > IT Hygiene to view the sections for System, Software, Processes, Network, Identity, Services, and an overview Dashboard. Every section offers an aggregated view of system inventory data from all monitored endpoints. For example, the System section provides details on hardware and operating systems across all monitored Wazuh endpoints.
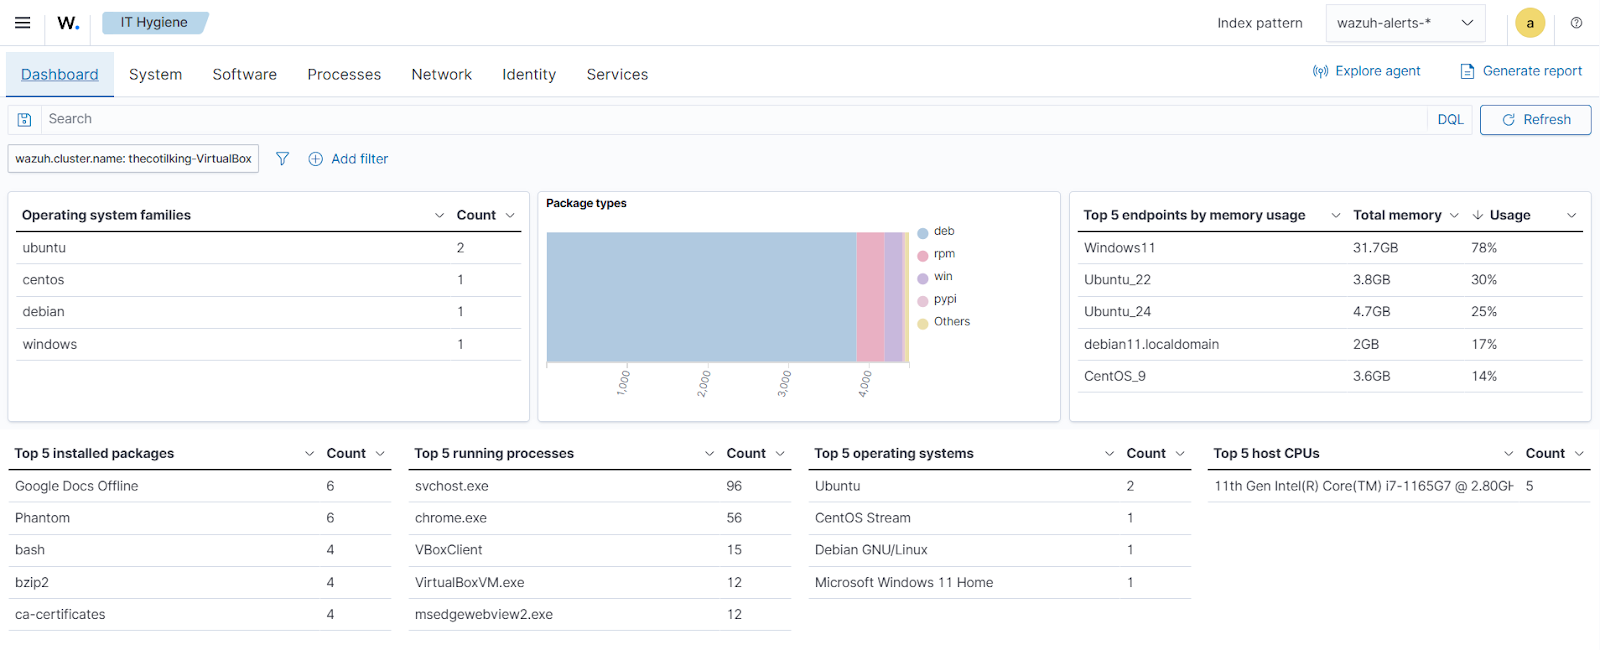
- Apply filters via the dropdowns to focus on specific subsets within a section. You can also select filters from available fields by clicking on + Add filter, highlighted below.
- Enable advanced filtering on System, Software, Processes, Network, Identity, and Services sections by toggling the Advanced filters to use the search bar.
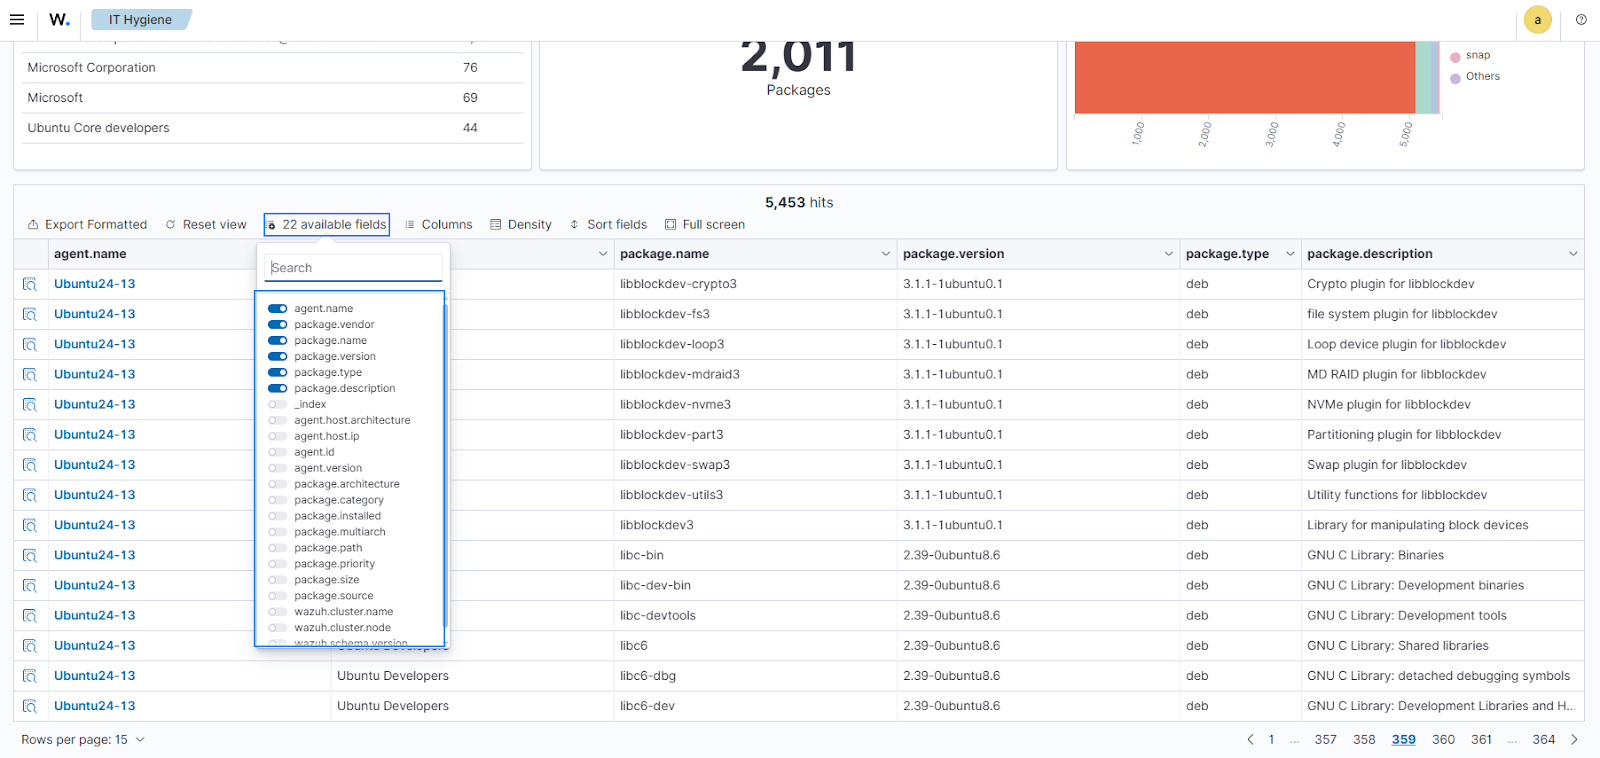
On each tab, you can select additional fields to display by clicking the available fields dropdown.
- Generate reports by clicking Generate report on the Dashboard section, exporting CSV summaries for compliance/auditing or general purposes.
See our documentation on System inventory for a more detailed guide.
Use cases
Wazuh supports different IT hygiene scenarios, allowing users to audit system data, enforce policies, and detect anomalies at scale. We explore the following use cases below:
- Detecting suspicious services across your infrastructure
- Asset and vulnerability management
- Auditing user accounts for hygiene and compliance
- Monitoring hardware resources across endpoints
Detecting suspicious services across your infrastructure
Malicious services, such as miners, backdoors, or persistence mechanisms, can operate covertly on endpoints and are often disguised as legitimate applications. Malware also persists by installing auto-start system services that run at system boot. These services typically use generic or random names and are configured to launch automatically. Additionally, we examine the process.executable field to detect disparities between the expected service executable and the actual binary running, further confirming suspicious or malicious intent when unexpected or unauthorized paths (for example, /tmp/ or C:\Users\*\Download) are involved.
Test the simulation
Test the simulation on a Windows 11 endpoint to create two suspicious services that auto-start during system boot.
1. Download and extract Non-Sucking Service Manager (NSSM). NSSM is a Windows service wrapper. It lets you run any normal executable (like a PowerShell script or a console app) as a Windows Service, even if that program wasn’t designed to behave like one.
2. Navigate to the directory with the downloaded NSSM on a CMD shell with Administrator privileges. Replace <USERNAME> with the name of the logged-in user:
cd C:\Users\<USERNAME>\Downloads\nssm-2.24\win64
3. Run the following commands on the CMD shell to create a sample suspicious service.
- The commands below install a new Windows service named
RogueServicethat will runnotepad.exeunder the NSSM service wrapper. It then sets it to start at system boot and executes the service.
nssm.exe install RogueService "C:\Windows\System32\notepad.exe"
nssm.exe set RogueService Start SERVICE_AUTO_START
nssm.exe start RogueService
- The commands below install a new Windows service named
MalServicethat executes a persistent ping request. It then sets it to start at system boot and executes the service.
nssm.exe install MalService "C:\Windows\System32\ping.exe" -t 127.0.0.1
nssm.exe set MalService Start SERVICE_AUTO_START
nssm.exe start MalService
Wazuh dashboard
1. Navigate to Security operations > IT Hygiene.
2. Select the Services tab.
3. Click + Add filter and configure it as follows:
- Field:
service.start_type - Operator:
is - Value:
AUTO_START
This filter identifies services configured to start automatically at boot, which is critical for detecting persistence mechanisms used by malware.
4. Click + 41 available fields and enable the service.start_type and process.executable fields.
The service.start_type field indicates how a service is configured to start (for example, AUTO_START, DEMAND_START), while the process.executable field shows the full path of the executable running the service. Enabling these fields allows you to identify services with unusual start types (for example, auto-starting unknown services) or unexpected executable paths (for example, /tmp/ or C:\Users\*\Download), helping detect potential malicious services and ensuring compliance with service management policies.
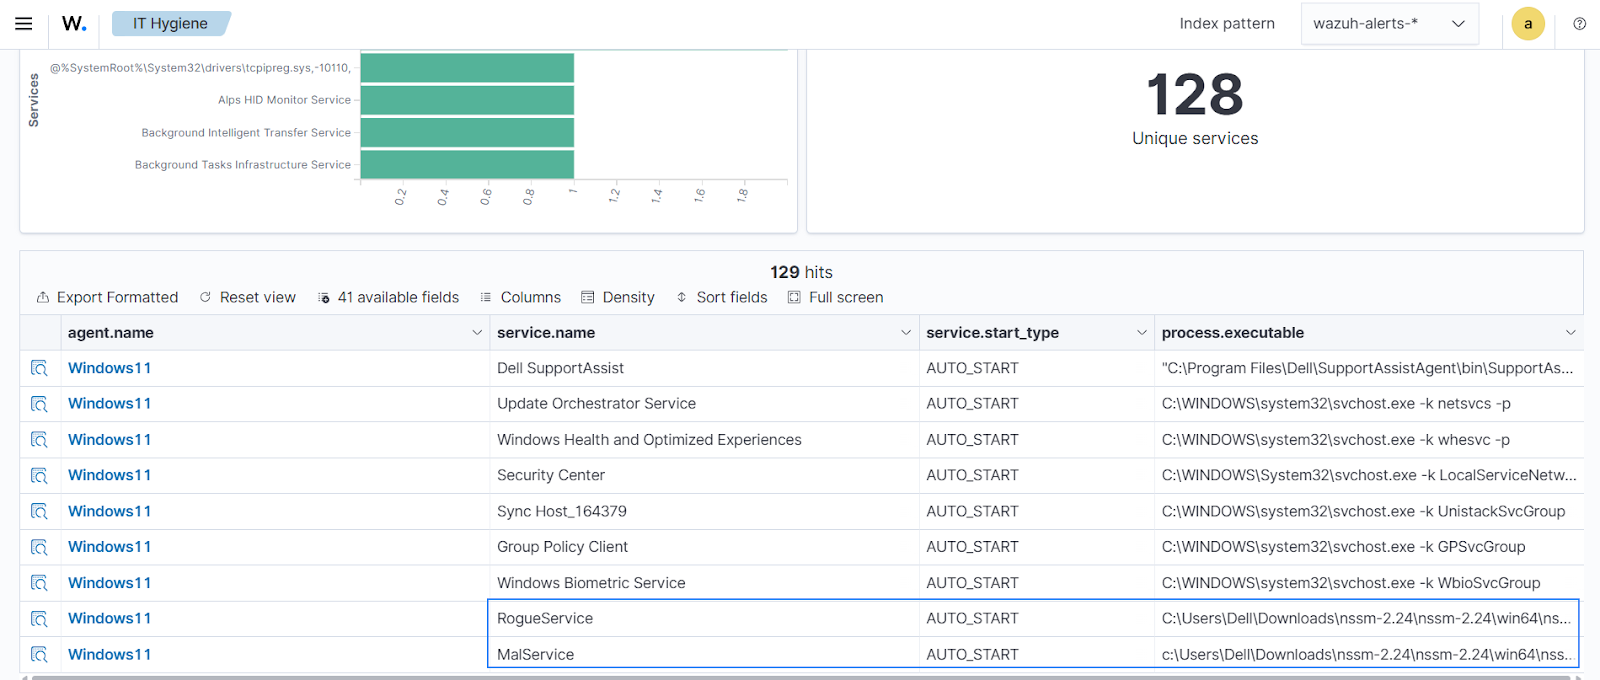
The image above shows two services, Malservice and RogueService, that we identified as suspicious.
Asset and vulnerability management
Maintaining consistent software package versions across all endpoints ensures security, stability, and compliance. Inconsistent versions, such as outdated packages on Linux or unapproved browser extensions with broad permissions, introduce exploitable vulnerabilities, disrupt operations, or violate patching and access policies. Manually checking the version of thousands of endpoints is time-consuming and impractical. Wazuh IT Hygiene module provides broad visibility into packages installed across your enterprise.
Managing an OpenSSL vulnerability
OpenSSL versions 3.0.0 through 3.0.7 are vulnerable to CVE-2024-41996 (a resource exhaustion flaw in Diffie-Hellman Key Agreement, allowing remote attackers to trigger expensive server-side calculations via crafted public keys, leading to denial of service).
Keeping software up to date, such as patching to version 3.0.8 or higher, helps maintain a secure environment by reducing the attack surface and eliminating outdated vulnerabilities that could compromise system integrity.
Test the simulation
Follow the steps below on your Linux endpoints to simulate an environment that has OpenSSL packages vulnerable to CVE-2024-41996.
1. Check if OpenSSL exists. On most Linux endpoints, OpenSSL is installed by default.
$ openssl version
Follow the steps below if no vulnerable version of OpenSSL is returned.
2. Install tools and libraries needed to compile OpenSSL from source:
$ sudo apt install -y build-essential checkinstall zlib1g-dev libssl-dev
$ sudo dnf groupinstall "Development Tools" -y
$ sudo dnf install perl-core zlib-devel wget gzip -y
3. Download the vulnerable version from the OpenSSL archive:
$ wget https://www.openssl.org/source/old/3.0/openssl-3.0.7.tar.gz
4. Unzip the downloaded file to a working directory:
$ tar -xzf openssl-3.0.7.tar.gz
$ cd openssl-3.0.7
5. Configure the build:
$ ./config --prefix=/usr/local/openssl-3.0.7 --openssldir=/usr/local/openssl-3.0.7 shared zlib
6. Build and install the vulnerable version:
$ make -j$(nproc)
$ sudo make install
7. Update the library paths:
$ sudo ldconfig
8. Verify installation:
$ /usr/local/openssl-3.0.7/bin/openssl version
Wazuh dashboard
1. Navigate to the Security operations > IT Hygiene.
2. Select the Software tab and then Packages.
3. Click + Add filter and configure it:
- Field:
package.name - Operator:
is - Value:
openssl.
This filter identifies endpoints with the vulnerable OpenSSL package installed.
4. Click Save.
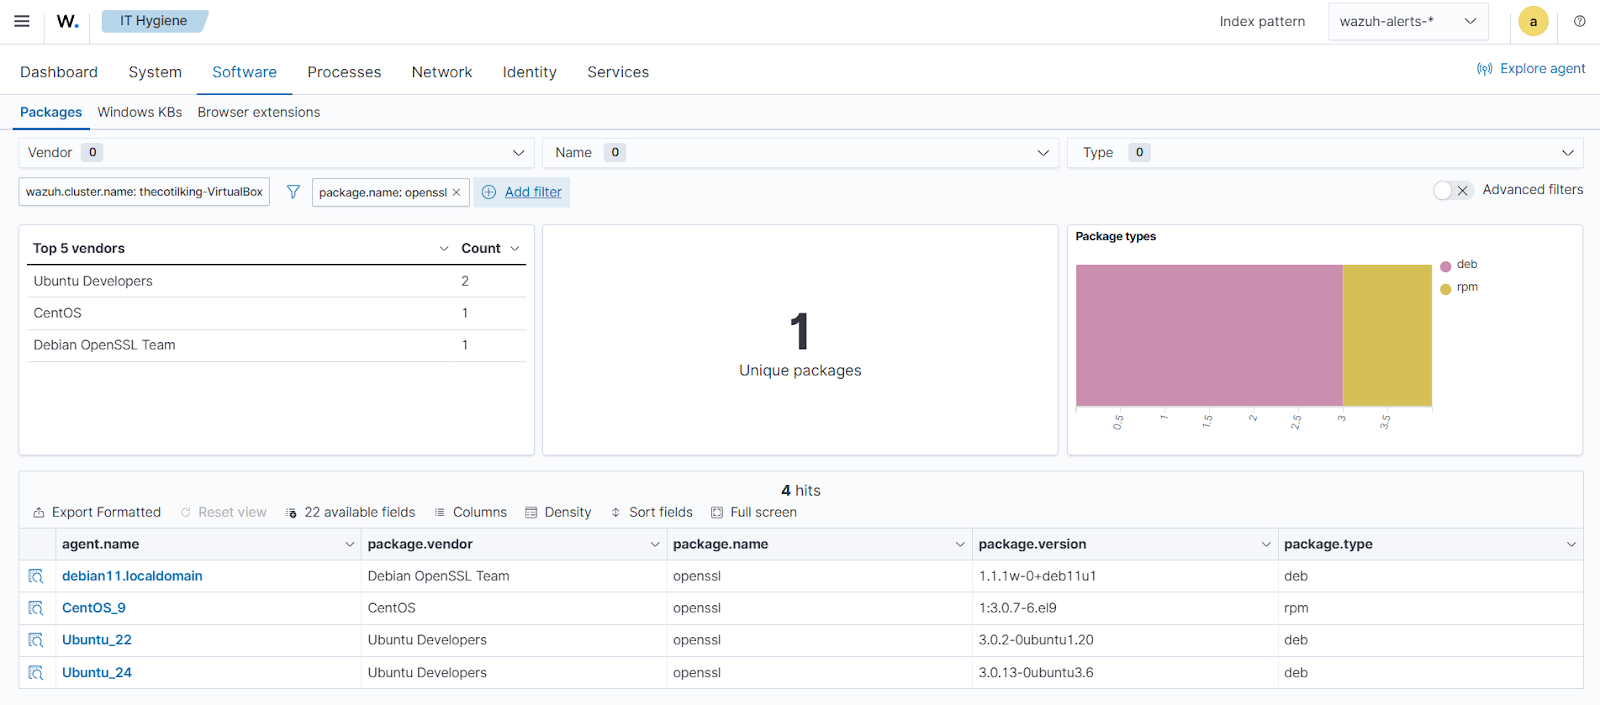
The image above displays OpenSSL packages installed on all endpoints that are not on version 3.0.8 or above, indicating a need to update these endpoints to a non-vulnerable version. You can also find vulnerable packages using the Wazuh vulnerability detection capability.
7. Click the ☰ icon at the top left corner and navigate to Threat intelligence and select Vulnerability Detection.
8. Select the Inventory tab.
9. Click + Add filter and configure it as follows:
- Field:
package.name - Operator:
is - Value
is openssl

Click the Vulnerability ID highlighted in the image above to open the Wazuh CTI resource that explains the selected vulnerability.
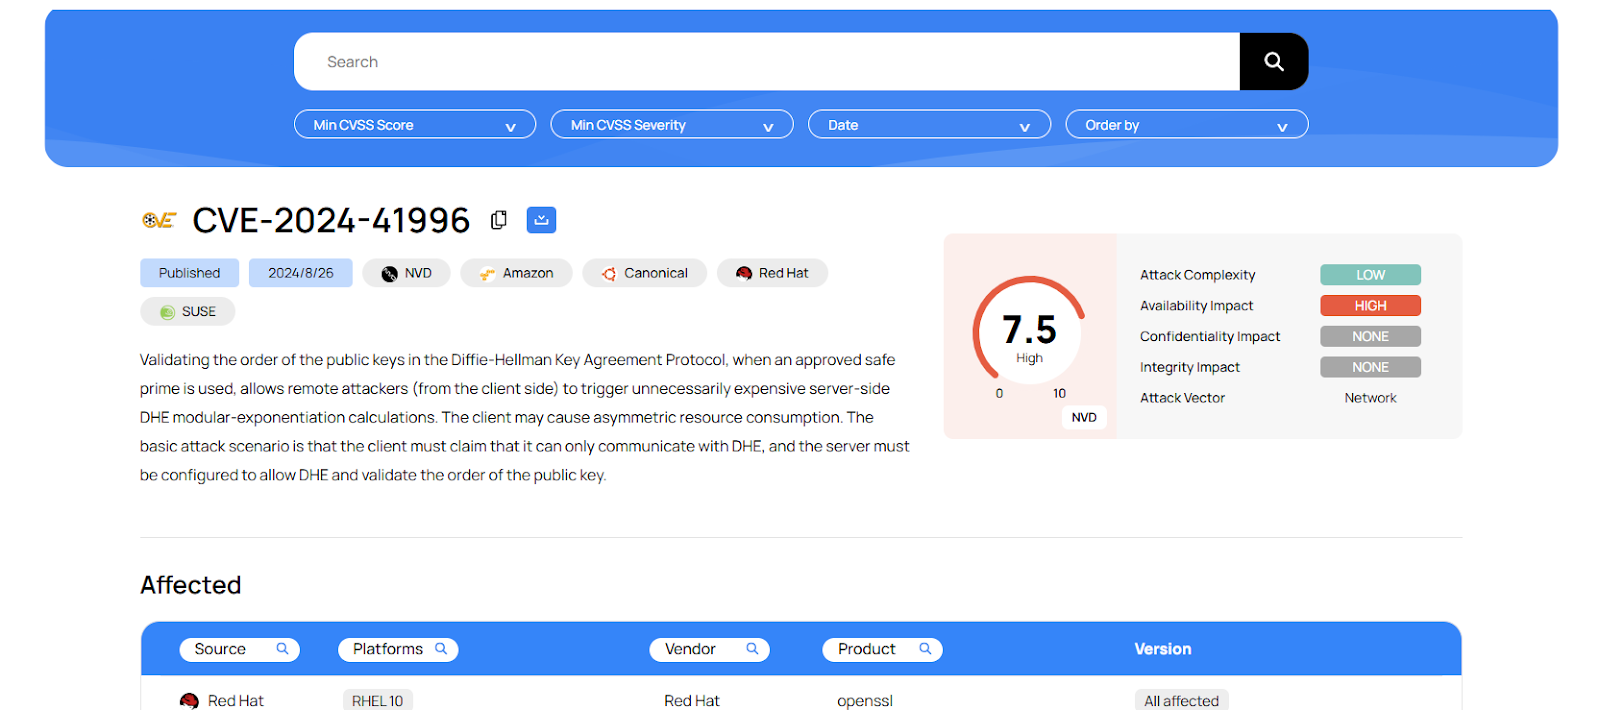
The image above shows all vulnerability information associated with our installed OpenSSL package across all monitored endpoints. This indicates that we should update to a non-vulnerable version.
Browser extension security monitoring
Unmanaged browser extensions are a growing supply chain and data leak risk. Extensions requesting tabs, storage, or webRequest permissions can read sensitive data, inject scripts, or serve as malware. In recent times, fake ad blockers and password managers have been used in credential theft campaigns. Wazuh provides a browser extensions inventory across your monitored endpoints using the Wazuh IT hygiene module.
Test the simulation
We download and install different browsers and browser extensions on the Windows endpoint in this scenario.
1. Download and install Chrome browser.
2. After installation, click on the dropdown on your browser at the top right and click Extensions.
3. Select Visit Chrome Web Store.
4. Search for and add the following extensions to Chrome. Allow access when prompted.
- Google Docs Offline
- Grammarly: AI Writing Assistant and Grammar Checker App
These apps will serve as part of your approved list of extensions.
5. Search for and add to Chrome the following extensions. Allow access when prompted.
- IE Tab
- MetaMask
- Phathom
- Leo Wallet
These apps will serve as extensions with access but not part of the approved list.
6. Download and install Comet browser.
7. Replicate the actions above. Alternatively, Comet allows you to import all browser information from Chrome.
Wazuh dashboard
1. Navigate to the Security operations > IT Hygiene.
2. Select the Software tab and then Browser extensions.
3. Click + Add filter and configure it as follows:
- Field:
package.permissions - Operator:
is one of - Value:
tabs,storage,webRequest.
This filter shows browser extensions that have tabs, storage, and web request permissions
4. Click Save.
5. Click + Add filter and configure it as follows:
- Field:
package.permissions - Operator:
is not one of - Value:
Google Docs Offline,Microsoft Url Search Hook,Grammarly: AI Writing Assistant and Grammar Checker App,Grammarly: AI Writing and Grammar Checker App.
This filter excludes your approved list of browser extensions, allowing you to identify unapproved extensions within your environment.
6. Click Save.
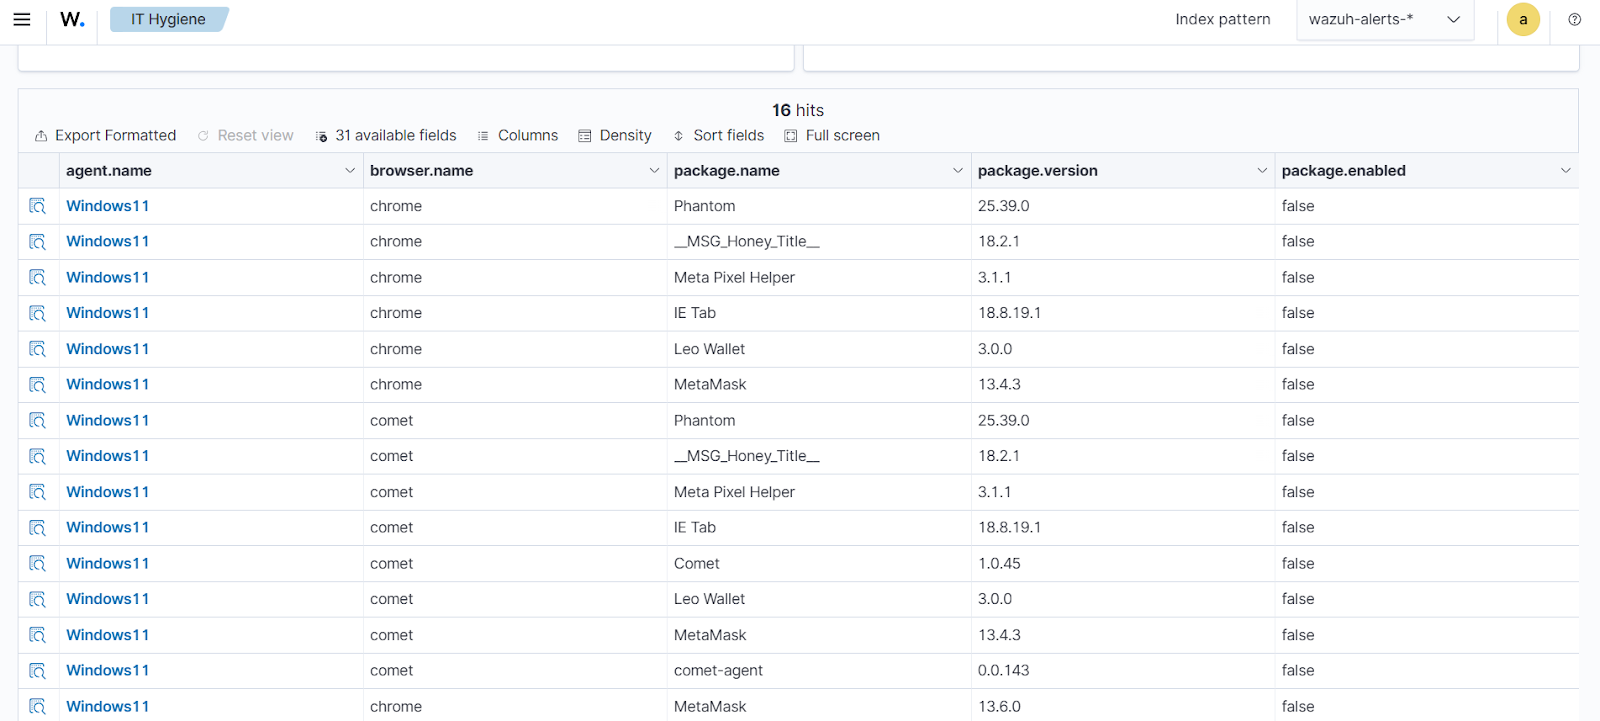
The image above shows all browser extensions across all monitored endpoints with tabs, storage, and web request permissions, except for some specified known extensions.
Auditing user accounts for hygiene and compliance
Auditing user accounts across endpoints prevents privilege escalation, orphaned access, or dormant credentials that attackers exploit. Untracked local user accounts, for example, unused service accounts on Windows or forgotten sudoers on Linux, can lead to unauthorized access or compliance failures. In environments with numerous endpoints, auditing user accounts either using net user on Windows or /etc/passwd on Linux per endpoint can be time-consuming and impractical. You need instant and centralized visibility. The Wazuh Syscollector module scans every endpoint and aggregates user data such as username, UID, shell, home directory, last login, and group membership. Dormant or misconfigured accounts represent a significant attack surface. They can be exploited for lateral movement, privilege escalation, or persistent access. Regular auditing ensures only legitimate, active accounts exist, reducing the risk of credential-based attacks and ensuring compliance with least-privilege principles. Auditing dormant and privileged accounts is critical for regulatory compliance (SOC 2, PCI-DSS, HIPAA, ISO 27001) and directly reduces the attack surface.
Non-standard shell for system account
Linux system accounts (UID 0–99) should never have interactive shells like /bin/bash or /bin/zsh. These are reserved for automated processes and must use non-login shells such as /sbin/nologin, /usr/sbin/nologin, /bin/sync, /sbin/halt, /sbin/shutdown, or /bin/false. A system account with a login shell is a red flag that may indicate a backdoor, misconfiguration, or privilege escalation attempt.
Test the simulation
Create a malicious account as a system user with an interactive shell on your Linux endpoints.
1. Create a system account malicious_sys with UID 99 and /bin/bash shell:
$ sudo useradd -u 99 -s /bin/bash malicious_sys -M
2. Set a password:
$ echo "malicious_sys:Temp123!" | sudo chpasswd
3. Verify the account:
$ sudo getent passwd malicious_sys
Wazuh dashboard
1. Navigate to the Security operations > IT Hygiene.
2. Select the Identity tab and then Users.
3. Click + Add filter and configure it as follows:
- Field:
user.uid_signed - Operator:
is between - Value:
0 to 100.
This filters for only system accounts.
4. Click Save.
5. Click + Add filter and configure it as follows:
- Field:
user.shell - Operator:
is not one of - Value:
/sbin/nologin,/usr/sbin/nologin,/bin/false,/bin/sync,/sbin/halt,/sbin/shutdown.
This filter excludes shells that do not allow login.
6. Click Save.
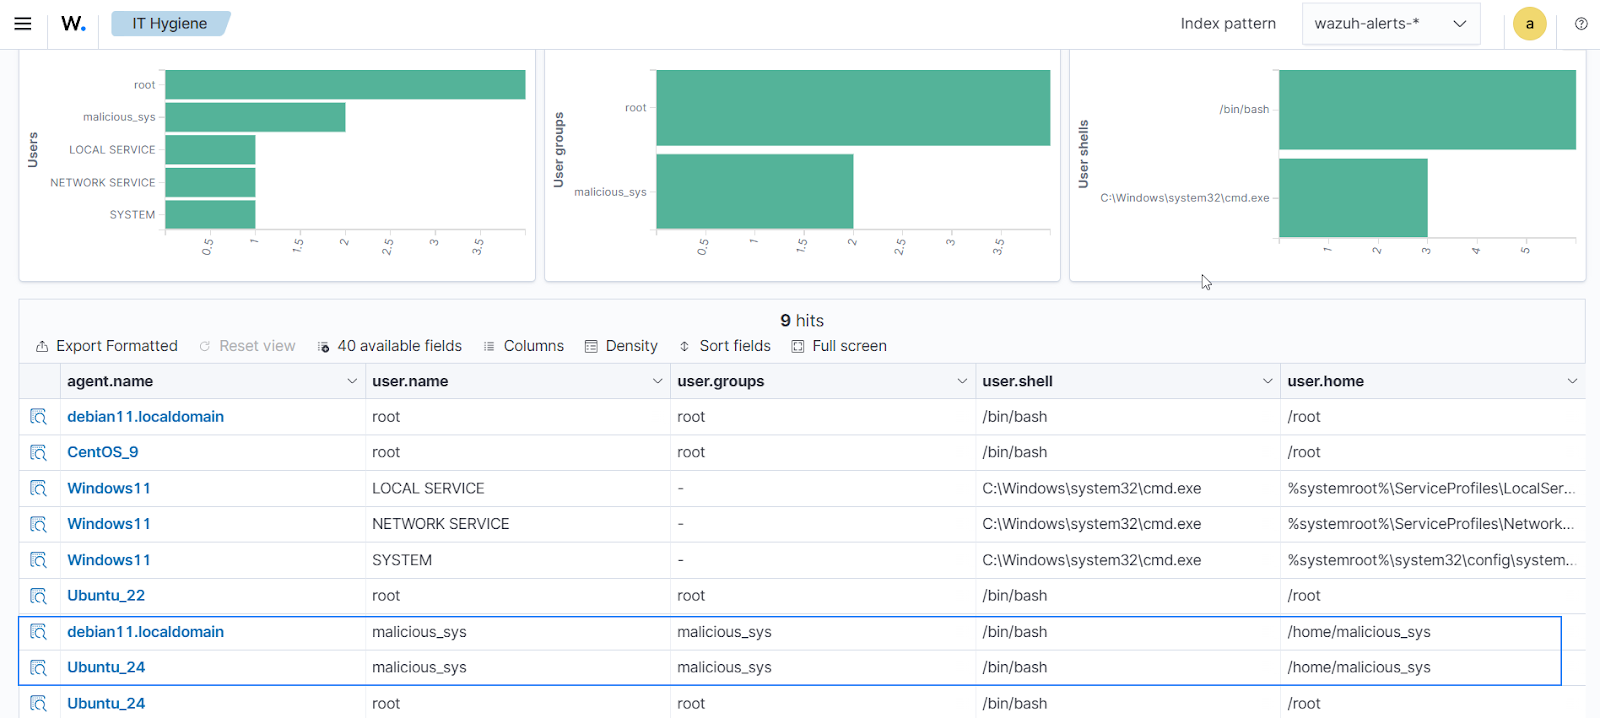
The image above displays all system accounts with their login shells. We identified malicious_sys as a system account with a login shell, indicating a compromise and immediate action to delete the user account.
Dormant local accounts
A local account that hasn’t been used in over 90 days is almost certainly forgotten, but it still exists with full access to the endpoint. These dormant accounts are hiding spots for attackers; no one monitors them. Passwords are often weak or unchanged, and they may retain admin rights. One compromised stale account can become the entry point for lateral movement or persistence.
Test the simulation
Simulate a dormant user account (never logged in or with an old last login). In this scenario, the user never logged in. Follow these steps on your Linux endpoints.
1. Create the user account and set any desired password of your choice:
$ sudo useradd -m olduser
$ sudo passwd olduser
2. Verify the account, check the account details to confirm setup:
$ sudo getent passwd olduser
$ sudo chage -l olduser
Wazuh dashboard
1. Navigate to the Security operations > IT Hygiene.
2. Select the Identity tab and then Users.
3. Click + Add filter and configure it as follows:
- Field:
user.shell - Operator:
is one of - Value:
/bin/bash,C:\Windows\system32\cmd.exe.
This filter is for users who have interactive login shells for both Linux and Windows endpoints. It identifies accounts capable of interactive login, which are potential targets for compromise or misuse.
4. Click Save.
5. Click + 40 available fields and enable user.last_login field.
The user.last_login field tracks the last time each account authenticated. Enabling this field also allows you to identify accounts that have never logged in. Identifying and disabling or removing such accounts reduces your attack surface and ensures compliance with access management policies.
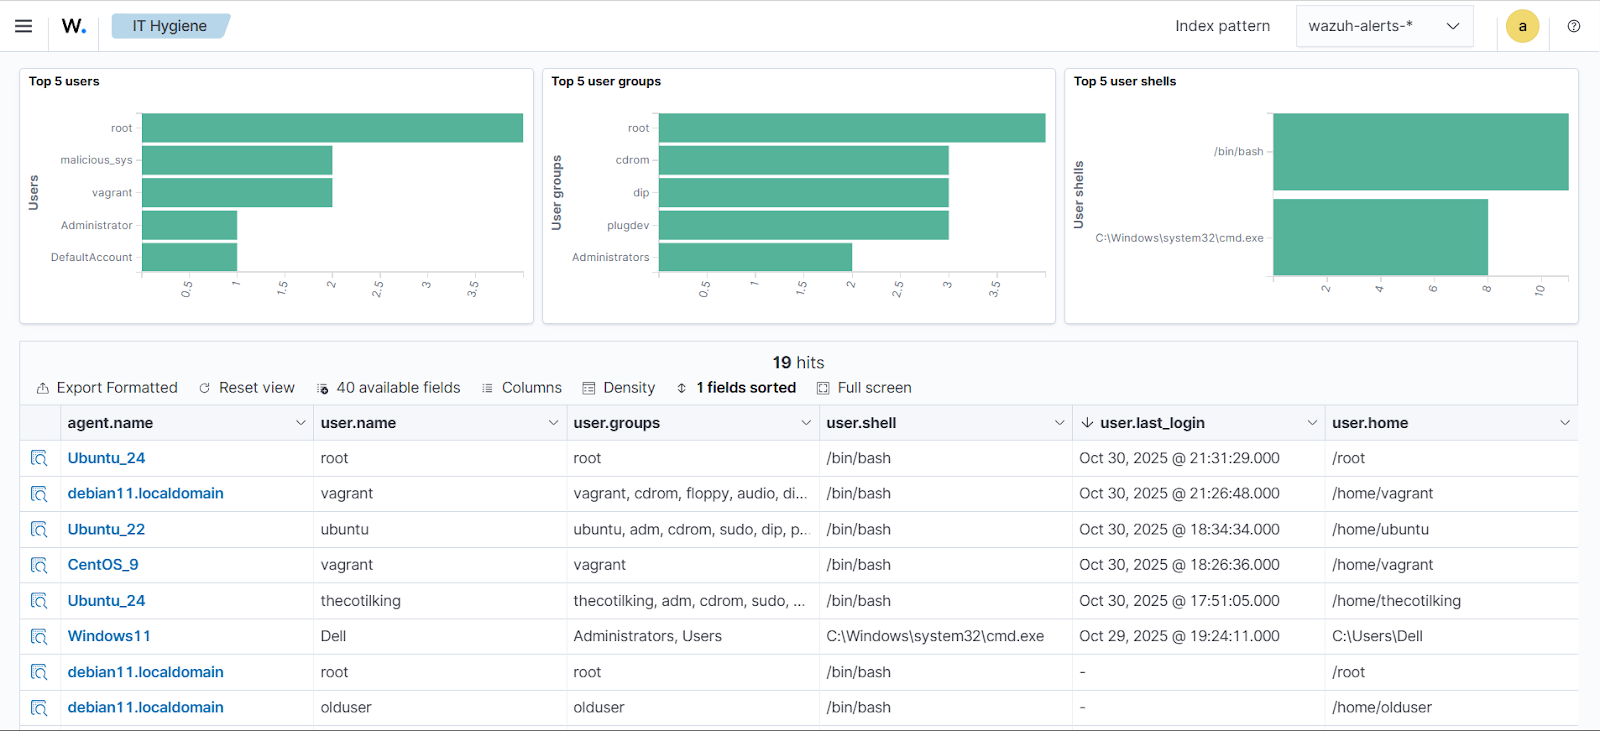
The image above shows all users with interactive shells and their last login times. It shows users with recent login times and two users, olduser and root, who have never logged on, hence an empty value for the field user.last.login.
Unapproved user in the Administrators group
An unapproved user in the local Administrators (Windows) or sudo (Linux) group is a critical privilege escalation risk. These accounts can install software, change settings, or disable security, even if they’re rarely used. Attackers utilize them because they blend in with legitimate access. The Wazuh IT hygiene module allows you to identify all users with elevated privileges across all monitored endpoints. The effect is to surface all accounts with elevated privileges across your environment, allowing you to verify that only authorized personnel have administrative access. This is essential for preventing unauthorized system changes and maintaining compliance with access control policies.
Test the simulation
We show users who are already part of the sudo group on Linux endpoints and users who are already part of the Administrators group on Windows endpoints.
Wazuh dashboard
1. Navigate to the Security operations > IT Hygiene.
2. Select the Identity tab and then Groups.
3. Click + Add filter and configure it as follows:
- Field:
group.name - Operator:
is one of - Value:
sudo,Administrators.
This filter isolates privileged accounts to identify all users who are members of privileged groups (sudo on Linux, Administrators on Windows).
2. Click Save.
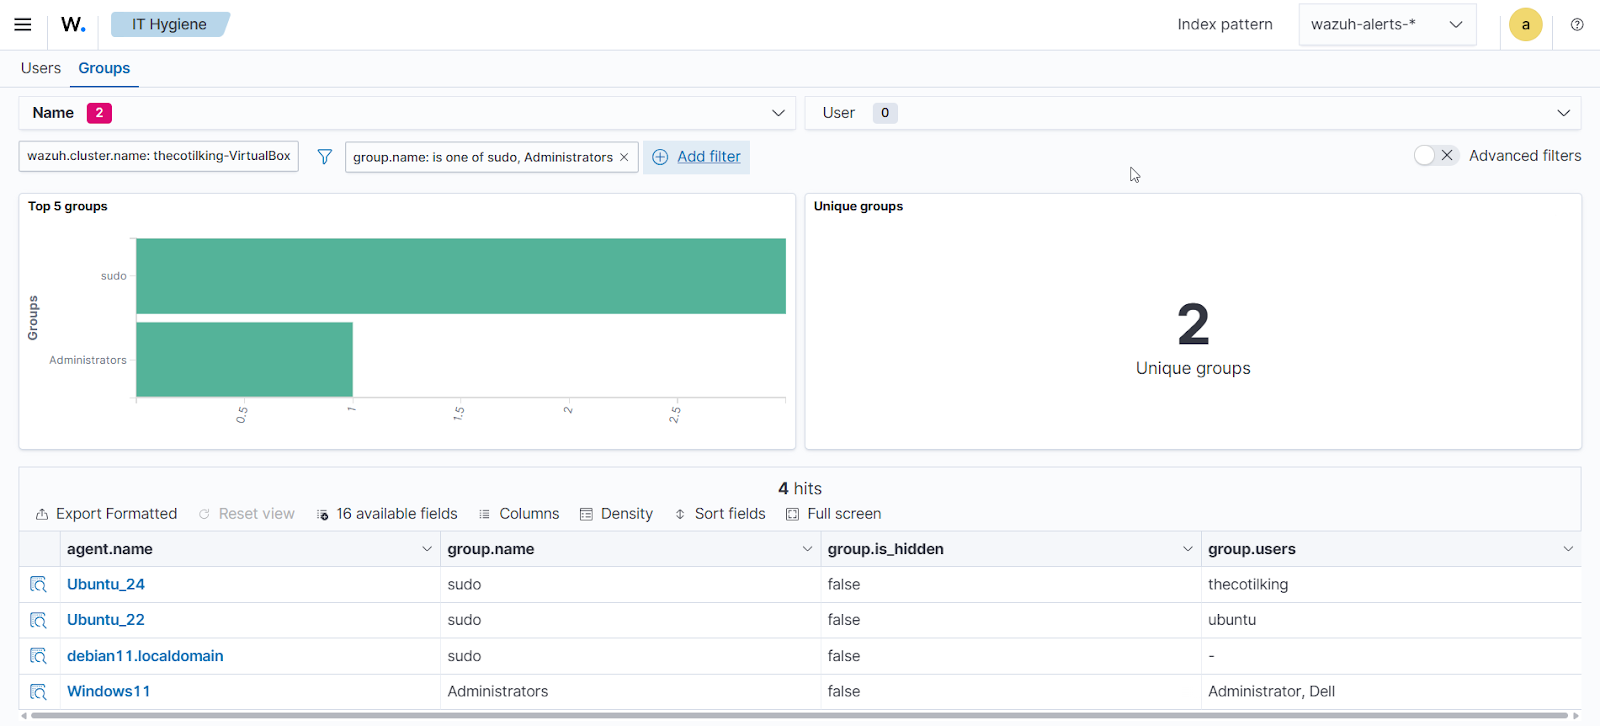
The image above shows the list of users across all endpoints who belong to the sudo (Linux) and Administrators (Windows) groups. These groups are recognized as having elevated privileges based on standard OS security conventions.
Monitoring hardware resources across endpoints
In enterprises with large numbers of Linux and Windows endpoints, mismatched hardware specifications (for example, servers with too few CPU cores or excessive memory) can lead to performance bottlenecks or wasted cloud spending. Oversized instances often account for significant cloud costs, while underpowered endpoints cause outages in critical workloads like databases. Wazuh IT hygiene module enables resource analysis across all devices to identify endpoints that fall outside policy-defined specifications (for example, a minimum of 4 cores for web servers). This supports cost optimization and reliability without requiring per-endpoint checks.
CPU core compliance
Follow the steps to identify underpowered endpoints.
Test the simulation
In this use case, we simulate an infrastructure with CPU configurations that are non-compliant with our environment. We assumed a policy stating that CPU specifications must be at least four cores, making endpoints with fewer than four CPUs non-compliant.
- Ubuntu 24 endpoint
- CentOS 9 endpoint
- Debian 11 endpoint.
Wazuh dashboard
1. Navigate to the Security operations > IT Hygiene.
2. Select the System tab and then Hardware.
3. Click + Add filter and configure it as follows:
- Field:
host.cpu.cores - Operator:
is one of - Value:
1,2,3
The host.cpu.cores field with is one of operator identifies endpoints with 1, 2, 3 CPU cores.
4. Click Save.
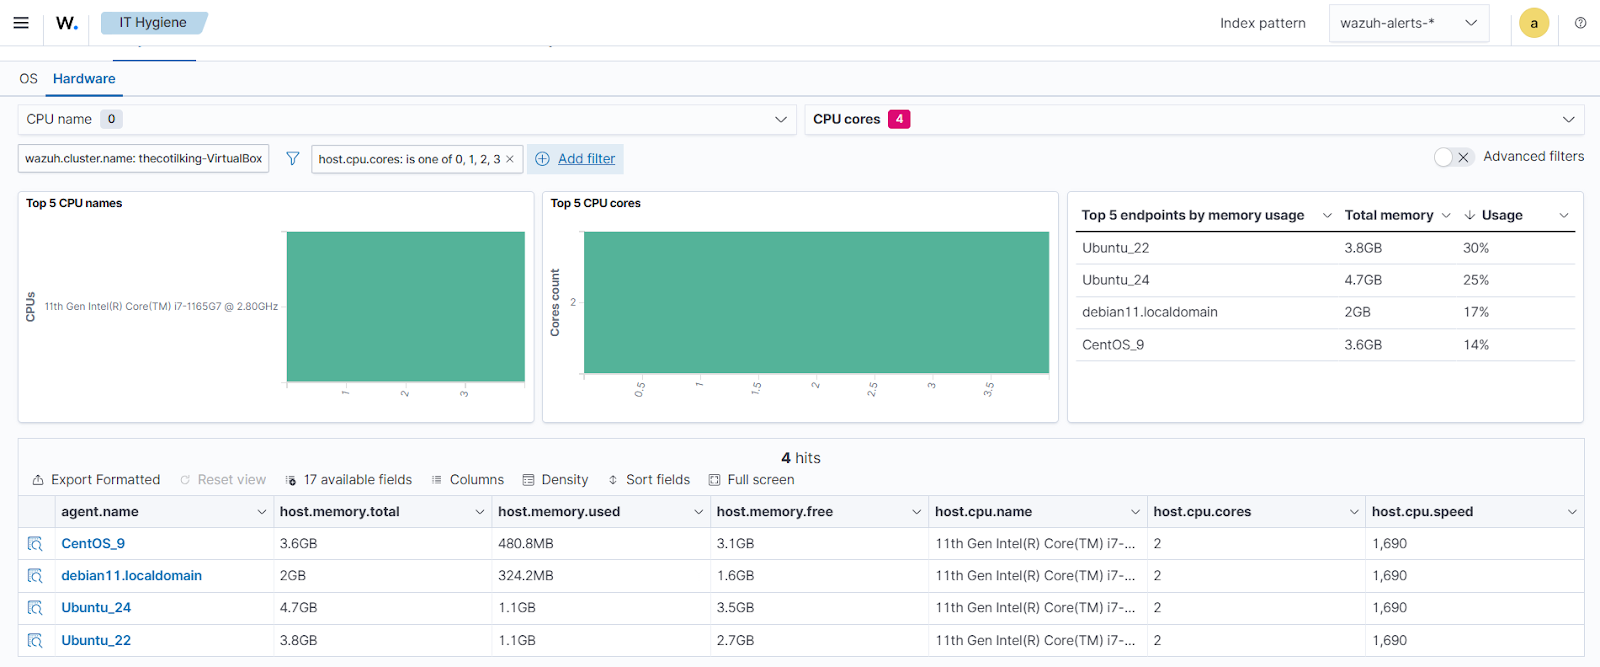
The image above shows endpoints having fewer than four CPU cores. These can be considered underpowered and a violation of policy-defined specification. In cloud environments, underpowered instances waste budget on inefficient resources, while overpowered instances drive unnecessary costs. This filter enables proactive capacity planning and cost optimization.
Memory configuration compliance
Follow the steps to identify non-compliant memory.
Test the simulation
In this use case, we simulate an infrastructure with memory configurations that are non-compliant with our environment. We assigned memory totals below 4GB and above 16GB to the following endpoints.
- Windows 11
- CentOS 9
- Debian 11
Wazuh dashboard
1. Navigate to the Security operations > IT Hygiene.
2. Select the System tab and then Hardware.
3. Click + Add filter and configure it as follows:
- Field:
host.memory.total - Operator:
is not between - Value:
4294967296>17179869184
This filter uses the host.memory.total field to identify endpoints with memory outside the range (4GB to 16GB in this example), helping ensure hardware meets organizational standards for performance and security.
4. Click Save.
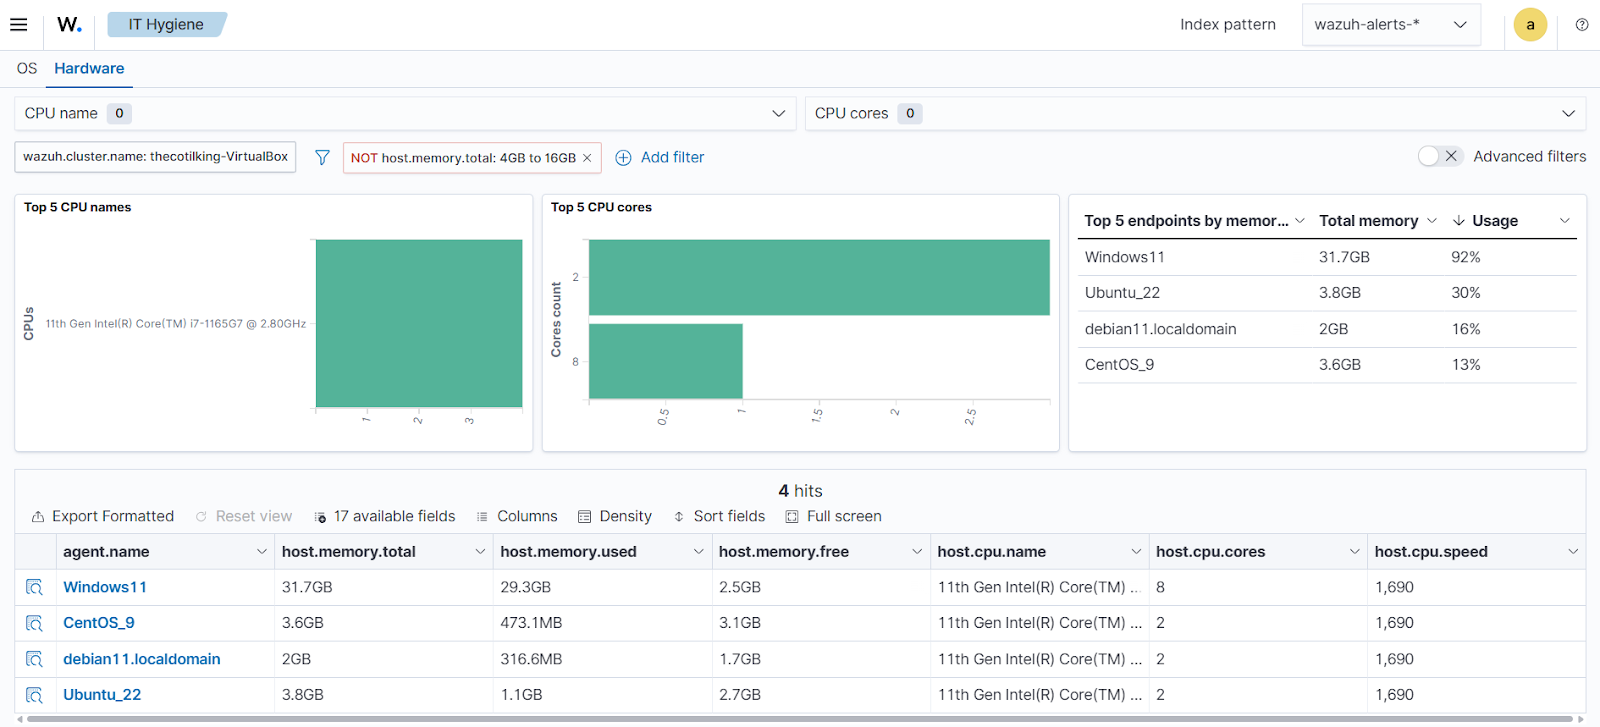
The image above shows endpoints below the defined memory threshold.
Conclusion
This blog post demonstrates how the Wazuh IT Hygiene module aggregates system inventory data across endpoints within your infrastructure, providing a comprehensive overview and enhancing overall security posture. We covered practical use cases, including dormant account detection, package version compliance, browser extensions, and others.
Beyond meeting compliance requirements, this centralized visibility enables continuous improvement and adaptive security governance. By aggregating real-time inventory data, security teams can identify trends, detect configuration drift, and respond to emerging threats faster than traditional point-in-time audits allow. This approach transforms IT hygiene from a periodic checklist into an ongoing, data-driven process that evolves with your organization’s risk landscape. The ability to correlate user accounts, software versions, hardware specifications, and browser extensions across thousands of endpoints enables teams to make informed decisions about resource allocation, patch prioritization, and policy refinement, ultimately building a more resilient and agile security posture.
If you have any questions about Wazuh, we invite you to join our community, where our team can assist you.