In this post you will find how to configure Elasticsearch to automatically back up your Wazuh indices in local or Cloud-based storage and restore them at any given time, both for standard Elastic and Open Distro. This will provide the opportunity to leverage a more resource-efficient destination for rarely accessed data.
The Wazuh Open Source Security Platform integrates with the Elastic Stack to allow you to quickly access and visualize alert information, greatly helping during an audit or forensic analysis process, among other tasks including threat hunting, incident response and security operations analysis.
For increased reliability and storage management, it’s good practice to back up critical information in any system. Your security data is of course not the exception.
Snapshots
A snapshot is a backup taken from a running Elasticsearch cluster. You can take snapshots of an entire cluster, including all or any of its indices.
It is worth mentioning that snapshots are incremental; a newer snapshot of an index will only store information that is not part of the previous one, thus reducing overhead.
First, you need to create a repository, which is where the data will be stored. There are different types of repositories:
- Filesystem. Uses the filesystem of the machine where Elasticsearch is running to store the snapshot.
- Read-only URL. Used when the same repository is registered in multiple clusters. Only one of them should have write access to it.
- Source only. Minimal snapshots that can take up to 50% less space on disk.
- AWS S3. The information is stored in an S3 bucket. A plugin is required.
- Azure. It leverages Azure storage as the backend. A plugin is required.
- GCS. Uses Google Cloud Storage to store the snapshots. A plugin is required.
- HDFS. Uses Hadoop’s highly fault-tolerant filesystem, designed for AI workloads. A plugin is required.
The following sections will showcase how to use filesystem and Amazon S3 bucket repositories. Configuration for other repositories will be similar.
Filesystem based repository
You can create snapshots using Elasticsearch’s computer filesystem, typically specifying a mount point that has more storage. It does not need to be a high-performance SSD.
For example, you can use the path /mount/elasticsearch_backup. Ensure that it is writeable by the Elasticsearch user:
chown elasticsearch: /mount/elasticsearch_backup/
Then add this folder as a repository in Elasticsearch’s configuration file, located at /etc/elasticsearch/elasticsearch.yml:
path.repo: ["/mount/elasticsearch_backup"]
Don’t forget to restart the Elasticsearch service for the change to take effect:
systemctl restart elasticsearch
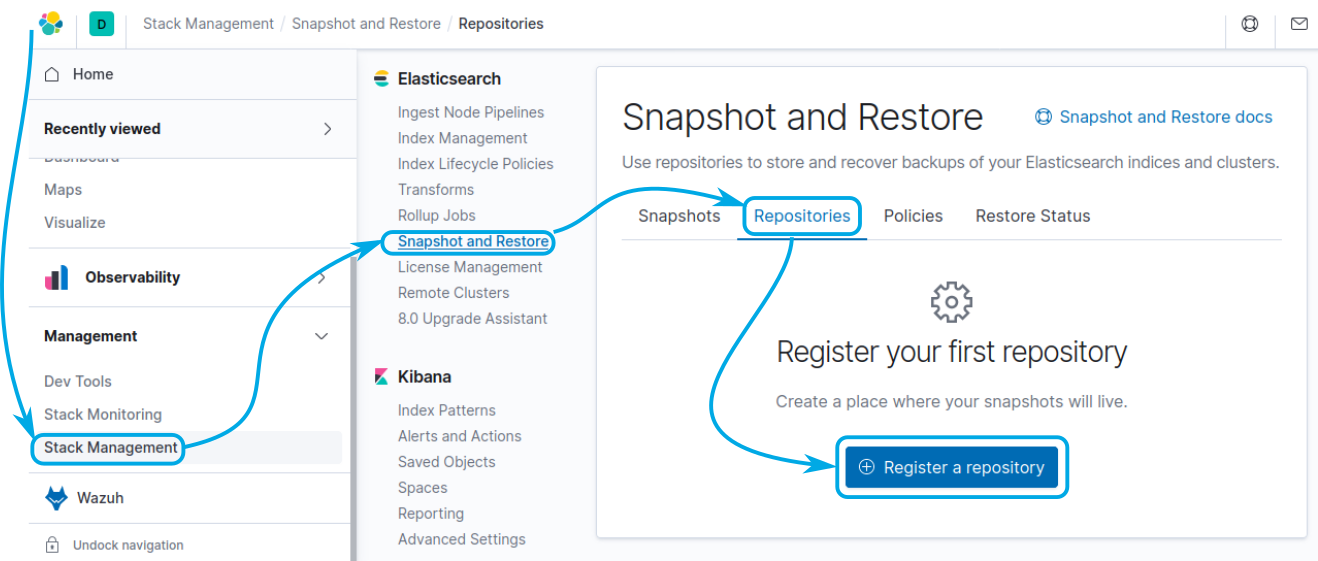
You may then configure the repository by navigating to Stack Management > Snapshot and Restore > Repositories; click on the Register a repository button:
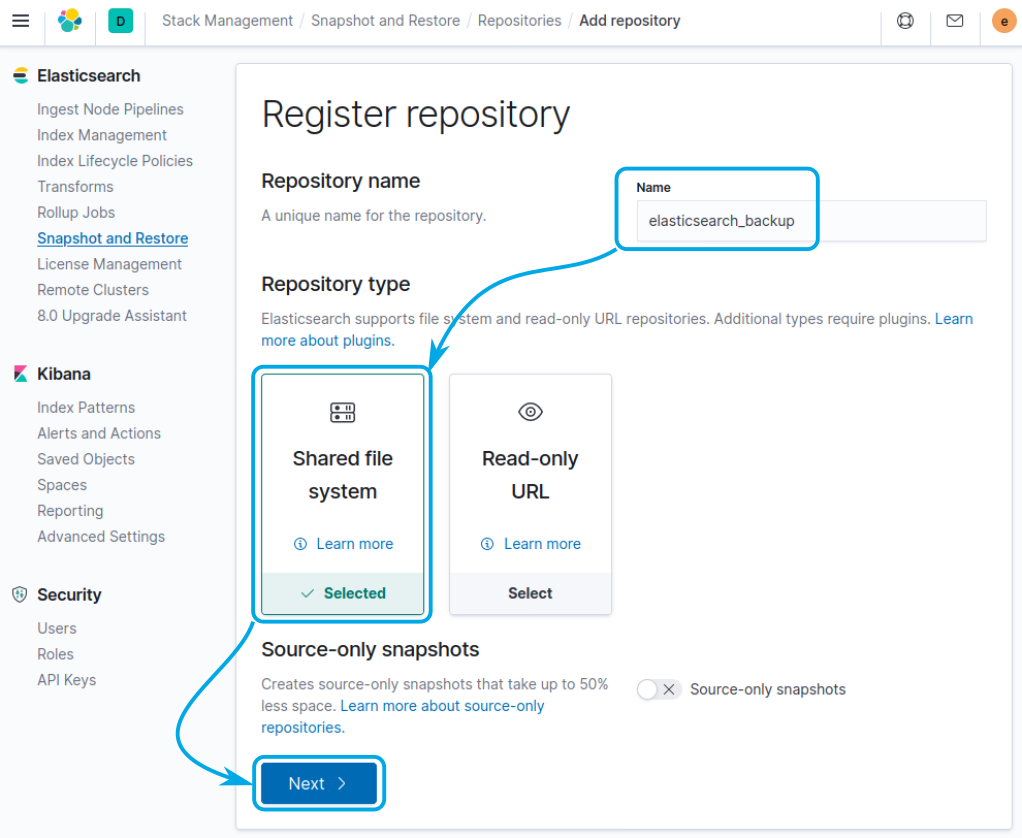
Provide a name for the repository, elasticsearch_backup was used in this example, and select the Shared file system type. Click on Next to proceed:
Alternatively, you may configure the repository by issuing the following API request:
curl -XPUT <elasticsearch_address>:9200/_snapshot/elasticsearch_backup -H "Content-Type: application/json" -d'
{
  "type": "fs",
  "settings": {
    "delegate_type": "fs",
    "location": "/mount/elasticsearch_backup",
    "compress": true
  }
}
'
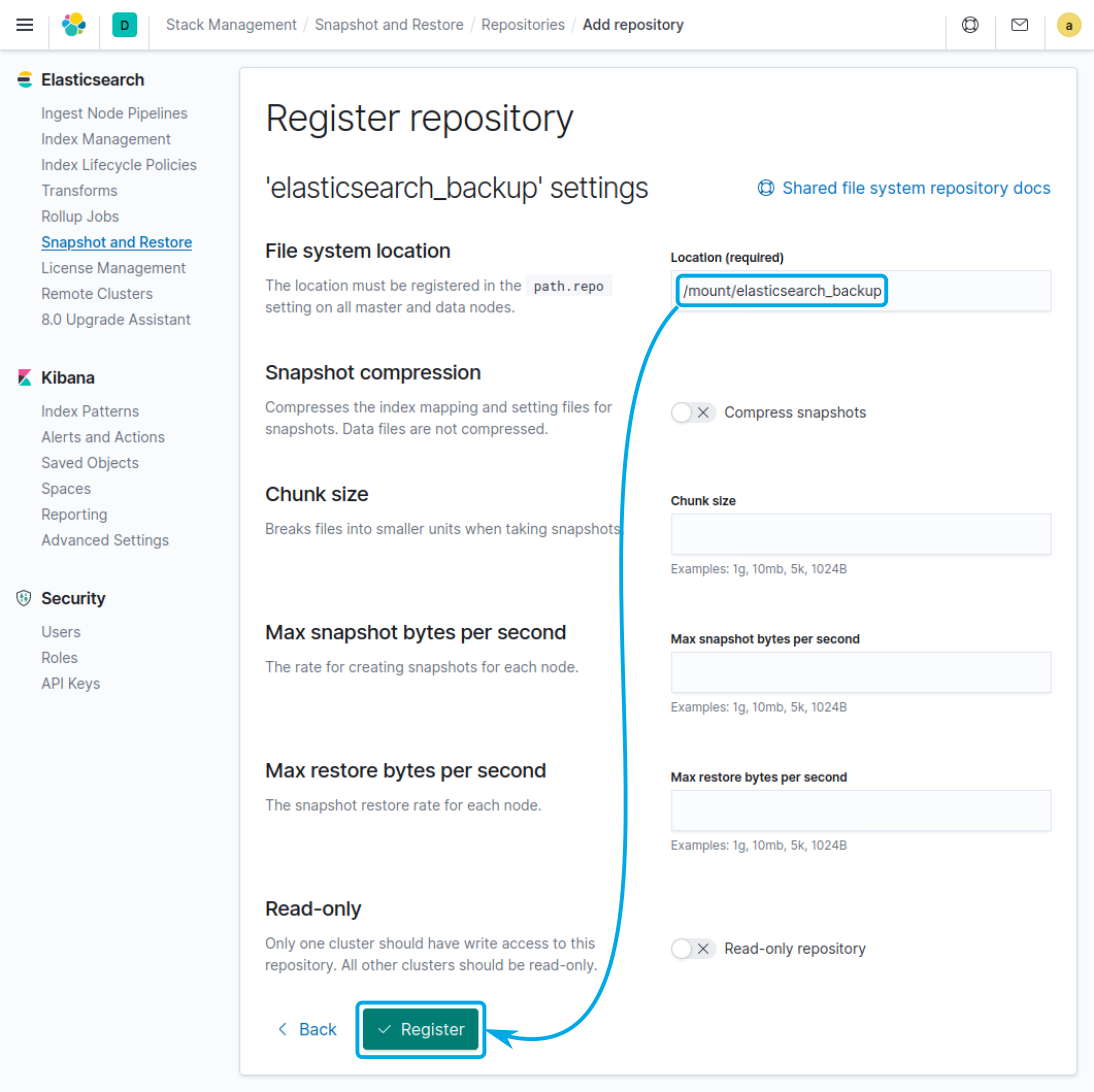
Finally, add the filesystem location where the information will be stored and click on Register:
Note
<elasticsearch_address> must be replaced by the IP or address to your Elasticsearch instance on this and all the other API call examples in this article.
Cloud-based repository
You can use storage located on the Cloud as the back-end for your repository. For this, there are readily available plugins for various Cloud service providers.
To do so, point a command line into the /usr/share/elasticsearch/bin/ directory and run the following as root for the corresponding Cloud provider you will use:
Amazon Web Services:
./elasticsearch-plugin install repository-s3
Microsoft Azure:
./elasticsearch-plugin install repository-azure
Google Cloud:
./elasticsearch-plugin install repository-gcs
When the command is executed you may receive a warning regarding additional permissions and you will then need to accept to continue with the installation.
After installing the plugin it is necessary to restart the Elasticsearch service:
systemctl restart elasticsearch
Similarly to the previous example, navigate to Stack Management > Snapshot and Restore > Repositories, then click on the Register a repository button:
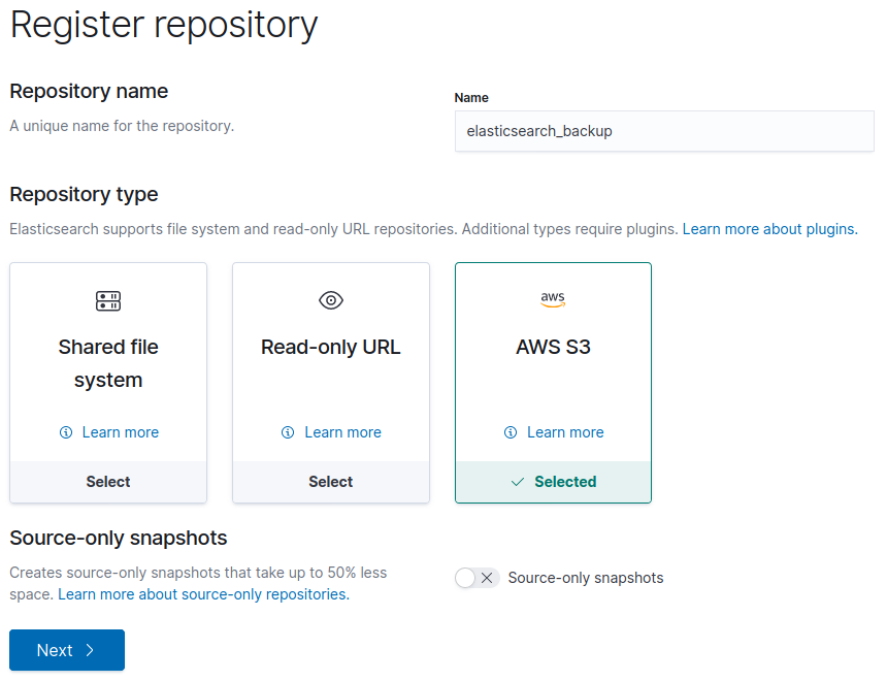
Once there select the AWS S3 type of repository, click on Next:
Then configure the repository by providing the name of the bucket where the snapshots will be stored and click on Register:

Alternatively, you can add the repository issuing the following request to the Elasticsearch API:
curl -XPUT <elasticsearch_address>:9200/_snapshot/elasticsearch_backup -H "Content-Type: application/json" -d'
{
  "type": "s3",
  "settings": {
    "bucket": "your-unique-bucket-ID",
  }
}
'
To access the bucket you can associate an AWS policy to the user with the following permissions:
{
  "Statement": [
    {
      "Action": [
        "s3:ListBucket",
        "s3:GetBucketLocation",
        "s3:ListBucketMultipartUploads",
        "s3:ListBucketVersions"
      ],
      "Effect": "Allow",
      "Resource": [
        "arn:aws:s3:::your-unique-bucket-ID"
      ]
    },
    {
      "Action": [
        "s3:GetObject",
        "s3:PutObject",
        "s3:DeleteObject",
        "s3:AbortMultipartUpload",
        "s3:ListMultipartUploadParts"
      ],
      "Effect": "Allow",
      "Resource": [
        "arn:aws:s3:::snaps.example.com/*"
      ]
    }
  ],
  "Version": "2012-10-17"
}
To securely provide credentials to Elasticsearch so it may access the repository, first add the AWS account’s access key by executing:
/usr/share/elasticsearch/bin/elasticsearch-keystore add s3.client.default.access_key
And the secret key by executing:
/usr/share/elasticsearch/bin/elasticsearch-keystore add s3.client.default.secret_key
Automating snapshot creation on Elastic or Open Distro
After configuring a repository, you may schedule snapshots to be automatically created using Snapshot Lifecycle Management on Elastic or Index State Management on Open Distro.
This will ensure that snapshots are created every day without human intervention and that they will be ready to restore whenever necessary.
Elastic Snapshot Lifecycle Management
To automate the creation of snapshots on Elastic go to Stack Management > Snapshot and Restore > Repositories > Policies and click on the Create a policy button:

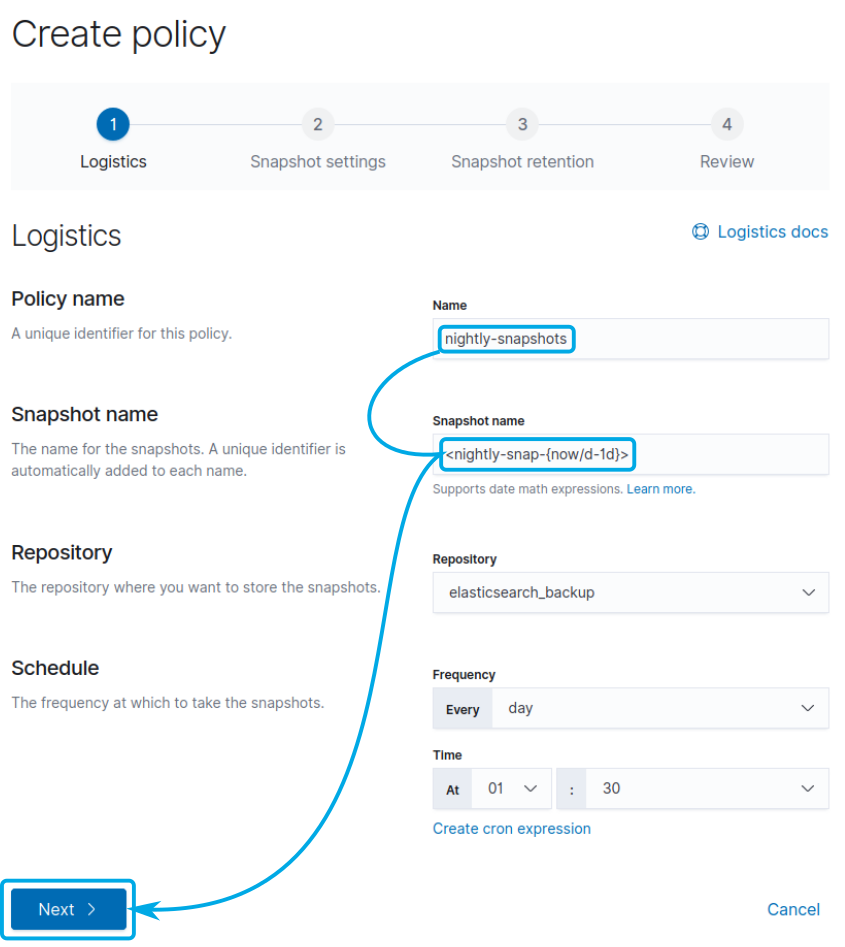
Provide a name for the policy, for example, nightly-snapshots, and a unique identifier for the snapshots. For instance, you may identify them using a date <nightly-snap-{now/d-1d}>.
By default, snapshots will be executed at 1:30 am, but you can adjust it to fit your needs. To continue, click on Next:
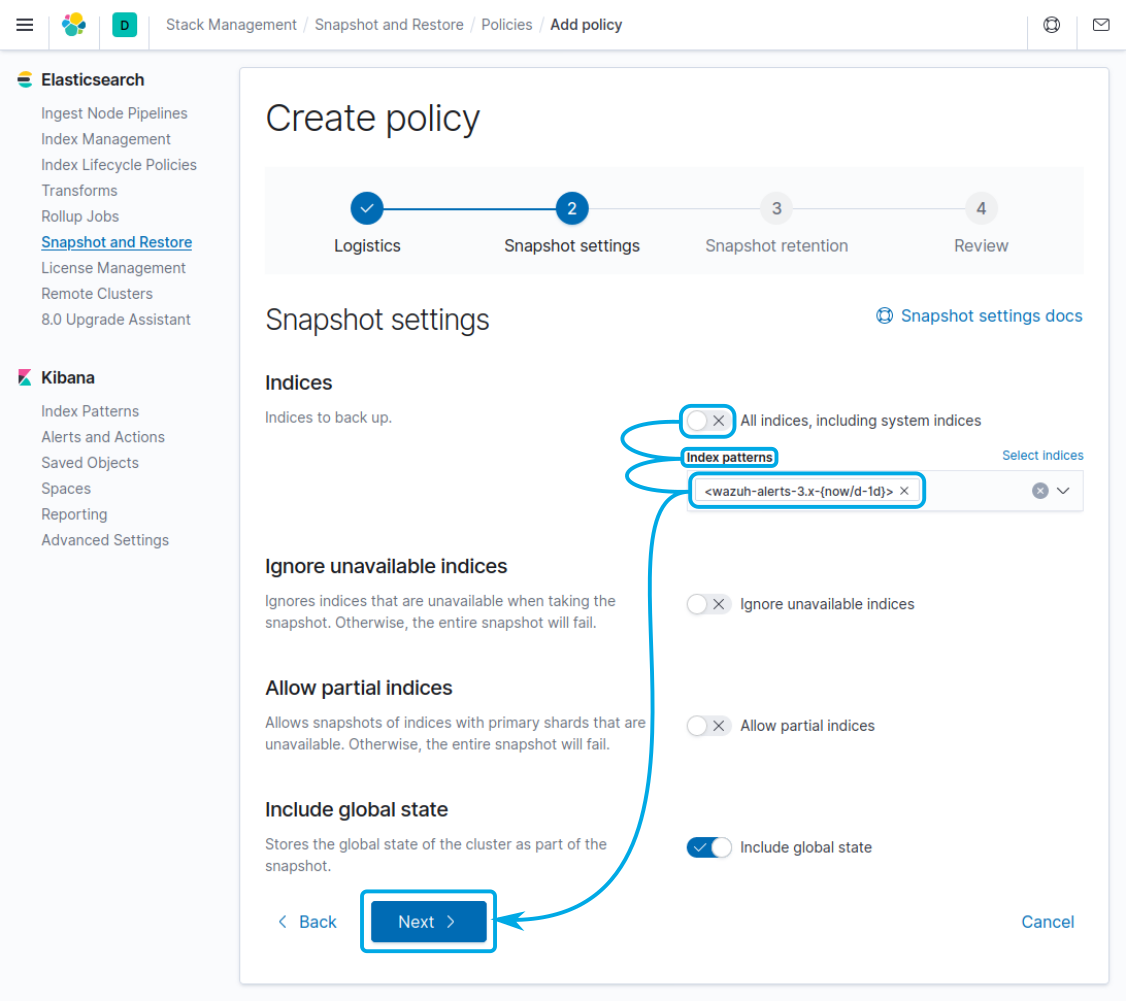
For you to back up wazuh alerts indices disable All indices, then select Index patterns and specify <wazuh-alerts-3.x-{now/d-1d}>. After that click on Next:
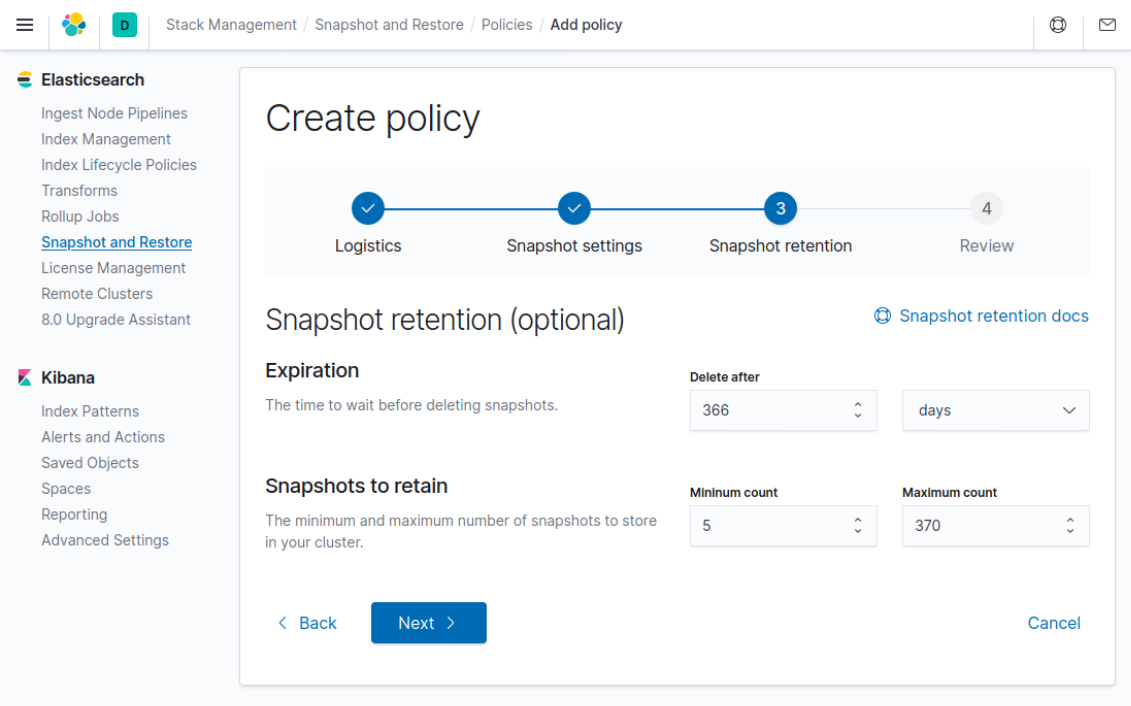
You may optionally specify when the snapshots will be automatically deleted to free up space in the repository. Adjust accordingly and click on Next:
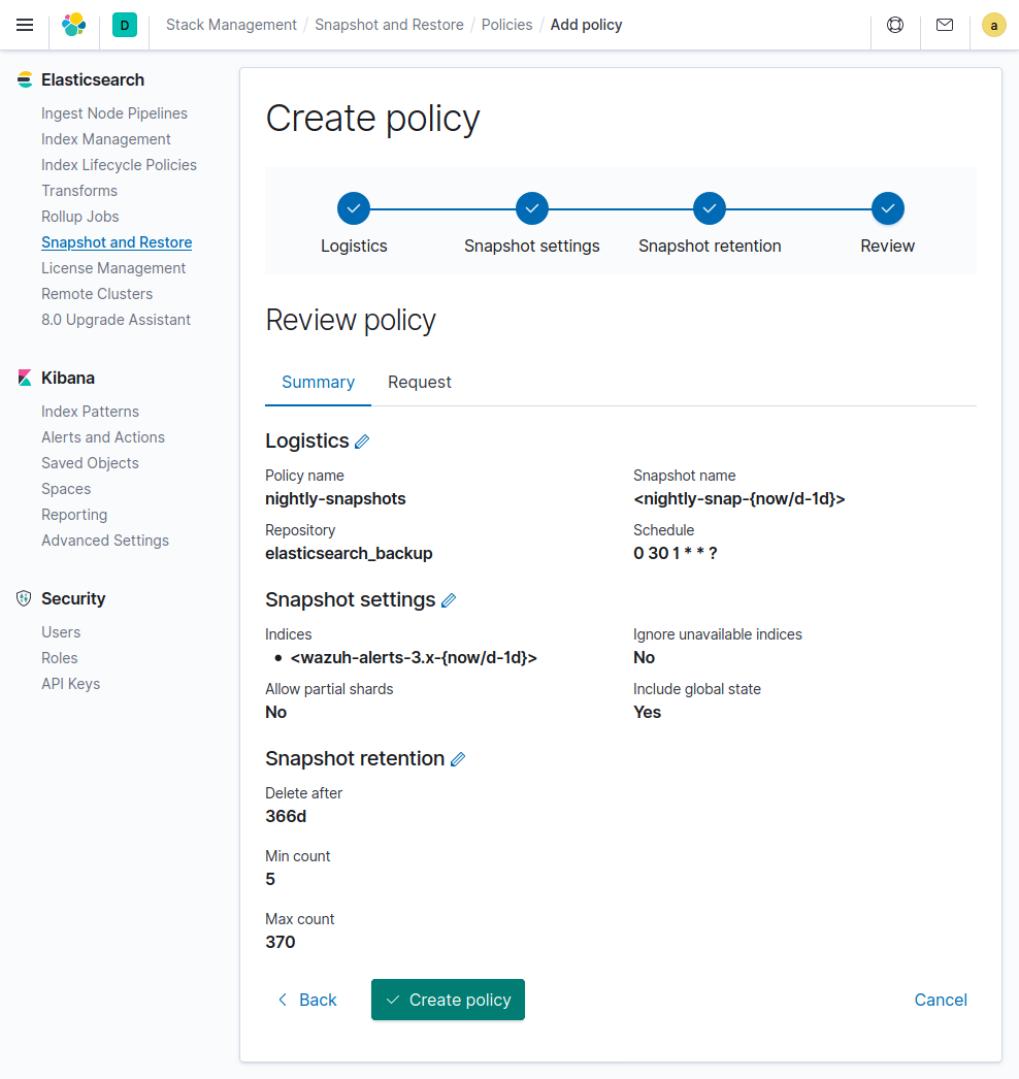
Review the policy before clicking on Create policy:
Alternatively, you may run the following query to create the policy:
curl -XPUT <elasticsearch_address>:9200/_slm/policy/nightly-snapshots -H "Content-Type: application/json" -d'
{
  "schedule": "0 30 1 * * ?",
  "name": "<nightly-snap-{now/d-1d}>",
  "repository": "elasticsearch_backup",
  "config": {
    "indices": ["<wazuh-alerts-3.x-{now/d-1d}>"]
  },
  "retention": {
    "expire_after": "366d",
    "min_count": 5,
    "max_count": 370
  }
}
'
Note
Note that there’s an optional retention policy that will automatically delete snapshots older than a year.
Open Distro Index State Management
A previous blog post, Wazuh index management, covered how to configure Index State Management in Open Distro. You can take advantage of this feature as well for scheduling the creation of snapshots.
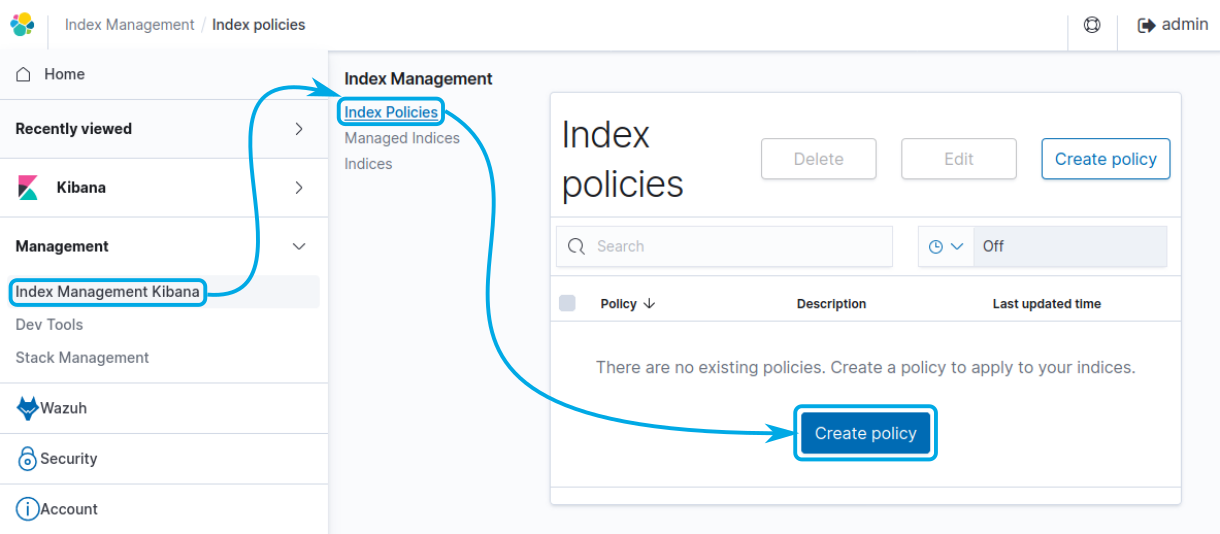
You may apply a policy by going into Index Management Kibana and clicking the Create policy button under Index Policies:
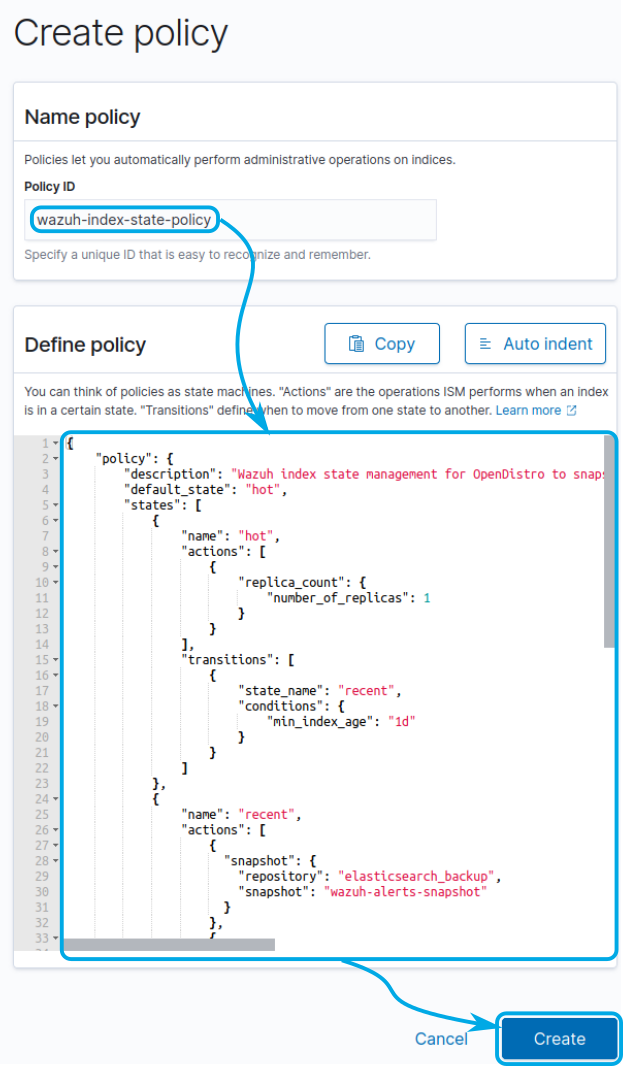
You need to specify a name for the policy and the policy itself. As part of it, one of the states should include the snapshot action:
{

    "name": "recent",
    "actions": [
        {
            "snapshot": {
            "repository": "elasticsearch_backup",
            "snapshot": "wazuh-alerts-snapshot"
            }
        }
    ]

}
You can find a complete example here:
{
    "policy": {
        "description": "Wazuh index state management for Open Distro to snapshot indices after 1 day, move into a cold state after 30 days and delete them after a year.",
        "default_state": "hot",
        "states": [
            {
                "name": "hot",
                "actions": [
                    {
                        "replica_count": {
                            "number_of_replicas": 1
                        }
                    }
                ],
                "transitions": [
                    {
                        "state_name": "recent",
                        "conditions": {
                            "min_index_age": "1d"
                        }
                    }
                ]
            },
            {
                "name": "recent",
                "actions": [
                    {
                      "snapshot": {
                        "repository": "elasticsearch_backup",
                        "snapshot": "wazuh-alerts-snapshot"
                      }
                    },
                    {
                        "read_only": {}
                    }
                ],
                "transitions": [
                    {
                        "state_name": "cold",
                        "conditions": {
                            "min_index_age": "30d"
                        }
                    }
                ]
            },
            {
                "name": "cold",
                "actions": [
                    {
                        "read_only": {}
                    }
                ],
                "transitions": [
                    {
                        "state_name": "delete",
                        "conditions": {
                            "min_index_age": "365d"
                        }
                    }
                ]
            },
            {
                "name": "delete",
                "actions": [
                    {
                        "delete": {}
                    }
                ],
                "transitions": []
            }
        ],
       "ism_template": {
           "index_patterns": ["wazuh-alerts*"],
           "priority": 100
       }
    }
}
Once you are ready click on Create:
Restoring snapshots
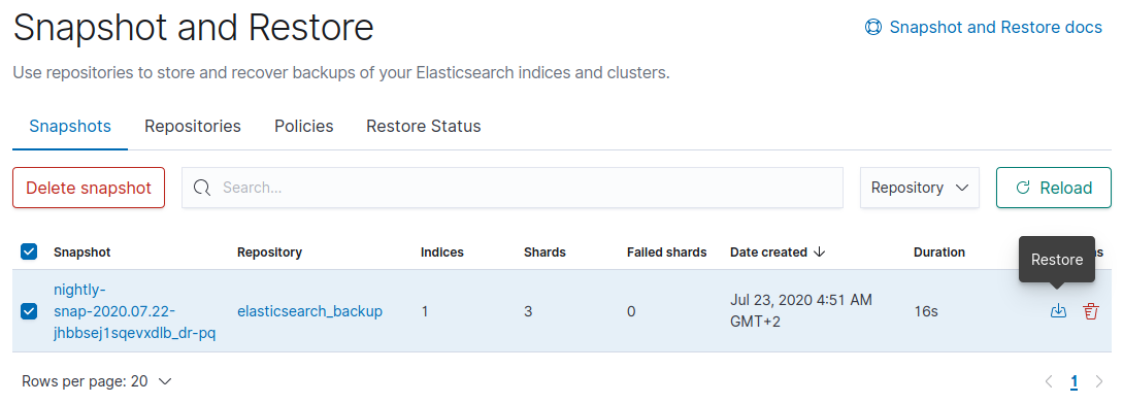
Elastic packages provide a dedicated UI to restore a snapshot. You may select the snapshot from Stack Management > Snapshot and Restore > Snapshots; click on the Restore button to the right:
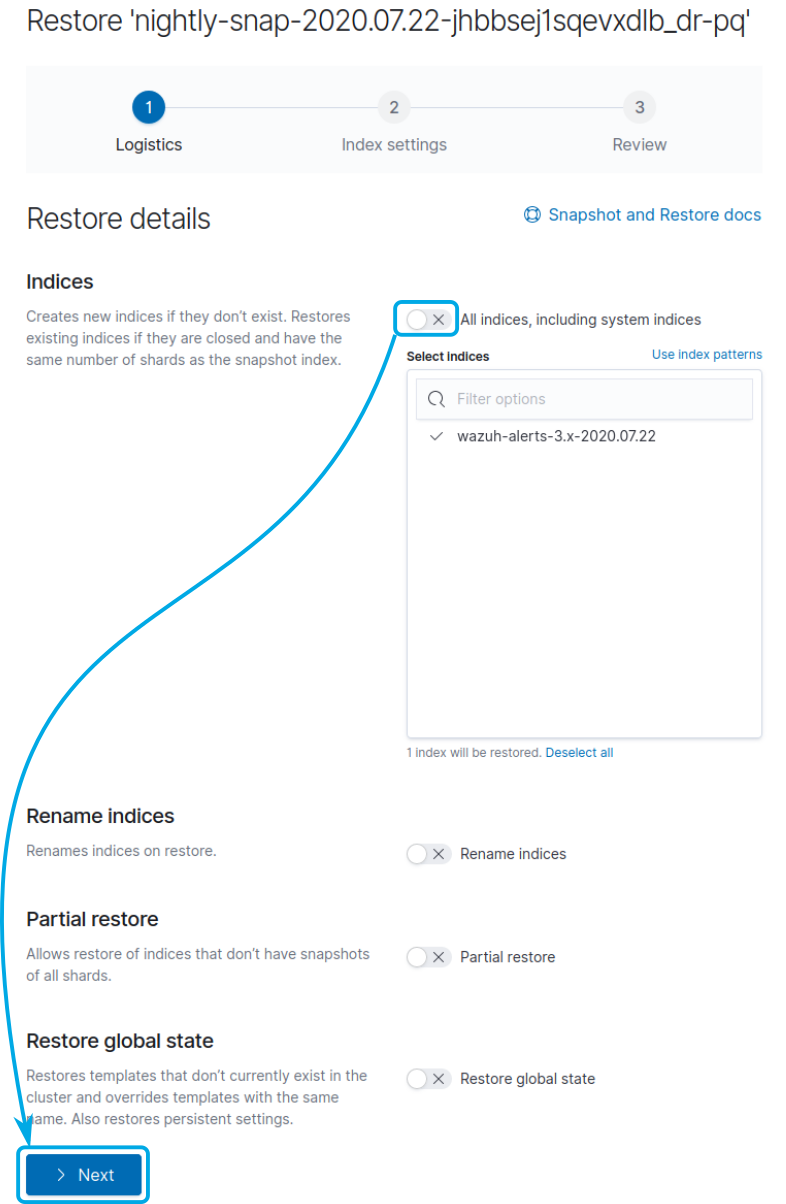
If you wish to select only a specific index to restore toggle the All indices and select the indices to be restored before clicking on Next:
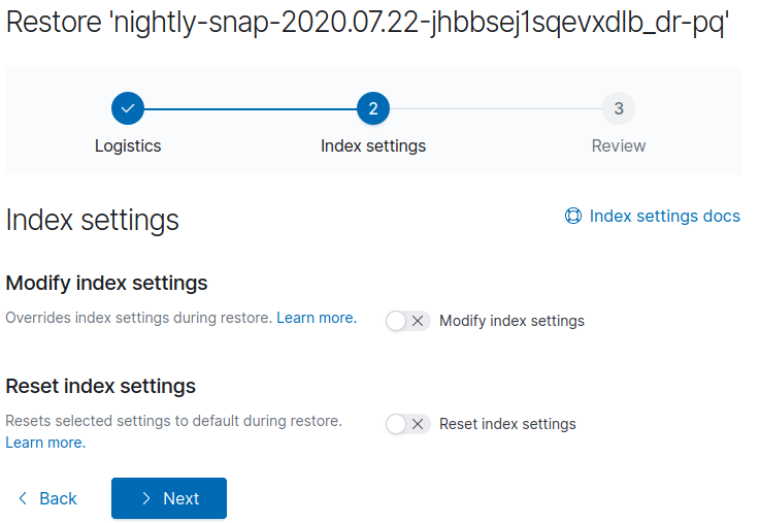
You can also modify indices before restoring them. If not, simply click on Next:
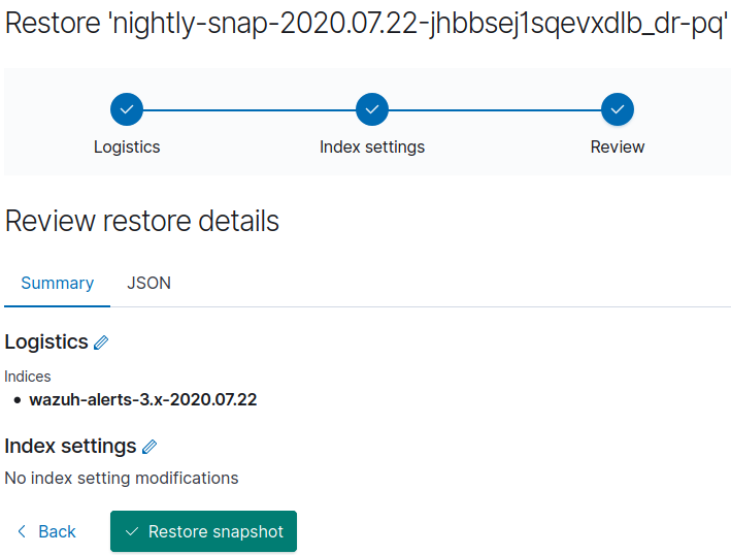
Review the action to be performed, then click on Restore snapshot:
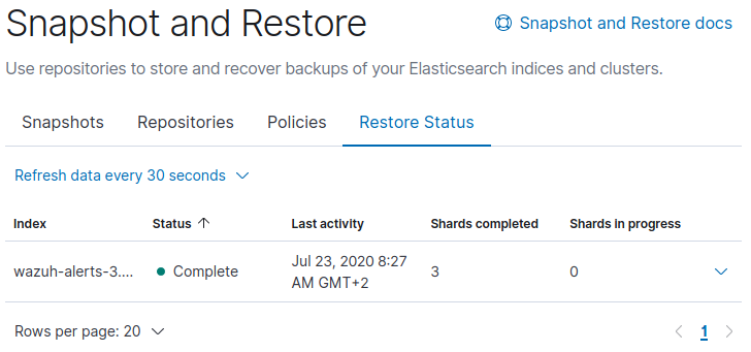
Finally, you may follow the progress on the Restore Status tab:
Open Distro doesn’t have a dedicated UI to restore snapshots, but you can use Elasticsearch’s API for this by issuing the following request:
curl -XPOST <elasticsearch_address>:9200/_snapshot/elasticsearch_backup/wazuh-alerts-snapshot-2020.07.22-01:30:00.015/_restore?wait_for_completion=true -H "Content-Type: application/json" -d'
{
  "indices": "wazuh-alerts-3.x-2020.07.22"
}
'
References
- Snapshot and Restore
- Registering a Snapshot Repository
- Taking a snapshot
- Restoring a snapshot
- Automating backups with SLM
- Open Distro Snapshots
- Open Distro Index State Management
- Wazuh Index Management
- S3 Repository Plugin options
- Hadoop HDFS Repository Plugin options
- Google Cloud Repository Plugin options
- Microsoft Azure Repository Plugin options
If you have any questions about this, join our Slack #community channel! Our team and other contributors will help you.