
VMware ESXi is a widely-adopted hypervisor that organizations use to virtualize their infrastructure, bringing benefits like resource utilization and flexibility. Recently, there have been several incidents of VMware ESXi cyber attacks. For example, the ESXiArgs ransomware campaign started targeting VMware ESXi servers in February 2023.
Wazuh, an open source security monitoring platform can help mitigate these types of risks. Administrators can monitor the security of their virtual infrastructure and quickly detect and respond to any potential malware attacks by integrating Wazuh with VMware ESXi.
Wazuh offers a range of powerful security monitoring capabilities, such as real-time threat detection and response, log data analysis, and compliance management. You can integrate Wazuh with ESXi to provide your organizations with a comprehensive view of your virtualized environment. By utilizing Wazuh to monitor an ESXi environment, organizations can enhance their security posture and more effectively safeguard their critical assets.
In this blog post, we showcase how you can leverage Wazuh to monitor and analyze security events in VMware ESXi endpoints and detect any malware present.
Infrastructure
- A pre-built ready-to-use Wazuh OVA 4.4.1. Follow the steps in the Virtual Machine (OVA) documentation to download and set this up.
- An Ubuntu 22.04 endpoint with the Wazuh agent 4.4.1 installed and enrolled to the Wazuh server.
- A VMware ESXi 8.0.0 hypervisor installed on a bare-metal server. Download the VMware ESXi ISO image from the official website.
Configuration
We configure the VMware ESXi endpoint to forward logs through syslog to an Ubuntu endpoint that has the Wazuh agent installed. The Wazuh agent then collects and forwards the security events to the Wazuh server for analysis.
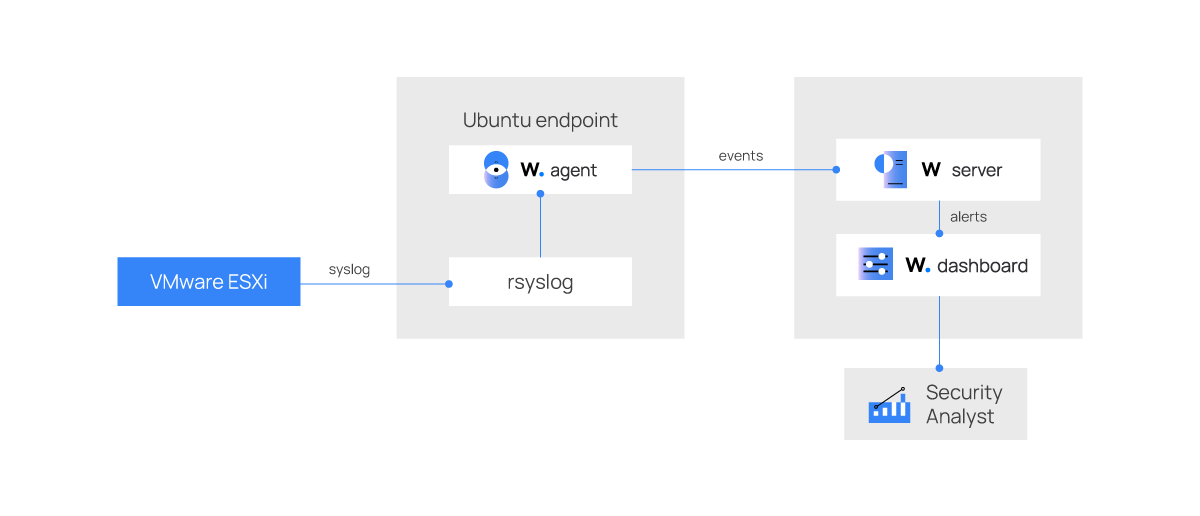
Follow the steps outlined below to configure the VMware ESXi and the Ubuntu endpoint.
Ubuntu
We use the rsyslog tool that is preinstalled in Ubuntu 22.04 to receive syslog from the VMware ESXi endpoint. We then configure the Wazuh agent to send the syslog log data to the Wazuh server.
1. Enable the UDP setting and add a location to store the security events by adding the following lines to the /etc/rsyslog.conf file on the Ubuntu endpoint:
$ModLoad imudp
$UDPServerRun 514

# Storing Messages from a Remote System into a specific File
if $fromhost-ip startswith '<ESXI_IP>' then /var/log/vmware-esxi.log
& ~
Replace <ESXI_IP> with the IP address of the VMware ESXi endpoint.
2. Create the file vmware-esxi.log in the /var/log directory to store the syslog events:
# touch /var/log/vmware-esxi.log
3. Change the vmware-esxi.log file owner to syslog and group to adm:
# chown syslog:adm /var/log/vmware-esxi.log
4. Restart the rsyslog server for the changes to take effect:
# systemctl restart rsyslog
5. Add the following contents inside the <ossec_config> blocks of the Wazuh agent configuration /var/ossec/etc/ossec.conf file:
<localfile>
  <log_format>syslog</log_format>
  <location>/var/log/vmware-esxi.log</location>
  <out_format>vmware-esxi: $(log)</out_format>
</localfile>
Where:
<log_format>defines the received log type.<location>defines the log file location.<out_format>allows us to modify the log output. The logs are tagged withvmware-esxi:, which we use to write custom decoders.
6. Restart the Wazuh agent for the changes to take effect:
# systemctl restart wazuh-agent
VMware ESXi
Follow the steps below to enable syslog forwarding capabilities in the VMware ESXi endpoint.
1. Log in to the VMware ESXi endpoint using SSH and run the command below to configure the ESXi to send syslog to the Wazuh agent installed on the Ubuntu endpoint:
# esxcli system syslog config set --loghost=udp://<UBUNTU_IP>:514
Replace <UBUNTU_IP> with the IP address of the Ubuntu endpoint.
2. Configure VMware ESXi firewall ruleset to allow syslog to forward security events. This is because syslog traffic is disabled by default:
# esxcli network firewall ruleset set --ruleset-id=syslog --enabled=true
# esxcli network firewall refresh
3. Reload VMware ESXi syslog service for the changes to take effect:
# esxcli system syslog reload
Wazuh server
We create custom decoders and rules to extract the important fields from the VMware ESXi syslog and generate alerts based on their significance. Perform the steps below to create custom rules and decoders in the Wazuh server.
1. Create a custom decoder file esxi_decoders.xml in the /var/ossec/etc/decoders/ directory:
# touch /var/ossec/etc/decoders/esxi_decoders.xml
2. Add the VMware ESXi custom decoders below to the /var/ossec/etc/decoders/esxi_decoders.xml file:
<decoder name="vmware-esxi">
  <prematch>^vmware-esxi: </prematch>
</decoder>

<decoder name="esxi-syslog">
  <parent>vmware-esxi</parent>
  <regex type="pcre2">\S+ (\d+-\d+-\d+T\d+:\d+:\d+.\d+Z) (\S+) (\S+)\[(\d+)]:</regex>
  <order>logtimestamp, esxi_host, process_name, process_id</order>
</decoder>

<decoder name="esxi-syslog">
  <parent>vmware-esxi</parent>
  <regex type="pcre2">\S+ (\d+-\d+-\d+T\d+:\d+:\d+.\d+Z) (\S+) (\S+):</regex>
  <order>logtimestamp, esxi_host, process_name</order>
</decoder>

<decoder name="esxi-syslog">
  <parent>vmware-esxi</parent>
  <regex type="pcre2">\S+ (\w+\s\d+\s\d+:\d+\:\d+) (\S+) (\S+)\[(\d+)]:</regex>
  <order>logtimestamp, esxi_host, process_name, process_id</order>
</decoder>

<decoder name="esxi-syslog">
  <parent>vmware-esxi</parent>
  <regex type="pcre2">\S+ (\w+\s\d+\s\d+:\d+\:\d+) (\S+) (\S+):</regex>
  <order>logtimestamp, esxi_host, process_name</order>
</decoder>

<decoder name="esxi-syslog">
  <parent>vmware-esxi</parent>
  <regex type="pcre2">Event (\d+) : SSH session was opened for '(\w+)@(\S+)'</regex>
  <order>event_id, user, srcip</order>
</decoder>

<decoder name="esxi-syslog">
  <parent>vmware-esxi</parent>
  <regex type="pcre2">Event (\d+) : SSH login has failed for '(\w+)@(\S+)'</regex>
  <order>event_id, user, srcip</order>
</decoder>

<decoder name="esxi-syslog">
  <parent>vmware-esxi</parent>
  <regex type="pcre2">Event (\d+) : SSH session was closed for '(\w+)@(\S+)'</regex>
  <order>event_id, user, srcip</order>
</decoder>

<decoder name="esxi-syslog">
  <parent>vmware-esxi</parent>
  <regex type="pcre2">Event (\d+) : (\S+) on  (\S+) in (\S+) is powered off</regex>
  <order>event_id, vm, esxi_host, datacenter</order>
</decoder>

<decoder name="esxi-syslog">
  <parent>vmware-esxi</parent>
  <regex type="pcre2">Event (\d+) : (\S+) on (\S+) in (\S+) has powered on</regex>
  <order>event_id, vm, esxi_host, datacenter</order>
</decoder>

<decoder name="esxi-syslog">
  <parent>vmware-esxi</parent>
  <regex type="pcre2">Event (\d+) : User (\w+)@(\S+) logged in</regex>
  <order>event_id, user, srcip</order>
</decoder>

<decoder name="esxi-syslog">
  <parent>vmware-esxi</parent>
  <regex type="pcre2">Event (\d+) : Cannot login (\w+)@(\S+)</regex>
  <order>event_id, user, srcip</order>
</decoder>

<decoder name="esxi-syslog">
  <parent>vmware-esxi</parent>
  <regex type="pcre2">Event (\d+) : User (\w+)@(\S+) logged out</regex>
  <order>event_id, user, srcip</order>
</decoder>

<decoder name="esxi-syslog">
  <parent>vmware-esxi</parent>
  <regex type="pcre2">: \[(\S+)]: (.+)$</regex>
  <order>user, command</order>
</decoder>

<decoder name="esxi-syslog">
  <parent>vmware-esxi</parent>
  <regex type="pcre2">Event (\d+) : Guest OS shut down for (\S+) on (\S+) in (\S+)</regex>
  <order>event_id, vm, esxi_host, datacenter</order>
</decoder>

<decoder name="esxi-syslog">
  <parent>vmware-esxi</parent>
  <regex type="pcre2">Event (\d+) : Guest OS reboot for (\S+) on (\S+) in (\S+)</regex>
  <order>event_id, vm, esxi_host, datacenter</order>
</decoder>

<decoder name="esxi-syslog">
  <parent>vmware-esxi</parent>
  <regex type="pcre2">Event (\d+) : Created virtual machine (\S+) on (\S+)</regex>
  <order>event_id, vm, esxi_host</order>
</decoder>

<decoder name="esxi-syslog">
  <parent>vmware-esxi</parent>
  <regex type="pcre2">Event (\d+) : Removed (\S+) on (\S+) from (\S+)</regex>
  <order>event_id, vm, esxi_host, datacenter</order>
</decoder>

<decoder name="esxi-syslog">
  <parent>vmware-esxi</parent>
  <regex type="pcre2">Event (\d+) : Registered (\S+) on (\S+) in (\S+)</regex>
  <order>event_id, vm, esxi_host, datacenter</order>
</decoder>

<decoder name="esxi-syslog">
  <parent>vmware-esxi</parent>
  <regex type="pcre2">Event (\d+) : File upload to path '\[(.+)' was initiated</regex>
  <order>event_id, path</order>
</decoder>

<decoder name="esxi-syslog">
  <parent>vmware-esxi</parent>
  <regex type="pcre2">Event (\d+) : Deletion of file or directory (.+) from (\S+) was initiated</regex>
  <order>event_id, path, disk</order>
</decoder>

<decoder name="esxi-syslog">
  <parent>vmware-esxi</parent>
  <regex type="pcre2">Event (\d+) : Account (\S+) was created on host (\S+)</regex>
  <order>event_id, user, esxi_host</order>
</decoder>

<decoder name="esxi-syslog">
  <parent>vmware-esxi</parent>
  <regex type="pcre2">Event (\d+) : Password was changed for account (\S+) on host (\S+)</regex>
  <order>event_id, user, esxi_host</order>
</decoder>

<decoder name="esxi-syslog">
  <parent>vmware-esxi</parent>
  <regex type="pcre2">Event (\d+) : Account (\S+) was removed on host (\S+)</regex>
  <order>event_id, user, esxi_host</order>
</decoder>
3. Create a custom rule file esxi_rules.xml in the /var/ossec/etc/rules/ directory:
# touch /var/ossec/etc/rules/esxi_rules.xml
4. Add the custom rules for VMware ESXi below to the /var/ossec/etc/rules/esxi_rules.xml file:
<group name="vmware-esxi-syslog,">
  <rule id="111010" level="0">
    <decoded_as>vmware-esxi</decoded_as>
    <description>VMware ESXi syslogs grouped.</description>
  </rule>

  <!-- create new virtual machines -->
  <rule id="111011" level="5">
    <if_sid>111010</if_sid>
    <match>Created virtual machine</match>
    <description>VMware ESXi: A new VM $(vm) was created on $(esxi_host).</description>
  </rule>

  <!-- virtual machines state changes -->
  <rule id="111012" level="3">
    <if_sid>111010</if_sid>
    <match>has powered on</match>
    <description>VMware ESXi: VM $(vm) on $(esxi_host) has powered on.</description>
  </rule>

  <rule id="111013" level="8">
    <if_sid>111010</if_sid>
    <match>is powered off</match>
    <description>VMware ESXi: VM $(vm) on $(esxi_host) was powered off.</description>
  </rule>

  <rule id="111014" level="8">
    <if_sid>111010</if_sid>
    <match>Guest OS shut down</match>
    <description>VMware ESXi: VM $(vm) on $(esxi_host) was shut down.</description>
  </rule>

  <rule id="111015" level="8">
    <if_sid>111010</if_sid>
    <match>Guest OS reboot</match>
    <description>VMware ESXi: VM $(vm) on $(esxi_host) was rebooted.</description>
  </rule>

  <!-- logins, logouts through web console, SSH and scripts -->
  <rule id="111016" level="7">
    <if_sid>111010</if_sid>
    <match>logged in</match>
    <description>VMware ESXi: User $(dstuser) with IP $(srcip) was logged in to $(esxi_host).</description>
  </rule>

  <rule id="111017" level="3">
    <if_sid>111010</if_sid>
    <match>logged out</match>
    <description>VMware ESXi: User $(dstuser) with IP $(srcip) was logged out from $(esxi_host).</description>
  </rule>

  <rule id="111018" level="8">
    <if_sid>111010</if_sid>
    <match>Cannot login</match>
    <description>VMware ESXi: User $(dstuser) with IP $(srcip) was trying to log in to $(esxi_host).</description>
  </rule>

  <rule id="111019" level="7">
    <if_sid>111010</if_sid>
    <match>: SSH session was opened</match>
    <description>VMware ESXi: User $(dstuser) with IP $(srcip) established SSH connection to $(esxi_host).</description>
  </rule>

  <rule id="111020" level="8">
    <if_sid>111010</if_sid>
    <match>: SSH login has failed</match>
    <description>VMware ESXi: User $(dstuser) with IP $(srcip) failed to SSH to $(esxi_host).</description>
  </rule>

  <rule id="111021" level="3">
    <if_sid>111010</if_sid>
    <match>: SSH session was closed</match>
    <description>VMware ESXi: User $(dstuser) with IP $(srcip) was disconnected from $(esxi_host).</description>
  </rule>

  <!-- datastore file upload, delete -->
  <rule id="111022" level="8">
    <if_sid>111010</if_sid>
    <match>File upload</match>
    <description>VMware ESXi: A file in $(path) was uploaded on $(esxi_host).</description>
  </rule>

  <rule id="111023" level="11">
    <if_sid>111010</if_sid>
    <match>Deletion of file or directory</match>
    <description>VMware ESXi: $(path) in $(disk) was deleted on $(esxi_host).</description>
  </rule>

  <!-- virtual machine registration and removal -->
  <rule id="111024" level="5">
    <if_sid>111010</if_sid>
    <regex>Registered (\S+) on</regex>
    <description>VMware ESXi: A new VM $(vm) was registered on $(esxi_host).</description>
  </rule>

  <rule id="111025" level="8">
    <if_sid>111010</if_sid>
    <regex>Removed (\S+) on</regex>
    <description>VMware ESXi: VM $(vm) was removed from $(esxi_host).</description>
  </rule>

  <!-- user create, modify and delete -->
  <rule id="111026" level="8">
    <if_sid>111010</if_sid>
    <regex>Account (\S+) was created</regex>
    <description>VMware ESXi: A new user $(dstuser) was created on $(esxi_host).</description>
  </rule>

  <rule id="111027" level="11">
    <if_sid>111010</if_sid>
    <regex>Account (\S+) was removed</regex>
    <description>VMware ESXi: User $(dstuser) was deleted from $(esxi_host).</description>
  </rule>

  <rule id="111028" level="8">
    <if_sid>111010</if_sid>
    <match>Password was changed</match>
    <description>VMware ESXi: Password for User $(dstuser) was changed on $(esxi_host).</description>
  </rule>

  <!-- shell commands -->
  <rule id="111029" level="8">
    <if_sid>111010</if_sid>
    <regex>shell[(\d+)]: [(\S+)]</regex>
    <description>VMware ESXi: User $(dstuser) run command $(command) on $(esxi_host) shell.</description>
  </rule>
</group>
5. Restart the Wazuh manager for the changes to take effect:
# systemctl restart wazuh-manager
Security alerts
There are a variety of activities that can be performed in a VMware ESXi environment. Some of these activities include logging in to the web console, changing the status of virtual machines, and creating ESXi users. These actions can generate security events that need to be monitored and analyzed for potential security threats.
Visit the Wazuh dashboard and navigate to Modules. From the Modules tab, select the Ubuntu endpoint and navigate to the Security events tab to view the generated alerts. The image below shows alerts generated when some of these actions were performed.

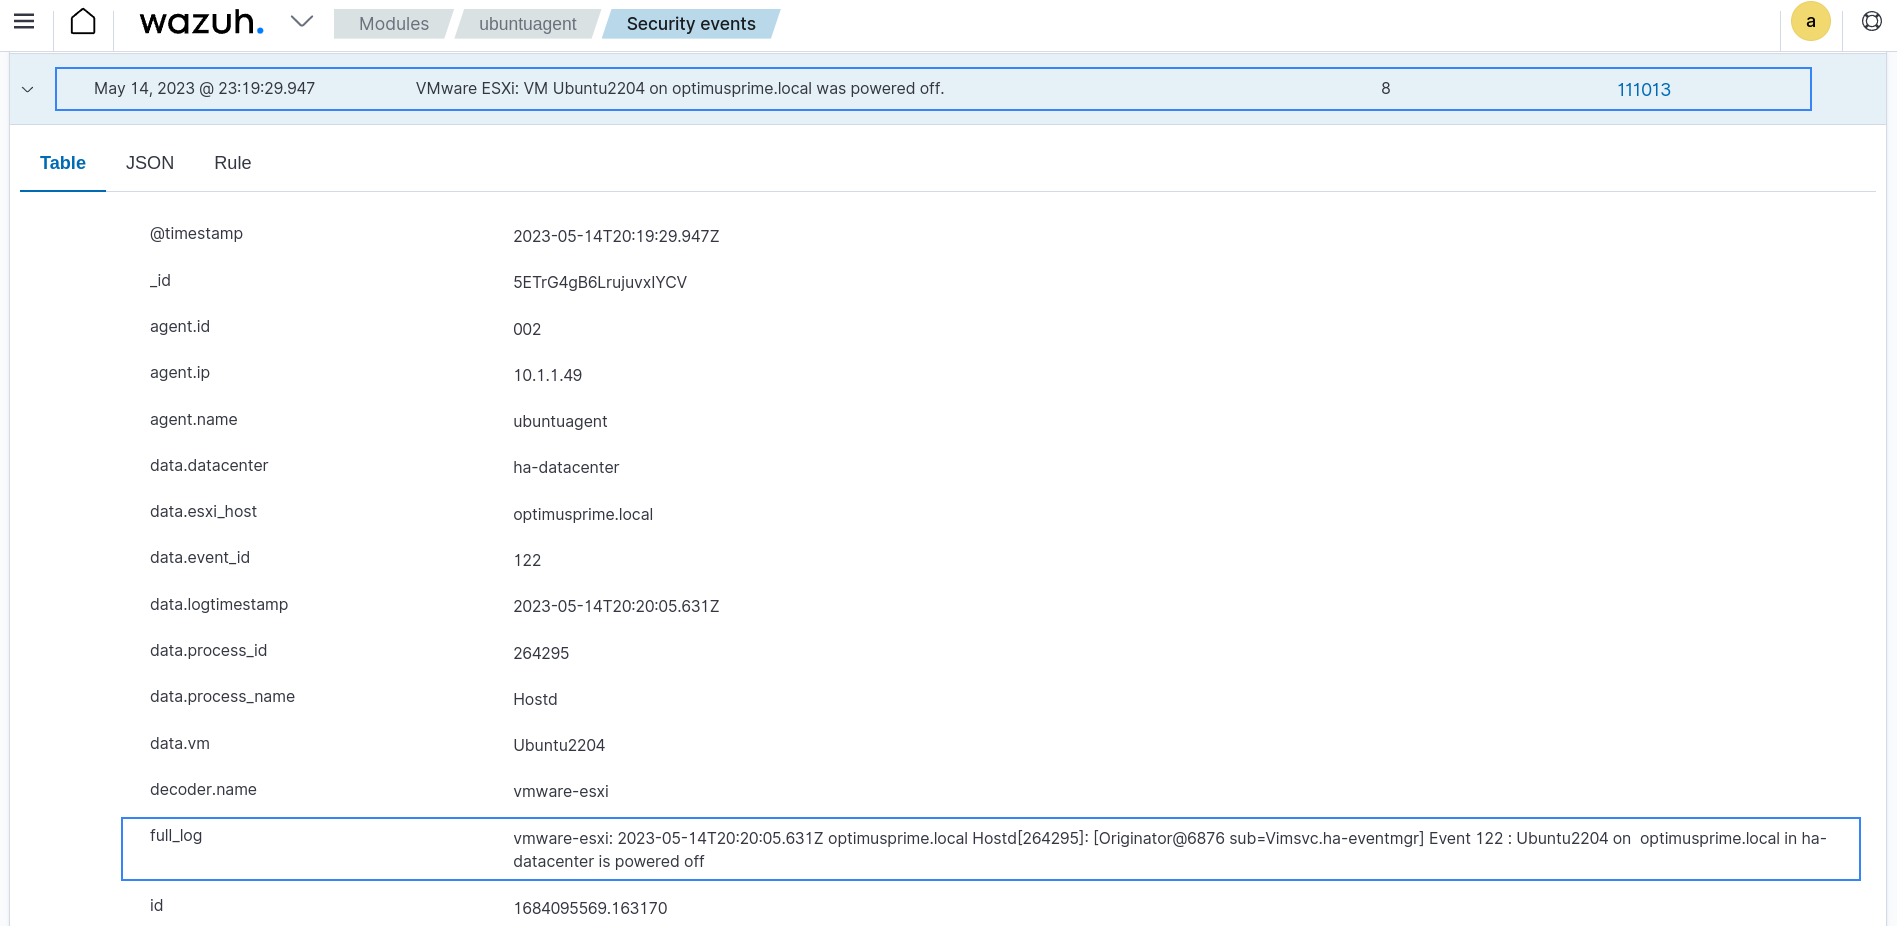
The image below shows details of an alert generated on the dashboard.
Malware detection
We configure the Ubuntu endpoint to mount the VMware ESXi /tmp directory and use a cronjob to periodically run YARA scans on the mounted directory. Once a YARA scan detects any malicious binary, it generates logs. The Wazuh agent then ships the logs to the Wazuh server and alerts are generated.
Ubuntu configuration
Perform the steps below to configure the Ubuntu endpoint for ESXi /tmp directory mounting and YARA scanning. Run all the commands below with elevated privilege.
1. Download and run the rclone installation script to install the latest rclone tool:
# curl https://rclone.org/install.sh | bash
2. Run the command below to configure the rclone tool with the VMware ESXi information:
# rclone config
Follow the SFTP configuration – Rclone guide to complete the setup filling in the appropriate VMware ESXi information.
After successful configuration, the rclone configuration file /root/.config/rclone/rclone.conf should have the similar contents shown below:
[esxi-config]
type = sftp
host = <ESXi_HOST_IP>
pass = <ESXi_SSH_PASSWORD>
user = <ESXi_ADMIN_USER>
port = <ESXi_SSH_PORT>
Where:
[esxi-config]is the configuration name.<ESXi_HOST_IP>is the ESXi endpoint IP address.<ESXi_SSH_PASSWORD>is the SSH password.<ESXi_ADMIN_USER>is the ESXi administrator user account.<ESXi_SSH_PORT>is the ESXi SSH port.
Note
The rclone configuration file includes type, host and pass as basic parameters, and uses the root user and port 22 by default. You will need to update more fields if you want rclone to perform other activities.
3. Make a directory /mnt/vmware-esxi to mount the VMware ESXi’s /tmp directory:
# mkdir /mnt/vmware-esxi
4. Mount the ESXi /tmp directory to /mnt/vmware-esxi:
# rclone mount esxi-config:tmp /mnt/vmware-esxi --dir-cache-time=1s --daemon
Where, --dir-cache-time=1s is the time to cache directory entries for 1 second.
5. Download, compile, and install YARA on the Ubuntu endpoint:
# apt update
# apt install -y make gcc autoconf libtool libssl-dev pkg-config jq
# curl -LO https://github.com/VirusTotal/yara/archive/v4.3.1.tar.gz
# tar -xvzf v4.3.1.tar.gz -C /usr/local/bin/ && rm -f v4.3.1.tar.gz
# cd /usr/local/bin/yara-4.3.1/
# ./bootstrap.sh && ./configure && make && make install && make check
6. Test that YARA is running properly:
# yara
yara: wrong number of arguments
Usage: yara [OPTION]... [NAMESPACE:]RULES_FILE... FILE | DIR | PID

Try `--help` for more options
If the error message below is displayed:
yara: error while loading shared libraries: libyara.so.10: cannot open shared object file: No such file or directory
This means that the loader doesn’t find the libyara library usually located in /usr/local/lib. Add the /usr/local/lib path to the /etc/ld.so.conf loader configuration file to solve this:
# echo "/usr/local/lib" >> /etc/ld.so.conf
# ldconfig
7. Download YARA detection rules:
# mkdir -p /tmp/yara/rules
# curl 'https://valhalla.nextron-systems.com/api/v1/get' \
-H 'Accept: text/html,application/xhtml+xml,application/xml;q=0.9,*/*;q=0.8' \
-H 'Accept-Language: en-US,en;q=0.5' \
--compressed \
-H 'Referer: https://valhalla.nextron-systems.com/' \
-H 'Content-Type: application/x-www-form-urlencoded' \
-H 'DNT: 1' -H 'Connection: keep-alive' -H 'Upgrade-Insecure-Requests: 1' \
--data 'demo=demo&apikey=1111111111111111111111111111111111111111111111111111111111111111&format=text' \
-o /tmp/yara/rules/yara_rules.yar
8. Create a yara.log file in the /var/log directory to store YARA scan logs:
# touch /var/log/yara.log
9. Add the following contents inside the <ossec_config> block of the Wazuh agent /var/ossec/etc/ossec.conf configuration file to collect log data from the /var/log/yara.log file:
<localfile>
  <log_format>syslog</log_format>
  <location>/var/log/yara.log</location>
</localfile>
10. Restart the Wazuh agent for the changes to take effect:
# systemctl restart wazuh-agent
11. Create an active response script yara.sh in the /var/ossec/active-response/bin/ directory:
# touch /var/ossec/active-response/bin/yara.sh
12. Add the following contents to the /var/ossec/active-response/bin/yara.sh file. The active response script scans all files in the /tmp directory including new ones and creates a log at /var/log/yara.log:
#!/bin/bash
# Wazuh - Yara active response
# Copyright (C) 2015-2023, Wazuh Inc.
#
# This program is free software; you can redistribute it
# and/or modify it under the terms of the GNU General Public
# License (version 2) as published by the FSF - Free Software
# Foundation.


#------------------------ Define parameters ------------------------#

# Arguments
YARA_PATH=/usr/local/bin
YARA_RULES=/tmp/yara/rules/yara_rules.yar
FILENAME=/mnt/vmware-esxi

# Set LOG_FILE path
LOG_FILE="/var/log/yara.log"

size=0
actual_size=$(stat -c %s ${FILENAME})
while [ ${size} -ne ${actual_size} ]; do
    sleep 1
    size=${actual_size}
    actual_size=$(stat -c %s ${FILENAME})
done

#----------------------- Analyze parameters -----------------------#

if [[ ! $YARA_PATH ]] || [[ ! $YARA_RULES ]]
then
    echo "wazuh-yara: ERROR - Yara active response error. Yara path and rules parameters are mandatory." >> ${LOG_FILE}
    exit 1
fi

#------------------------- Main workflow --------------------------#

# Execute Yara scan on the specified filename
yara_output="$("${YARA_PATH}"/yara -w -r "$YARA_RULES" "$FILENAME")"

if [[ $yara_output != "" ]]
then
    # Iterate every detected rule and append it to the LOG_FILE
    while read -r line; do
        echo "wazuh-yara: INFO - Scan result: $line" >> ${LOG_FILE}
    done <<< "$yara_output"
fi

exit 0;
13. Change the yara.sh file permission to make it executable:
# chmod +x /var/ossec/active-response/bin/yara.sh
14. Edit the crontab file and select your preferred editor using the command below:
# crontab -e
15. Add the following line at the end of the crontab file to run the yara.sh script every five minutes:
*/5 * * * * bash /var/ossec/active-response/bin/yara.sh
After adding the line, it should be visible as shown below:
# Edit this file to introduce tasks to be run by cron.
#
# Each task to run has to be defined through a single line
# indicating with different fields when the task will be run
# and what command to run for the task
#
# To define the time you can provide concrete values for
# minute (m), hour (h), day of month (dom), month (mon),
# and day of week (dow) or use '*' in these fields (for 'any').
#
# Notice that tasks will be started based on the cron's system
# daemon's notion of time and timezones.
#
# Output of the crontab jobs (including errors) is sent through
# email to the user the crontab file belongs to (unless redirected).
#
# For example, you can run a backup of all your user accounts
# at 5 a.m every week with:
# 0 5 * * 1 tar -zcf /var/backups/home.tgz /home/
#
# For more information see the manual pages of crontab(5) and cron(8)
#
# m h  dom mon dow   command
*/5 * * * * bash /var/ossec/active-response/bin/yara.sh
16. Restart the cron service to apply the configuration changes:
# systemctl restart cron
Wazuh server configuration
Perform the steps below to add custom rules and decoders to the Wazuh server to generate alerts from the YARA scan logs. Run the command below with elevated privilege.
1. Create a new decoder file yara_decoder.xml in the /var/ossec/etc/decoders directory:
# touch /var/ossec/etc/decoders/yara_decoder.xml
2. Add the following contents to the yara_decoder.xml file to decode the logs generated by the active response script yara.sh:
<decoder name="yara_decoder">
  <prematch>wazuh-yara:</prematch>
</decoder>

<decoder name="yara_decoder1">
  <parent>yara_decoder</parent>
  <regex>wazuh-yara: (\S+) - Scan result: (\S+) (\S+)</regex>
  <order>log_type, yara_rule, yara_scanned_file</order>
</decoder>
3. Create a yara_rules.xml file in the /var/ossec/etc/rules directory:
# touch /var/ossec/etc/rules/yara_rules.xml
4. Add the following contents to the yara_rules.xml file to alert when YARA detects a malicious file in the /tmp directory of the monitored VMware ESXi endpoint:
<group name="yara,">
  <rule id="111100" level="0">
    <decoded_as>yara_decoder</decoded_as>
    <description>Yara grouping rule</description>
  </rule>

  <!-- malware detection by yara scan -->
  <rule id="111101" level="12">
    <if_sid>111100</if_sid>
    <match>wazuh-yara: INFO - Scan result: </match>
    <description>File "$(yara_scanned_file)" is a positive match. Yara rule: $(yara_rule)</description>
  </rule>
</group>
5. Restart the Wazuh manager for the changes to take effect:
# systemctl restart wazuh-manager
Attack emulation
To test the malware detection configuration, download some known malicious files to the /tmp directory of the VMware ESXi endpoint.
Note
Testing malware can be dangerous and should only be done in a controlled and secure environment.
# cd /tmp
# wget https://raw.githubusercontent.com/wazuh/wazuh-documentation/refs/heads/4.13/resources/samples/mirai
# wget https://raw.githubusercontent.com/wazuh/wazuh-documentation/refs/heads/4.13/resources/samples/xbash
# wget https://raw.githubusercontent.com/wazuh/wazuh-documentation/refs/heads/4.13/resources/samples/vpn_filter
# wget https://raw.githubusercontent.com/wazuh/wazuh-documentation/refs/heads/4.13/resources/samples/webshell
Detection result
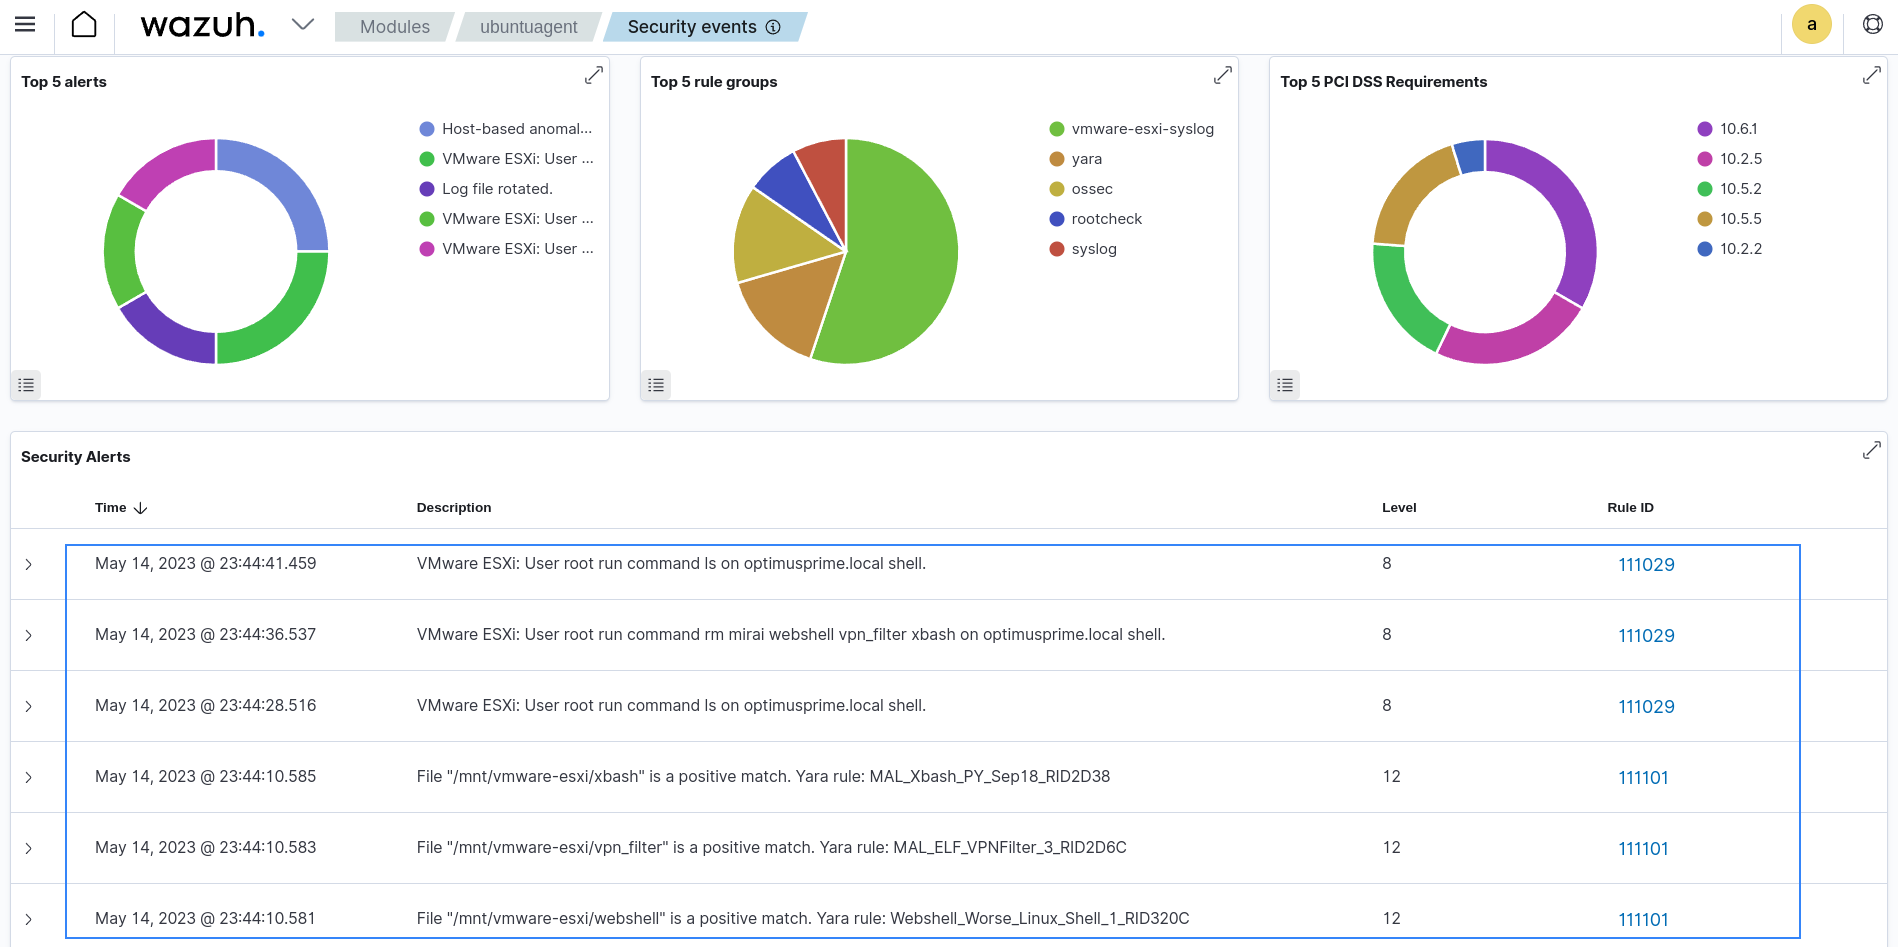
Alerts are generated on the Wazuh dashboard anytime the cron job triggers the /var/ossec/active-response/bin/yara.sh script and detects malware.
From the Modules tab, select the Ubuntu endpoint and navigate to the Security events tab to view the generated alerts.
VMware ESXi: Conclusion
VMware ESXi is a widely used hypervisor in organizations worldwide, making it a frequent target for threat actors. It is crucial for organizations to detect and prevent attacks against this critical infrastructure. Wazuh provides a powerful solution for monitoring and securing VMware ESXi environments with its flexible and robust capabilities.
This blog demonstrates how Wazuh detects common security events and malware in a VMware environment.