OSSEC can be used to monitor whether the SSH configuration file allows root user access. In this particular case, we show how to use OSSEC to check that this file is configured NOT to allow root user login. If it turns out to be the contrary, we will see that an alert will be triggered.
OSSEC uses its rootcheck component to verify that the system configuration is set up as expected. This capability, known as policy monitoring, is very useful when monitoring a large number of hosts that need to be configured according to a baseline or a security policy, for instance CIS hardening guidelines or PCI DSS.
Coming back to our example, we will first configure OSSEC to check ssh configuration file and then, we will see how the alert is triggered when root user login is allowed (not desirable). Our starting point is having a manager with Wazuh HIDS (our OSSEC fork) installed and several agents reporting. Those agents are running on the servers where we want to do the verification. All, manager and agents, are linux machines: Ubuntu 14.0.4. Note that Wazuh HIDS is needed to be able to use Kibana.
Rootcheck rule for the ssh configuration file
On Linux, Unix and BSD systems, the system_audit file is responsible for all policy monitoring.
We need to add a new rule to the rootcheck. First, create a file on the manager, named for example: system_audit_test.txt, in the /var/ossec/etc/shared/ folder. Edit this file writing the following rootcheck rule:
# PermitRootLogin no allowed
# PermitRootLogin indicate if the user root can log in by ssh.
$sshd_file=/etc/ssh/sshd_config;

[SSH Configuration - 1: Root can log in] [any] [1]
f:$sshd_file -> !r:^# && r:PermitRootLogin\.+yes;
f:$sshd_file -> r:^#\s*PermitRootLogin;
Specify the system audit file
Now, we need to add the path of the file created to the rootcheck section of our configuration file. We have two different options as follows:
/var/ossec/etc/ossec.conf: which would only affect the manager local agent./var/ossec/etc/shared/agent.conf: which will push the configuration out to the remote agents.
Since we are going to share it among all of our linux agents we’ll use agent.conf on the manager. Include the path in this file as seen below:
<agent_config os="Linux">
   <rootcheck>
      <system_audit>/var/ossec/etc/shared/system_audit_test.txt</system_audit>
   </rootcheck>
</agent_config>
Now, restart the manager to apply the changes done on the previous steps.
On the manager:
$ sudo /var/ossec/bin/ossec-control restart
Testing our configuration
We might want to test that the changes made work. For this, it is useful to enable the OSSEC logall option in order to see, in real time, the results of the rootcheck scan being ran on the agents. These results are shown in the manager file archives.log. Next, modify the sshd_config file on one of the agents, to allow root user login. Don’t forget to restore it back after all tests have been completed. This is how your line should look like:
# Authentication:
LoginGraceTime 120
PermitRootLogin yes
StrictModes yes
We need to restart the ssh service on the agent to get the new ssh configuration:
$ sudo service ssh restart
To run the rootcheck on the agent we use the agent_control binary from the manager:
$ sudo /var/ossec/bin/agent_control -r -u (agent-id)
Check the archives.log file, where you will find all the events, including the one we are looking for.
$ tail -f /var/ossec/logs/archives/archives.log
Syscheck and Rootcheck can take a little bit of time, so you might need to wait a few minutes to see something like this:
2016 Apr 07 13:40:26 (ubuntu) 10.0.0.144->rootcheck Starting rootcheck scan. 2016 Apr 07 13:40:28 (ubuntu) 10.0.0.144->rootcheck System Audit: SSH Configuration – 1: Root
As you can see we got the message from the ubuntu agent (IP:10.0.0.144) showing that root can log in. If we go to alerts.log we will see the alert triggered by this event. The rule that matches the event is the following:
<rule id="516" level="3">
    <if_sid>510</if_sid>
    <match>^System Audit</match>
    <description>System Audit event.</description>
    <group>rootcheck</group>
</rule>
You can see the alert at your terminal:
** Alert 1460061628.35089: – ossec,rootcheck
2016 Apr 07 13:40:28 (ubuntu) 10.0.0.144->rootcheck
Rule: 516 (level 3) -> ‘System Audit event.’
System Audit: SSH Configuration – 1: Root can log in. File: /etc/ssh/sshd_config. Reference: 1 .
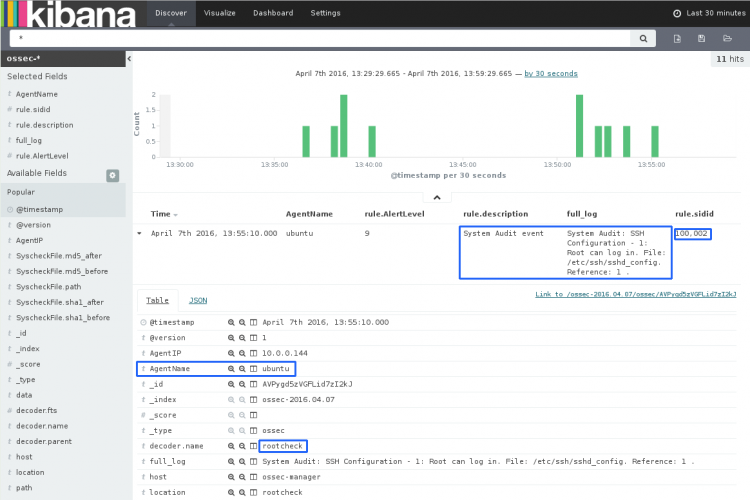
Or, better, on Kibana:

Changing the alert level
As you could see this event has generated a level 3 alert. In some cases you might want to get a higher level for a specific event, for example, a number high enough to get mail notifications. To do this, create a new rule with a higher level on your local rules as shown below:
<rule id="100002" level="9">
    <if_sid>516</if_sid>
    <description>System Audit event</description>
    <group>rootcheck,</group>
</rule>
This is how the alert will be seen when this new rule is applied in both, alerts.log and Kibana:
** Alert 1460062363.35945: mail – local,syslog,rootcheck,
2016 Apr 07 13:52:43 (ubuntu) 10.0.0.144->rootcheck
Rule: 100002 (level 9) -> ‘System Audit event’
System Audit: SSH Configuration – 1: Root can log in. File: /etc/ssh/sshd_config. Reference: 1 .
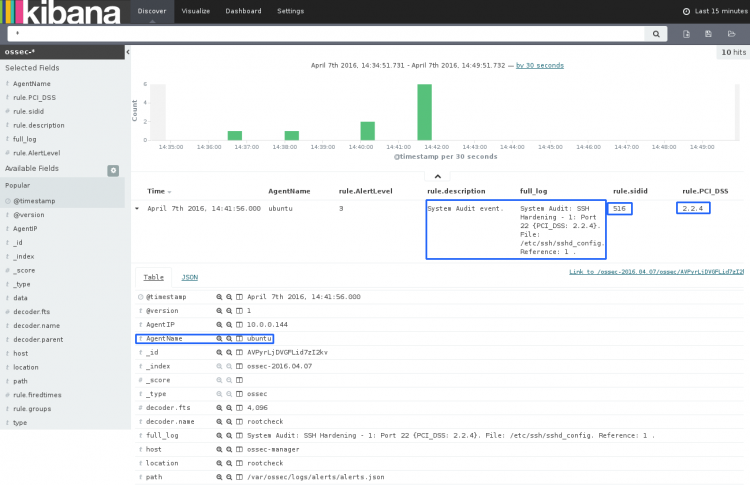
Use Case: PCI Requirements
What we just did, can be helpful to meet some standard PCI requirements leveraging the OSSEC rootcheck component.
For example:
PCI 2.2.4 Configure system security parameters to prevent misuse.
In order to verify the security parameters of SSH, Wazuh has developed several rules that are included in system_audit_ssh.txt. Check out these rules on Github. This file is installed on your OSSEC manager when you use Wazuh’s fork. To enable these rules you just need to locate this file at ossec.conf or agent.conf as seen before. Thus providing compliance with the above mentioned PCI.
Kibana gives you full information about the alert. As you can see, here we have an useful tag that give us information about the PCI requirement that we’re not following.
If you have any questions about this, join our Slack community channel! Our team and other contributors will help you.