The Security Configuration Assessment module (SCA) was added to the Wazuh platform in version 3.9.0. It provides out-of-the-box checks that are used for systems hardening. The module works on all Wazuh supported platforms (Linux, macOS, Windows, Solaris, AIX and HP-UX).
The Security Configuration Assessment module provides an engine to interpret and run configuration checks in YAML format. Furthermore, pre-defined policies help meet regulatory compliance such as HIPAA or PCI DSS or meet standards like CIS (Center of Internet Security).
This blog post is an introduction to the SCA module and will give you a good understanding of how to use it efficiently.
SCA: How it works
Setting up the SCA module is quite simple. Just use the following configuration stanza, in your Wazuh agent configuration file (ossec.conf), to enable it:
<sca>
    <enabled>yes</enabled>
    <scan_on_start>yes</scan_on_start>
    <interval>12h</interval>
    <skip_nfs>yes</skip_nfs>
</sca>
You can find the complete list of settings in our reference documentation.
An SCA policy is a group of configuration checks. These checks do use a rule, or a combination of rules, to verify the state of a system. Rules, among other things, can run custom commands, inspect configuration files and look for running processes or Windows registry keys.
The SCA module automatically loads the default policies, available at the directory ruleset/sca. These policies are specific to the operating system where the agents get installed. In addition, on the manager side, you can find all Wazuh SCA policies. Users can also create their own custom policies, as we will see in this article.
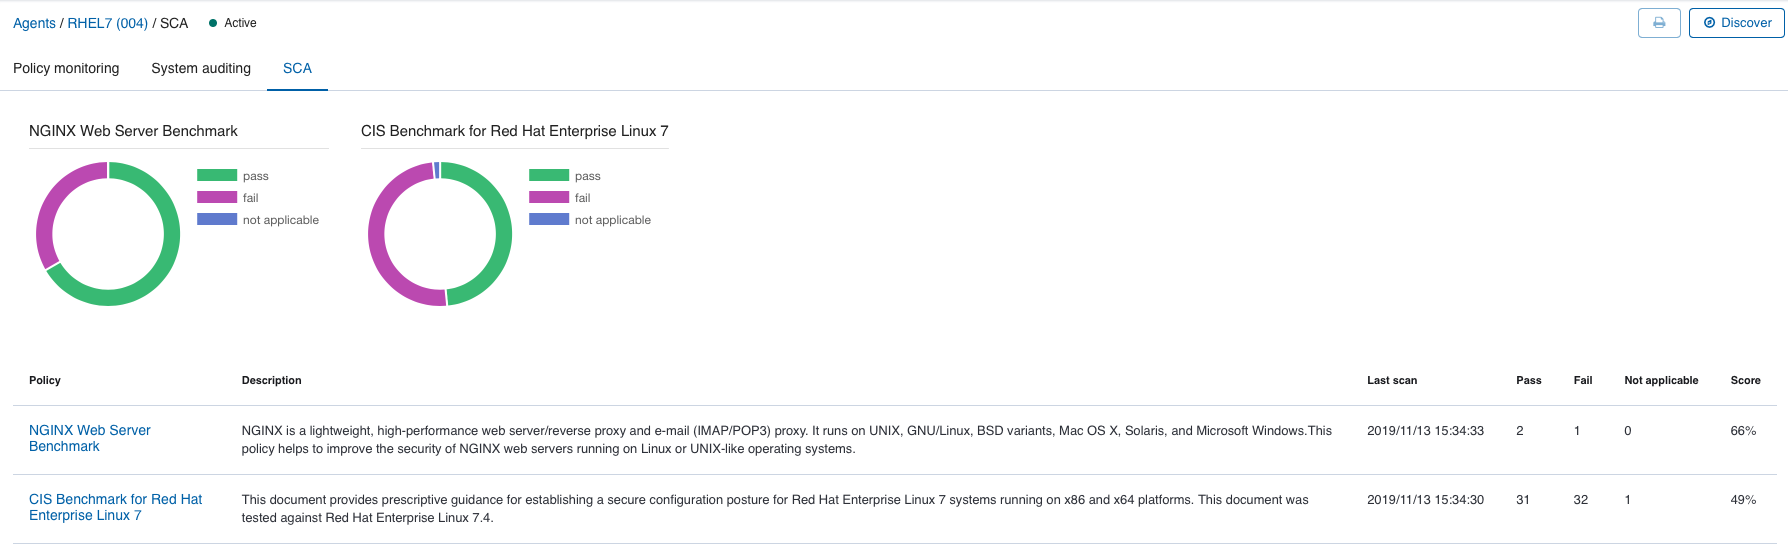
After a scan is completed, the agent reports to the results to the manager, and those become available in the web user interface (Wazuh Kibana plugin). See screenshot below:

Security Configuration Assessment example: Assessing Nginx configuration
For this example, we are creating an SCA policy from scratch, to assess the NGINX configuration for one of our monitored systems. More information on how to create custom policies is available in our technical documentation.
Step 1: Creating the custom policy
Our SCA policy is based on security practices for NGINX, found on several security blogs (see Reference section below). The created policy follows a defined structure, that includes the following sections: header, variables, requirements, and checks.
- The header section includes the needed information to identify and describe the policy. The fields are self-explanatory, as we can see below:
policy:
id: "nginx_audit"
file: "nginx_audit.yml"
name: "NGINX Web Server Benchmark"
description: "NGINX is a lightweight, high-performance web server/reverse proxy and e-mail (IMAP/POP3) proxy. It runs on UNIX, GNU/Linux, BSD variants, Mac OS X, Solaris, and Microsoft Windows. This policy helps to improve the security of NGINX web servers running on Linux or UNIX-like operating systems."
references:
  - https://nginx.org
- The variables section is optional, and we will use it to evaluate more than one target file (possible locations of the NGINX configuration file) in the same rule.
variables:
  $nginx_config: /etc/nginx/nginx.conf,/usr/local/nginx/conf/nginx.conf
- The requirements section is optional as well, and it establishes the conditions for the policy checks to be run. When they are not satisfied, the policy is skipped for that monitored system. Below we will just verify that NGINX is installed and that the configuration file does exist.
requirements:
  title: "Check that NGINX is installed on the system"
  description: "Requirements for running the SCA scan against the NGINX policy."
  condition: all
  rules:
    - 'c:nginx -v -> r:^nginx version'
    - 'f:$nginx_config'
- The checks section is the most important part in an SCA policy, it includes all the checks evaluated on the target system. Checks can run one or multiple rules. Below we are creating some checks, that will work as an example:
- id: 10001
  title: "Allow minimal privileges via mount options"
  description: "Make sure /nginx is mounted with noexec, nodev and nosuid permissions."
  rationale: "The noexec, nodev and nosuid mount options specify that the filesystem cannot contain executable binaries, special devices and set userid files, respectively. These options for security precautions avoid situations such as root escalation or executing programs from shared memory."
  remediation: "1) Create a new partition for NGINX. 2) Configure '/etc/fstab' as appropriate, add noexec, nodev and nosuid to the fourth field (mounting options) for the NGINX partition."
  compliance:
    - cis_csc: ["5.1"]
  references:
    - https://www.cyberciti.biz/tips/linux-unix-bsd-nginx-webserver-security.html
  condition: all
  rules:
    - 'c:mount -> r:\s/nginx\s && r:noexec'
    - 'c:mount -> r:\s/nginx\s && r:nodev'
    - 'c:mount -> r:\s/nginx\s && r:nosuid'
The check above processes the mount command output, looking for the content specified by the regular expressions (on the right side of the rule). The first rule looks for the output of mount to match a line that contains [space]/nginx[space] and noexec. In addition, the condition is set to all, meaning that all the rules have to match for the check to report as passed, otherwise it reports as failed.
Let’s create one more check.
- id: 10002
  title: "Avoid clickjacking attacks"
  description: "Inject X-FRAME-OPTIONS in HTTP Header to prevent clickjacking attack."
  rationale: "Clickjacking is a malicious technique of tricking a user into clicking on something different from what the user perceives, thus potentially revealing confidential information or allowing others to take control of their computer while clicking on seemingly innocuous objects, including web pages. In web browsers, clickjacking is a browser security issue that is a vulnerability across a variety of browsers and platforms."
  remediation: "Add the following sentence in NGINX config file: add_header X-Frame-Options \"SAMEORIGIN\"; This header will instruct a browser to load the resources ONLY from the same origin."
  compliance:
    - pci_dss: ["2.2.4"]
  references:
    - https://en.wikipedia.org/wiki/Clickjacking
    - https://geekflare.com/nginx-webserver-security-hardening-guide/
  condition: all
  rules:
    - 'f:$nginx_config -> r:^add_header && r:X-Frame-Options && r:SAMEORIGIN'
In this case, the rule is analyzing the NGINX configuration file (location found resolving $nginx_config variable), using a combination of regular expressions to inspect the content of the file. If the rule finds a line in the file matching those regular expressions then the check is considered passed.
And here is another example, used to check that the local firewall (Iptables) is limiting the number of connections per IP :
- id: 10003
  title: "Throttle Nginx Connections Per Second"
  description: "Configure the firewall to drop incoming connections if IP makes more than 15 connection attempts to port 80 within 60 seconds."
  rationale: "A webserver must keep an eye on connections and limit connections per second. This is serving 101. Both pf and iptables can throttle end users before accessing your NGINX server."
  remediation: "Following commands will set the required limitation: 1) /sbin/iptables -A INPUT -p tcp --dport 80 -i eth0 -m state --state NEW -m recent --set 2) /sbin/iptables -A INPUT -p tcp --dport 80 -i eth0 -m state --state NEW -m recent --update --seconds 60 --hitcount 15 -j DROP 3) service iptables save. Note: Alter the iptables parameters in compliance with site policy."
  compliance:
    - pci_dss: ["1.2.1.b"]
  reference:
    - https://www.cyberciti.biz/tips/linux-unix-bsd-nginx-webserver-security.html
    - https://linux.die.net/man/8/iptables
  condition: all
  rules:
    - 'c:iptables -L INPUT -> r:^DROP && r:tcp && r:dpt:http && r:state\s+NEW && n:second:\s+(\d+) compare <= 60 && n:hit_count:\s+(\d+) compare >= 15'
For this final check, the rule contains numerical comparisons for seconds and hit_count parameters.
Finally, a few notes to take into account when creating SCA checks:
- The check ID is unique across all SCA policies. Checks should always have different IDs, no matter if they belong to the same policy or not.
- Fields
id,title,conditionandrulesare mandatory in all checks. The rest of them are optional. - The syntax for rules was improved from Wazuh 3.9.X to 3.10 onwards. These examples are based on the new syntax.
The checks section in the documentation provides more detailed information and examples of how SCA checks are built.
Step 2: Enabling the SCA policy
We can deploy SCA policies locally, loading them directly on the Wazuh agent, or push them remotely from the Wazuh manager (to one or multiple agents). We will go with the latest option for this example, meaning that we will be pushing the SCA policy file from our Wazuh manager to one of our agents (the one on the system running NGINX).
For the Wazuh agent to allow remote policies we will configure it to accept SCA remote commands. This configuration is necessary, as the default agent behavior is not to allow remote SCA policies. We can change this by editing our Wazuh agent local_internal_options.conf file:
# echo "sca.remote_commands=1" >> /var/ossec/etc/local_internal_options.conf
Now we will use centralized configuration features to push our new SCA policy from the manager. This can be done using agent groups.
The first step is to create a group for NGINX servers. This can be especially useful if we wanted to push the policy to more than one Wazuh agent. For our example, we will just add our RHEL7 agent to the group. This all can be done from the management section of the web user interface:

Now we need to add the SCA policy file to the Wazuh manager. If we are running a Wazuh cluster, with multiple managers, we would just need to add it to the master node. The file has to be placed in the group folder (/var/ossec/etc/shared/nginx/). Additionally, we need to set the ossec user as the file owner. We can use the Linux command line to create the file, or SCP to copy it remotely over SSH.
Once the file is in place, in order to enable our new SCA policy, we add a configuration stanza for the SCA module in our agent.conf file (the one in the group folder). This can be done directly through the web user interface, or through the Linux command line terminal:
<sca>
  <policies>
    <policy>/var/ossec/etc/shared/nginx_audit.yml</policy>
  </policies>
</sca>
At this point, the new configuration should get automatically applied to the Wazuh agent (it can take a few seconds). The agent will restart itself to apply the new settings and run the SCA policy (no intervention is needed on the agent side).
Step 3: Configuration assessment results
Once the SCA scan is completed, the assessment results are available from the Wazuh user interface. In our case, we can see that two checks are considered passed and one has failed to pass. See screenshot below:

Taking a look at the details we can see the different fields for each check, including the rationale, remediation and description, and even mapping with regulatory compliance (e.g. PCI DSS).

Once the configuration of the NGINX server is fixed, the next scan will fire an alert reporting a change in one of the checks’ status. This is what the alert looks like (notice the fields result and previous_result):
{
  "timestamp": "2019-11-13T14:54:05.979+0000",
  "rule": {
    "level": 3,
    "description": "NGINX Web Server Benchmark: Avoid clickjacking attacks: Status changed from failed to passed",
    "id": "19010",
    "firedtimes": 1,
    "mail": false,
    "groups": [
      "sca"
    ],
    "gdpr": [
      "IV_35.7.d"
    ],
    "pci_dss": [
      "2.2.4"
    ]
  },
  "agent": {
    "id": "004",
    "name": "RHEL7",
    "ip": "10.0.1.168"
  },
  "manager": {
    "name": "wazuh-master"
  },
  "id": "1573656845.217494500",
  "decoder": {
    "name": "sca"
  },
  "data": {
    "sca": {
      "type": "check",
      "scan_id": "1877049038",
      "policy": "NGINX Web Server Benchmark",
      "check": {
        "id": "10002",
        "title": "Avoid clickjacking attacks",
        "description": "Inject X-FRAME-OPTIONS in HTTP Header to prevent clickjacking attack.",
        "rationale": "Clickjacking is a malicious technique of tricking a user into clicking on something different from what the user perceives, thus potentially revealing confidential information or allowing others to take control of their computer while clicking on seemingly innocuous objects, including web pages. In web browsers, clickjacking is a browser security issue that is a vulnerability across a variety of browsers and platforms.",
        "remediation": "Add the following sentence in NGINX config file: add_header X-Frame-Options \"SAMEORIGIN\"; This header will instruct a browser to load the resources ONLY from the same origin.",
        "compliance": {
          "pci_dss": "2.2.4"
        },
        "references": "https://en.wikipedia.org/wiki/Clickjacking,https://geekflare.com/nginx-webserver-security-hardening-guide/",
        "file": [
          "/etc/nginx/nginx.conf",
          "/usr/local/nginx/conf/nginx.conf"
        ],
        "result": "passed",
        "previous_result": "failed"
      }
    }
  },
  "location": "sca",
  "cluster": {
    "name": "wazuh",
    "node": "wazuh-master"
  }
}
At the same time, the SCA policy information gets updated too.

References
Wazuh documentation
NGINX security practices
- Top 25 NGINX Web Server Best Security Practices
- NGINX Web Server Security and Hardening Guide
- NGINX official documentation: security controls
Wazuh users community
If you have any questions about this, don’t hesitate to check out our documentation to learn more about Wazuh. You can also join our Slack and our mailing list where our team and other users will help you.