
Indicators of compromise (IoCs) are forensic artifacts that provide evidence of a potential security breach on an endpoint or network. Forensic experts use these artifacts to analyze security threats and other anomalies after an incident has occurred. Examples of IoCs include file names, file hashes, IP addresses, email addresses, URLs, and domain names.
Indicators of compromise provide cybersecurity teams with crucial information to monitor, detect, assess, prioritize, and efficiently respond to malicious activities in their early stages. This is why identifying and storing IoCs is an essential part of a multi-layered cybersecurity strategy involving threat hunting and incident response. Organizations can add identified IoCs to the databases of monitoring tools and antivirus software to combat subsequent cyberattacks and maintain their security posture.
The Lockheed Martin paper Intelligence-Driven Computer Network Defense Informed by Analysis of Adversary Campaigns and Intrusion Kill Chains categorizes IoCs into 3 types: atomic, computed, and behavioral.
- Atomic: These are IoCs that can’t be broken down into smaller parts while retaining their meaning in the context of an intrusion. Typical examples include IP addresses, email addresses, file names, and hostnames.
- Computed: These IoCs are derived from data about a security incident. Common examples of these indicators include hash values and regular expressions.
- Behavioral: These are IoCs describing collections of computed and atomic indicators in a security incident. They include the Tactics, Techniques, and Procedures (TTPs) threat actors use in a compromise.
Wazuh provides a variety of capabilities including intrusion detection, log data analysis, incident response, and more, to detect, analyze, and respond to security threats in real-time. By detecting security threats, we can configure Wazuh to capture IoCs by analyzing the events. This makes the solution ideal to provide actionable threat intelligence data for organizations to improve their incident response and remediation strategies.
This blog post shows how we leverage the Wazuh XDR capability to identify and store IoCs detected in an organization’s infrastructure. We focus on the atomic and computed IoCs which include IP addresses, URLs, and file hashes.
Prerequisites
We use the following endpoints and software to demonstrate how to emulate attacks and store their detected IoCs for further use.
| Endpoint | Description |
|---|---|
| CentOS 7 | This endpoint hosts the Wazuh central components (Wazuh server, Wazuh indexer, and Wazuh dashboard). Install Wazuh 4.4.1 using the Quickstart installation guide. You can also follow the installation alternatives guide. |
| Ubuntu 22.04 | Install Wazuh agent 4.4.1 on this endpoint and enroll it to the Wazuh server. Follow the Wazuh Linux agent installation guide to achieve this. |
| Parrot OS | We use this endpoint to emulate cyberattacks against the Ubuntu 22.04 endpoint. |
Scenario to detect and store IoCs
Wazuh generates security alerts on the dashboard when an attack or malicious activity occurs in an organization’s infrastructure. Some of these alerts contain IoCs which forensic experts use to enhance threat intelligence. We configure Wazuh to extract and store IoCs from critical security alerts with the aid of a Python script and the Wazuh active response module. The active response module automatically executes the Python script to extract and store detected IoCs when Wazuh triggers critical security alerts.
Configuration
We create an active response Python script to parse the content of critical alerts and store their IoCs to predefined files on the Wazuh server. The script analyzes security alerts and extracts file hashes, IP addresses, and URLs. These IoCs are uniquely stored in the mal-ip-list, mal-url-list, and mal-md5-list files at the /var/ossec/etc/lists/ directory of the Wazuh server.
- The
mal-url-listfile stores the detected URLs. - The
mal-ip-listfile stores the detected IP addresses. - The
mal-md5-listfile stores the detected MD5 file hashes.
Perform the following steps on the Wazuh server to configure it.
1. Create a Python script, ioc-builder.py, in the /var/ossec/active-response/bin/ directory with the following command:
$ sudo touch /var/ossec/active-response/bin/ioc-builder.py
2. Add the following content to the /var/ossec/active-response/bin/ioc-builder.py script file. This script extracts the values of the fields that contain IoCs which Wazuh decodes as srcip, url, md5_after, md5, and id in an alert. Then, it creates the IoC files, mal-ip-list, mal-url-list, and mal-md5-list, and stores the extracted IoCs in their respective files.
#!/var/ossec/framework/python/bin/python3
# Copyright (C) 2015-2023, Wazuh Inc.
# All rights reserved.

# This program is free software; you can redistribute it
# and/or modify it under the terms of the GNU General Public
# License (version 2) as published by the FSF - Free Software
# Foundation.

import sys
import json
import datetime
from pathlib import PureWindowsPath, PurePosixPath, Path

OS_SUCCESS = 0
OS_INVALID = -1

LOG_FILE = "/var/ossec/logs/active-responses.log"
MAL_IP_LIST  = "/var/ossec/etc/lists/mal-ip-list"
MAL_URL_LIST = "/var/ossec/etc/lists/mal-url-list"
MAL_MD5_LIST = "/var/ossec/etc/lists/mal-md5-list"

# Write a log file for debugging.
def write_debug_file(ar_name, msg):
    with open(LOG_FILE, mode="a") as log_file:
        ar_name_posix = str(PurePosixPath(PureWindowsPath(ar_name[ar_name.find("active-response"):])))
        log_file.write(str(datetime.datetime.now().strftime("%a %b %d %H:%M:%S %Z %Y")) + " " + ar_name_posix + ": " + msg +"\n")

# Get alert data from STDIN
def read_alert_data():
    input_str = ""
    for line in sys.stdin:
        input_str = line
        break

    try:
        alert_data = json.loads(input_str)
    except ValueError:
        write_debug_file(sys.argv[0], "Decoding JSON has failed, invalid input format")
        sys.exit(OS_INVALID)

    return alert_data

# Check for duplicated IoCs in the IoC files.
def is_not_duplicate_ioc(ioc_file, ioc):
    ioc += ":\n"
    for line in ioc_file:
        if line == ioc:
            return False

    return True

# Get the value of the alert object key if it exists.
def get_ioc_if_exist(alert_obj, keys):
    if not keys or alert_obj is None:
        return alert_obj

    return get_ioc_if_exist(alert_obj.get(keys[0]), keys[1:])

# Write unique IoCs to their respective files.
def write_ioc_file(ioc_list, ioc):
    if not Path(ioc_list).is_file():
        open(ioc_list, 'w').close()

    with open(ioc_list, "r+") as f:
        if is_not_duplicate_ioc(f, ioc):
            f.write(f"{ioc}:\n")
            write_debug_file(sys.argv[0], "ioc-data:" + "True|" + ioc + "|" + ioc_list)
        else:
            write_debug_file(sys.argv[0], "ioc-data:" + "False|" + ioc + "|" + ioc_list)

# Extract IoCs from security alerts.
def extract_iocs():
    alert_obj = read_alert_data()

    # Uniquely add the url to mal-url-list.
    url = get_ioc_if_exist(alert_obj, ["parameters", "alert", "data", "url"])
    if url is not None:
        write_ioc_file(MAL_URL_LIST, url)

    # Uniquely add the srcip to mal-ip-list.
    srcip = get_ioc_if_exist(alert_obj, ["parameters", "alert", "data", "srcip"])
    if srcip is not None:
        write_ioc_file(MAL_IP_LIST , srcip)

    # Uniquely add the file hash to mal-md5-list.
    md5_after = get_ioc_if_exist(alert_obj, ["parameters", "alert", "syscheck", "md5_after"])
    if md5_after is not None: # For FIM alert format.
        write_ioc_file(MAL_MD5_LIST, md5_after)

    md5 = get_ioc_if_exist(alert_obj, ["parameters", "alert", "data", "virustotal", "source", "md5"])
    if md5 is not None: # For VT alert format.
        write_ioc_file(MAL_MD5_LIST, md5)

    id = get_ioc_if_exist(alert_obj, ["parameters", "alert", "data", "id"])
    if id is not None and len(id) == 32: # For ClamAV alert format. The id field represents the md5 hash.
        write_ioc_file(MAL_MD5_LIST, id)

def main(argv):

    write_debug_file(argv[0], "Started")

    extract_iocs()

    write_debug_file(argv[0], "Ended")

    sys.exit(OS_SUCCESS)

if __name__ == "__main__":
    main(sys.argv)
3. Change the permissions and ownership of the ioc-builder.py script to 750 and root:wazuh respectively using the following commands:
$ sudo chmod 750 /var/ossec/active-response/bin/ioc-builder.py
$ sudo chown root:wazuh /var/ossec/active-response/bin/ioc-builder.py
4. Append the following configuration to the /var/ossec/etc/ossec.conf file enabling the Wazuh active response module to automatically execute the ioc-builder.py script. This automatic execution only occurs after an endpoint triggers a rule with an ID defined in the <rules_id> tag as highlighted in the configuration below.
<ossec_config>
  <command>
    <name>ioc-builder</name>
    <executable>ioc-builder.py</executable>
  </command>

  <active-response>
    <disabled>no</disabled>
    <command>ioc-builder</command>
    <location>server</location>
    <rules_id>5712,87105,31103</rules_id>
  </active-response>
</ossec_config>
By default, Wazuh triggers security alerts with rule IDs 5712, 87105, and 31103 to detect the following cyberattacks which we demonstrate in the attack emulation section:
- Rule ID
5712is triggered when Wazuh detects a brute-force attack against an SSH service with a non-existent user. - Rule ID
87105is triggered when Wazuh integrated with VirusTotal detects a malware attack. - Rule ID
31103is triggered when Wazuh detects an SQL injection attack against an application server.
Note
You can add more comma-separated rule IDs to the <rules_id> tag to gain more coverage on the number of IoCs captured. However, the alerts generated with these rule IDs must contain one or more of the decoded fields srcip, url, md5_after, md5, and id to capture the IoCs.
5. Append the following decoder to the /var/ossec/etc/decoders/local_decoder.xml file to extract the fields in the log event produced by the ioc-builder.py script:
<decoder name="ioc_builder">
  <prematch>^\w\w\w\s\w+\s+\d+\s\d\d:\d\d:\d\d\s+\d+\s\S+\sioc-data:</prematch>
  <regex offset="after_prematch">^(\S+)\|(\S+)\|(\S+)</regex>
  <order>ioc_not_found, ioc, ioc_file</order>
</decoder>
6. Append the following rules to the /var/ossec/etc/rules/local_rules.xml file. Wazuh triggers the rules when it verifies or adds an entry into the appropriate IoC files.
<group name="iocs,">
  <rule id="111000" level="0">
    <decoded_as>ioc_builder</decoded_as>
    <description>Grouping of IoC rules.</description>
  </rule>

  <rule id="111001" level="5">
    <if_sid>111000</if_sid>
    <field name="ioc_not_found">^True$</field>
    <description>Suspicious IoC "$(ioc)" added to "$(ioc_file)".</description>
  </rule>

  <rule id="111002" level="5" ignore="60">
    <if_sid>111000</if_sid>
    <field name="ioc_not_found">^False$</field>
    <description>Suspicious IoC "$(ioc)" already found in "$(ioc_file)".</description>
  </rule>
</group>
Where:
- Rule ID
111000groups IoC events and doesn’t generate an alert because we set the alert level to0 - Rule ID
111001is triggered when an IoC is added to the appropriate IoC file. - Rule ID
111002is triggered when an IoC already exists in the appropriate IoC file implying it is not added.
7. Restart the Wazuh manager to apply the configuration changes:
$ sudo systemctl restart wazuh-manager
Attack emulation
In this section, we perform three attacks that generate security alerts from which Wazuh extracts and stores the IoCs. The first is a malware attack against the Ubuntu endpoint. For the second and third attacks, we use the Parrot OS endpoint to perform SQL injection and brute-force attacks against the Ubuntu endpoint.
Malware attack
A malware attack is the most widely known cyberattack where threat actors use malicious software to execute unauthorized actions on a victim’s endpoint. We configure the File Integrity Monitoring (FIM) module and VirusTotal integration on the Ubuntu endpoint and Wazuh server respectively to detect the presence of malware attack against on the Ubuntu endpoint.
In this scenario, the FIM module monitors a directory and triggers alerts when it detects file addition or modification events in the monitored directory. The FIM alerts then trigger VirusTotal to scan the affected files against public engines to detect malicious content.
Configuring the FIM module and VirusTotal integration
Ubuntu endpoint
Perform the following steps to configure FIM to monitor for file changes.
1. Append the following configuration to the /var/ossec/etc/ossec.conf file to monitor the /home directory for file changes in real-time:
<ossec_config>
  <syscheck>
    <directories realtime="yes">/home</directories>
  </syscheck>
</ossec_config>
2. Restart the Wazuh agent to apply the configuration changes:
$ sudo systemctl restart wazuh-agent
Wazuh server
Perform the following steps to configure the VirusTotal integration to scan for malicious files.
1. Follow the instructions from the VirusTotal API key page to obtain a free key for scanning files if you don’t have one already.
2. Append the following settings to the /var/ossec/etc/ossec.conf file and replace <YOUR_VIRUS_TOTAL_API_KEY> with your VirusTotal API key obtained in step 1 above:
<ossec_config>
  <integration>
    <name>virustotal</name>
    <api_key><YOUR_VIRUS_TOTAL_API_KEY></api_key>
    <rule_id>554,550</rule_id>
    <alert_format>json</alert_format>
  </integration>
</ossec_config>
The FIM rule IDs 554 and 550 detect file addition and modification events respectively. These rule IDs trigger VirusTotal to scan the added or modified file on the monitored endpoint to detect the presence of malware.
3. Restart the Wazuh manager to apply the configuration changes:
$ sudo systemctl restart wazuh-manager
Launching the attack
Warning
For testing purposes, we download the EICAR anti-malware test file as shown below. We recommend testing in a sandbox, not in a production environment.
1. Download the malware, eicar, to the /tmp directory and copy it to the /home directory of the Ubuntu endpoint using the following commands:
$ curl -o /tmp/eicar https://secure.eicar.org/eicar.com
$ sudo cp /tmp/eicar /home
Viewing the results
Perform the following steps on the Wazuh dashboard to view the generated alerts and stored IoCs.
1. Navigate to Modules > Security events tab to view the generated alerts.
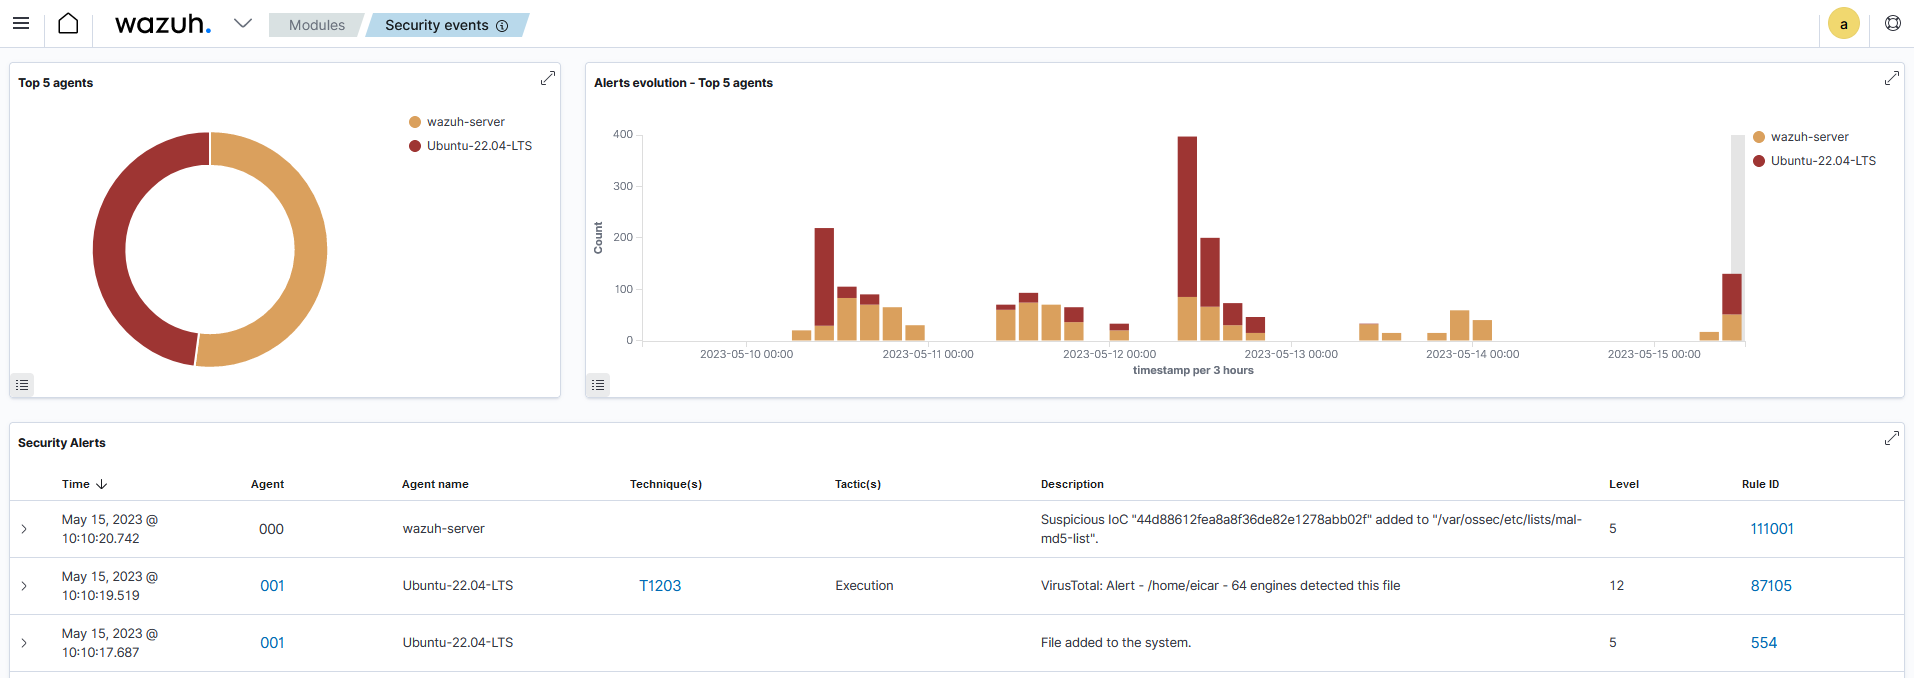
2. Navigate to Management > CDB lists and click the mal-md5-list CDB list to see the stored suspicious MD5 hash of the eicar malware.

SQL injection attack
SQL injection (SQLi) is a cyberattack that allows an attacker to inject malicious SQL code into data-driven applications interfering with the queries the application makes to its database. To emulate an SQLi attack against the Ubuntu endpoint, we configure it to run a web server with a sample website.
Setting up and monitoring Apache web server logs
Perform the following steps on the Ubuntu endpoint.
1. Install the Apache web server using the following commands:
$ sudo apt update
$ sudo apt install apache2 -y
2. Verify the Apache service is running using the following command:
$ sudo systemctl status apache2
3. Test that you can access the homepage of the Apache web server. The following command makes a request to the web server which responds with an HTTP status code of 200 implying the homepage is accessible. Replace <UBUNTU_IP> with the IP address of the Ubuntu endpoint.
$ curl -I http://<UBUNTU_IP>
4. Append the following configuration to the Wazuh agent /var/ossec/etc/ossec.conf file to forward the Apache web server logs to the Wazuh server for analysis:
<ossec_config>
  <localfile>
    <log_format>apache</log_format>
    <location>/var/log/apache2/access.log</location>
  </localfile>
</ossec_config>
5. Restart the Wazuh agent to apply the configuration changes:
$ sudo systemctl restart wazuh-agent
Launching the attack
1. On the Parrot OS endpoint, launch the SQLi attack using the following command while replacing <UBUNTU_IP> with the IP address of the Ubuntu endpoint:
$ curl -XGET "http://<UBUNTU_IP>/users/?id=SELECT+*+FROM+users";
Viewing the results
Perform the following steps on the Wazuh dashboard to view the generated alerts and stored IoCs.
1. Navigate to Modules > Security events tab to view the generated alerts.

2. Navigate to Management > CDB lists and click the mal-url-list CDB list to see the stored suspicious URL.

3. Navigate to Management > CDB lists and click the mal-ip-list CDB list to see the stored suspicious IP address of the Parrot OS attacker endpoint.

192.168.6.131 is the IP address of the Parrot OS endpoint performing the SQL injection attack.
Brute-force attack
A brute-force attack is a technique that uses trial and error to guess credentials and gain unauthorized access to applications and services. We emulate a brute-force attack against the SSH service on the Ubuntu endpoint. By default, Ubuntu 22.04 LTS has an SSH server installed and enabled. Wazuh detects brute-force attacks, making it easier to extract and store IoCs from the security alerts.
Launching the attack
Perform the following steps on the Parrot OS endpoint to launch the brute-force attack.
1. Create a text file, pass_list.txt, with six (6) random passwords in the /tmp/ directory using the following command:
$ cat > /tmp/pass_list.txt << EOF
_jD%=}]AYwQZ3/ahK_:)
gL9rR$,]n=*WK56X-)'&
s.3r9J%nn\v/?\^Y@-9b
'u3@#P!wP->'mjt:eM_V
w/nxmq6g6y<.{3qE!V2_
E8].jQhp;vv^eN"53=~p
EOF
2. Launch the brute-force attack against the Ubuntu endpoint’s SSH service using the following command while replacing <UBUNTU_IP> with the IP address of the Ubuntu endpoint:
$ sudo hydra -l attacker -P /tmp/pass_list.txt <UBUNTU_IP> ssh
Viewing the results
Perform the following steps on the Wazuh dashboard to view the generated alerts and stored IoCs.
1. Navigate to Modules > Security events tab to view the generated alerts.

2. Navigate to Management > CDB lists and click the mal-ip-list CDB list to see the stored suspicious IP address of the Parrot OS attacker endpoint.
Notice that no new entry of the IP address is added. This is because it is the same Parrot OS endpoint performing the attack so the IP address is already found in the list as reported in the figure above.
Conclusion
Organizations must be aware of the IoCs linked to different types of attacks to detect and respond to security breaches efficiently. By proactively monitoring endpoints and networks for IoCs, organizations can promptly identify and control security issues, minimizing the harm they might cause.
In this blog post, we have shown how to leverage the Wazuh XDR capability to detect, extract, and store IoCs which can be used for threat hunting. For example, the IoC files can be used as CDB list (constant database) input for custom rules and active response scripts.
Learn more about the open source Wazuh security platform and its capabilities to protect against malware and gain visibility of your infrastructure. You can also join our Slack community of professionals and users if you have any questions on this blog post or Wazuh in general.