BQTLock is a .NET-based ransomware that targets Windows environments and employs a hybrid encryption approach combining AES-256 and RSA-4096, marking encrypted files with .bqtlock extension. It operates under a Ransomware‑as‑a‑Service (RaaS) model, which lowers the barrier to entry for attackers and accelerates its spread across industries.
BQTLock operators typically favor targeted intrusions over random infections, carrying out activities such as lateral movement and data exfiltration long before the encryption stage begins. It is engineered to blend into normal system behavior, escalate privileges, and quietly prepare for deeper impact. By embedding itself within legitimate Windows processes, BQTLock avoids early detection and delays the moment its malicious payload becomes visible to defenders.
In this blog post, we demonstrate how organizations can leverage Wazuh to detect and respond to BQTLock ransomware on infected Windows endpoints.
BQTLock ransomware behavior
Below are some of the behaviors observed when BQTLock ransomware is successfully executed on a Windows endpoint:
- Upon execution, the ransomware creates a scheduled task configured to run at user logon with the highest privileges, ensuring it automatically executes every time the system is accessed.
- Afterwards, it creates a privileged account,
BQTLockAdmin, which indicates a potential persistence and privilege-escalation mechanism. - The ransomware proceeds to create a file
passwords.txtorbqt_passwords.txtin theC:\Windows\Temp\directory, indicating a credential/data staging activity. - The ransomware executes the command
vssadmin.exe delete shadows /all /quietto delete Volume Shadow Copies and prevent backup recovery. - It executes the command
bcdedit /set {default} bootstatuspolicy ignoreallfailuresto configure the system to ignore boot failures. - Subsequently, it executes the command
bcdedit /set {default} recoveryenabled noto disable the Windows recovery environment. - It creates the ransom note
READ_ME_NOW_*.txt,README_pay2_DECRYPT.txt, orREADME_TO_DECRYPT.txtin multiple directories. - It encrypts files by appending
.BQTLOCKextension to the encrypted files. - It executes the command
timeout /t 3 /nobreak > NUL & del /f /q ...\update.exe & exitin an attempt to remove executable artifacts after execution.
Analyzed IOC
| Hash (SHA 256) |
| 324eabc27a25f524c94bb62573986b3335ab5181ddc6825d959d16aaaccdc7aa |
| 9600db537e27db88ed2eca3be0ffab35cdb22a86a6dbb048d8deaf8f56944822 |
| 3857744a651da4e431083180798041a5e888b09334a1a04c2c047216f471b0f6 |
| b211537ea626fae4ad2ef5ee2652633dc68aaf20da6eb953a44f266c4106b367 |
Infrastructure
We use the following infrastructure to demonstrate the detection of BQTLock ransomware with Wazuh:
- A pre-built, ready-to-use Wazuh OVA 4.14.4, which includes the Wazuh central components (Wazuh server, Wazuh indexer, and Wazuh dashboard). Follow this guide to download and set up the Wazuh virtual machine.
- A Windows 11 endpoint with Wazuh agent 4.14.4 installed and enrolled in the Wazuh server.
Detection with Wazuh
We use the following techniques to detect the BQTLock ransomware behavior on an infected Windows endpoint:
- Using detection rules to identify malicious activities associated with the BQTLock ransomware.
- Detecting and removing malicious artifacts using the Wazuh CDB lists and Active Response module.
Detection rules
We monitor system events on the Windows endpoint using Sysmon and create custom rules on the Wazuh server to detect the malicious behavior of BQTLock ransomware.
Windows endpoint
Follow the steps below to configure Sysmon on the monitored endpoint and forward logs in the Sysmon event channel to the Wazuh server for analysis:
- Download Sysmon from the Microsoft Sysinternals page.
- Extract the compressed Sysmon file to your preferred location.
- Run PowerShell as an administrator to download the Sysmon configuration file (sysmonconfig.xml). Replace
<SYSMON_EXECUTABLE_PATH>with the path to your Sysmon executable.
> wget -Uri https://wazuh.com/resources/blog/emulation-of-attack-techniques-and-detection-with-wazuh/sysmonconfig.xml -OutFile <SYSMON_EXECUTABLE_PATH>\sysmonconfig.xml
- Navigate to the folder containing the Sysmon executable. Run the command below to install and start Sysmon:
> .\Sysmon64.exe -accepteula -i sysmonconfig.xml
- Add the following configuration within the
<ossec_config>block of theC:\Program Files (x86)\ossec-agent\ossec.conffile to forward Sysmon events to the Wazuh server for analysis:
<localfile>
  <location>Microsoft-Windows-Sysmon/Operational</location>
  <log_format>eventchannel</log_format>
</localfile>
- Restart the Wazuh agent to apply the changes:
> Restart-Service -Name wazuh
Wazuh server
In this section, we create rules from the Wazuh dashboard to detect the activities associated with BQTLock malware.
- Navigate to Server management > Rules.
- Click + Add new rules file.
- Add the following detection rules:
<group name="BQTLock,ransomware,">

<!-- Suspicious account creation by BQT ransomware -->
  <rule id="100301" level="12">
    <if_sid>60109</if_sid>
    <field name="win.eventdata.targetUserName" type="pcre2">(?i)BQTLockAdmin$</field>
    <description>Suspicious user account '$(win.eventdata.TargetUserName)' created. Possible BQTLock ransomware persistence mechanism.</description>
    <mitre>
      <id>T1136</id>
    </mitre>
  </rule>

<!-- The ransomware creates data staging file -->
  <rule id="100302" level="12">
    <if_sid>61613</if_sid>
    <field name="win.eventdata.image" type="pcre2">\.exe</field>
    <field name="win.eventdata.targetFilename" type="pcre2">(?i)[C-Z]:\\\\Windows\\\\Temp\\\\[^\"]*passwords\.txt</field>
    <description>File $(win.eventdata.targetFilename) created by BQTLock ransomware.</description>
    <mitre>
      <id>T1047</id>
    </mitre>
  </rule>

<!-- The ransomware deletes Volume shadow copy -->
  <rule id="100303" level="12">
    <if_sid>61603</if_sid>
    <field name="win.eventdata.CommandLine" type="pcre2">(?i)vssadmin\.exe\sdelete\sshadows\s\/all\s\/quiet</field>
    <description>Volume shadow copy deleted using $(win.eventdata.originalFileName). Potential ransomware activity detected.</description>
    <mitre>
      <id>T1490</id>
    </mitre>
  </rule>

<!-- The ransomware modifies boot configuration -->
  <rule id="100304" level="12">
    <if_sid>61603</if_sid>
    <field name="win.eventdata.CommandLine" type="pcre2">(?i)bcdedit\.exe\s\/set\s\{default\}\sbootstatuspolicy\signoreallfailures</field>
    <description>Boot configuration modified to ignore failures. Potential ransomware recovery inhibition activity detected.</description>
    <mitre>
      <id>T1490</id>
    </mitre>
  </rule>

<!-- The ransomware disables Windows recovery environment -->
  <rule id="100305" level="12">
    <if_sid>61603</if_sid>
    <field name="win.eventdata.CommandLine" type="pcre2">(?i)bcdedit\.exe\s\/set\s\{default\}\srecoveryenabled\sno</field>
    <description>Windows recovery environment disabled. Potential ransomware recovery inhibition activity detected.</description>
    <mitre>
      <id>T1490</id>
    </mitre>
  </rule>

<!-- The ransomware creates ransom note file -->
  <rule id="100306" level="12" timeframe="100" frequency="2">
    <if_sid>61613</if_sid>
    <field name="win.eventdata.image" type="pcre2">\.exe</field>
    <field name="win.eventdata.targetFilename" type="pcre2">(?i)[C-Z]:\\.*\\(READ_ME_NOW_\d+|README_TO_DECRYPT)\.txt$</field>
    <description>The file $(win.eventdata.targetFilename) has been created in multiple directories. BQTLock ransomware detected.</description>
    <mitre>
      <id>T1059</id>
    </mitre>
  </rule>

<!-- The ransomware encrypts files across system by appending .BQTLock extension -->
  <rule id="100307" level="12">
    <if_sid>61613</if_sid>
    <field name="win.eventdata.image" type="pcre2">\.exe</field>
    <field name="win.eventdata.targetFilename" type="pcre2">(?i)[C-Z]:.*.\\*.BQTLOCK$</field>
    <description>File created with .BQTLock extension. BQTLock ransomware encryption activity detected.</description>
    <mitre>
      <id>T1047</id>
    </mitre>
  </rule>

<!-- Suspicious scheduled task creation for persistence -->
  <rule id="100308" level="12">
    <if_sid>61603</if_sid>
    <field name="win.eventdata.commandLine" type="pcre2">(?i)schtasks\s\/create\s\/tn\s\\\"BQTLock_Startup_\d+\\\"\s\/tr\s\\\".+?\\\"\s\/sc\sONLOGON\s\/rl\sHIGHEST\s\/f</field>
    <description>Suspicious scheduled task created with ONLOGON trigger and elevated privileges matching BQTLock persistence pattern. Possible ransomware activity.</description>
    <mitre>
      <id>T1053.005</id>
    </mitre>
  </rule>

<!-- The ransomware self-deletes using delayed command execution -->
  <rule id="100309" level="12">
    <if_sid>61603</if_sid>
    <field name="win.eventdata.commandLine" type="pcre2">(?i)timeout\s\/t\s\d+.*del\s\/f\s\/q\s\\\"[^\"]+\\\".*exit</field>
    <description>Suspicious command chaining with timeout and file deletion detected. Possible malware self-deletion activity detected.</description>
    <mitre>
      <id>T1070.004</id>
    </mitre>
  </rule>

</group>
Where:
100301is triggered when the ransomware creates a suspicious privilege account.100302is triggered when the ransomware creates a staging file.100303is triggered when the ransomware deletes the Volume shadow copy.100304is triggered when the ransomware modifies the boot configuration to ignore failure.100305is triggered when the ransomware disables the Windows recovery environment.100306is triggered when the ransomware creates the ransom note in multiple directories.100307is triggered when the ransomware encrypts files across the system by appending the.BQTLOCKextension to the encrypted files.100308is triggered when the ransomware creates a scheduled task configured to run at user logon with the highest privileges, ensuring it automatically executes every time the system is accessed.100309is triggered when the ransomware executes a command to remove executable artifacts after execution.
- Name the file
BQTLock_ransomware_rules.xmland click Save - Click Reload to apply the changes.
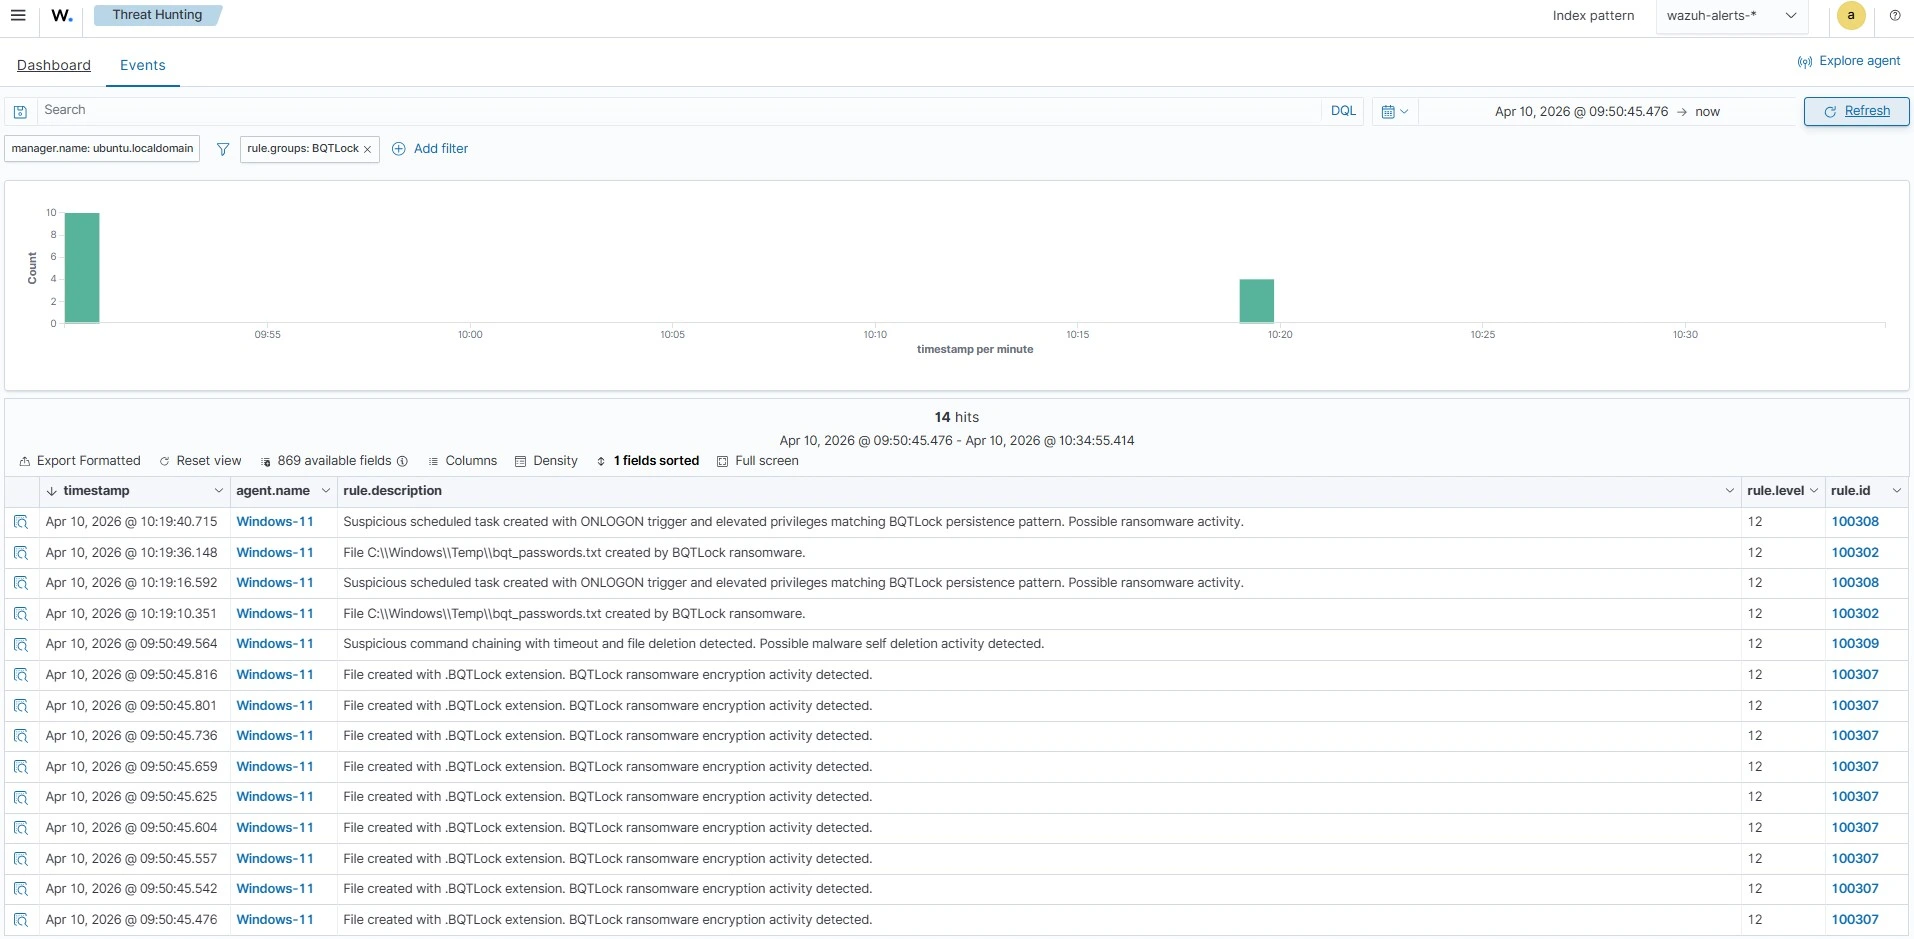
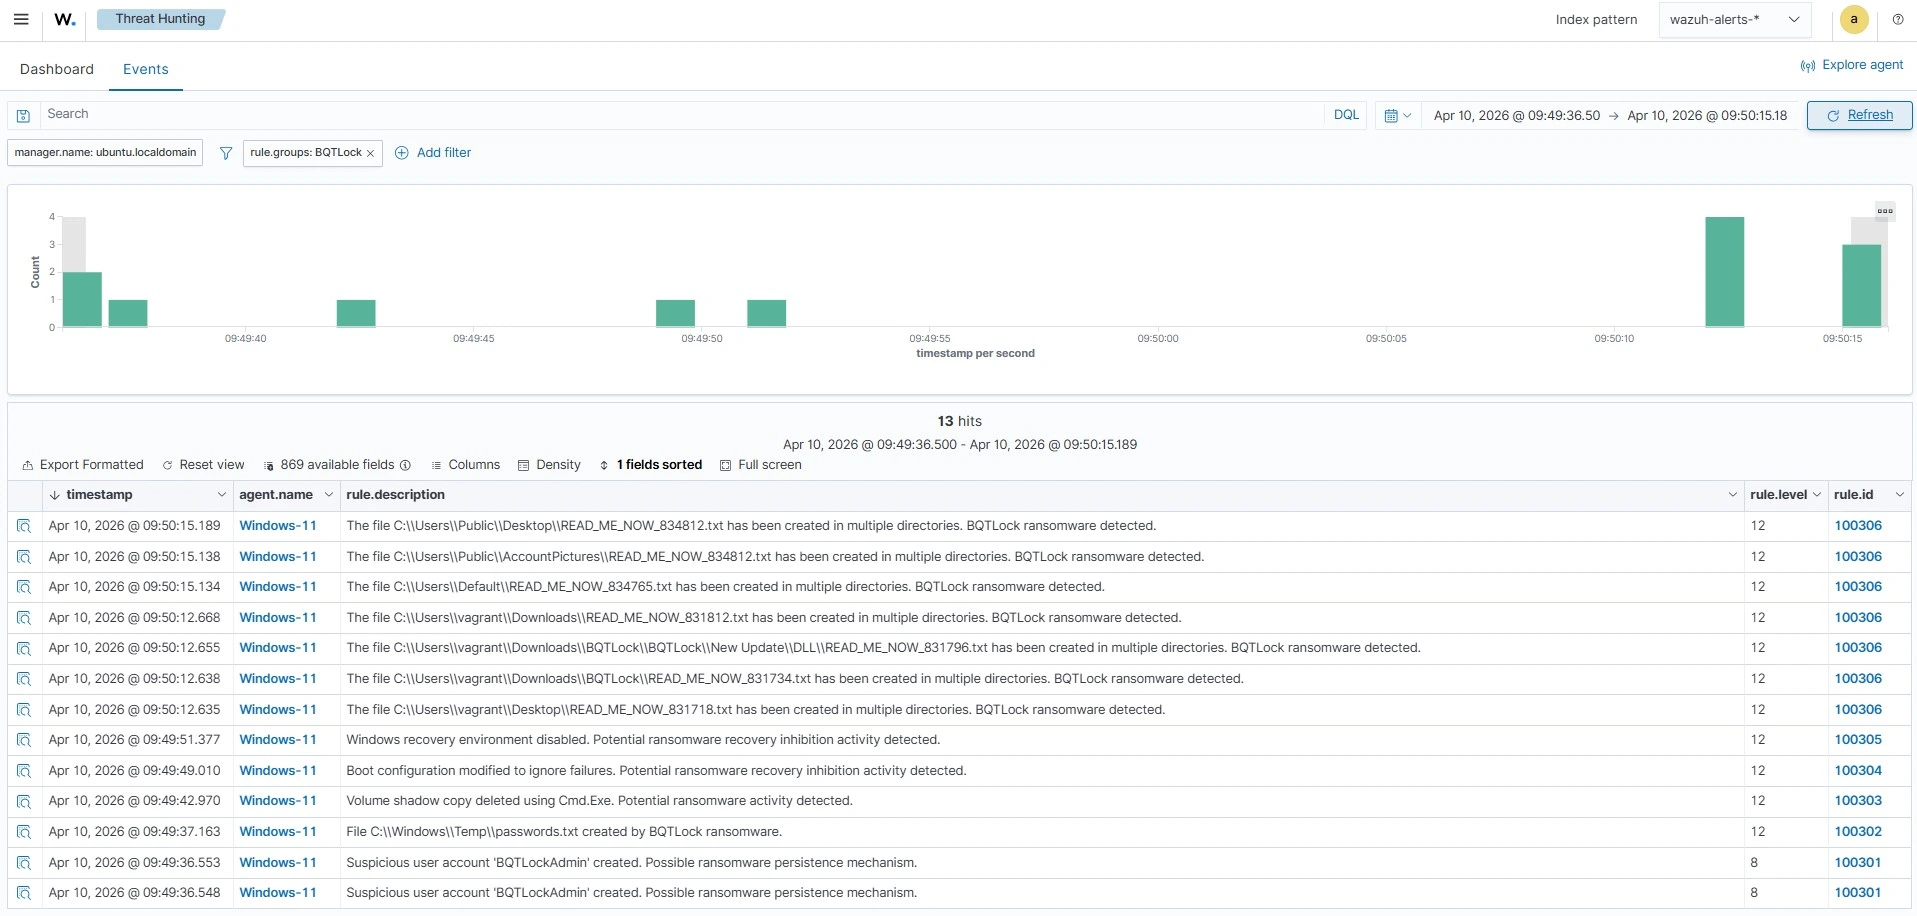
Alerts visualization
Follow the steps below to view the alerts generated on the Wazuh dashboard:
- Navigate to Threat intelligence > Threat Hunting.
- Switch to the Events tab.
- Click + Add filter. Then filter by
rule.groups. - In the Operator field, select
is. - Search and select
BQTLockin the Values field. - Click Save.
Responding to BQTLock ransomware using Wazuh CDB list and Active Response
Wazuh identifies malicious files by comparing their signatures to entries stored in a CDB list of known malware indicators. A CDB list functions as a key:value pair database, allowing users to track usernames, file hashes, IP addresses, or domain names. Populating this list with relevant indicators helps to identify threats effectively. More details about CDB lists are available in our documentation.
Detecting BQTLock ransomware using file hash in the Wazuh CDB list
To detect the BQTLock ransomware, add its known hash to a CDB list. The Wazuh File Integrity Monitoring (FIM) module tracks file activity in monitored directories and generates alerts on creation, modification, or deletion events. These alerts contain the file’s MD5, SHA1, and SHA256 checksums. By comparing the SHA-256 values from these alerts with the entries in your CDB list, Wazuh immediately identifies any file that matches the BQTLock payload.
Follow the steps below to create a CDB list and set up the detection rule.
Wazuh server
- Create a file without extension named
BQTLock-hashesand copy the below asKey:Valuepairs into the file:
| 2aae1d749353067f5afb5bebedb5249047f60e7aaa9684ac7c779a0908b1573c:BQTLock 3857744a651da4e431083180798041a5e888b09334a1a04c2c047216f471b0f6:BQTLock 5ffa525fead0b2d81d8bbfa0630aebee5f0b2d3f4ab583e92ac41e6c8f814661:BQTLock 9600db537e27db88ed2eca3be0ffab35cdb22a86a6dbb048d8deaf8f56944822:BQTLock 4525387f28bee6bb48d07e6989319f382447a8a6e48ae11f332dee9916feb8cc:BQTLock 67a315a0fe8d466f71716a83ab0e745ec4a7fa2e210a1b06e3396b516f554554:BQTLock 9cd62dbace3324487124787127cff7c63a9f005d8d3aff9bac28c437e5caefc7:BQTLock 425b2f283b71237276f84d941d9c2982c7f61a9aff12ece10e15065b73b7165e:BQTLock b211537ea626fae4ad2ef5ee2652633dc68aaf20da6eb953a44f266c4106b367:BQTLock 11affbeb18f4d6edcc9a4be5a82f8e23dfc31178887e97119faa5ddc75990494:BQTLock b7796a3b1812f329c43d5d37bbb6d8032b7bc06b15af29f555eb3e0c7b1b1c3d:BQTLock a6a397fec6c109a1402c6f1144d647843b2093f65fedd27204b40ebeea0640b6:BQTLock 00005ed250d85fc47e4c3883b8e6179a9888b8140acfeb94a40edc36bd523adb:BQTLock 324eabc27a25f524c94bb62573986b3335ab5181ddc6825d959d16aaaccdc7aa:BQTLock af90666822646e35eb52248f4a89eb715ce9f44459205bc24827a2aafe053548:BQTLock 9547933dd46501af7fc095a3513e48b81178e344b86e075b679259875f0fd5a7:BQTLock cd5e7b3b59cea14b804f6c01821d1ab94a0046422fe956f623b238c5db0cac99:BQTLock 0ccd3f2d7e6637eaf5414e35b97d9d8bf6b8e4182859cace8ca8e02377a4e62a:BQTLock 008ec0226066572f4b27f100d08443120b9dd55cefbec2bbff994b5b552e546c:BQTLock 5b992a3438e344dddcdd66151a40efb3452b2ff37cdc40b37db612afeb29ed29:BQTLock 780e34c72404fd464669626ae554b81393d2bae95293284b375bb5d989914486:BQTLock b61ae633616d7dd29aaf0b170fdfbe8f282c0f8bdcb1c52aedee473ce4bf5789:BQTLock 56eec59a5fe3f5a3c2c836701557bf1956770f465cd9e049995b86aef76a3e39:BQTLock 97524f4c582e0fbe46b74a7cfe4db9f078f368520cda25f27a50c5d2c50161f9:BQTLock 590e47944ef0597bf1ff1d41656859b776e7031a4611cbf22d619002cbe49312:BQTLock e2622ede1ebe5a37c439a32f0c63c13f893d1e5513b27367502898651cc5464b:BQTLock 10938c2d01dc999d2fe1f8c635e3705e7e663077935a17e730c849d1191c76ed:BQTLock fbd67a3bcc964e370931f620a85bf368d7b5797ebc1d53fe3be11a89a90e7961:BQTLock dacbba7f18d0835deb2eeb4e4d82c8f57234767291a90da1a5f3fd02d6bc13c2:BQTLock 4369aed581de0fe84c25a1ef2c3cf0bb6bf70df8b51fdf38b3b0b2a55f43261b:BQTLock f77c203d0c80598954c06a0f6f0c46f8b885ba423d12a21f13ded0168aa11b10:BQTLock 881b048234ebed82339244eb0c18580d785944dc82f83949f6adc1a9bc225c3b:BQTLock 49f89b2fdef345a9d92fc821e4a226d8ac99e4ca0d2d11b5654f6557800b85f2:BQTLock 618070d597dd73c43ba5d4bde2baa93a4f6038e3279de3bafe688caa5c409a58:BQTLock 862f29aa00bb4ee33729bc6699990dbdf9ef890b8364f8288b173cb1ca5d6787:BQTLock |
- Navigate from the Wazuh dashboard to Server management > CDB Lists.
- Click on Import files to import the
BQTLock-hashesfile, and click on Upload to add it to the CBD lists.
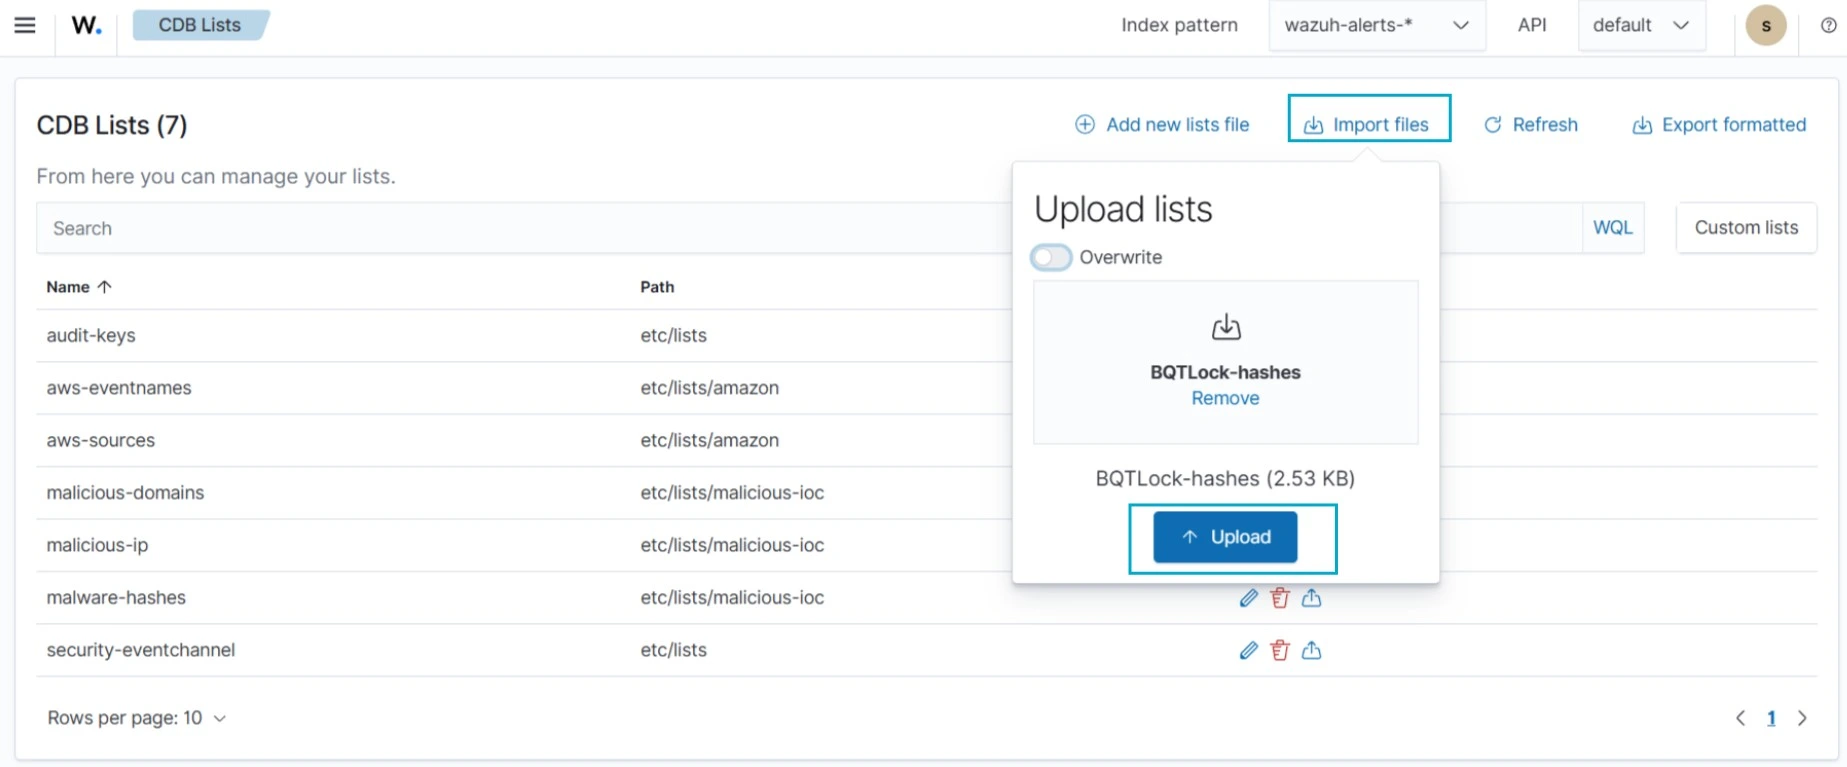
- Click Reload to apply the changes.
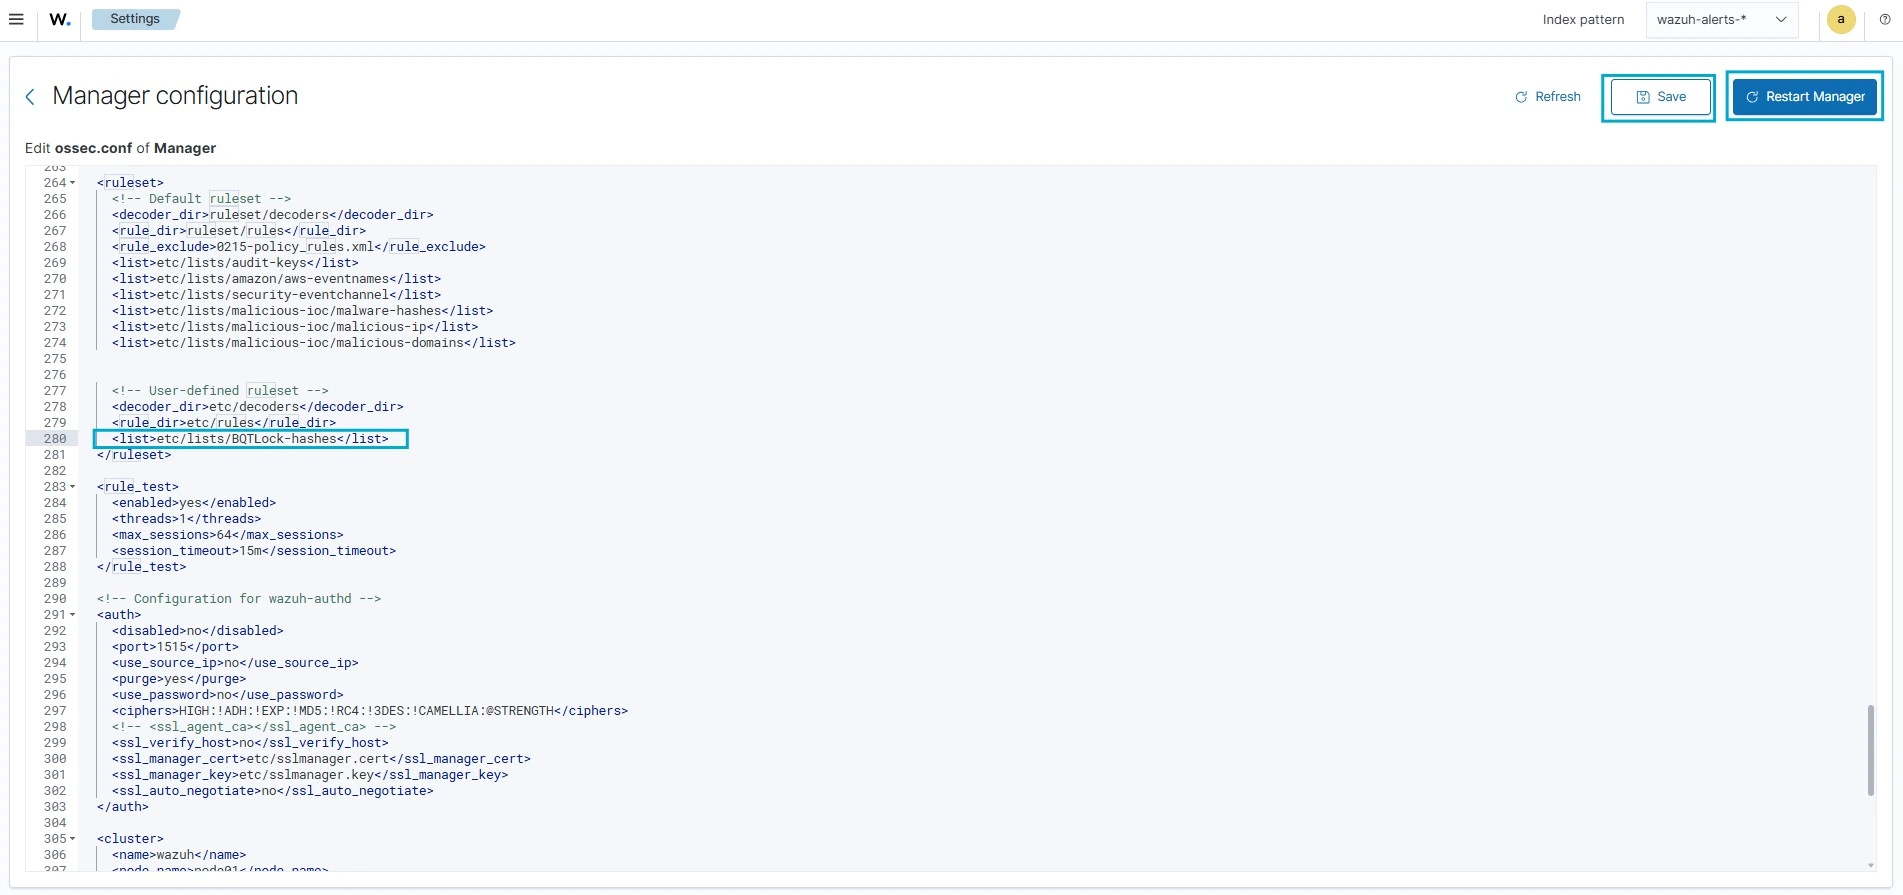
- Navigate to Server management > Settings.
- Click Edit configuration to edit the
ossec.conffile of the Wazuh manager. - Add the
etc/lists/BQTLock-hasheslist within the User-defined part of the<ruleset>configuration block:
 <ruleset>
    <!-- User-defined ruleset -->
    <list>etc/lists/BQTLock-hashes</list>
  </ruleset>
- Click Save and then Restart Manager.
- Navigate to Server management > Rules.
- Click Manage rule files.
- Search for and edit the
local_rules.xmlfile. - Add the following custom detection rule to trigger alerts on the Wazuh dashboard whenever a SHA256 hash from the BQTLock CDB list is detected:
<group name="BQTLock,">
  <rule id="100121" level="13">
    <if_sid>554, 550</if_sid>
    <list field="sha256" lookup="match_key">etc/lists/BQTLock-hashes</list>
    <description>A known BQTLock ransomware hash detected: $(file)</description>
  </rule>
</group>
Note
Rule ID 554 is triggered when a new file is added to a monitored directory, while rule ID 550 is triggered when a file is modified.
- Click Save and then Reload to apply the changes.
Windows endpoint
- Monitor the
Downloadsfolder of all users in real-time by adding the below configuration within the<syscheck>block of theC:\Program Files (x86)\ossec-agent\ossec.conffile:
<directories realtime="yes">C:\Users\*\Downloads</directories>
Note
In this blog post, we monitored only the Downloads folder of all users. However, you can configure Wazuh to monitor any directory of your choice.
- Restart the Wazuh agent to apply the changes:
> Restart-Service -Name wazuh
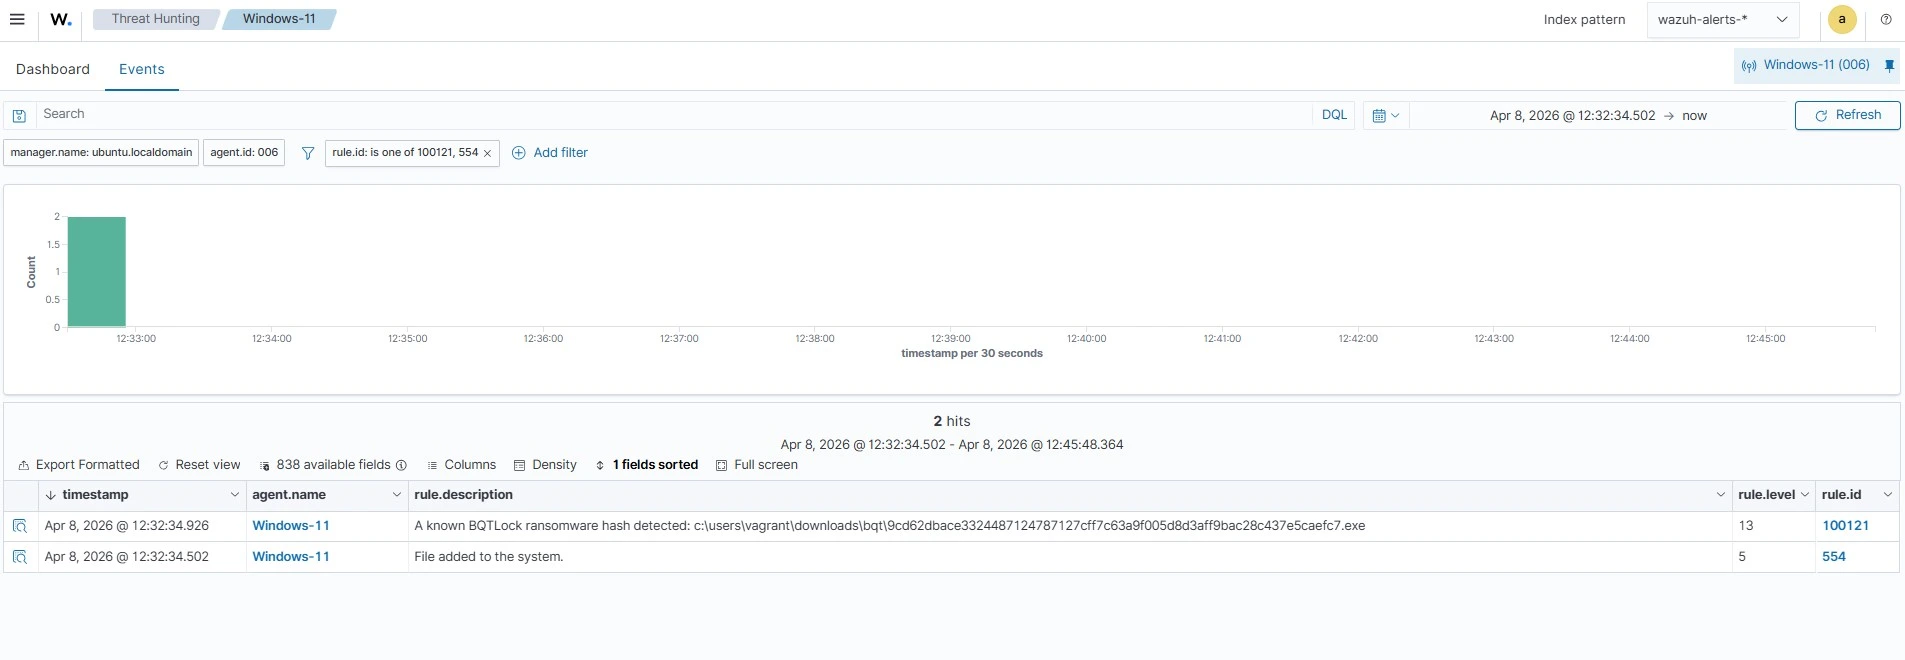
Alerts visualization
Follow the steps below on the Wazuh dashboard to view the alerts generated when the BQTLock ransomware file is added to the monitored Download directory.
- Navigate to Threat intelligence > Threat Hunting.
- Switch to the Events tab.
- Click + Add filter. Then filter by
rule.id. - In the Operator field, select
is one of. - Search and select
100121and554in the Values field. - Click Save.
Removing BQTLock ransomware using Active Response
The Wazuh Active Response module mitigates threats by executing predefined scripts on an endpoint when a corresponding alert is generated. Once a rule is triggered, Wazuh immediately runs the associated script on the impacted host to perform remediation.
In this guide, we configure an Active Response script on the monitored Windows endpoint to automatically remove BQTLock ransomware files upon detection. Since the script must be compiled into a standalone executable, the endpoint needs Python and PyInstaller installed to package the script.
Follow the steps below to configure the Active Response script to clean up BQTLock ransomware artifacts upon detection.
Windows endpoint
- Download and install Python with the following options enabled during installation:
- Use admin privileges when installing py.exe
- Add Python.exe to PATH.
- Run the following command on PowerShell in administrator mode to install PyInstaller:
> pip install -U pyinstaller
- Create a
remove-threat.pyfile and copy the script below into it:
#!/usr/bin/python3
# Copyright (C) 2015-2022, Wazuh Inc.
# All rights reserved.

import os
import sys
import json
import datetime

if os.name == 'nt':
    LOG_FILE = "C:\\Program Files (x86)\\ossec-agent\\active-response\\active-responses.log"
else:
    LOG_FILE = "/var/ossec/logs/active-responses.log"

ADD_COMMAND = 0
DELETE_COMMAND = 1
CONTINUE_COMMAND = 2
ABORT_COMMAND = 3

OS_SUCCESS = 0
OS_INVALID = -1

class message:
    def __init__(self):
        self.alert = ""
        self.command = 0

def write_debug_file(ar_name, msg):
    with open(LOG_FILE, mode="a") as log_file:
        log_file.write(str(datetime.datetime.now().strftime('%Y/%m/%d %H:%M:%S')) + " " + ar_name + ": " + msg +"\n")

def setup_and_check_message(argv):

    # get alert from stdin
    input_str = ""
    for line in sys.stdin:
        input_str = line
        break
    try:
        data = json.loads(input_str)
    except ValueError:
        write_debug_file(argv[0], 'Decoding JSON has failed, invalid input format')
        message.command = OS_INVALID
        return message

    message.alert = data

    command = data.get("command")

    if command == "add":
        message.command = ADD_COMMAND
    elif command == "delete":
        message.command = DELETE_COMMAND
    else:
        message.command = OS_INVALID
        write_debug_file(argv[0], 'Not valid command: ' + command)

    return message


def send_keys_and_check_message(argv, keys):

    # build and send message with keys
    keys_msg = json.dumps({"version": 1,"origin":{"name": argv[0],"module":"active-response"},"command":"check_keys","parameters":{"keys":keys}})

    write_debug_file(argv[0], keys_msg)

    print(keys_msg)
    sys.stdout.flush()

    # read the response of previous message
    input_str = ""
    while True:
        line = sys.stdin.readline()
        if line:
            input_str = line
            break

    # write_debug_file(argv[0], input_str)

    try:
        data = json.loads(input_str)
    except ValueError:
        write_debug_file(argv[0], 'Decoding JSON has failed, invalid input format')
        return message

    action = data.get("command")

    if "continue" == action:
        ret = CONTINUE_COMMAND
    elif "abort" == action:
        ret = ABORT_COMMAND
    else:
        ret = OS_INVALID
        write_debug_file(argv[0], "Invalid value of 'command'")

    return ret

def main(argv):

    write_debug_file(argv[0], "Started")

    # validate json and get command
    msg = setup_and_check_message(argv)

    if msg.command < 0:
        sys.exit(OS_INVALID)

    if msg.command == ADD_COMMAND:
        alert = msg.alert["parameters"]["alert"]
        keys = [alert["rule"]["id"]]
        action = send_keys_and_check_message(argv, keys)

        # if necessary, abort execution
        if action != CONTINUE_COMMAND:

            if action == ABORT_COMMAND:
                write_debug_file(argv[0], "Aborted")
                sys.exit(OS_SUCCESS)
            else:
                write_debug_file(argv[0], "Invalid command")
                sys.exit(OS_INVALID)

        try:
            os.remove(msg.alert["parameters"]["alert"]["syscheck"]["path"])
            write_debug_file(argv[0], json.dumps(msg.alert) + " Successfully removed threat")
        except OSError as error:
            write_debug_file(argv[0], json.dumps(msg.alert) + "Error removing threat")


    else:
        write_debug_file(argv[0], "Invalid command")

    write_debug_file(argv[0], "Ended")

    sys.exit(OS_SUCCESS)

if __name__ == "__main__":
    main(sys.argv)
- Convert the Python script
remove-threat.pyinto an executable file:
> pyinstaller -F remove-threat.py
- Copy the built executable from the
\distfolder in your current working directory to theC:\Program Files (x86)\ossec-agent\active-response\bindirectory.
> Copy-Item -Path ".\dist\remove-threat.exe" -Destination "C:\Program Files (x86)\ossec-agent\active-response\bin"
- Restart the Wazuh agent to apply the changes:
> Restart-Service -Name wazuh
Wazuh server
- Navigate to Server management > Settings.
- Click Edit configuration to edit the
ossec.confof the Wazuh manager. - Add the following configuration within the
<ossec_config>block to trigger an Active Response to rule ID100121:
<command>
    <name>remove-threat-windows</name>
    <executable>remove-threat.exe</executable>
    <timeout_allowed>no</timeout_allowed>
  </command>

  <active-response>
    <disabled>no</disabled>
    <command>remove-threat-windows</command>
    <location>local</location>
    <rules_id>100121</rules_id>
  </active-response>
Where:
<name>specifies the name of the command being called in the active response section, which isremove-threat-windows.<executable>specifies the executable file to run, which isremove-threat.exe.<command>specifies the command that the active response will use.- The
<active response>block calls the<command>block when the rule ID100121is triggered. <location>specifies where the active response script will execute.
- Click Save and then Restart Manager
- Navigate to Server management > Rules.
- Click Manage rule files.
- Search for and edit the
local_rules.xmlfile. - Add the following detection rules to generate alerts when remediation actions are taken:
<group name="BQTLock,">
  <rule id="100122" level="12">
    <if_sid>657</if_sid>
    <match>Successfully removed threat</match>
    <description>$(parameters.program): Successfully removed threat $(parameters.alert.syscheck.path) whose hash appears in a malware blacklist.</description>
  </rule>

  <rule id="100123" level="12">
    <if_sid>657</if_sid>
    <match>Error removing threat</match>
    <description>$(parameters.program): Error removing threat $(parameters.alert.syscheck.path) whose hash appears in a malware blacklist.</description>
  </rule>

</group>
Where:
- Rule ID
100122is triggered when the Wazuh Active Response module successfully removes the threat. - Rule ID
100123is triggered when the Wazuh active response module does not successfully remove the threat.
- Click Save and then Reload to apply the changes.
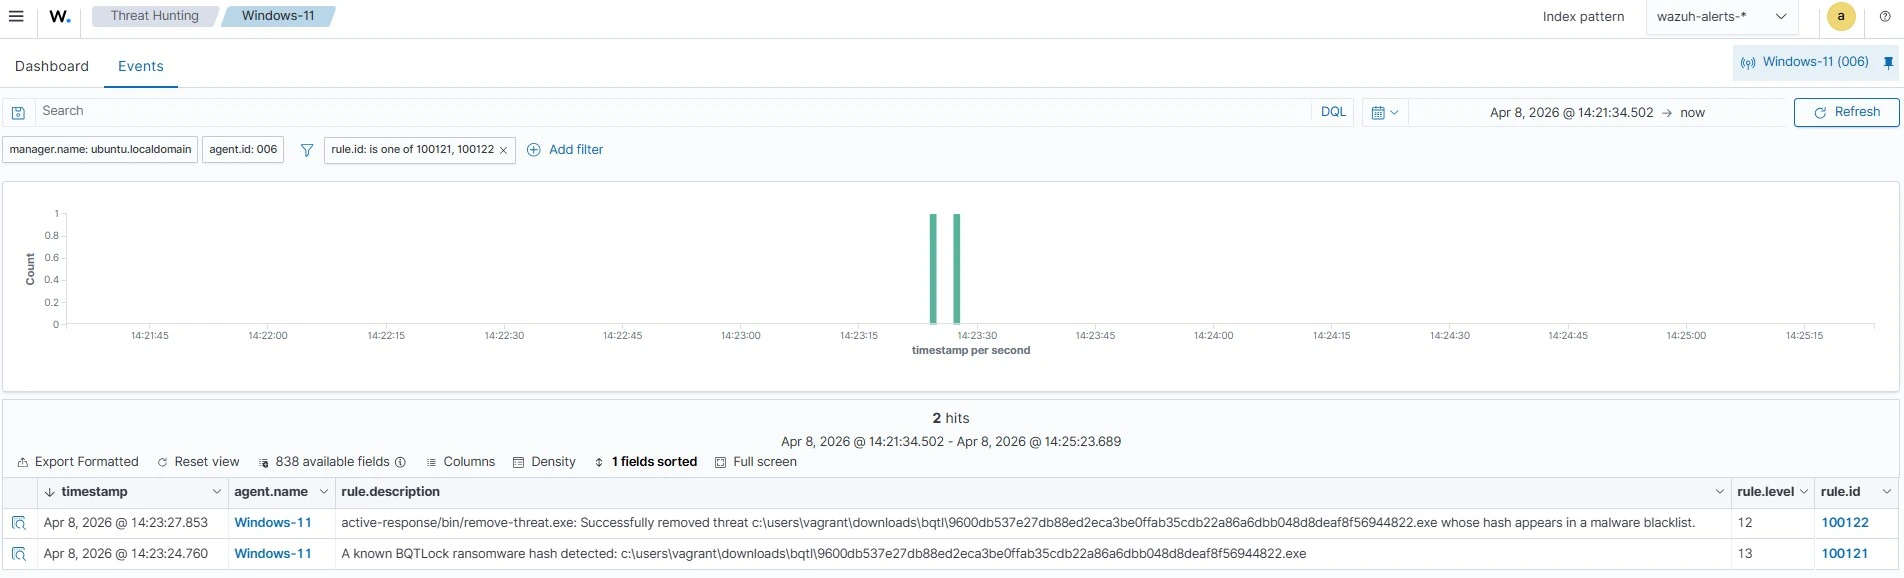
Alerts visualization
Follow the steps below on the Wazuh dashboard to view the alerts generated upon successful remediation:
- Navigate to Threat intelligence > Threat Hunting.
- Switch to the Events tab.
- Click + Add filter. Then filter by
rule.id. - In the Operator field, select
is one of. - Search and select rule ID
100121and100122in the Values field. - Click Save.
Conclusion
In this blog post, we illustrated how to detect and respond to BQTLock ransomware on monitored Windows endpoints. We enriched logs from the monitored endpoint by integrating Sysmon and created Wazuh custom detection rules to identify the malicious behaviors associated with BQTLock ransomware. We also demonstrated how to remediate the detected threats by using the Wazuh CDB lists and Active Response module.
Wazuh is a free open source security platform providing a wide range of defensive capabilities to safeguard your infrastructure. If you have questions about this blog post or Wazuh, join our community; our team actively engages there and is ready to help.