
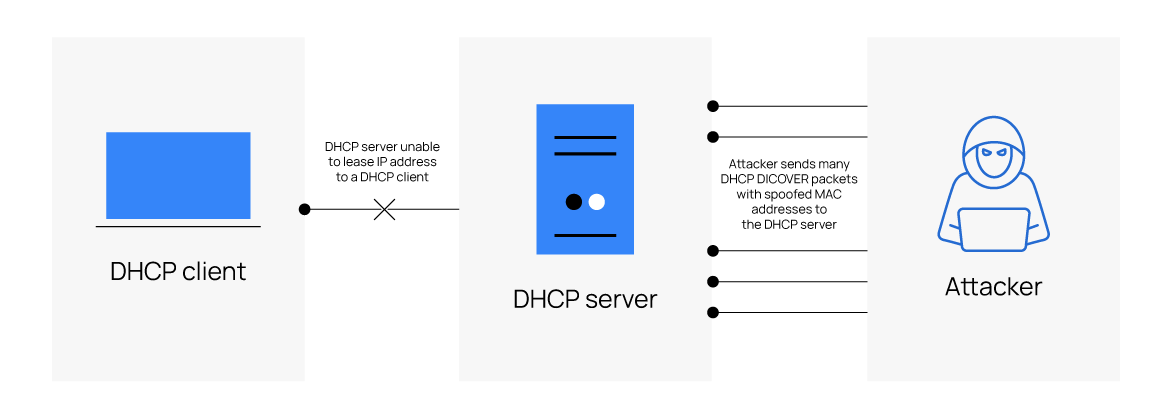
A DHCP starvation attack occurs when a malicious actor floods a DHCP server with a large number of DHCP DISCOVER packets with spoofed MAC addresses. This action exhausts all the available IP addresses the DHCP server can assign to clients. After a successful DHCP starvation attack, a DHCP server will not be able to offer IP addresses to its clients.
A DHCP (Dynamic host configuration protocol) server is a network device that automatically assigns IP addresses, subnet masks, default gateway, and other network information to client devices. A DHCP client receives an IP address from a DHCP server by exchanging packets with the DHCP server. These packets are DISCOVER, OFFER, REQUEST, and ACKNOWLEDGEMENT (DORA).

The below steps explain the DHCP DORA process:
1. When a DHCP client boots up on a network, it sends a DHCP DISCOVER packet to discover a DHCP server. In a DHCP DISCOVER packet, the DHCP client requests an IP address from a DHCP server.
2. The DHCP server responds with an OFFER packet. In the OFFER packet, the DHCP server offers an available IP address to the DHCP client.
3. After the DHCP client receives the OFFER packet from the DHCP server, it sends a DHCP REQUEST to the server. In a DHCP REQUEST packet, the DHCP client confirms its request for the offered IP address and formally asks the DHCP server to assign it.
4. Finally, the DHCP server sends an ACKNOWLEDGEMENT (ACK) packet to the DHCP client on the network. This packet means that the DHCP server has accepted the DHCP client’s request for the assigned IP address. It also verifies that the client has an exclusive right to use that IP address and other clients can reach the DHCP client on the assigned IP address.
In this blog post, we use Suricata and Wazuh to detect a DHCP starvation attack against a DHCP server.
Infrastructure
To illustrate the detection of a DHCP starvation attack with Suricata and Wazuh, we use the following setup:
- A pre-built, ready-to-use Wazuh OVA 4.4.3: Follow this guide to download the virtual machine (VM). This VM hosts the Wazuh central components (Wazuh server, Wazuh indexer, and Wazuh dashboard). This VM has a static IP address of 192.168.0.205.
- An Ubuntu 22.04 endpoint: A Wazuh agent 4.4.3 installed and enrolled to the Wazuh server. We install Suricata and our DHCP server on this endpoint. The Ubuntu endpoint has a static IP address of 192.168.0.230.
- A Kali Linux 2022 attacker endpoint: We install Yersinia on this endpoint to perform a DHCP starvation attack against the DHCP server. The Kali Linux endpoint has a static IP address of 192.168.0.207.
- A Windows 10 endpoint: This is our DHCP client. We use this endpoint to automatically request an IP address from the DHCP server.
Configuration
In this section, we set up a DHCP server on an Ubuntu endpoint and integrate Suricata with the Wazuh server. We install Yersinia on the Kali Linux endpoint. Finally, we create a rule on the Wazuh server to detect a DHCP starvation attack against the DHCP server.
Ubuntu
Perform the following steps to install and configure the DHCP server and Suricata.
DHCP server
1. Install the DHCP server on the Ubuntu endpoint:
$ sudo apt install isc-dhcp-server
2. Edit the /etc/dhcp/dhcpd.conf file and add the following configuration:
subnet 192.168.0.0 netmask 255.255.255.0 {
range 192.168.0.198 192.168.0.201;
option routers 192.168.0.230;
option subnet-mask 255.255.255.0;
default-lease-time 600;
max-lease-time 7200;
}
Where:
range 192.168.0.198 192.168.0.201is the range of IP addresses the DHCP server can allocate to DHCP clients.option routers 192.168.0.230represents the IP address of our DHCP server.option subnet-mask 255.255.255.0represents the subnet mask of the IP address of our DHCP server.default-lease-time 600represents the default lease time in seconds.max-lease-time 7200represents the maximum lease time in seconds.
3. Find the interface name of the Ubuntu endpoint with the command below:
$ ip a
In this case, the output shows that the interface name is enp0s3:
enp0s3: <BROADCAST,MULTICAST,UP,LOWER_UP> mtu 1500 qdisc fq_codel state UP group default qlen 1000
    link/ether 08:00:27:91:34:95 brd ff:ff:ff:ff:ff:ff
    inet 192.168.0.230/24 brd 192.168.0.255 scope global noprefixroute enp0s3
       valid_lft forever preferred_lft forever
    inet6 fe80::c22b:c284:e93d:253c/64 scope link noprefixroute
       valid_lft forever preferred_lft forever
4. Edit the file /etc/default/isc-dhcp-server to define the interface the DHCP server listens to.
# Additional options to start dhcpd with.
#       Don't use options -cf or -pf here; use DHCPD_CONF/ DHCPD_PID instead
#OPTIONS=""

# On what interfaces should the DHCP server (dhcpd) serve DHCP requests?
#       Separate multiple interfaces with spaces, e.g. "eth0 eth1".
INTERFACESv4="<INTERFACE_NAME>"
INTERFACESv6=""
Where:
<INTERFACE_NAME>represents the interface name of your Ubuntu endpoint.
5. Restart the DHCP service for the changes to take effect:
$ sudo systemctl restart isc-dhcp-server.service
Suricata
1. Install Suricata to monitor network traffic to the DHCP server:
$ sudo add-apt-repository ppa:oisf/suricata-stable
$ sudo apt-get update
$ sudo apt-get install suricata
2. Add the network interface to monitor in the Suricata configuration file. Find the af-packet section in the /etc/suricata/suricata.yaml file, and replace eth0 with the interface name of the Ubuntu endpoint:
af-packet:
  - interface: eth0
    # Number of receive threads. "auto" uses the number of cores
    #threads: auto
3. Download the Emerging Threats Open ruleset:
$ sudo suricata-update
4. Create a file /etc/suricata/rules/local.rules, and include the following Suricata rule inside the file:
# This rule generates an alert when the same source IP address sends 100 DHCP DISCOVER packets in 5 minutes to a DHCP server.
alert udp any 68 -> any 67 (msg: "Too many DHCP DISCOVER packets!"; sid:11; flow: to_server; threshold: type both, track by_src, count 100, seconds 300;)
5. Edit the file /etc/suricata/suricata.yaml, and include the file /etc/suricata/rules/local.rules under the rules-files section. This configuration allows the Suricata rule in the file /etc/suricata/rules/local.rules to take effect.
## Configure Suricata to load Suricata-Update managed rules.
##

default-rule-path: /var/lib/suricata/rules

rule-files:
  - suricata.rules
  - /etc/suricata/rules/local.rules
6. Test your Suricata configuration:
$ sudo suricata -T -c /etc/suricata/suricata.yaml -v
You should have a similar output if your configuration is valid:
1/5/2023 -- 01:24:57 - <Info> - Running suricata under test mode
1/5/2023 -- 01:24:57 - <Notice> - This is Suricata version 6.0.11 RELEASE running in SYSTEM mode
1/5/2023 -- 01:24:57 - <Info> - CPUs/cores online: 1
1/5/2023 -- 01:24:58 - <Info> - fast output device (regular) initialized: fast.log
1/5/2023 -- 01:24:58 - <Info> - eve-log output device (regular) initialized: eve.json
1/5/2023 -- 01:24:58 - <Info> - stats output device (regular) initialized: stats.log
1/5/2023 -- 01:25:49 - <Info> - 2 rule files processed. 33433 rules successfully loaded, 0 rules failed
1/5/2023 -- 01:25:49 - <Info> - Threshold config parsed: 0 rule(s) found
1/5/2023 -- 01:25:50 - <Info> - 33436 signatures processed. 1249 are IP-only rules, 5197 are inspecting packet payload, 26784 inspect application layer, 108 are decoder event only
1/5/2023 -- 01:26:36 - <Notice> - Configuration provided was successfully loaded. Exiting.
1/5/2023 -- 01:26:37 - <Info> - cleaning up signatureq grouping structure... complete
7. Run the commands to start Suricata, and also enable it to start at system reboot:
$ sudo systemctl start suricata
$ sudo systemctl enable suricata
8. Edit the Wazuh agent /var/ossec/etc/ossec.conf file and add the following configuration within the <ossec_config> block:
<!-- Configure Wazuh agent to collect and forward the Suricata logs to the Wazuh server for analysis -->
<localfile>
  <log_format>json</log_format>
  <location>/var/log/suricata/eve.json</location>
</localfile>
9. Restart the Wazuh agent service for the changes to take effect:
$ sudo systemctl restart wazuh-agent
Kali Linux
Install Yersinia on the Kali Linux endpoint to perform a DHCP starvation attack against the DHCP server:
$ sudo apt-get install yersinia
Wazuh server
Perform the following steps to add a rule to detect a DHCP starvation attack.
1. Edit the file /var/ossec/etc/rules/local_rules.xml on the Wazuh server and include the following configuration:
<group name="detect_dhcp_starvation_attack,">
  <rule id="100005" level="12">
    <if_sid>86601</if_sid>
    <match>Too many DHCP DISCOVER packets</match>
    <description>A DHCP starvation attack detected.</description>
    <mitre>
      <id>T1498</id>
    </mitre>
  </rule>
</group>
2. Restart the Wazuh manager for the changes to take effect:
$ sudo systemctl restart wazuh-manager
DHCP starvation attack emulation
The image below depicts a DHCP starvation attack against a DHCP server. We use the Yersinia tool installed on the Kali Linux endpoint to launch a DHCP starvation attack against the DHCP server. This attack prevents the Windows 10 endpoint from receiving an IP address from the DHCP server.
Perform the following steps to emulate a DHCP starvation attack against the DHCP server.
Windows
1. Launch a Command Prompt on the Windows 10 endpoint.
2. Confirm that an IP address has been assigned to the Windows endpoint by the DHCP server:
> ipconfig
Note
The Windows 10 endpoint must be set to obtain an IP address automatically.
3. Run the following command on the Windows endpoint to release the IP address:
> ipconfig /release
Kali Linux
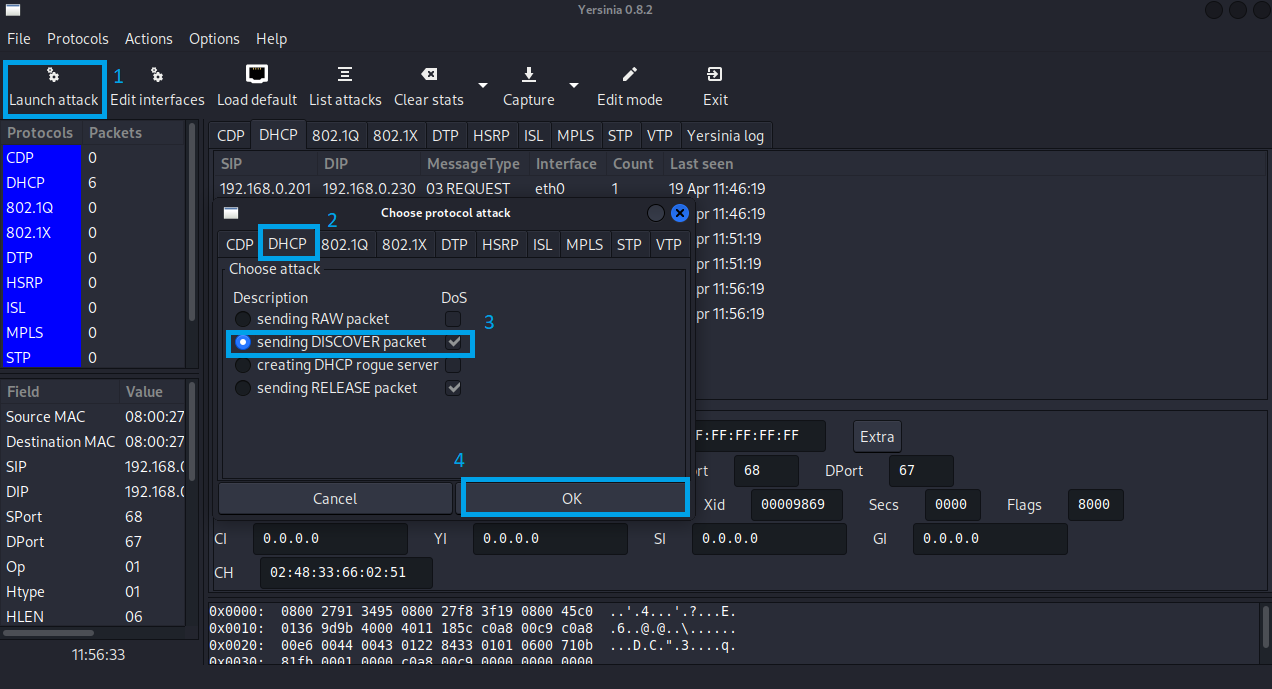
1. Run the following command on the Kali Linux endpoint to open Yersinia:
$ sudo yersinia -G
2. On Yersinia, click Launch attack > DHCP > sending DISCOVER packet > OK to start a DHCP starvation attack against the DHCP server.
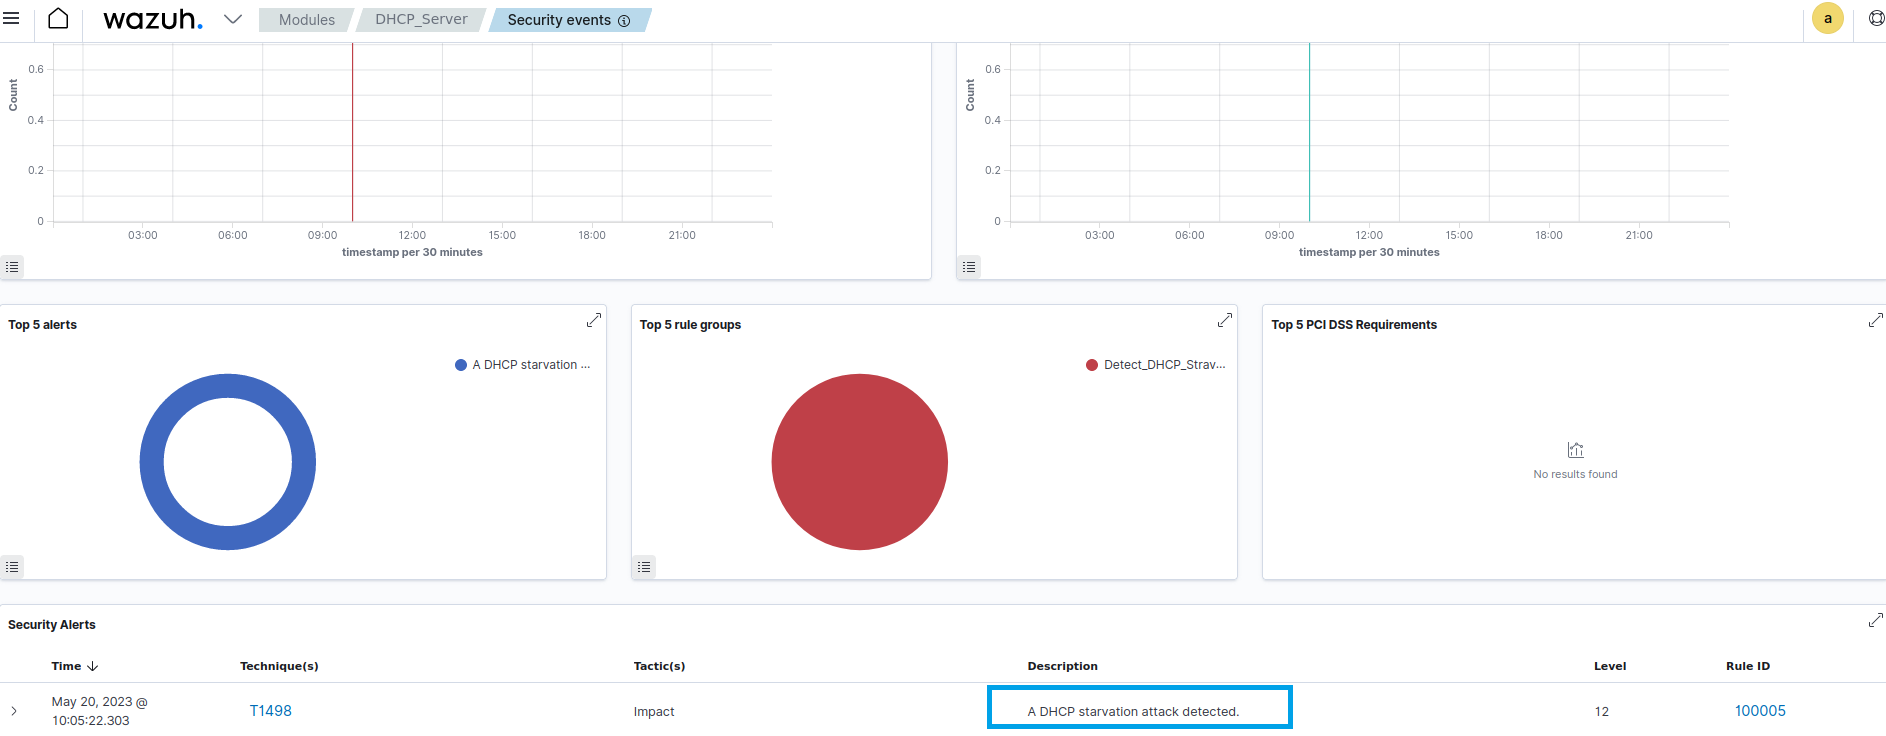
Wazuh dashboard
To visualize the alert on the Wazuh dashboard, navigate to Modules > Security events and apply a filter for rule.id:100005.
Note
You will receive a lot of the following messages “Agent event queue is full. Events may be lost” while the attack is in progress.
DHCP starvation attack validation
Windows
1. Wait for about five minutes after launching the DHCP starvation attack for the DHCP server to lease all its IP addresses. Then, request a new lease for an IP address from the DHCP server. You should not be able to obtain an IP address from the DHCP server:
> ipconfig /renew
2. Press the Ctrl + C keys on your keyboard to abort the request.
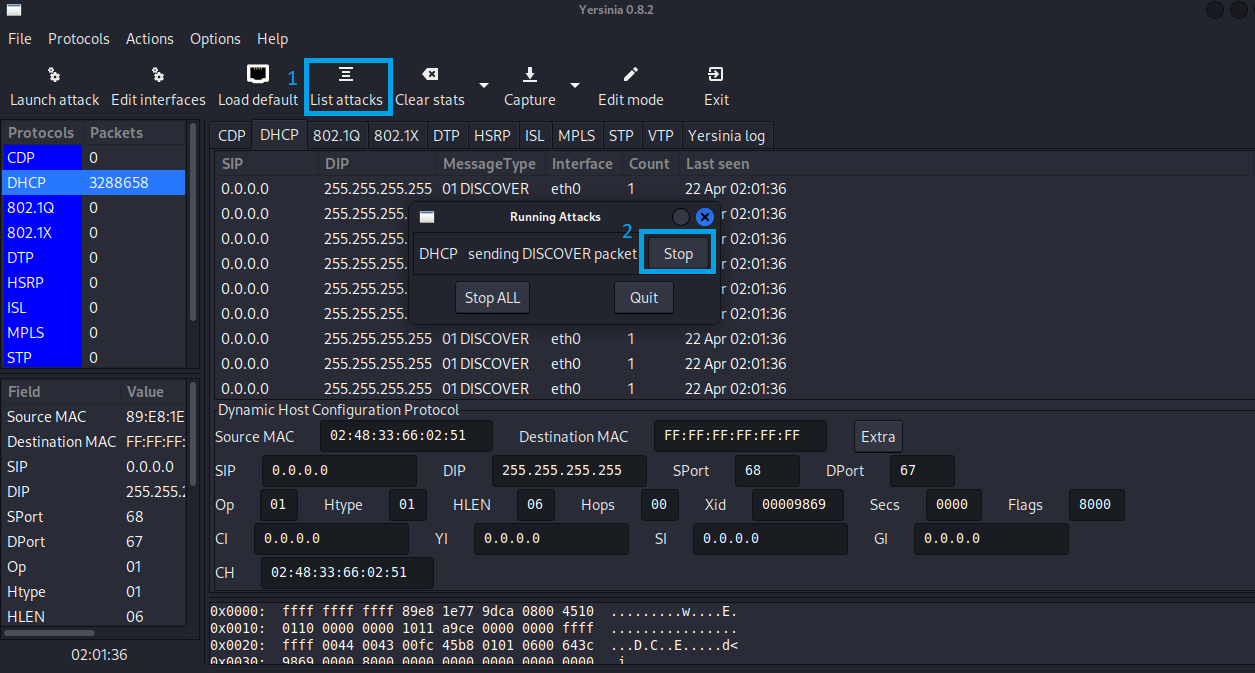
Kali Linux
On Yersinia, click List attacks > Stop to stop the DHCP starvation attack against the DHCP server.
Windows
Wait for about five minutes after stopping the DHCP starvation attack and request a new lease for an IP address from the DHCP server, ensuring that it maintains an active network connection. You should be able to receive an IP address from the DHCP server:
> ipconfig /renew
Conclusion
A DHCP starvation attack can have a devastating impact on organizations. Hence, It is important that security teams detect and prevent a DHCP starvation attack. This blog post used Suricata integration with Wazuh to detect a DHCP starvation attack.
Wazuh is a free and open source enterprise-ready security solution for threat detection, incident response, and compliance. Wazuh integrates seamlessly with third-party solutions and technologies. Wazuh also has an ever-growing community where users are supported. To learn more about Wazuh, please check out our documentation and blog posts.