
Managing secrets in a distributed environment remains a significant challenge for many organizations. HashiCorp Vault (Vault) serves as a centralized system for storing and managing sensitive data such as API keys, tokens, passwords, and certificates. While centralization simplifies administration and access control, misconfigurations or unauthorized access can quickly lead to compromise and data loss. Therefore, it is important to gain visibility into how Vault is accessed and used.
Wazuh is an open source security platform that helps organizations meet monitoring needs by aggregating security events and analyzing system behavior. Integrating Wazuh with HashiCorp Vault enables the collection and analysis of logs to identify anomalous behavior and potential security breaches. Furthermore, Wazuh utilizes its Active Response capability to automate threat mitigation, such as sealing a Vault cluster when specific security incidents are identified.
This blog post explores how to integrate Wazuh with Vault to provide continuous monitoring of authentication events, secret access, policy changes, and system activity. Additionally, it shows how to configure the Wazuh Active Response module to automatically respond to potential threats targeting the Vault in real time.
Infrastructure
We use the following infrastructure for this integration:
- A pre-built, ready-to-use Wazuh OVA 4.14.4, which includes the Wazuh central components (Wazuh server, Wazuh indexer, and Wazuh dashboard). Follow this guide to download and deploy the virtual machine.
- An Ubuntu 24.04 endpoint with:
- The Wazuh agent 4.14.4 installed and enrolled to the Wazuh server.
- HashiCorp Vault installed following these steps.
HashiCorp Vault events
HashiCorp Vault (Vault) generates two types of logs:
- Audit logs: These logs provide a detailed trail of every request made to the Vault and its corresponding response. They are not enabled by default, but once active, they answer the “Who, What, and When” for every secret access or policy change. Vault supports several audit device types, including Syslog, Socket, and File. In this blog post, we will use the File audit device to store our logs.
- Operational logs: These are standard system logs that focus on the health and state of the Vault server. They record events such as service startup, sealing/unsealing, cluster leadership changes, and internal storage or network connectivity errors.
Configuration
Ubuntu endpoint
In this section, we enable Vault audit logging, then configure the Wazuh agent to collect these logs and forward them to the Wazuh server for analysis.
Note
According to HashiCorp documentation, Vault prioritizes security over availability. If an audit device is enabled but cannot be written to (for example, due to a permission denied or disk full error), the Vault will stop responding to all client requests. To maintain availability, it is recommended to enable multiple audit devices.
- Enable Vault service to start upon restarts:
# systemctl enable --now vault.service
- Export the following variables to make it available to Vault processes launched from the current shell session:
# export VAULT_ADDR="https://<VAULT_SERVER_IP>:8200"
# export VAULT_SKIP_VERIFY=true
Where:
VAULT_ADDR: Defines the Vault API endpoint to query using the Vault CLI. Replace<VAULT_SERVER_IP>with the IP address of your Vault server.VAULT_SKIP_VERIFY=true: Is required when Vault is configured with self-signed certificates (default setup). Without this, the Vault CLI will reject the connection because it cannot verify the certificate authority.
- Verify your Vault instance is running:
# vault status
Key                Value
---                -----
Seal Type          shamir
Initialized        false
Sealed             true
Total Shares       0
Threshold          0
Unseal Progress    0/0
Unseal Nonce       n/a
Version            1.21.3
Build Date         2026-02-03T14:56:30Z
Storage Type       file
HA Enabled         false
- Initialize the Vault instance to generate the Unseal keys and the initial root token. Vault uses a threshold-based mechanism where the master key is split into multiple shares to ensure security. You must provide a minimum number of these shares (the threshold) to reconstruct the key and unseal the Vault after a restart or seal event.
Make sure you save these credentials securely. With the key-threshold parameter set to three, you will need to provide three Unseal keys during the unseal operation.
# vault operator init -key-shares=5 -key-threshold=3
- Unseal the Vault with one of the unseal keys using the command below. You will be prompted to enter your
Unseal key.
# vault operator unseal
Unseal Key (will be hidden):
Key                Value
---                -----
Seal Type          shamir
Initialized        true
Sealed             true
Total Shares       5
Threshold          3
Unseal Progress    1/3
Unseal Nonce       4dd71e09-6cf9-2039-3e32-bc968ce37053
Version            1.21.3
Build Date         2026-02-03T14:56:30Z
Storage Type       file
HA Enabled         false
Repeat the process with a different Unseal key till the key Sealed is false.
- Log in to the Vault using the initial root token saved during the initialization process.
# vault login
Token (will be hidden):
Success! You are now authenticated. The token information displayed below
is already stored in the token helper. You do NOT need to run "vault login"
again. Future Vault requests will automatically use this token.
- Create a file
vault_audit.login the/var/log/directory to record Vault events for security auditing, and set the ownership permissions:
# touch /var/log/vault_audit.log
# chown vault:vault /var/log/vault_audit.log
- Enable audit prefixing in the Vault configuration and restart the service to apply the configuration changes:
# echo "allow_audit_log_prefixing = true" >> /etc/vault.d/vault.hcl
# systemctl restart vault.service
- Unseal the Vault cluster as performed in step 5 above. This is because Vault has been sealed during the service restart operation.
# vault operator unseal
- Enable the file-based audit device on your Vault server:
# vault audit enable -description "Auditing Vault" file file_path='/var/log/vault_audit.log' mode="644" elide_list_responses=true prefix="[vault audit]"
Note
Vault operational logs are enabled by default with the info log level, but you can adjust the verbosity to trace, debug, warn, or error using the log_level parameter in the Vault configuration file or the VAULT_LOG_LEVEL environment variable.
- Append the configuration below to the Wazuh agent file
/var/ossec/etc/ossec.confto monitor and forward Vault events to the Wazuh server for analysis:
<ossec_config>
  <localfile>
    <log_format>syslog</log_format>
    <location>/var/log/vault_audit.log</location>
  </localfile>
</ossec_config>
- Restart the Wazuh agent to apply the changes:
# systemctl restart wazuh-agent
Wazuh dashboard
Perform the following steps on the Wazuh dashboard to create custom decoders and rules to trigger alerts for relevant Vault events:
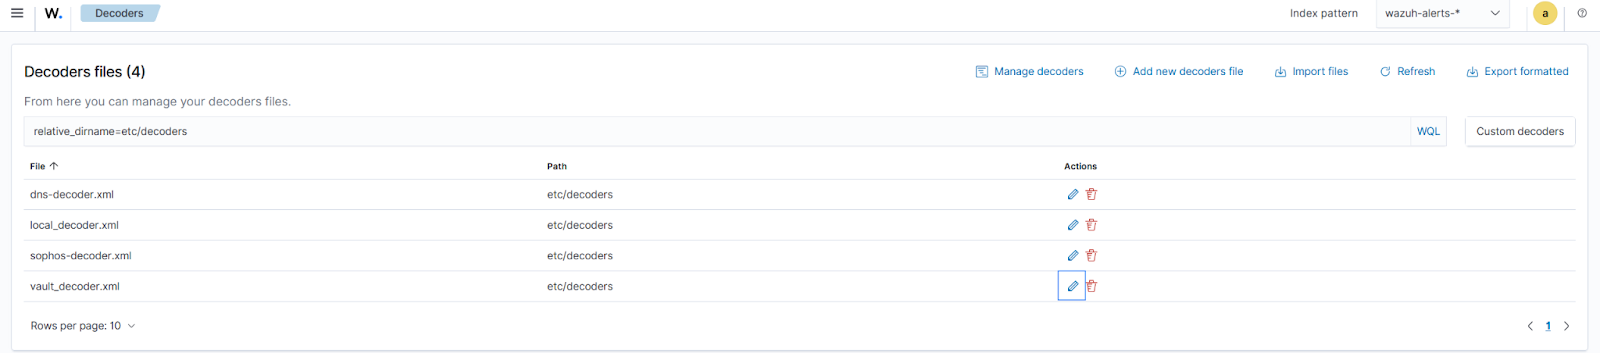
- Navigate to Server management > Decoders, click + Add new decoders file.
- Copy and paste the decoders below, name the file
vault_decoder.xml, and click Save.
<decoder name="vault-audit">
    <prematch>^[vault audit]</prematch>
    <plugin_decoder offset="after_prematch">JSON_Decoder</plugin_decoder>
</decoder>

<decoder name="vault">
  <program_name>^vault$</program_name>
</decoder>

<decoder name="vault-fields">
  <parent>vault</parent>
  <regex type="pcre2">\[(\w+)\]\s+([\w\.-]+):\s+(.*)</regex>
  <order>vault_level, vault_component, vault_message</order>
</decoder>

<decoder name="vault-fields">
  <parent>vault</parent>
  <regex type="pcre2">from ([\d\.]+):(\d+)</regex>
  <order>srcip, srcport</order>
</decoder>
- Navigate to Server management > Rules and click + Add new rules file.
- Copy and paste the rules below and name the file
vault_audit.xml. Click Save, then Reload to apply the changes.
<group name="vault,">

  <!-- Vault operational base rule-->
  <rule id="100600" level="0">
    <decoded_as>vault</decoded_as>
    <description>Vault operational events.</description>
  </rule>

  <!-- Trace and debug logs -->
  <rule id="100601" level="3">
    <if_sid>100600</if_sid>
    <field name="vault_level">^TRACE$|^DEBUG$</field>
    <description>[Vault operational] Debug log.</description>
  </rule>

  <!-- Informational log, useful for audit trail -->
  <rule id="100602" level="3">
    <if_sid>100600</if_sid>
    <field name="vault_level">^INFO$</field>
    <description>[Vault operational] Informational log from $(vault_component).</description>
  </rule>

  <!-- Warning - may indicate misconfiguration issues -->
  <rule id="100603" level="5">
    <if_sid>100600</if_sid>
    <field name="vault_level">^WARN$|^WARNING$</field>
    <description>[Vault operational] Warning: $(vault_message)</description>
  </rule>

  <!-- Error - requires investigation -->
  <rule id="100604" level="7">
    <if_sid>100600</if_sid>
    <field name="vault_level">^ERROR$</field>
    <description>[Vault operational] Error: $(vault_message)</description>
  </rule>

  <!-- Critical: Vault sealed - all secret access is now blocked. -->
  <rule id="100605" level="12">
    <if_sid>100600</if_sid>
    <match>vault is sealed|marked as sealed</match>
    <description>[Vault operational] Critical: Vault has been sealed.</description>
    <group>service_availability,</group>
  </rule>

  <!-- Info: Vault unsealed - the service is now accessible. -->
  <rule id="100606" level="3">
    <if_sid>100600</if_sid>
    <match>vault is unsealed</match>
    <description>[Vault operational] Info: Vault has been unsealed.</description>
    <group>service_availability,</group>
  </rule>

  <!-- Critical: Audit device failure - this might result in a service unavailability -->
  <rule id="100607" level="10">
    <if_sid>100604</if_sid>
    <match>audit mount failed|</match>
    <description>[Vault operational] Critical: Audit failure - $(vault_message).</description>
  </rule>

  <!-- Vault audit base rule-->
  <rule id="100610" level="0">
    <decoded_as>vault-audit</decoded_as>
    <description>Vault audit events.</description>
  </rule>

  <!-- Catches every API request Vault receives. -->
  <rule id="100611" level="3">
    <if_sid>100610</if_sid>
    <field name="type">request</field>
    <description>[Vault audit] $(request.operation) request performed by $(auth.display_name) on $(request.path).</description>
  </rule>

  <!-- Catches successful response to a request. -->
  <rule id="100612" level="3">
    <if_sid>100610</if_sid>
    <field name="type">response</field>
    <field name="data.error" negate="yes">.+</field>
    <description>[Vault audit] Successful response on path ($(request.path)) by $(auth.display_name).</description>
  </rule>

  <!-- Catches any response containing an error -->
  <rule id="100613" level="7">
    <if_sid>100610</if_sid>
    <field name="type">response</field>
    <field name="data.error">.+</field>
    <description>[Vault audit] Request on path ($(request.path)) by $(auth.display_name) failed.</description>
  </rule>

  <!-- Root token usage -->
  <rule id="100614" level="9">
    <if_sid>100611</if_sid>
    <field name="auth.display_name">^root$</field>
    <description>[Vault audit] Root token used for $(request.operation) on $(request.path).</description>
    <group>pci_dss_10.2.2,</group>
  </rule>

  <!-- Succesfull deletion -->
  <rule id="100615" level="12">
    <if_sid>100612</if_sid>
    <field name="request.operation">^delete$</field>
    <description>[Vault audit] Critical: $(request.path) deleted by $(auth.display_name). Potential footprint cleaning.</description>
    <mitre>
      <id>T1562.001</id>
    </mitre>
  </rule>

  <rule id="100616" level="7">
    <if_sid>100612</if_sid>
    <field name="request.operation">^update$</field>
    <description>[Vault audit] $(request.path) updated by $(auth.display_name).</description>
    <mitre>
      <id>T1562.001</id>
    </mitre>
  </rule>

  <!-- Exfiltration by any user: 10+ reads in 60s -->
  <rule id="100617" level="14" frequency="10" timeframe="60">
    <if_matched_sid>100611</if_matched_sid>
    <field name="request.operation">^read$</field>
    <same_field>auth.accessor</same_field>
    <description>[Vault audit] Potential data exfiltration: $(auth.display_name) performed 10+ reads in 1 minute.</description>
    <mitre>
      <id>T1537</id>
    </mitre>
  </rule>

  <!-- Escalated: root token performs 10+ reads in 60s -->
  <rule id="100618" level="15" frequency="10" timeframe="60">
    <if_matched_sid>100611</if_matched_sid>
    <field name="request.operation">^delete$</field>
    <same_field>auth.accessor</same_field>
    <description>[Vault audit] Potential data destruction: $(auth.display_name) performed 10+ deletes in 1 minute.</description>
    <mitre>
      <id>T1537</id>
    </mitre>
  </rule>

</group>
Where:
- Rule ID
100600is the parent rule to identify any events successfully decoded as Vault operational logs. - Rule ID
100601capturesTRACEandDEBUGlevel logs. - Rule ID
100602detects operational events atINFOseverity level, such as service startups or component refreshes. - Rule ID
100603detects Vault events withWARNorWARNINGseverity level, indicating non-fatal issues such as TLS handshake errors. - Rule ID
100604detects Vault events atERRORseverity level, indicating operational failures that require administrator attention. - Rule ID
100605escalates alerts to level 12 when logs indicate the Vault has been sealed, resulting in a complete service outage for secret retrieval. - Rule ID
100606detects Vault unseal events, indicating that the service is now accessible for secret retrieval. - Rule ID
100607escalates “audit mount failed” events to level 12, as this might result in service unavailability. - Rule ID
100610is the parent rule to identify audit events specifically prefixed with[vault audit], distinguishing them from operational logs. - Rule ID
100611captures the initiation of a request, identifying who performed what and on which secret path. - Rule ID
100612captures the system’s response without thedata.errorfield, indicating a successful operation. - Rule ID
100613captures the system’s response with thedata.errorfield, indicating a failed operation. - Rule ID
100614identifies any operation performed by the root user. - Rule ID
100615identifies a successful delete operation. - Rule ID
100616identifies a successful update operation. - Rule ID
100617identifies a potential data exfiltration. - Rule ID
100618identifies a potential data destruction.
Responding to threats
The Wazuh Active Response module allows you to run commands on a monitored endpoint in response to an incident. In this section, we create an active response script to seal the Vault when a suspicious action is detected. It uses the operator seal command to instantly secure the Vault. Once sealed, data becomes inaccessible to all users until the Vault is manually unlocked using the unseal keys. This allows for damage control during a detected intrusion.
Configuration
Ubuntu endpoint
- Create a restricted policy that can only seal the Vault:
# vault policy write vault-sealer - <<EOF
path "sys/seal" {
  capabilities = ["sudo", "update"]
}
EOF
- Generate a new Vault token attached to the restricted policy. The token value will be saved in
/etc/vault.d/vault-seal.tokenand will serve for seal operations only:
# vault token create -policy="vault-sealer" -period=720h -format=json | jq -r .auth.client_token > /etc/vault.d/vault-seal.token
- Restrict access to the
/etc/vault.d/vault-seal.tokentoken file:
# chmod 600 /etc/vault.d/vault-seal.token
# chown wazuh:wazuh /etc/vault.d/vault-seal.token
- Create a Wazuh active response script,
vault-seal.sh, in the/var/ossec/active-response/bindirectory with the content below:
| Warning: This script is a proof of concept (PoC). Review and validate it to ensure it meets the operational and security requirements of your environment. |
This script authenticates to the local Vault instance using the initial root Vault token, then it executes the operator seal command. The script logs the outcome of the seal action to /var/ossec/logs/active-responses.log.
#!/bin/bash
# Wazuh - Vault Seal Active Response

LOG_FILE="/var/ossec/logs/active-responses.log"
VAULT_EXE="/usr/bin/vault"
TOKEN_FILE="/etc/vault.d/vault-seal.token"

#------------------------- Read Wazuh input -----------#
read INPUT_JSON
COMMAND=$(echo "$INPUT_JSON" | grep -o '"command":"[^"]*"' | cut -d'"' -f4)

if [ "$COMMAND" != "add" ]; then
    echo "$(date "+%b %d %H:%M:%S") $(hostname) vault-seal: INFO - Ignoring command '$COMMAND'." >> "$LOG_FILE"
    exit 0
fi

#------------------------- Environment setup ----------------------#
export VAULT_ADDR="https://127.0.0.1:8200"
export VAULT_SKIP_VERIFY=true #When using self-signed certificates (Vault default)

# Read token from protected file
if [ ! -f "$TOKEN_FILE" ]; then
    echo "$(date "+%b %d %H:%M:%S") $(hostname) vault-seal: ERROR - Token file not found." >> "$LOG_FILE"
    exit 1
fi
export VAULT_TOKEN=$(cat "$TOKEN_FILE")

#------------------------- Main workflow --------------------------#
$VAULT_EXE status > /dev/null 2>&1
case $? in
    2) echo "$(date "+%b %d %H:%M:%S") $(hostname) vault-seal: INFO - Already sealed." >> "$LOG_FILE"; exit 0 ;;
    1) echo "$(date "+%b %d %H:%M:%S") $(hostname) vault-seal: ERROR - Vault unreachable." >> "$LOG_FILE"; exit 1 ;;
esac

OUTPUT=$($VAULT_EXE operator seal 2>&1)
if [ $? -eq 0 ]; then
    echo "$(date "+%b %d %H:%M:%S") $(hostname) vault-seal: SUCCESS - Vault sealed. INVESTIGATE IMMEDIATELY." >> "$LOG_FILE"
else
    echo "$(date "+%b %d %H:%M:%S") $(hostname) vault-seal: ERROR - Seal failed: $OUTPUT" >> "$LOG_FILE"
    exit 1
fi
- Change the Wazuh Active Response script ownership and permissions as shown below:
# chmod 750 /var/ossec/active-response/bin/vault-seal.sh
# chown root:wazuh /var/ossec/active-response/bin/vault-seal.sh
- Restart the Wazuh agent to apply the changes:
# systemctl restart wazuh-agent
Wazuh dashboard
Perform the following steps on the Wazuh dashboard to configure active response:
- Click the upper left menu ☰ and navigate to Server management > Settings.
- Click Edit configuration to edit the
ossec.confof the Wazuh manager. - Append the following configuration to the editor to trigger an active response action to rule ID
100617or100618. Click Save, then Restart Manager to apply the changes:
<ossec_config>
  <command>
    <name>vault-seal</name>
    <executable>vault-seal.sh</executable>
    <timeout_allowed>no</timeout_allowed>
  </command>

  <active-response>
    <disabled>no</disabled>
    <command>vault-seal</command>
    <location>local</location>
    <rules_id>100617,100618</rules_id>
  </active-response>
</ossec_config>
- Navigate to Server management > Decoders, click Manage decoders files, then Custom decoders.
- Click the edit button next to the
vault_decoder.xmlfile.
- Append the decoders below to the file, then click Save:
<decoder name="vault-seal">
  <program_name>^vault-seal$</program_name>
</decoder>

<decoder name="vault-seal-fields">
  <parent>vault-seal</parent>
  <regex type="pcre2">(\w+)\s+-\s+(\w.+)</regex>
  <order>vault_seal_level, vault_seal_message</order>
</decoder>
- Navigate to Server management > Rules, click Manage rules files, then Custom rules.
- Click the edit button next to the vault_audit.xml file.

- Add the rules below within the
<group>block of the file. Click Save, then Reload to apply the changes:
 <!-- Vault seal base rule-->
  <rule id="100620" level="0">
    <decoded_as>vault-seal</decoded_as>
    <description>Vault Active Response logs.</description>
  </rule>

  <!-- Active response confirmation: vault-seal.sh logged SUCCESS.-->
  <rule id="100621" level="12">
    <if_sid>100620</if_sid>
    <field name="vault_seal_level">SUCCESS</field>
    <description>Vault sealed by active response. Immediate investigation required.</description>
    <group>service_availability,active_response,</group>
    <mitre>
      <id>T1537</id>
    </mitre>
  </rule>

  <!-- Active response failure: vault-seal.sh could not seal Vault. -->
  <rule id="100622" level="14">
    <if_sid>100620</if_sid>
    <field name="vault_seal_level">ERROR</field>
    <description>Active response failed to seal Vault. Manual intervention required.</description>
    <group>service_availability,active_response,</group>
  </rule>

  <rule id="100623" level="3">
    <if_sid>100620</if_sid>
    <field name="vault_seal_level">INFO</field>
    <description>Vault Active Response: $(vault_seal_message)</description>
    <group>service_availability,active_response,</group>
  </rule>
Where:
- Rule ID
100620is the parent rule for all Vault active response logs. - Rule ID
100621is triggered when a successful automated sealing operation is executed. - Rule ID
100622is triggered when there is a failure in the active response script. - Rule ID
100623identifies informational events.
Testing the integration
We perform the following actions on the Ubuntu endpoint to trigger alerts:
- Enable the key-value secret engine at the path
secret:
# vault secrets enable -path=secret kv-v2
- Create a secret with some data:
# vault kv put secret/myapp/config \
    db_password="supersecret123" \
    api_key="sk-prod-abc123xyz" \
    db_host="prod-db.internal"
- Create a policy with read-only permissions on the secret
secret/myapp/config:
# vault policy write limited-user - <<EOF
path "secret/data/myapp/config" {
  capabilities = ["read"]
}
EOF
- Create a user
Boband attach thelimited-userpolicy:
# vault auth enable userpass
# vault write auth/userpass/users/bob \
    password="password123" \
    policies="limited-user"
- Login to the Vault as
Bob:
# BOB_TOKEN=$(vault login -method=userpass \
    username=bob \
    password=password123 \
    -format=json | grep -o '"client_token":"[^"]*"' | cut -d'"' -f4)

# export VAULT_TOKEN=$BOB_TOKEN
- Try forbidden actions to the Vault:
# vault kv list secret/
# vault kv get secret/otherapp/config
- Simulate data exfiltration:
# for i in {1..12}; do
    vault kv get secret/myapp/config > /dev/null 2>&1
    echo "Read $i done"
done
Visualizing alerts on the Wazuh dashboard
Perform the following steps to visualize the alerts generated on the Wazuh dashboard:
- Navigate to Threat intelligence > Threat Hunting > Events.
- In the search bar, type
rule.groups:vault, and click Update.
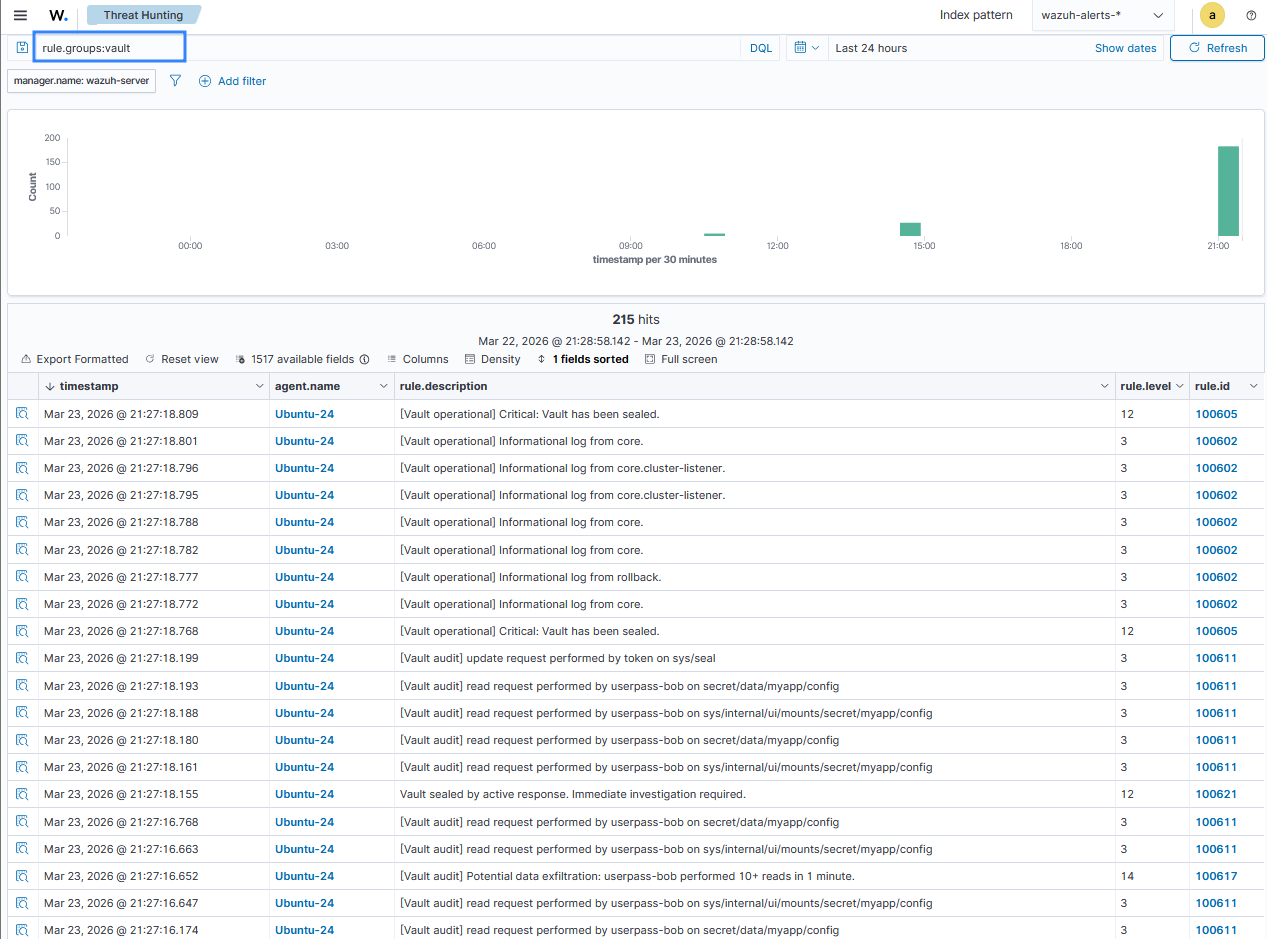
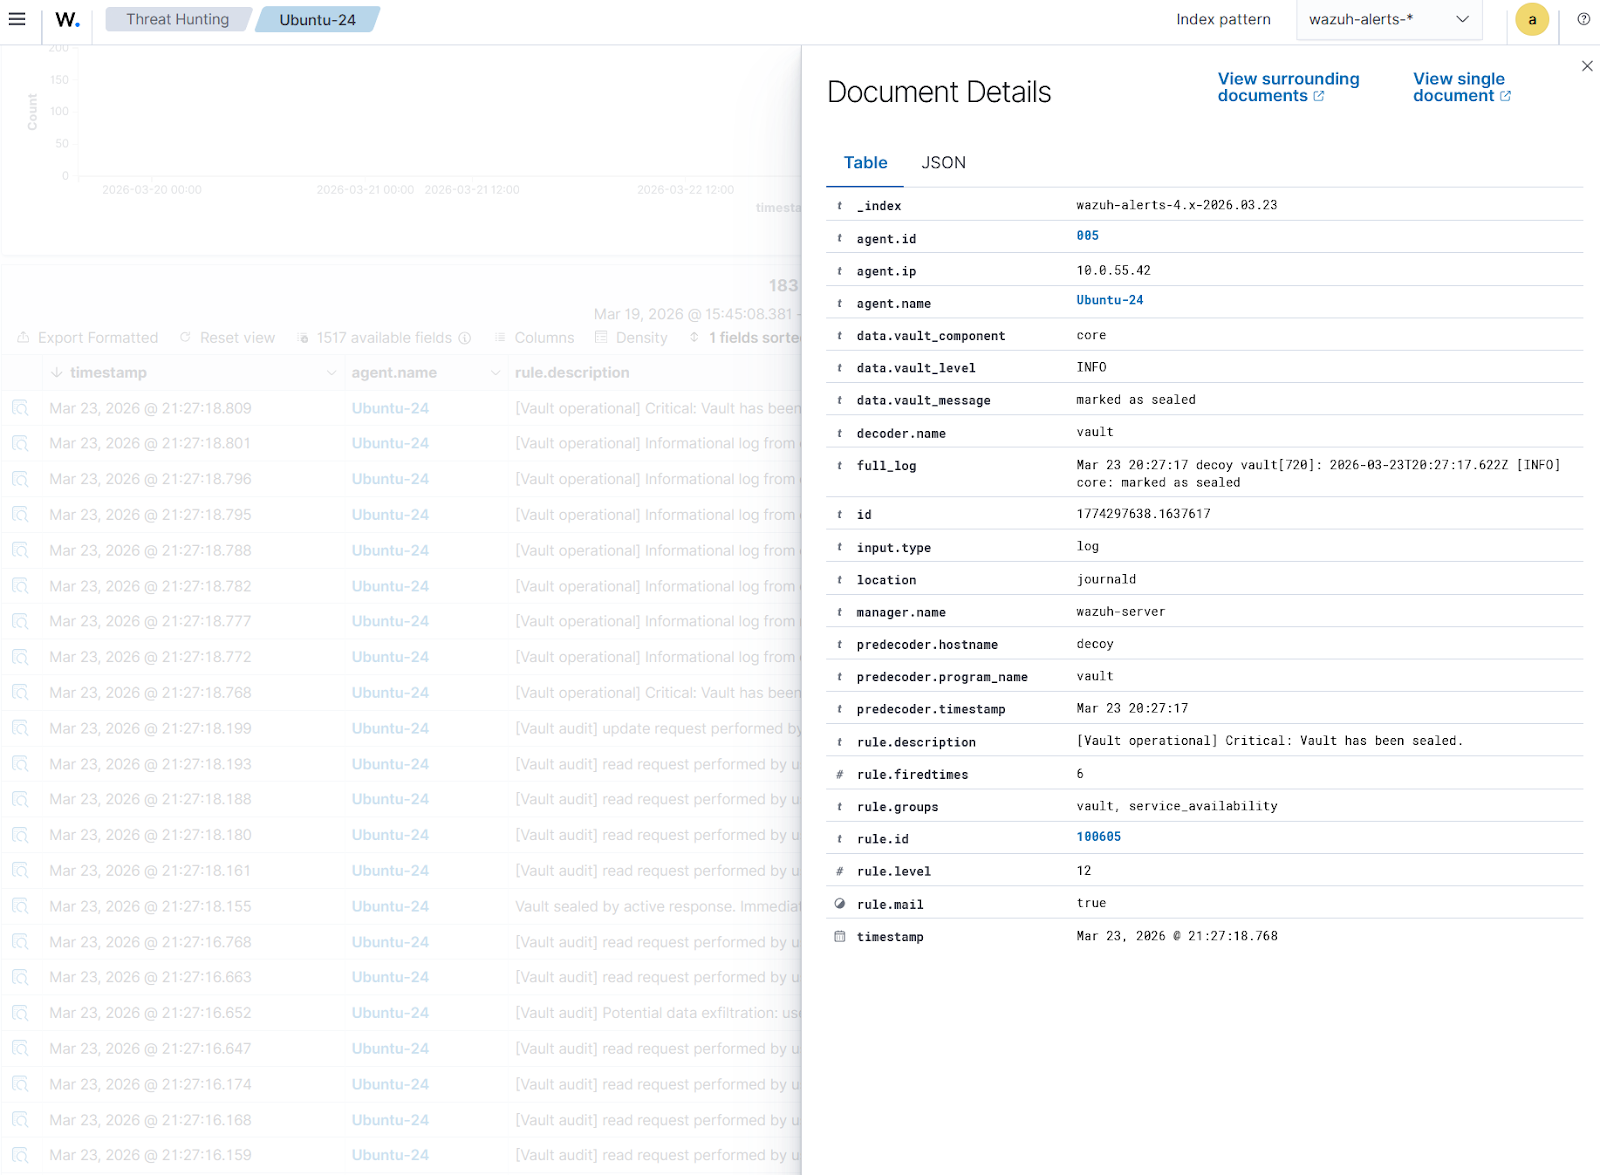
Click Inspect document details on any alert to have a detailed view. The figure below shows a Vault seal operation corresponding to event ID 100605.
Conclusion
Monitoring HashiCorp Vault is essential for maintaining visibility, detecting threats, and ensuring the integrity of sensitive secrets management. Using Wazuh, organizations can analyze Vault operational and audit logs to monitor system health and track access patterns. With Wazuh custom rules and the Active Response module, administrators can detect suspicious activities such as data exfiltration and trigger immediate actions such as automated sealing. This integrated approach improves security oversight and supports compliance with security standards.
Discover more about Wazuh by exploring our other blog posts and becoming part of our growing community.