Security automation refers to the use of technology to automatically handle security tasks, processes, and workflows with minimal human intervention. These tasks include detecting threats, triaging alerts, responding to incidents, remediating vulnerabilities, and more. Automating repetitive and time-consuming tasks allows security teams to reduce response times, minimize human error, and focus on more complex strategic activities.
The Wazuh unified XDR and SIEM platform provides out-of-the-box integration with Shuffle SOAR, a general-purpose security automation platform. This integration, introduced in Wazuh 4.4.0, extends the capabilities of Wazuh by enabling response on any device or technology that Shuffle already integrates with. Users simply need to add a webhook URI from Shuffle to the Wazuh server configuration, then specify the rule ID, rule group, or alert level of events that Wazuh should forward to Shuffle.
In this post, we explore how Wazuh and Shuffle deliver efficient, automated security workflows.
Generic Wazuh-Shuffle integration
This section aims to integrate Wazuh and Shuffle and show that Shuffle can receive and process Wazuh alerts.
Requirements
- A pre-built, ready-to-use Wazuh Virtual machine (OVA) 4.14.5 hosting the Wazuh central components, including the Wazuh server, Wazuh indexer, and Wazuh dashboard.
- A Shuffle SOAR instance. You can set up Shuffle in a Docker environment or use Shuffle Cloud (SaaS).
Configuration
Shuffle SOAR
Perform the steps below on the Shuffle dashboard to create a new workflow and extract the webhook URI.
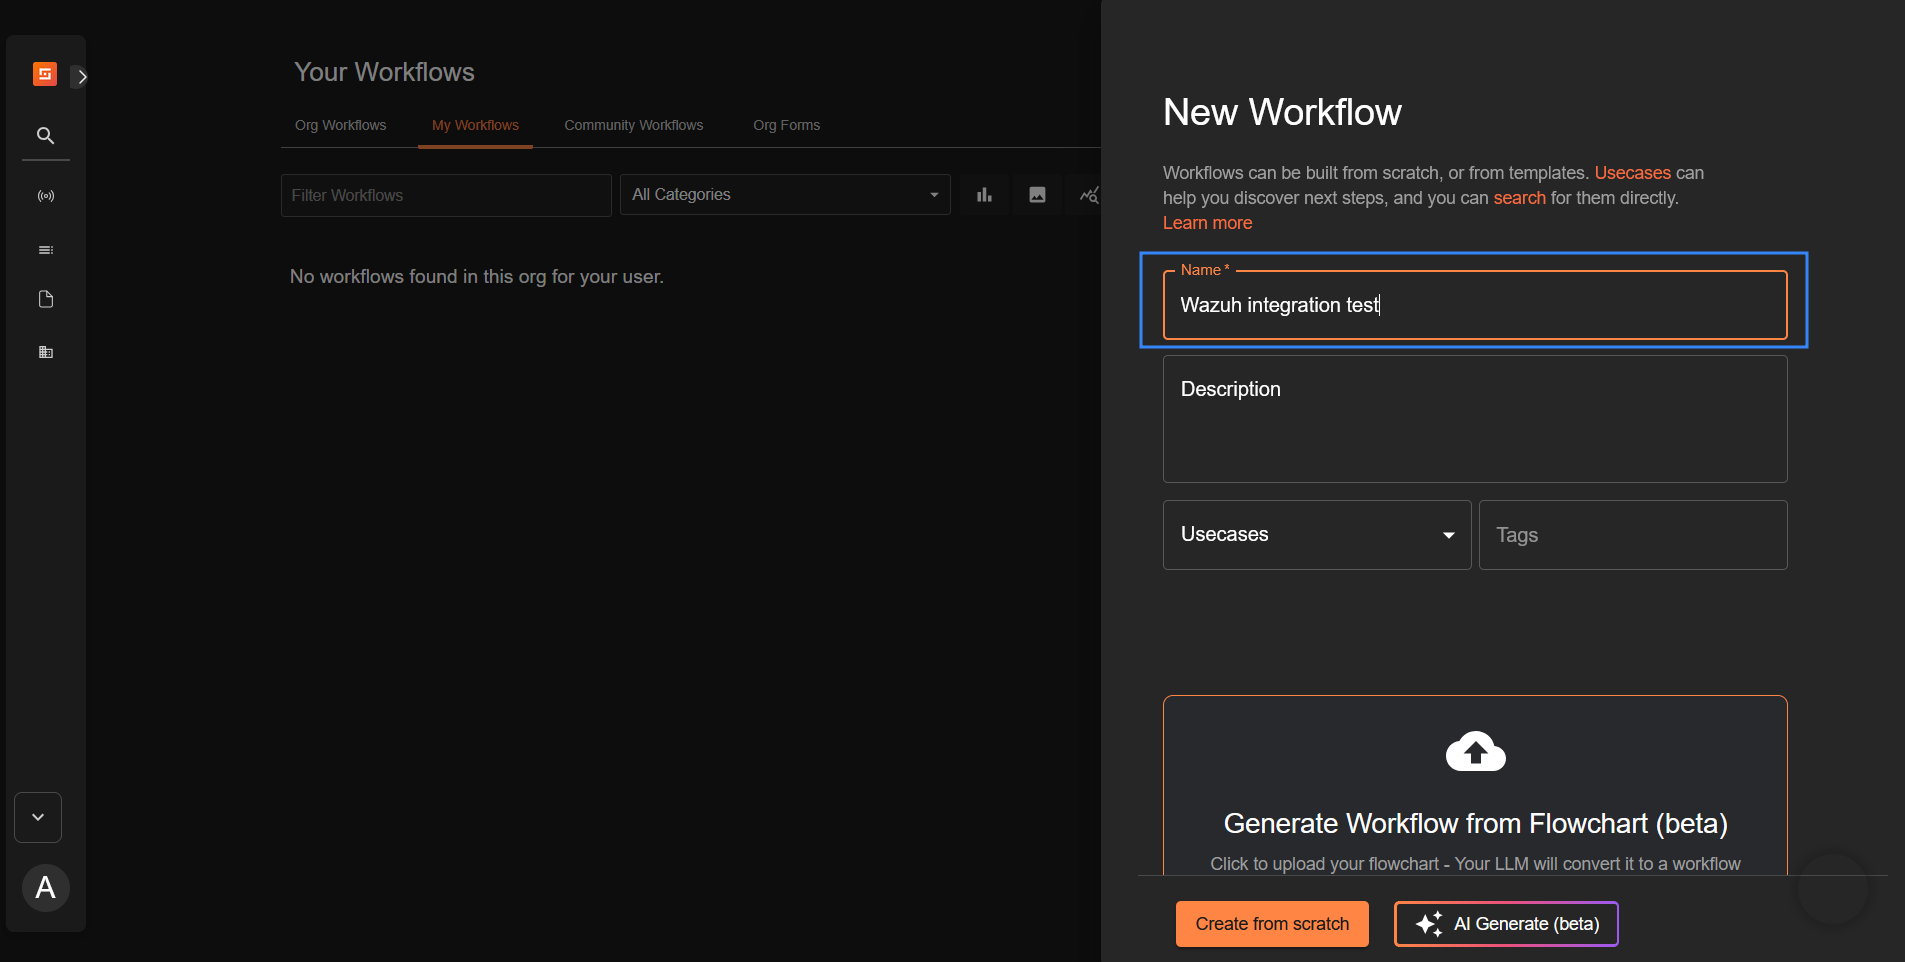
- Navigate to Automate > Workflows and click + Create Workflow to create a new workflow on Shuffle. Name it “Wazuh integration test” or any custom name of your choice, then click Create from scratch.
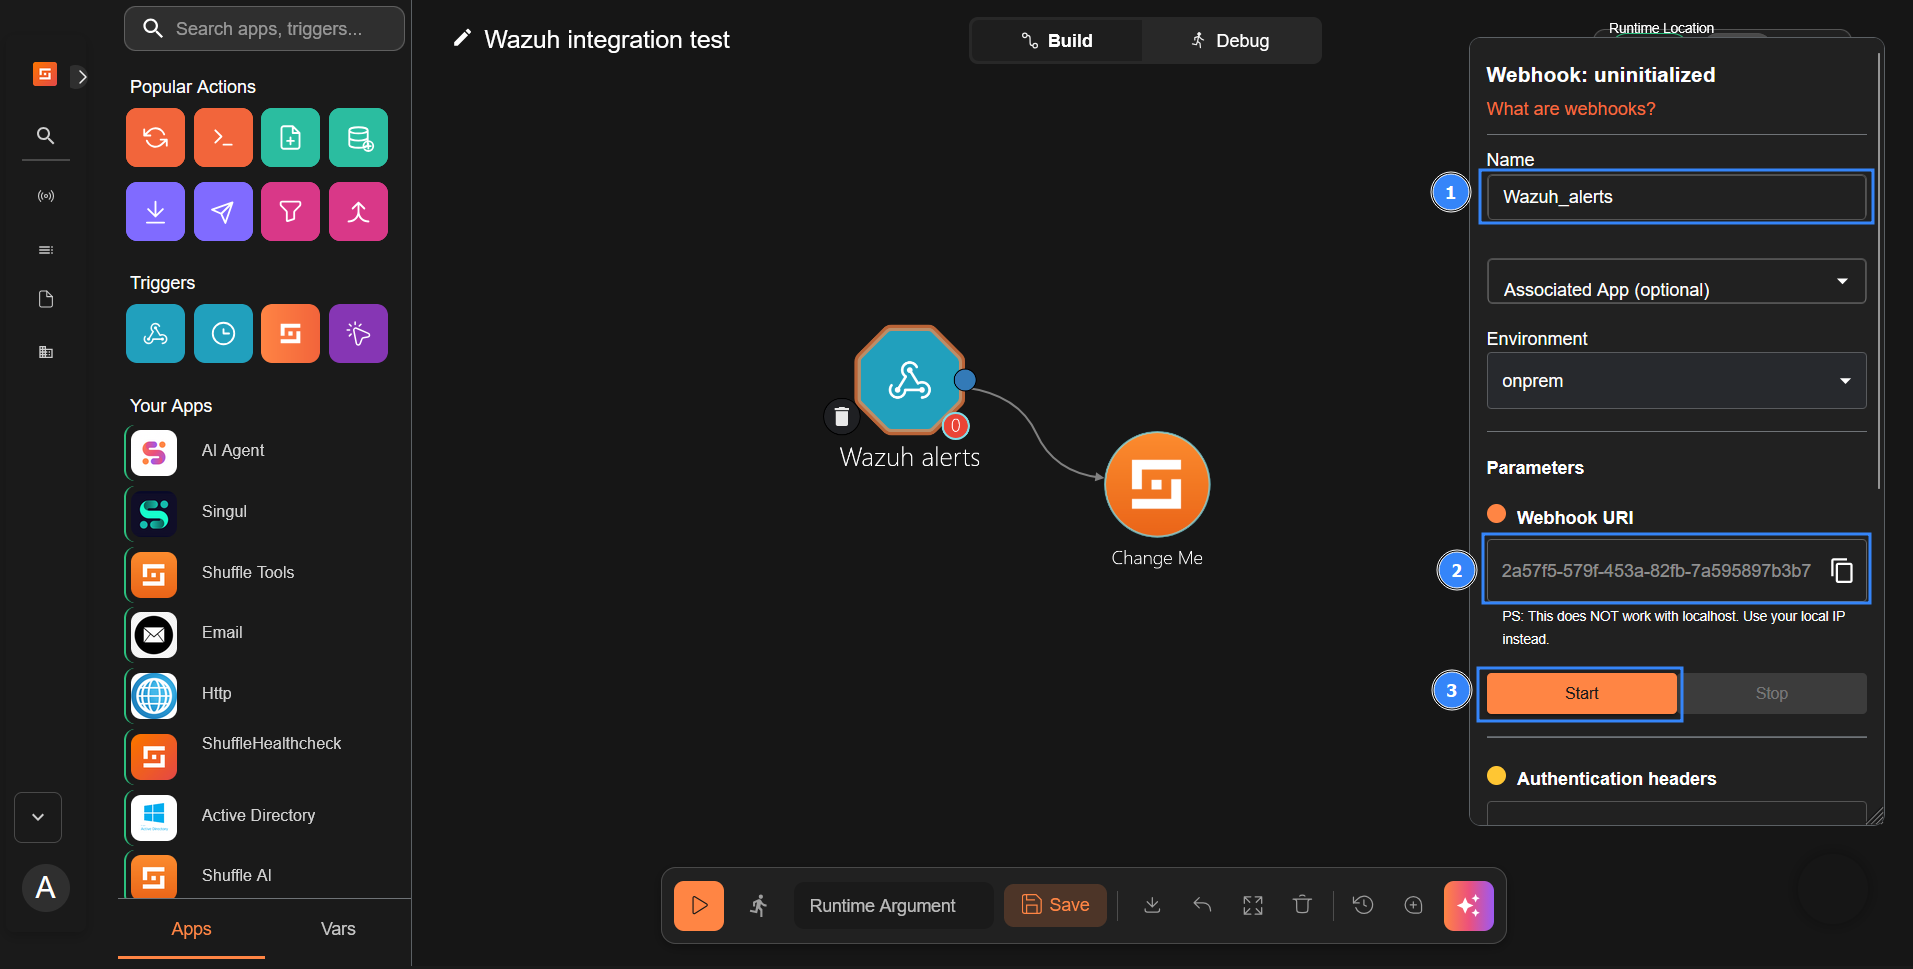
- Drag the node Webhook under Triggers to the workspace. The node automatically connects with an existing Change Me node on the workspace.
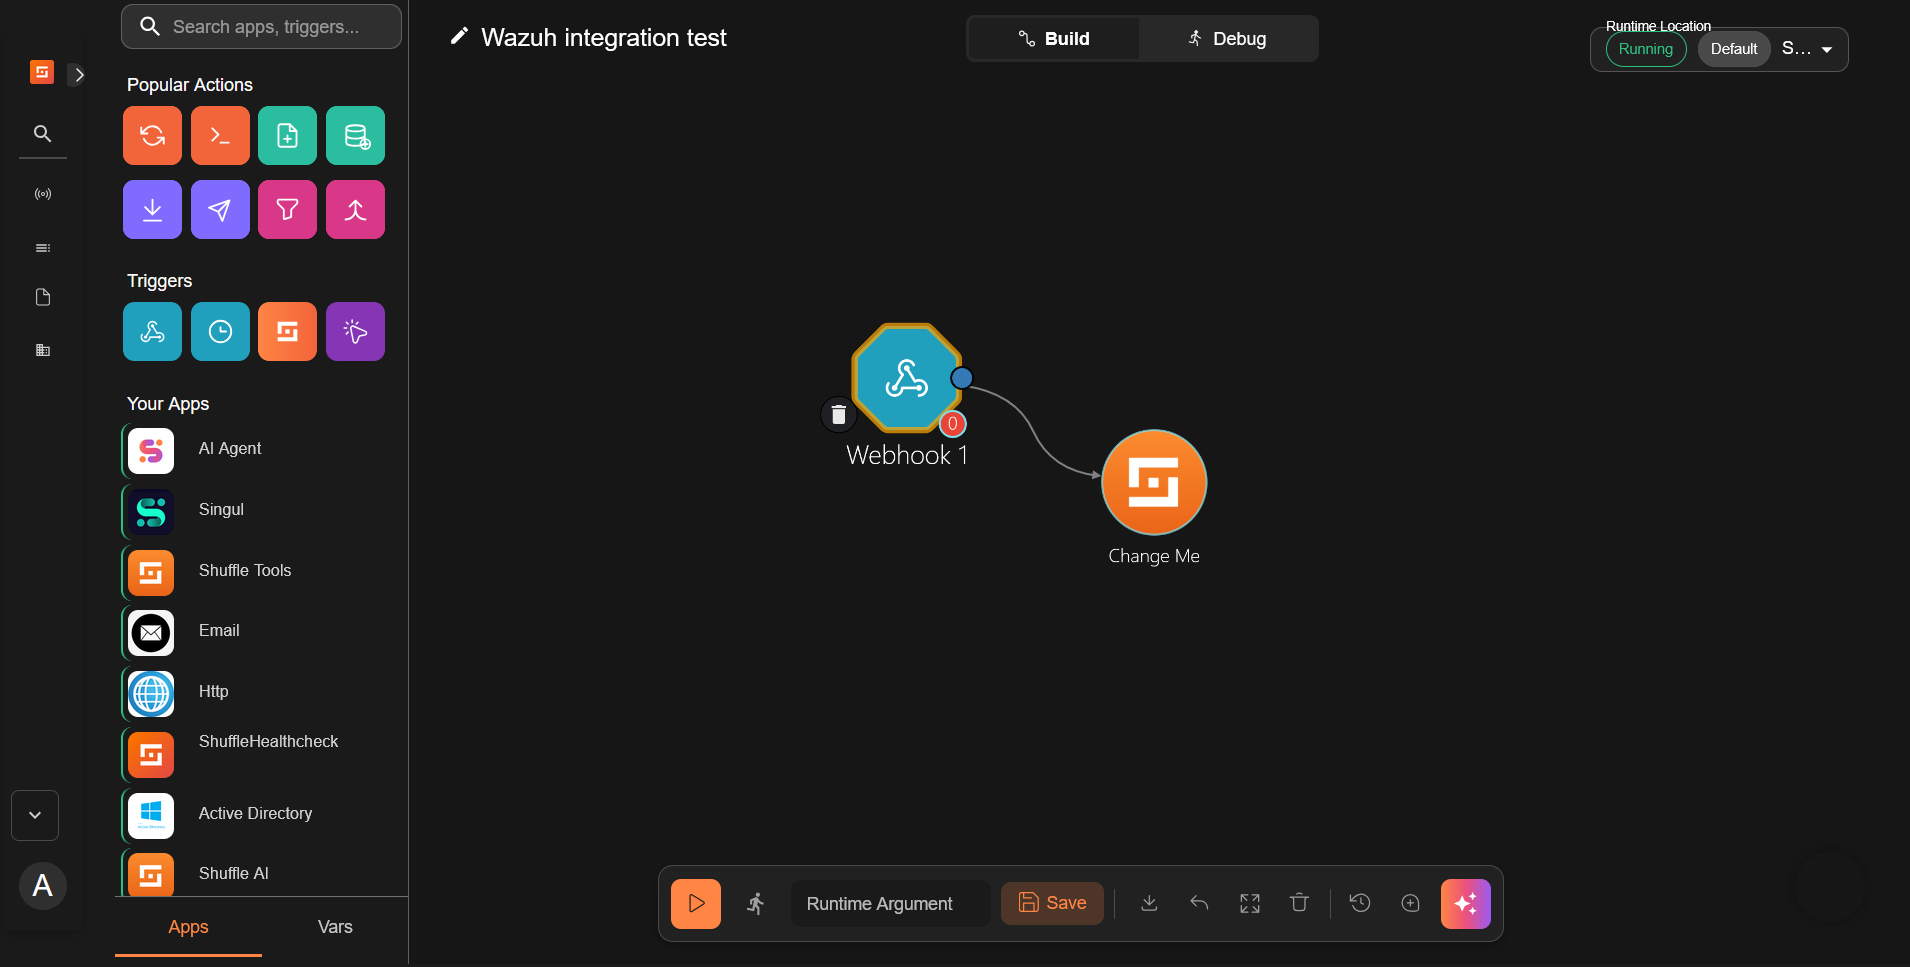
- Click on the webhook node and rename it to
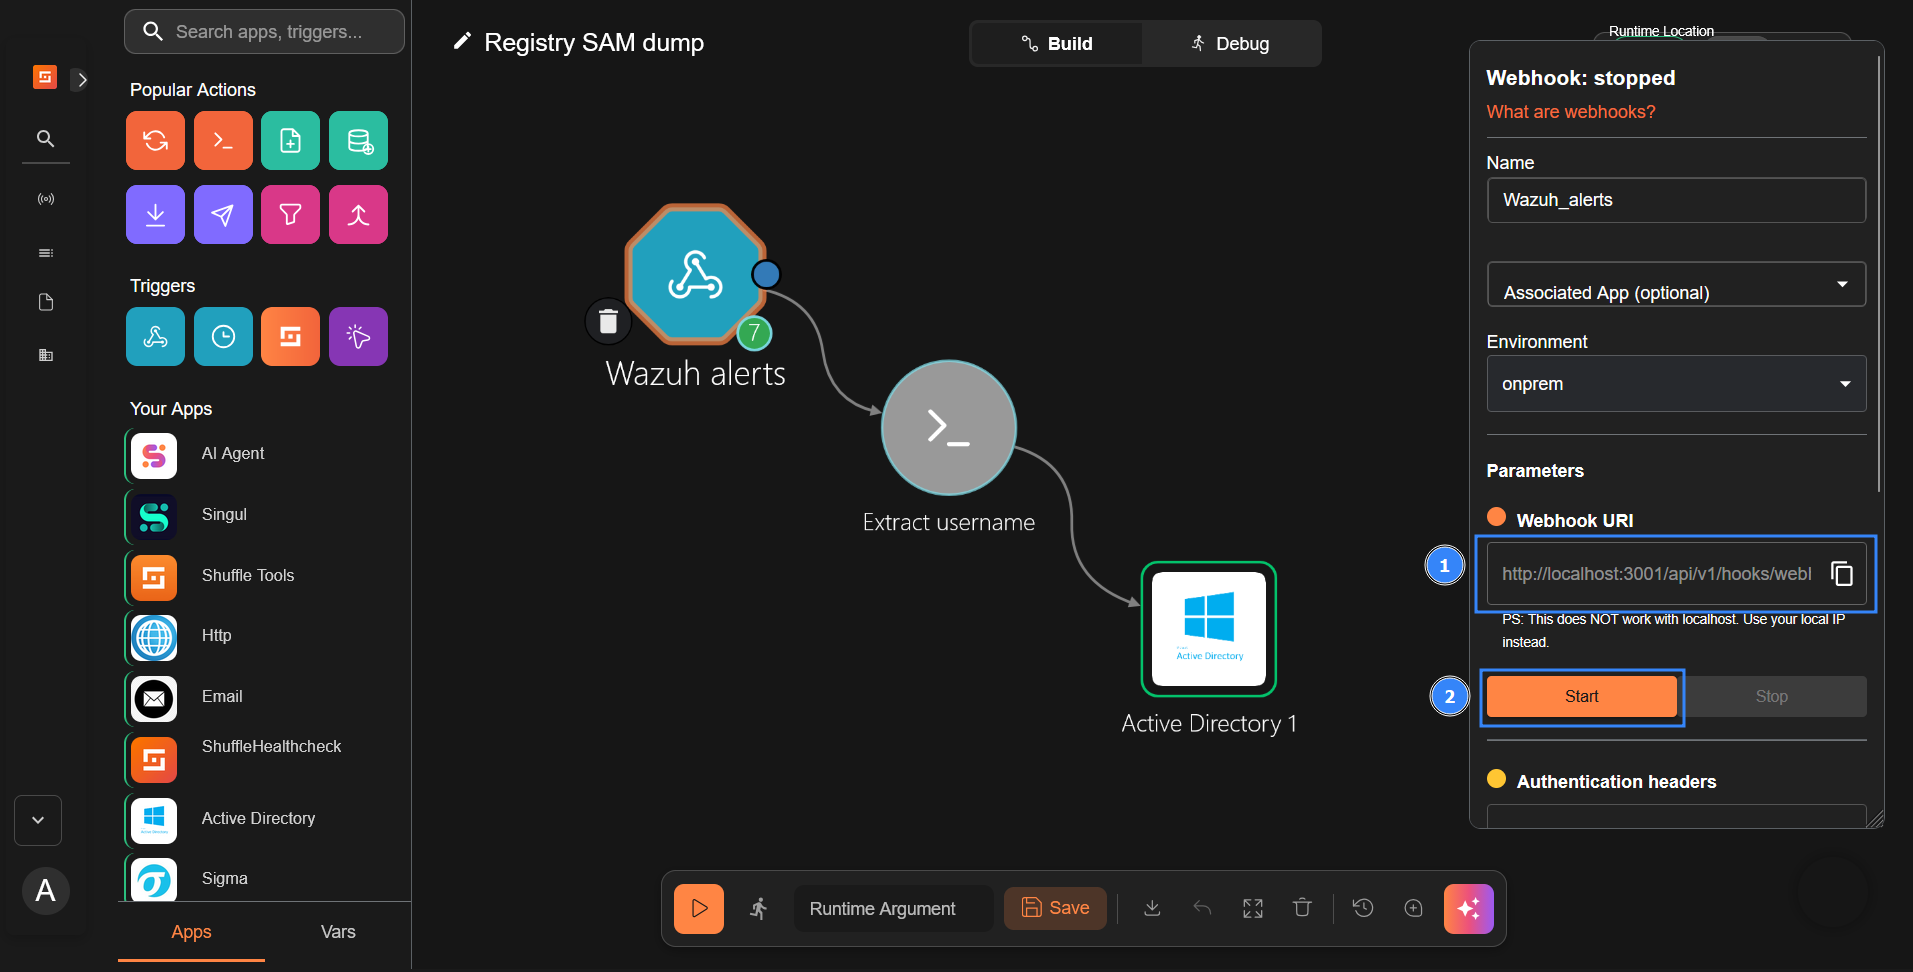
Wazuh_alerts.- Copy and save the webhook URI to use it when configuring the Wazuh server. The webhook URI looks like the following:
https://<SHUFFLE_IP_ADDRESS>:3001/api/v1/hooks/webhook_18cdc939-5e7b-428e-b82f-e1481ffc8fe6. - Click on Start to run the webhook.
- Copy and save the webhook URI to use it when configuring the Wazuh server. The webhook URI looks like the following:
Wazuh dashboard
Perform the following steps to configure the Wazuh server to send alerts to Shuffle for analysis.
- Click on the upper left menu ☰, navigate to Server management > Settings, and click Edit configuration:
- Copy and append the configuration below to the text editor and click Save:
<ossec_config>
  <integration>
    <name>shuffle</name>
    <hook_url><SHUFFLE_WEBHOOK_URL></hook_url>
    <level>3</level>
    <alert_format>json</alert_format>
  </integration>
</ossec_config>
Where:
<name>: Indicates the name of the service to integrate with.<hook_url>: This is the webhook URI copied from the Shuffle webhook. Your Shuffle URL depends on your deployment, for example,http://<SHUFFLE_IP>:3001for a Shuffle on-premise deployment andhttps://shuffler.iofor Shuffle Cloud.
Replace <SHUFFLE_WEBHOOK_URL> with the appropriate Shuffle instance webhook URI.
<level>: Filters alerts and forwards only alerts with the specified level or above.<alert_format>: This forwards alerts to Shuffle in JSON format.
For more information on available options, check out this guide.
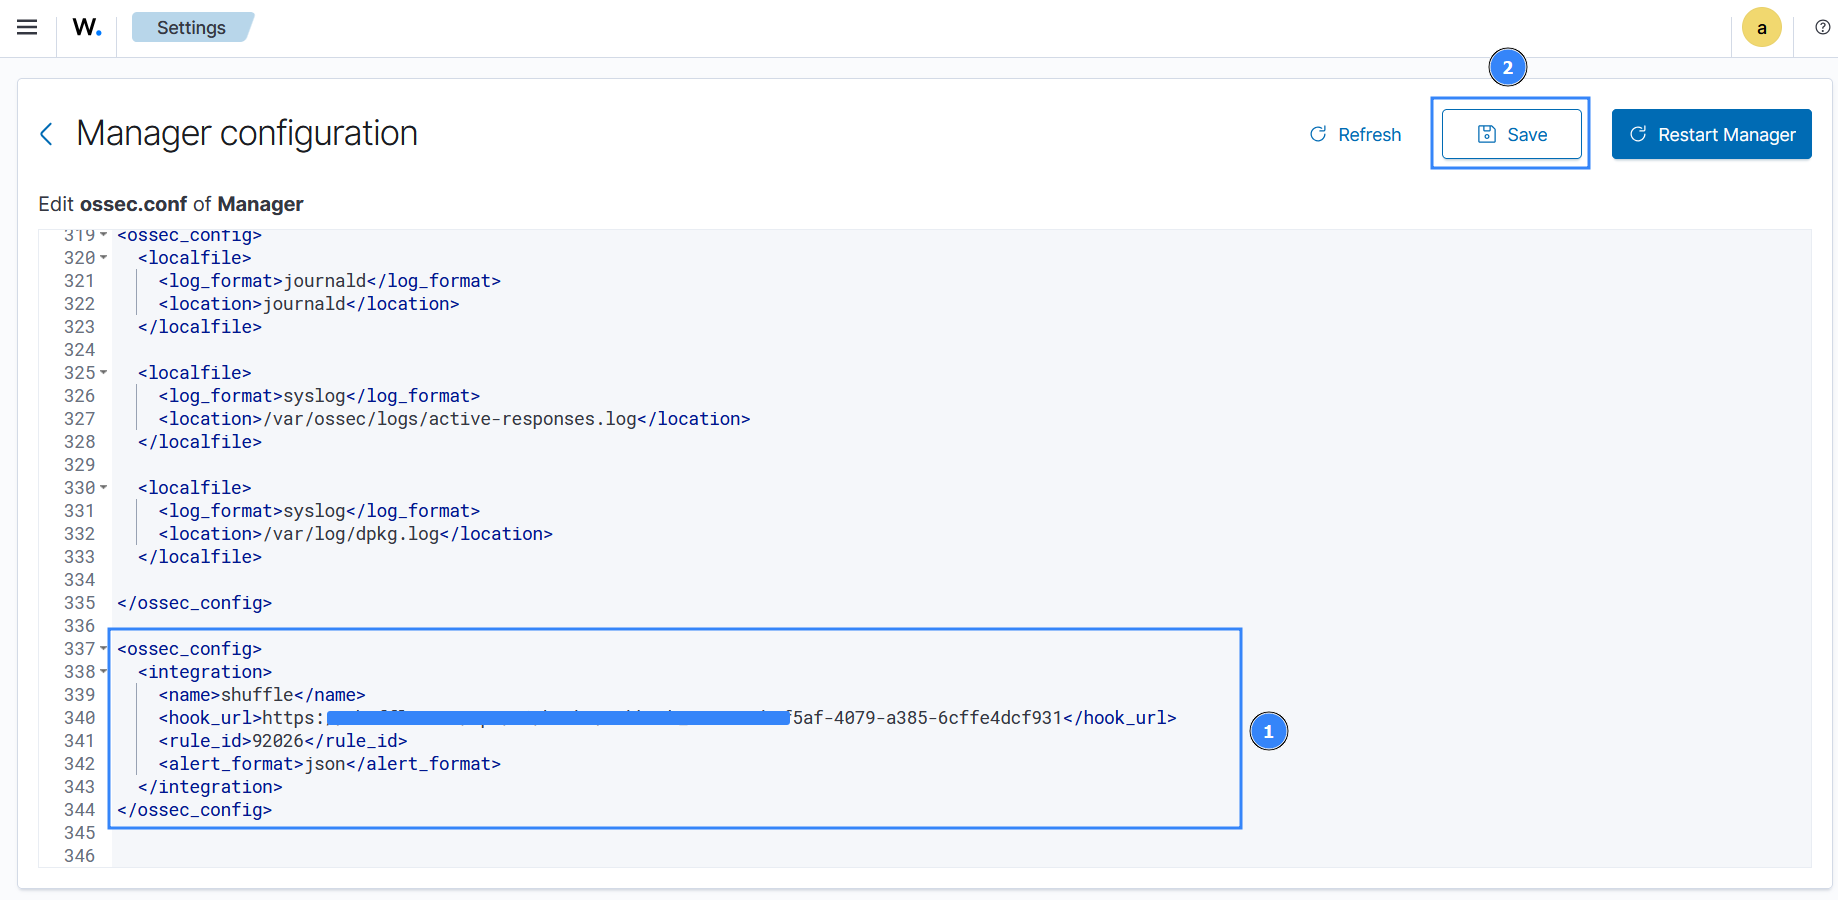
- Click Restart Manager and confirm the action to effect the changes.
Shuffle SOAR
- Click on the Change me node and perform the following actions:
- Rename it to
Receive_Wazuh_alerts.
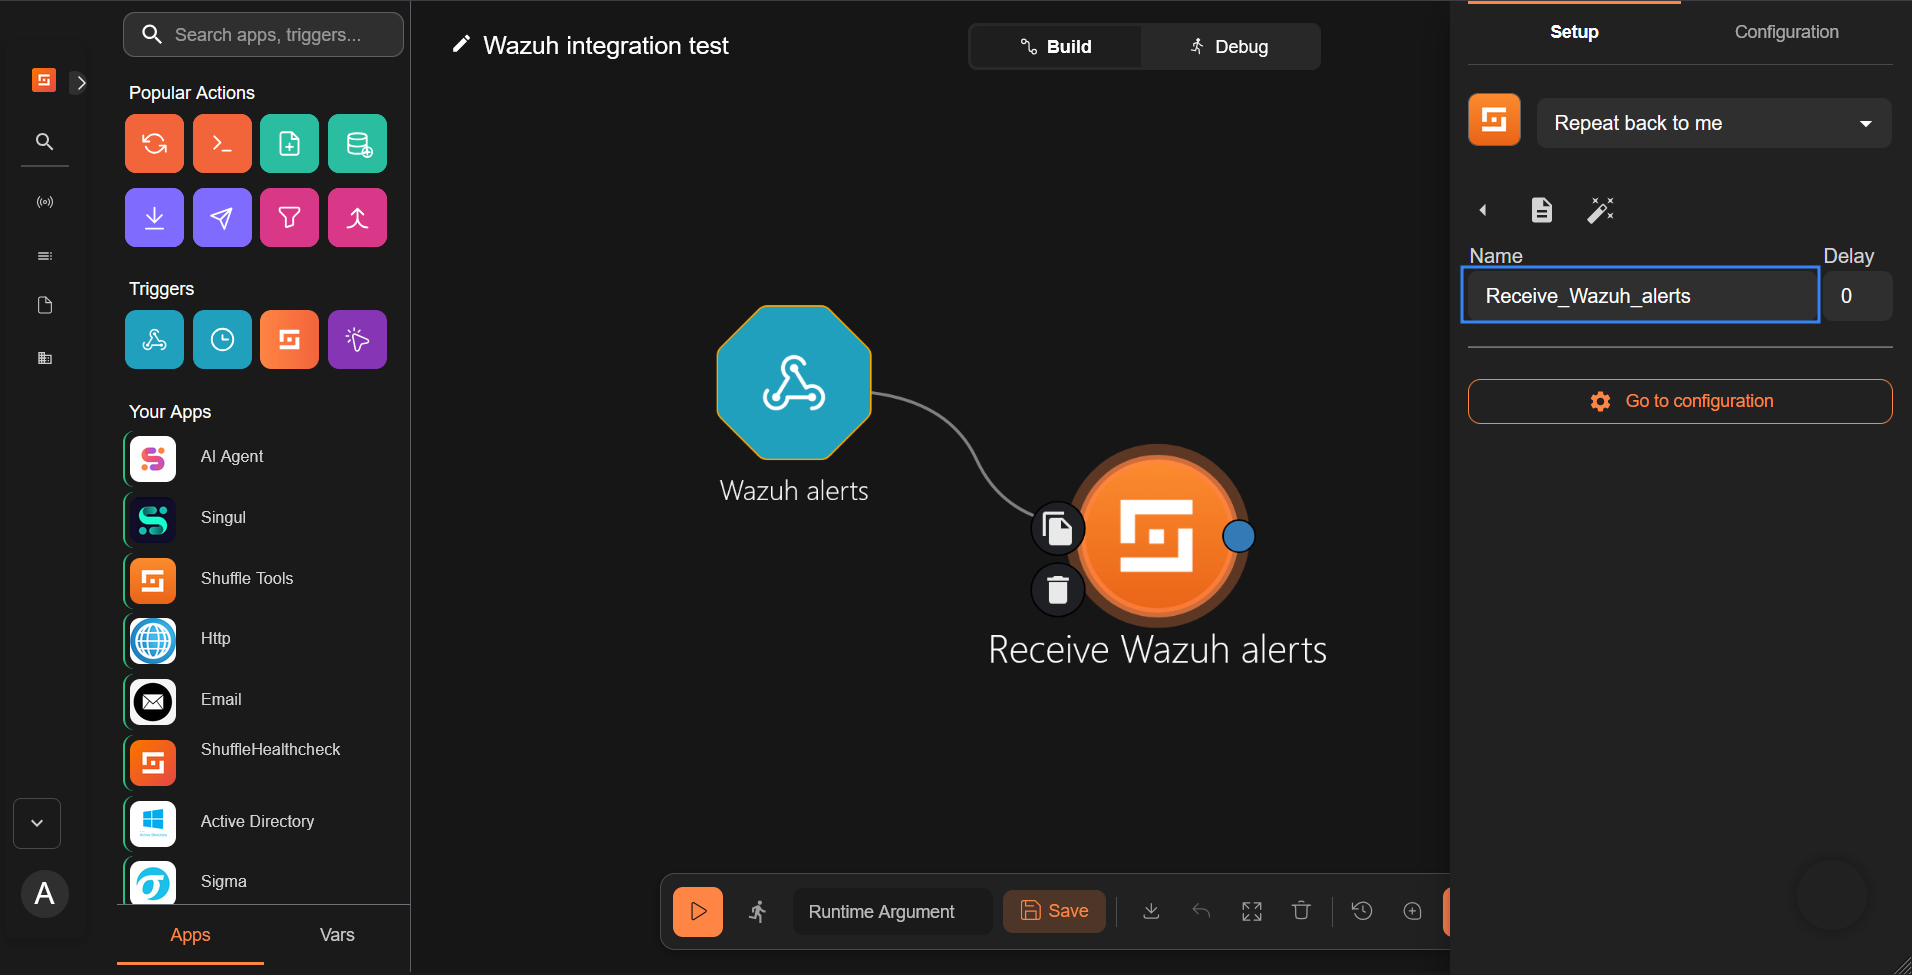
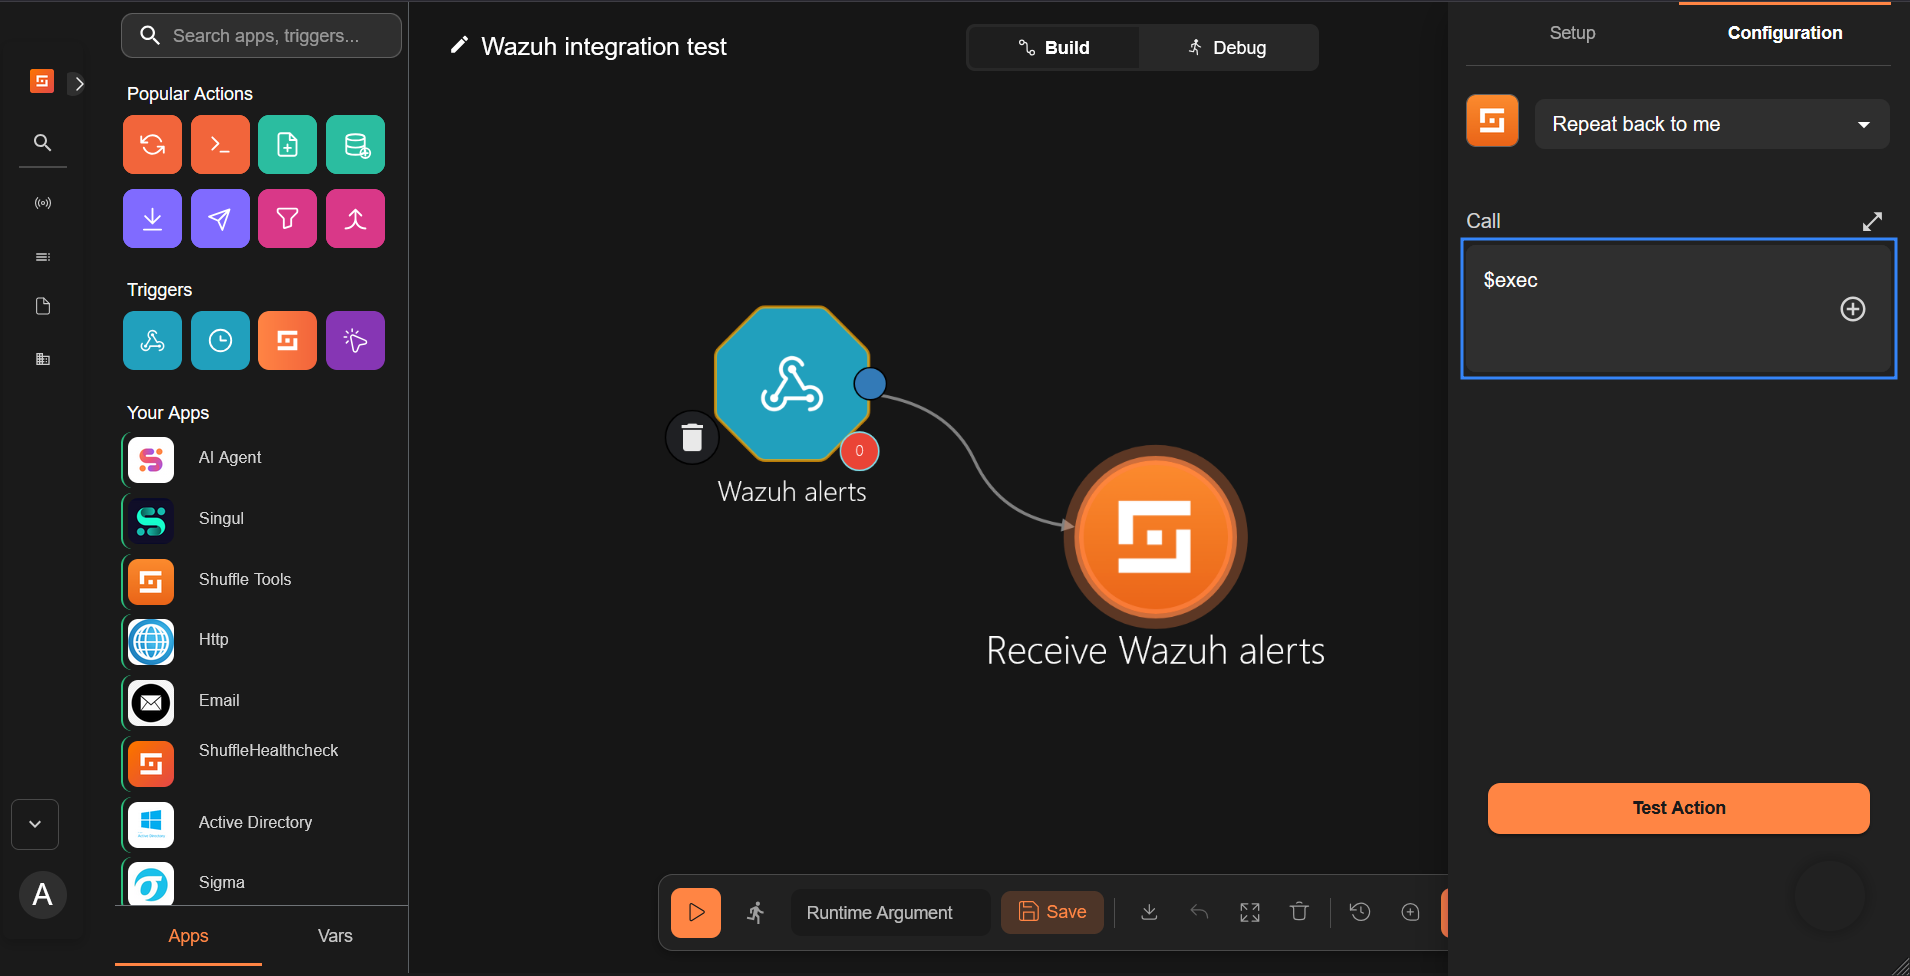
- Set the call option to
$execunder the Configuration tab, and save the workflow.
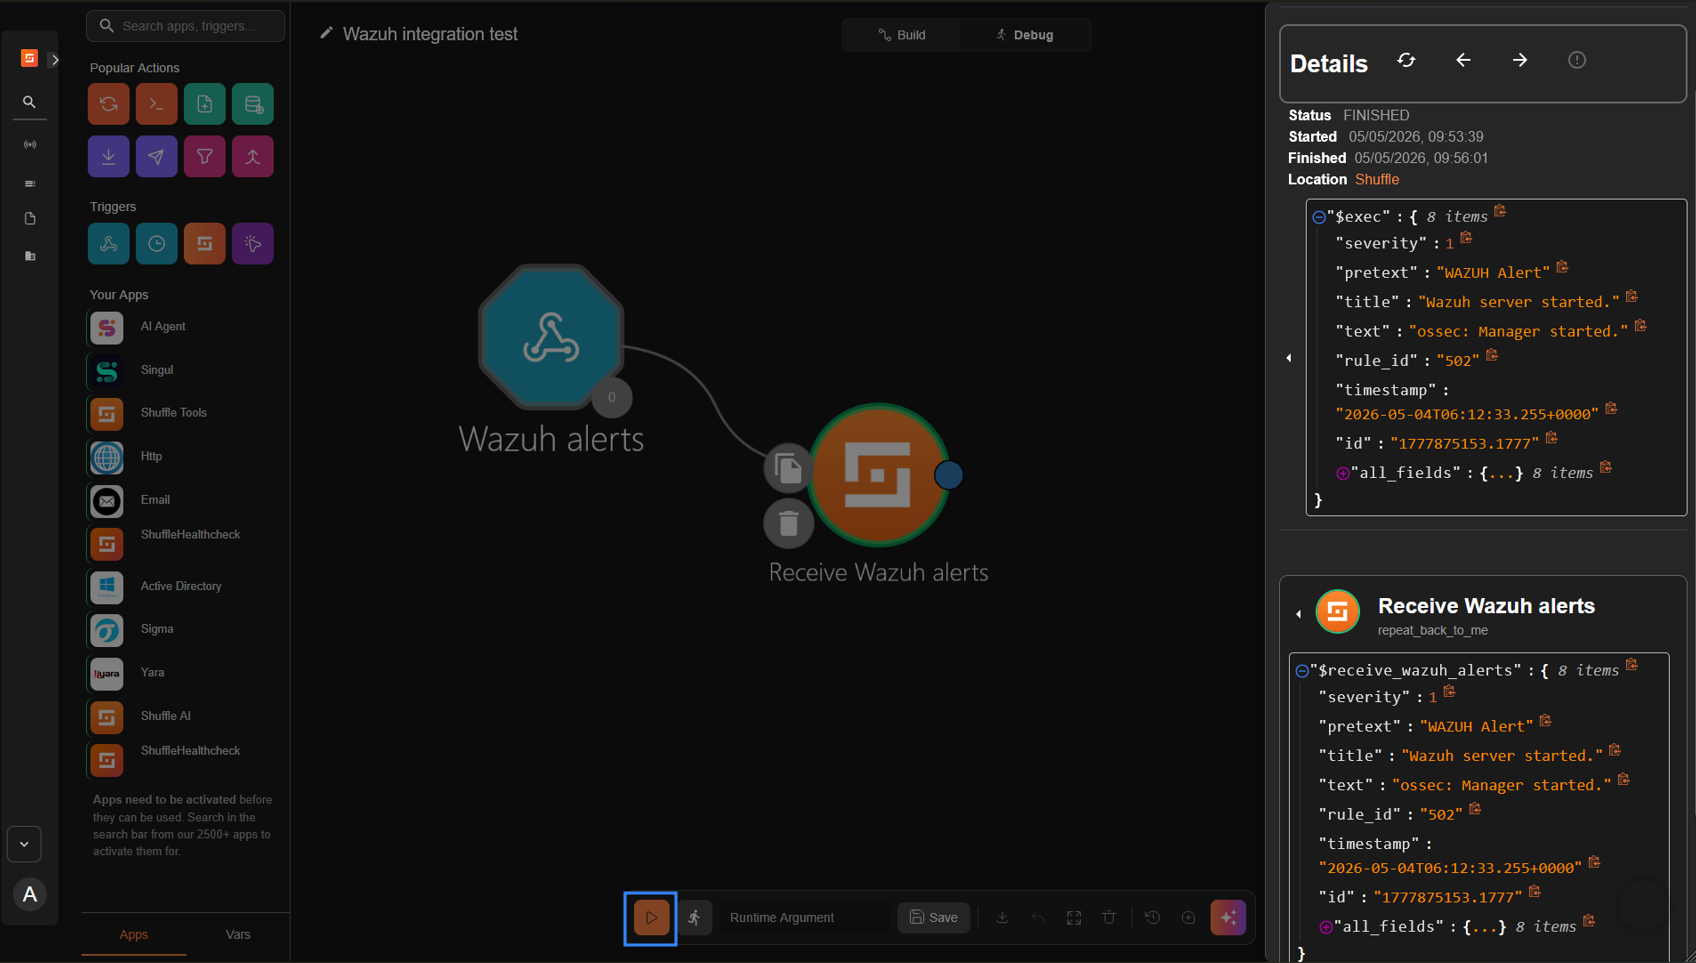
This Shuffle app now repeats the events that are received by the Wazuh alerts webhook. This allows us to test that Shuffle can receive alerts from Wazuh.
- Click the run icon to run the workflow. Shuffle receives the Wazuh alert and repeats it back as shown below.
Note
You may need to wait for a duration of time for Wazuh alerts to appear in Shuffle. This is dependent on the number of events generated in your environment. To manually trigger alerts, restart the Wazuh manager service on the Wazuh server.
This integration shows that Wazuh is sending alerts to Shuffle successfully.
The webhook trigger can be configured with other apps to perform various functions in a workflow. To demonstrate this, we show how to use the Shuffle Active Directory application to disable a user account when Wazuh detects credential dumping on a Windows endpoint.
Use case: Detecting and responding to Windows SAM credential dumping
The SAM database is a crucial part of a Windows system, holding essential details about user accounts like usernames and password hashes. Accessing this information without authorization can pose a severe risk to the system’s security and its users.
While Active Directory stores user account information, the SAM database is still present on each Windows endpoint and holds local account information. Dumping the SAM database from a Windows endpoint can allow attackers to obtain local user account information and escalate privileges or move laterally across the network. In an Active Directory environment, dumping the SAM database is often part of a larger attack campaign targeting a specific system or user account.
In this use case, we show how Wazuh detects SAM credential dumping and triggers a response to disable the Active Directory user account that attempted the dump. The response action to disable the user account is performed with the Shuffle integration. The user account is disabled pending the completion of an investigation to ascertain the impact of such a compromise.
Requirements
In addition to the Wazuh server and the Shuffle SOAR setup, the following requirements are needed to test this use case:
- Windows Server 2022 with Active Directory enabled, acting as a domain controller.
- A Windows 11 endpoint joined to the previously configured Active Directory.
Windows 11 configuration
- Download the latest version of Sysmon from the Microsoft Sysinternals page.
- Extract the compressed Sysmon file to your preferred location.
- Download the Sysmon configuration file using PowerShell as an administrator. Replace
<SYSMON_EXECUTABLE_PATH>with the path to your Sysmon executable:
> wget -Uri https://wazuh.com/resources/blog/emulation-of-attack-techniques-and-detection-with-wazuh/sysmonconfig.xml -OutFile <SYSMON_EXECUTABLE_PATH>\sysmonconfig.xml
- Switch to the folder containing the Sysmon executable. Run the command below to install and start Sysmon:
> .\Sysmon64.exe -accepteula -i sysmonconfig.xml
- Append the following configuration to the
C:\Program Files (x86)\ossec-agent\ossec.conffile to forward Sysmon events to the Wazuh server:
<ossec_config>
  <localfile>
    <location>Microsoft-Windows-Sysmon/Operational</location>
    <log_format>eventchannel</log_format>
  </localfile>
</ossec_config>
- Restart the Wazuh agent to apply the changes:
> Restart-Service -Name wazuh
Configure Shuffle to respond to SAM credential dumping
We create a workflow that disables a user account when Wazuh sends an alert for SAM credential dumping to the Shuffle webhook trigger. The JSON alert event data sent by Wazuh contains the username of the account that Shuffle should disable. We configure the workflow to extract the username from the alert event data.
- Take steps 1 to 3 in the Generic Wazuh-Shuffle integration configuration section to create a new workflow titled “Registry SAM dump”.

- Configure the Shuffle tool to extract the username of the account used to dump the SAM from the Wazuh alert. The username of the account performing the SAM dump is in the
data.win.eventdata.userfield of the Wazuh alert. Therefore, we parse the log to extract it.
- Rename the
Change Menode toextract_usernameunder the Setup tab.
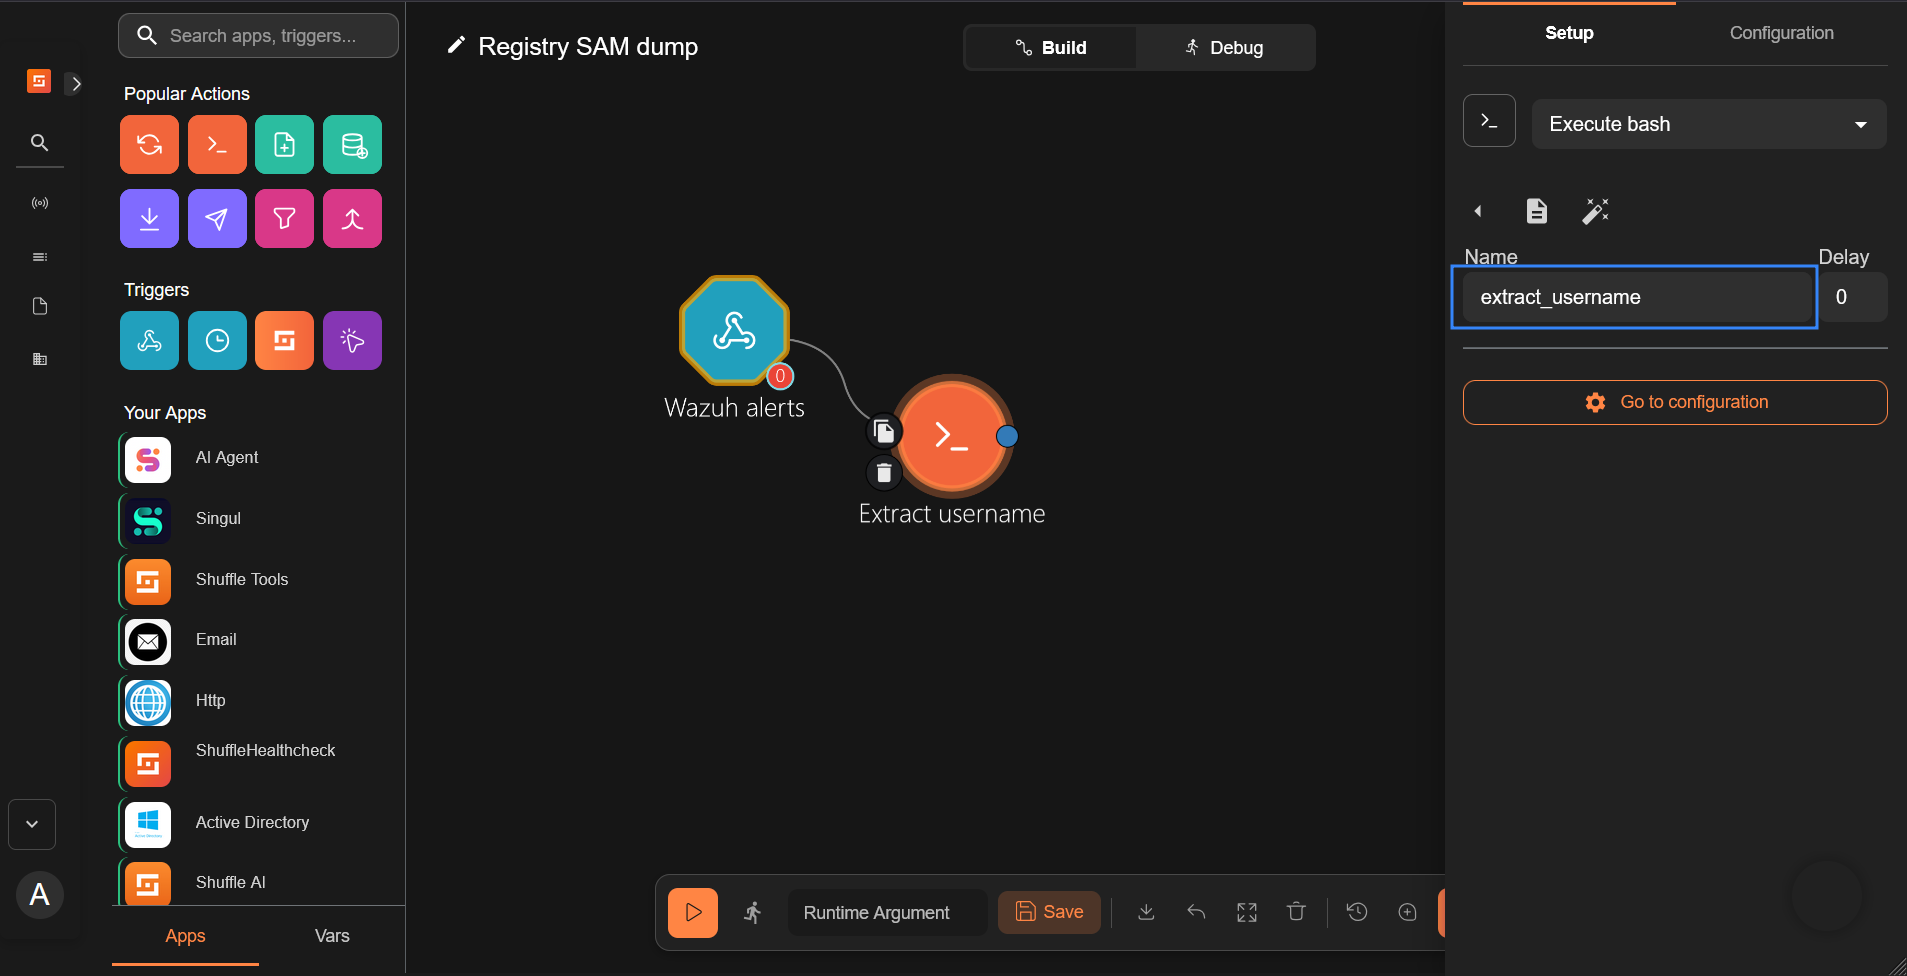
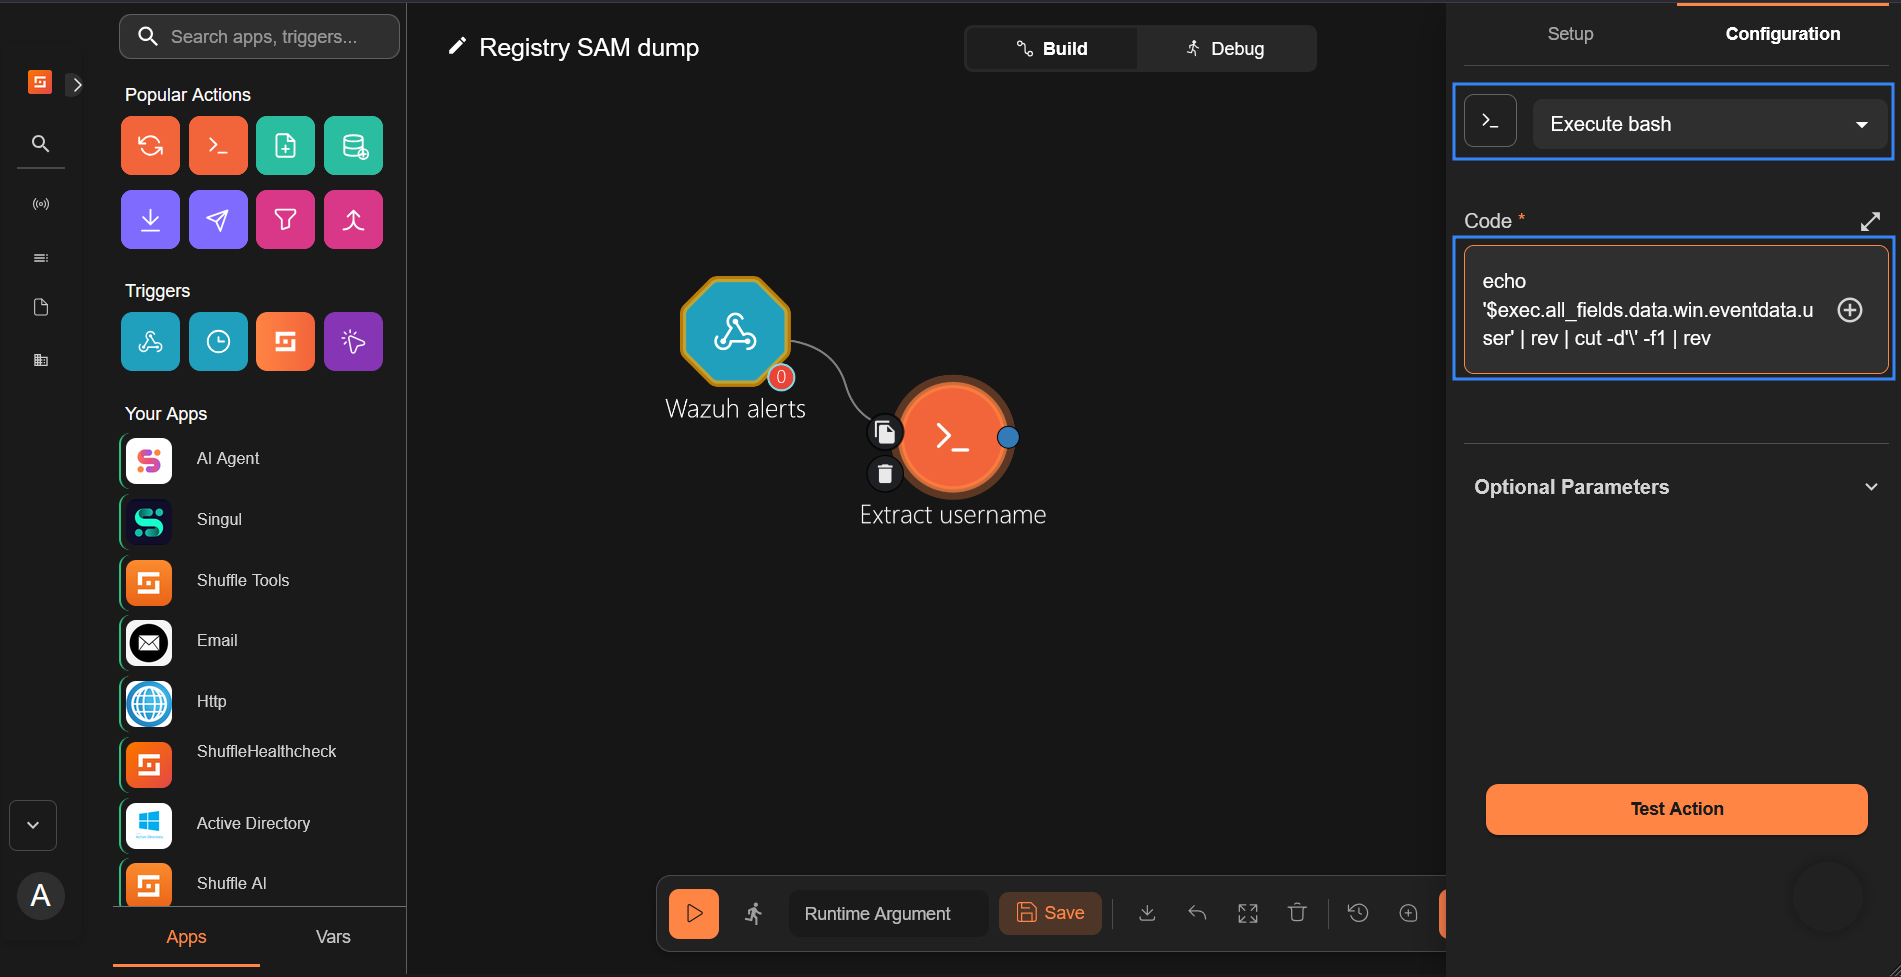
- Select the Execute bash action under the Configuration tab and enter the code snippet below in the Code section. This Bash command filters the string to extract only the username of the account performing the credential dump. This is necessary because the username is usually in the form
<DOMAIN_NAME>\\<USERNAME>, and we need only the username.
echo '$exec.all_fields.data.win.eventdata.user' | rev | cut -d'\' -f1 | rev
Note
We recommend that you modify the code to exclude usernames of domain administrator accounts when in production. This will prevent account lockout in case of a breach. Consider the following script that excludes <EXCLUDED_USER> as an example:output=$(echo '$exec.all_fields.data.win.eventdata.user' | rev | cut -d'\' -f1 | rev); if [ "$output" = "<EXCLUDED_USER>" ]; then echo ""; else echo "$output"; fi
Replace <EXCLUDED_USER> with the username of the domain account you wish to exclude.
- Search and drag the Active Directory app to the workspace. It automatically connects to the Extract username node.
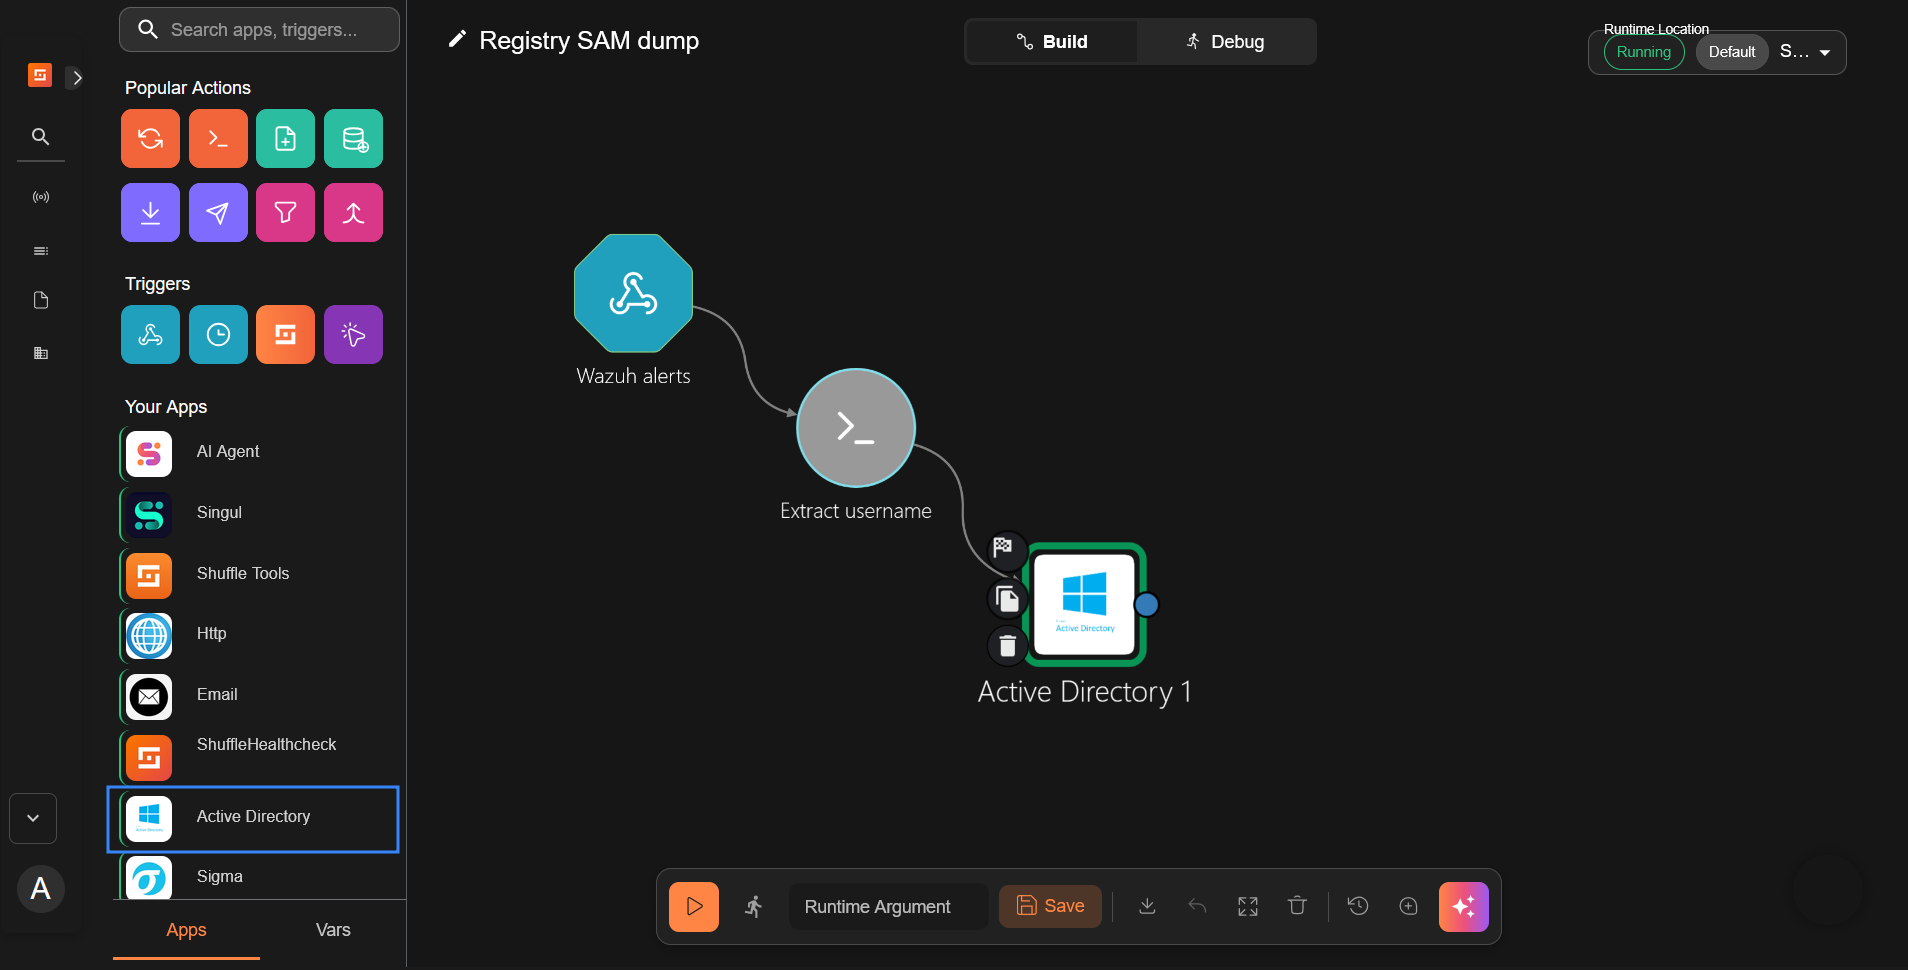
- Select the Active Directory app and perform the following actions under the Configuration tab:
- Select
Disable userand set Samaccountname to$extract_username. - Enter your Active Directory server credentials as follows.
- Server: The IP or hostname to connect to.
- Port: The port to connect to. The default port is
389. - Domain: Your domain name. Used to log in properly together with your login user name.
- Login user: Your username. Don’t add your domain name in front.
- Password: The password of the user logging in.
- Base dn: The base Distinguished Name (DN) of the Active Directory. Run the PowerShell command
Get-ADDomainon the domain controller and use the value of theUsersContainerfield. For example:OU=Users,DC=wazuh,DC=domain - Use ssl: Whether to use SSL to connect to the default port.
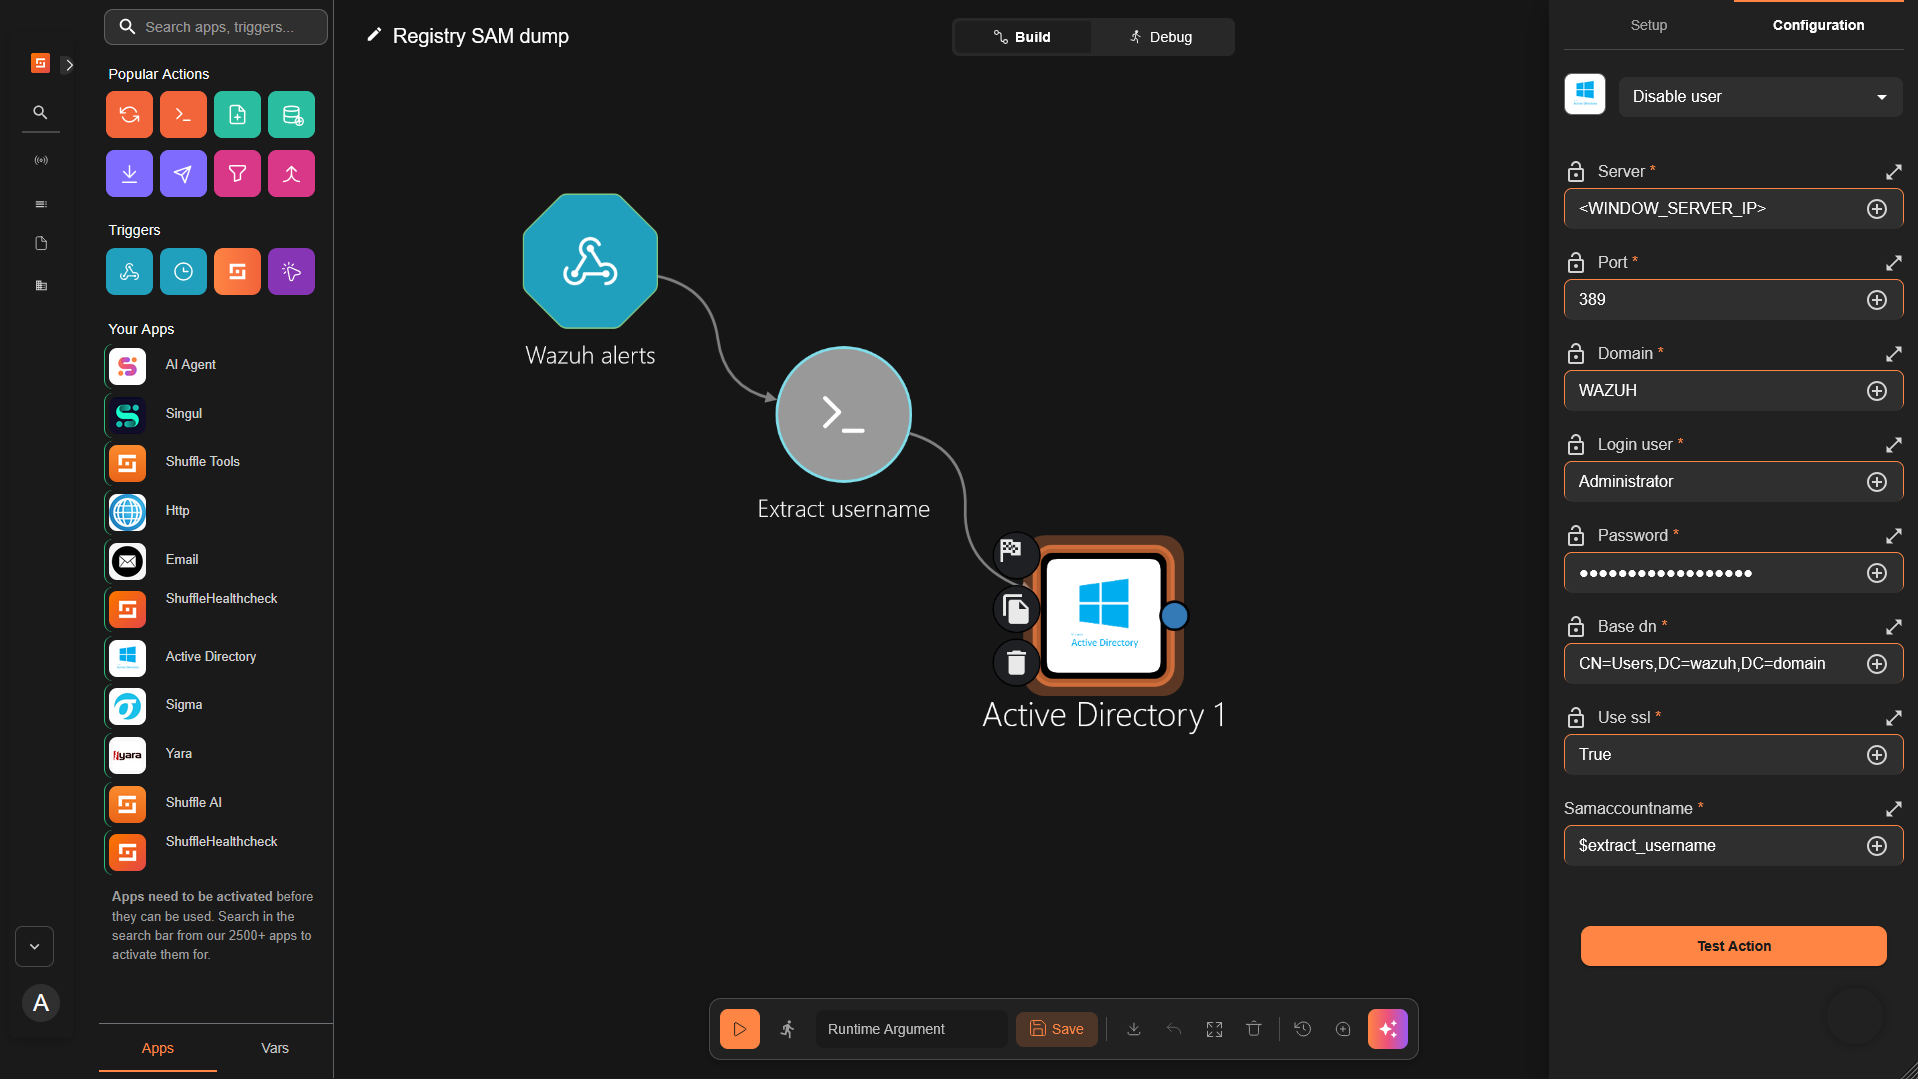
Click Save after filling out the form with the required data.
- Copy the Wazuh alerts webhook URI, and start the trigger if it is not currently running.
Configuring the Wazuh server to forward registry SAM dump alerts to Shuffle
Wazuh has the built-in rule 92026, which triggers an alert when a user attempts to dump the SAM database from the registry. Perform the following steps on the Wazuh dashboard to configure the Wazuh server to send registry SAM dump alerts to Shuffle SOAR for further action.
- Click on the upper left menu ☰, navigate to Server management > Settings, and click Edit configuration.
- Copy and append the configuration below to the text editor and click Save:
<ossec_config>
  <integration>
    <name>shuffle</name>
    <hook_url><YOUR_SHUFFLE_URL></hook_url>
    <rule_id>92026</rule_id>
    <alert_format>json</alert_format>
  </integration>
</ossec_config>
Replace <YOUR_SHUFFLE_URL> with the appropriate Shuffle instance URI.
- Click Restart Manager and confirm the action when prompted to effect the changes.
Dumping credentials from the SAM database
In this section, we perform a registry SAM dump to test our configuration. When the SAM database is dumped, Wazuh generates an alert and triggers the Shuffle workflow, which disables the user account responsible for the action.
Perform the following steps on the Windows endpoint to dump the SAM database:
- Run PowerShell as an administrator and authenticate with the
wazuhuseraccount when prompted to enter credentials. - Run the following command to dump the SAM database:
> reg save hklm\sam c:\sam
The operation completed successfully.
The command dumps the SAM database to the file path c:\sam.
Credential dumping verification
Perform the following steps to verify credential dumping and the disabling of the target account.
- Open Shuffle to verify the workflow completed successfully.
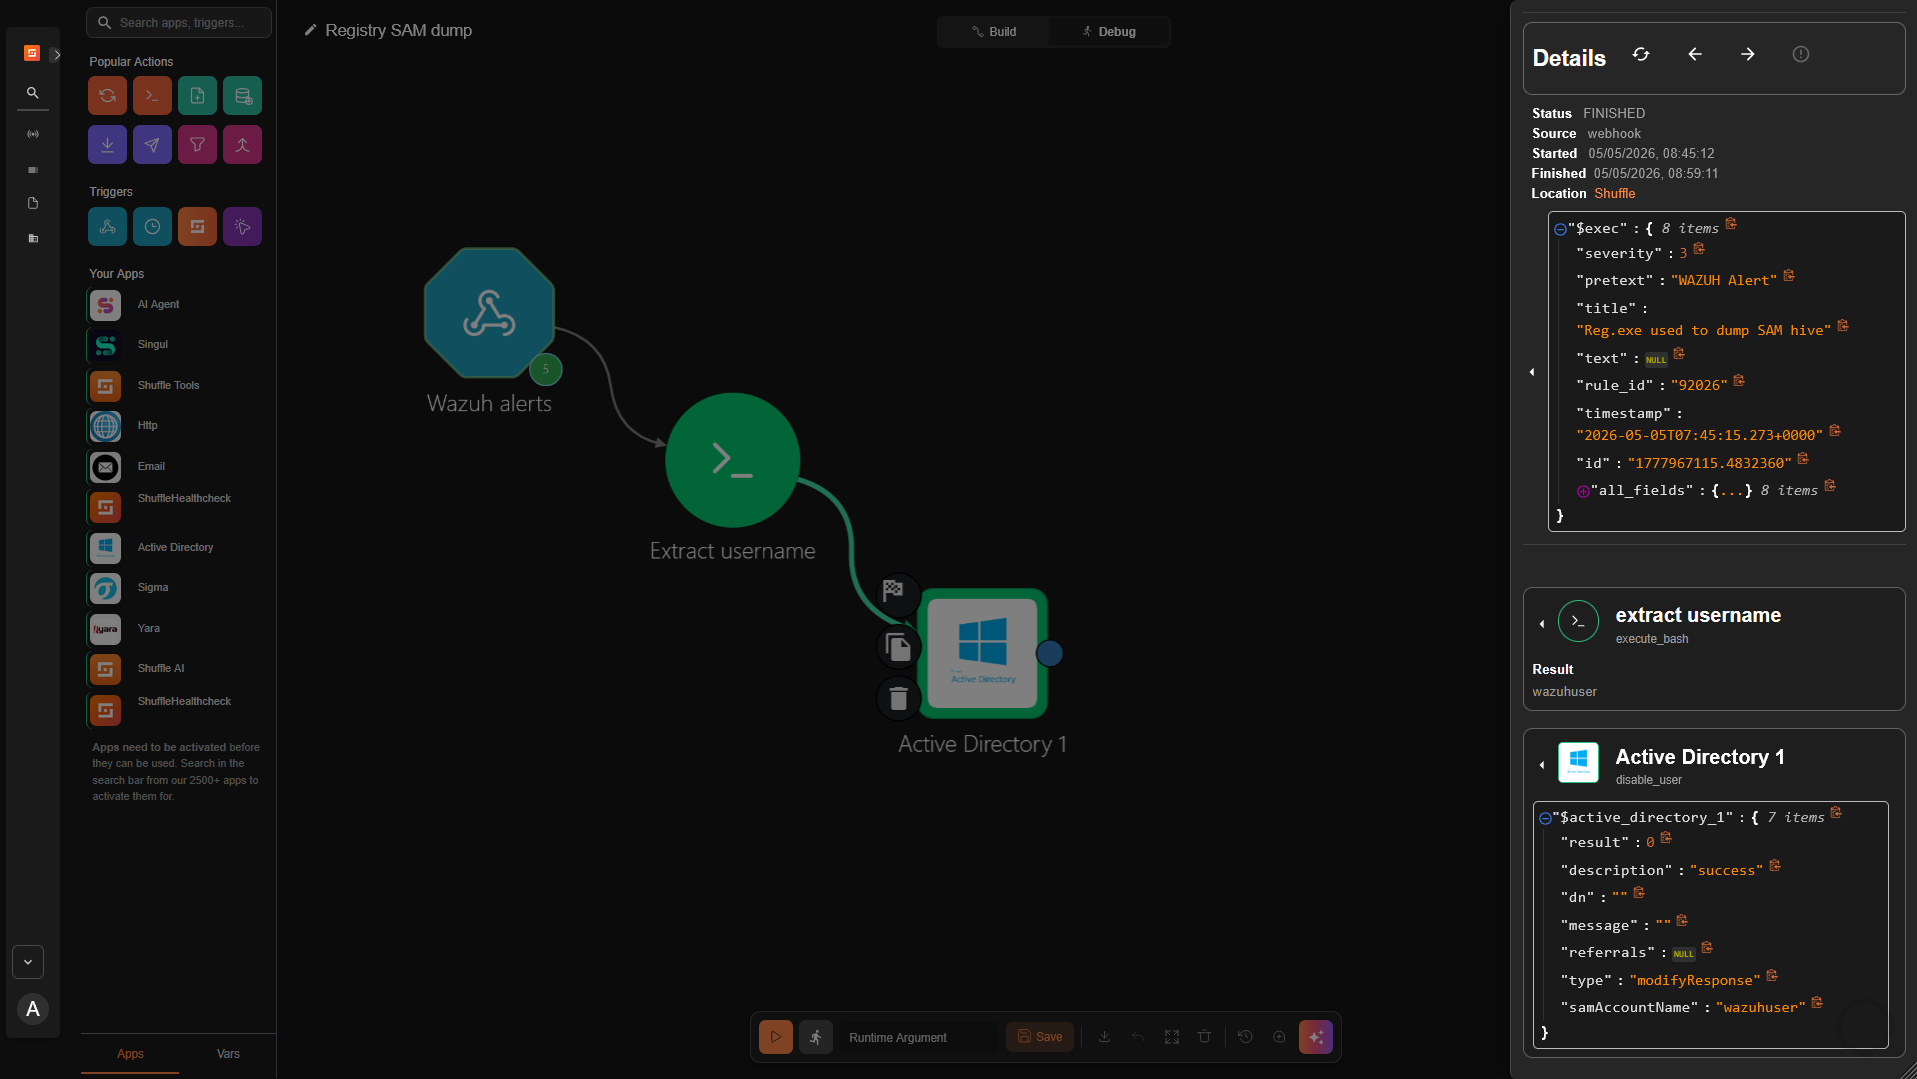
- Visit the Wazuh dashboard, navigate to Threat Hunting > Events, and search the query
rule.id: 92026 or 60110 or 60111to view the generated alerts. Rule92026triggers when we dump the SAM database, and rules60110and60111trigger when Shuffle disables the user account in response to the dump.
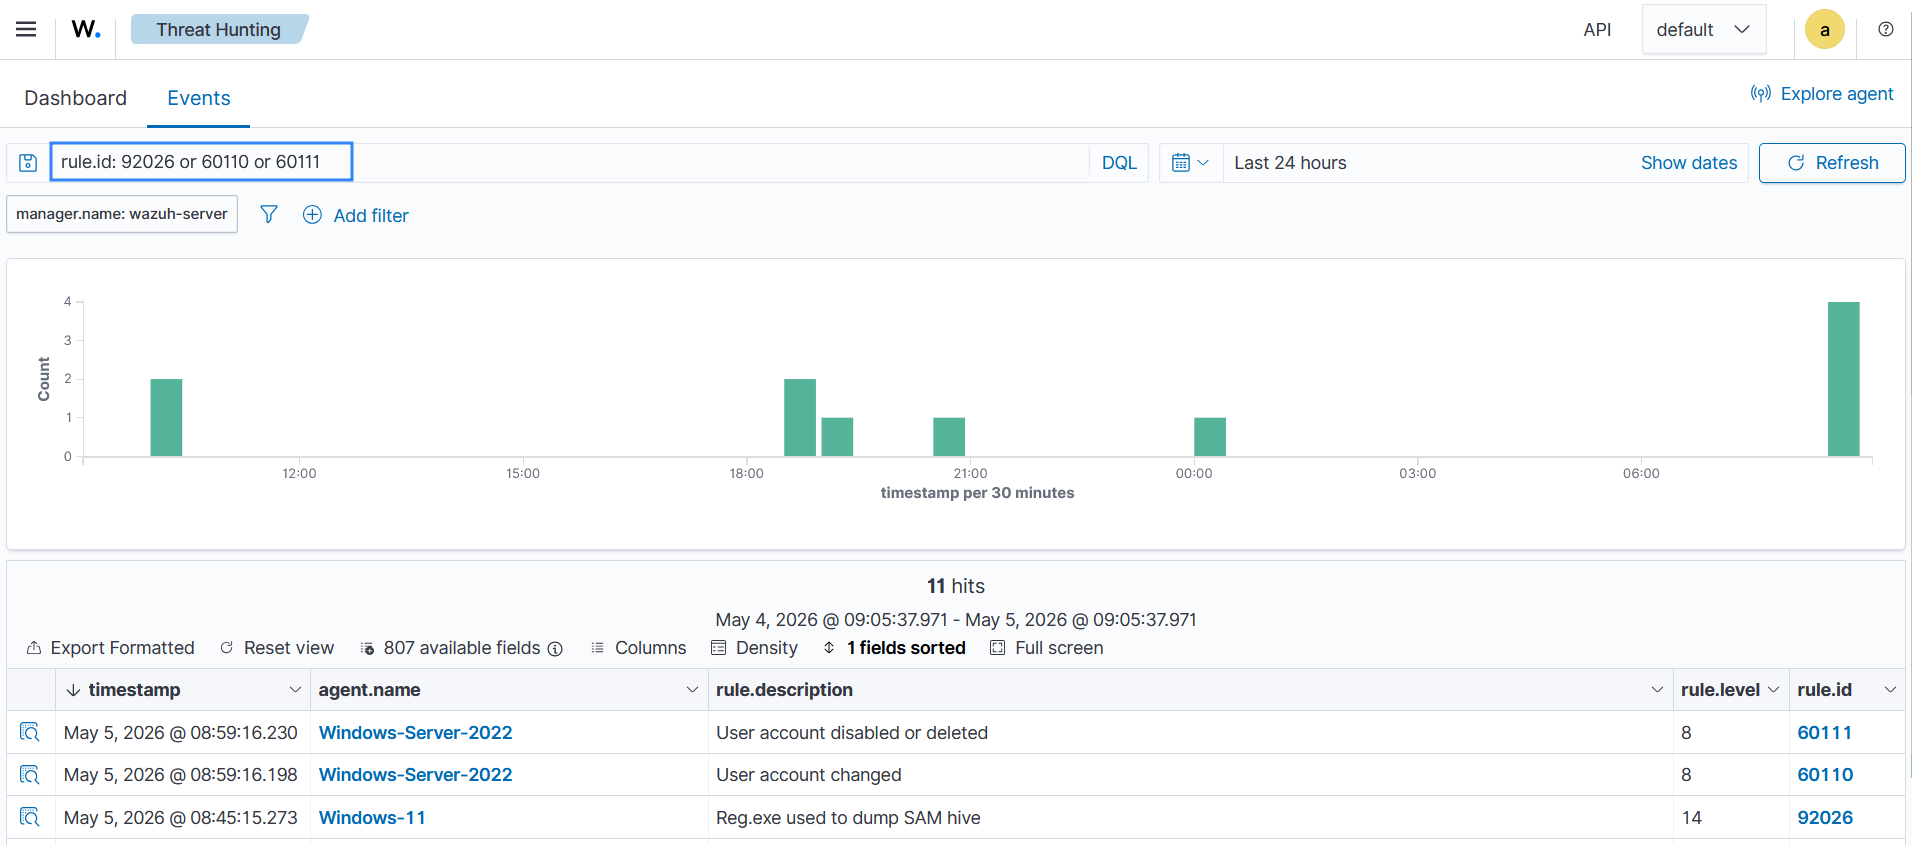
The Wazuh alerts for rules 60110 and 60111 prove that the workflow executed as expected, and the account is disabled.
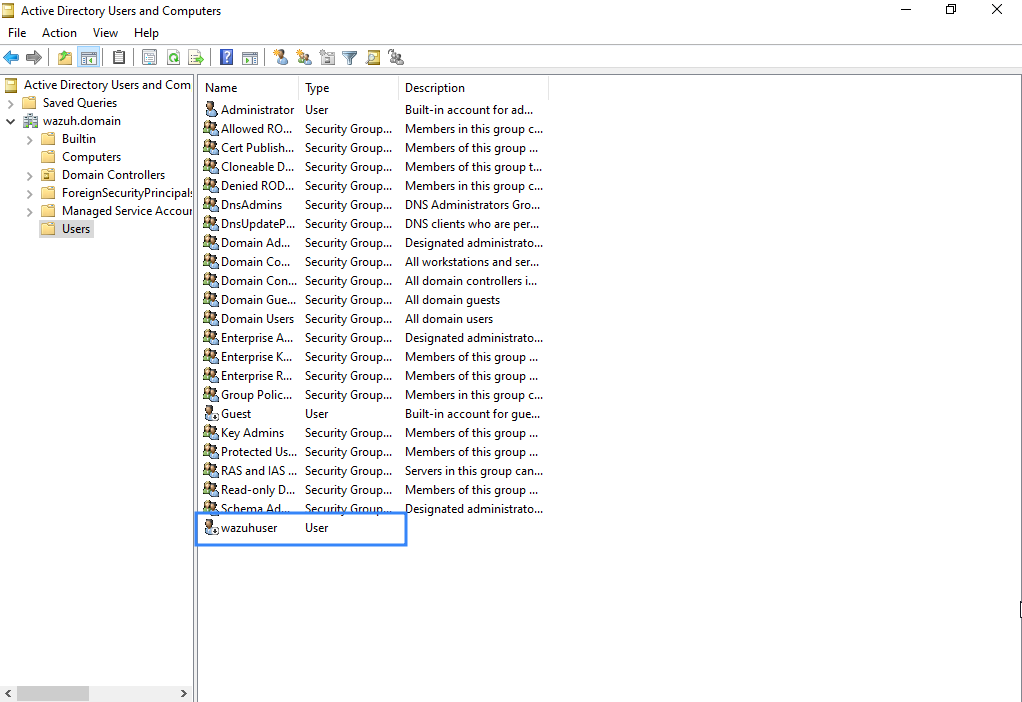
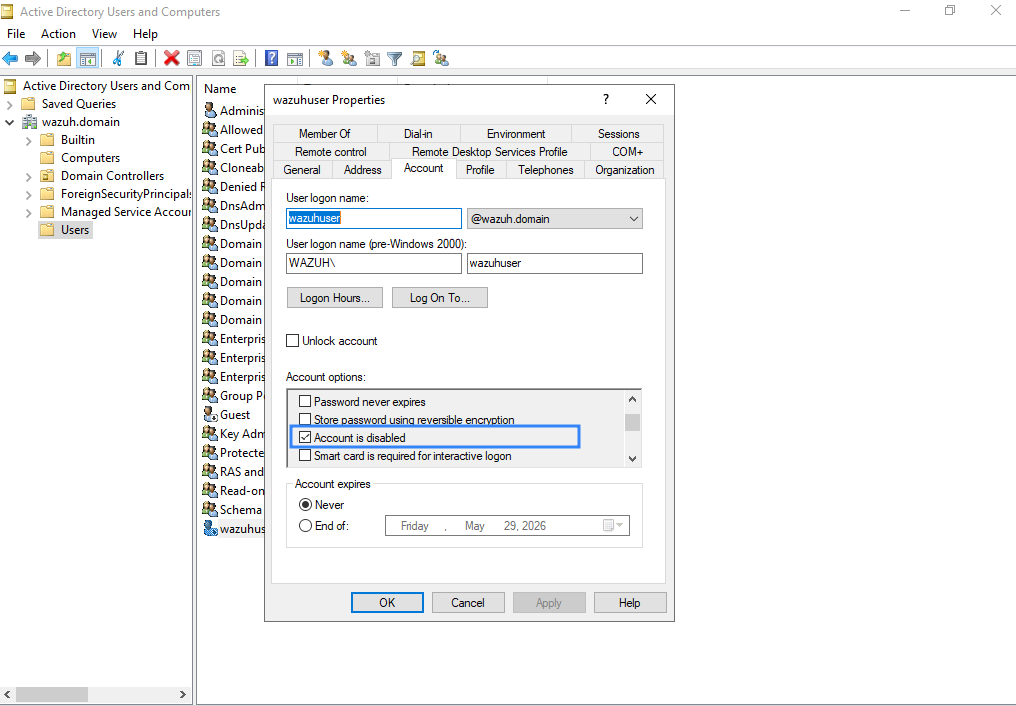
- Go to the Windows Server (domain controller) and open Active Directory Users and Computers to confirm that the account is disabled.
- Open the Users tab to verify that the wazuhuser account used to dump the SAM database has been disabled.
- Additionally, right-click on the wazuhuser account and select the Account tab to view the account options. The account options show that
wazuhuseris now disabled.
Conclusion
In this blog post, we have shown how to configure the Shuffle integration with Wazuh. This out-of-the-box integration introduced in Wazuh 4.4 gives a robust approach to security data analytics, threat detection, and response. The generic steps shown apply to every use case you want to consider. Once the desired alerts are delivered to Shuffle, the rest is up to the user to design the Shuffle workflow actions according to the playbook. In this case, we have shown a simple workflow that uses the Active Directory app to disable a user account that attempts to dump the SAM database. This use case shows how Wazuh and Shuffle complement each other to improve attack detection and timely response.
Feel free to connect with the Wazuh community, where our team and contributors actively share knowledge and provide support.