Secure forensic archiving protects security evidence from tampering, enabling reliable forensic analysis, compliance validation, and incident response. Evidence can lose value if it is altered, deleted, or improperly stored.
Wazuh provides real-time threat detection, log analysis, and alerting across cloud and on-premises environments. When integrated with Shuffle, an open source SOAR platform, organizations can automate evidence preservation and maintain stronger chain-of-custody controls. This architecture separates preserved forensic evidence from live XDR/SIEM telemetry, reducing risks during active incidents.
In this post, we demonstrate how integrating Wazuh with Shuffle enables automated secure forensic archiving in Amazon S3. High-severity alerts are preserved as encrypted evidence objects inside a controlled S3 bucket. Restrictive bucket policies ensure that only the automated workflow can upload evidence. The workflow validates storage integrity by checking Block public access and Server access logging settings. Object Lock retention preserves evidence against modification, while Slack notifications confirm successful evidence archiving and integrity validation.
Infrastructure
We use the following infrastructure to showcase Wazuh integration capabilities with Shuffle, providing a practical demonstration of automated alert handling and secure evidence archiving.
- A pre-built, ready-to-use Wazuh OVA 4.14.5, which includes the Wazuh central components (Wazuh server, Wazuh indexer, and Wazuh dashboard). Follow this guide to download and set up the Wazuh virtual machine.
- An Ubuntu 24.04 victim endpoint with the Wazuh agent 4.14.5 installed and enrolled to the Wazuh server.
- An Ubuntu 24.04 attacker endpoint was used to simulate repeated SSH authentication failures against a non-existent user.
- A Shuffle SOAR instance, deployed on Shuffle Cloud (SaaS) for this demonstration.
- Amazon S3 to store and preserve Wazuh alerts as immutable evidence objects for forensic analysis.
Configuration
Perform the steps in the sections below to configure a secure forensic archive using Wazuh and Shuffle for automated, immutable evidence storage.
AWS infrastructure
Set up S3 buckets
This setup uses two Amazon S3 buckets to support secure and auditable evidence archiving. The primary bucket stores Wazuh alerts as immutable evidence, ensuring integrity, traceability, and controlled access for forensic analysis. The secondary bucket stores access logs, providing visibility into all requests made to the evidence bucket.
Create the access logging bucket
Perform the following steps to create a secondary S3 bucket to store access logs for the evidence bucket.
- Go to the search bar at the top left, type S3, then select S3 from the results and click Create bucket.
- Select General purpose as the bucket type, then select Global namespace or Account region namespace, depending on how S3 bucket naming is defined in your environment.
- Enter a unique name under Bucket name. (e.g.,
wazuh-access-logs-main) - Select ACLs disabled (recommended) under Object Ownership.
- Select Block all public access under Block Public Access settings for this bucket.
- Select Disable under Bucket Versioning.
- Select Server-side encryption with AWS Key Management Service keys (SSE-KMS) under Default encryption for stronger forensic protection, auditable key usage, and full key lifecycle control. SSE-S3 may be used for lower-sensitivity environments where AWS KMS is not required.
Note
SSE-S3 was used in this use case as it represents a lower-sensitivity environment setup.
- Select Enable under Bucket key.
- Leave Advanced settings > Object Lock disabled.
- Click Create bucket to complete the setup.
Note
Do not enable versioning or Object Lock on this bucket, as it is used only to store access logs.
Create the evidence bucket
Perform the following steps to create the primary S3 bucket used for secure forensic archiving and immutable evidence storage.
- Go to the search bar at the top left, type S3, then select S3 from the results and click Create bucket.
- Select General purpose as the bucket type, select Global namespace or Account region namespace, depending on how S3 bucket naming is defined in your environment.
- Enter a unique name under Bucket name. (e.g.,
wazuh-shuffle-secure-evidence) - Select ACLs disabled (recommended) under Object Ownership.
- Select Block all public access under Block Public Access settings for this bucket.
- Select Enable under Bucket Versioning.
- Select Server-side encryption with AWS Key Management Service keys (SSE-KMS) under Default encryption for stronger forensic protection, auditable key usage, and full key lifecycle control. SSE-S3 may be used for lower-sensitivity environments where AWS KMS is not required.
Note
SSE-S3 was used in this use case as it represents a lower-sensitivity environment setup.
- Select Enable under Bucket key.
- Select Enable under Advanced settings > Object Lock.
- Select I acknowledge that enabling Object Lock will permanently allow objects in this bucket to be locked.
- Click Create bucket to complete the setup.
Note
Enable Object Lock to enforce Write-Once Read-Many (WORM), ensuring that stored evidence cannot be modified or deleted.
Configure access logging and object retention
Perform the following steps to configure logging and enforce immutability on the evidence bucket.
- Navigate to the newly created evidence bucket (
wazuh-shuffle-secure-evidence), then select the Properties tab. - Navigate to Server access logging > click Edit > select Enable under Server access logging.
- Select Browse S3 under Destination > select the previously created access logging bucket (
wazuh-access-logs-main). - Select the preferred Log object key format.
- Click Save changes.
- Navigate to Object Lock under Properties, then click Edit:
- Select Enable under Default retention.
- Select Compliance mode under Default retention mode.
- Enter a default retention period based on your organization’s requirements, then click Save changes.
Note
Retention aligns with compliance needs. HIPAA requires 6 years, PCI DSS requires 12 months, while internal investigations typically use 90-180 days.
- Type confirm in the confirmation field, then click Enable compliance mode.
Configure AWS IAM user for secure S3 access
Perform the following steps to create an IAM user, assign least privilege permissions, and generate access keys. These credentials authenticate the S3 app in Shuffle, enabling secure interaction with the evidence bucket without granting unnecessary access.
- Go to the search bar at the top left, type IAM, then select IAM from the results > Policies > Create Policy.
- Select JSON and replace the existing policy format with the policy below. Replace
<AWS_BUCKET_NAME>with the S3 bucket (e.g.,wazuh-shuffle-secure-evidence) created on the AWS infrastructure:
{
  "Version": "2012-10-17",
  "Statement": [
    {
      "Sid": "AllowUploadObject",
      "Effect": "Allow",
      "Action": [
        "s3:PutObject"
      ],
      "Resource": "arn:aws:s3:::<AWS_BUCKET_NAME>/*"
    },
    {
      "Sid": "AllowBucketReadMetadata",
      "Effect": "Allow",
      "Action": [
        "s3:GetBucketPolicyStatus",
        "s3:GetBucketLogging"
      ],
      "Resource": "arn:aws:s3:::<AWS_BUCKET_NAME>"
    }
  ]
}
Note
This policy grants the IAM user access to the S3 bucket used for secure evidence archiving, enabling Shuffle to store Wazuh alert data securely.
- Select Next and name the policy as “
s3-shuffle-policy”. Select Create policy to finish creating the policy.
- Navigate to the left under Access management, then select IAM Users, and select Create user.
- Select Attach policies directly, and search for the
s3-shuffle-policypolicy. - Select the
s3-shuffle-policypolicy to assign it directly to the user and select Next. - Review the details and select Create user to complete the setup.
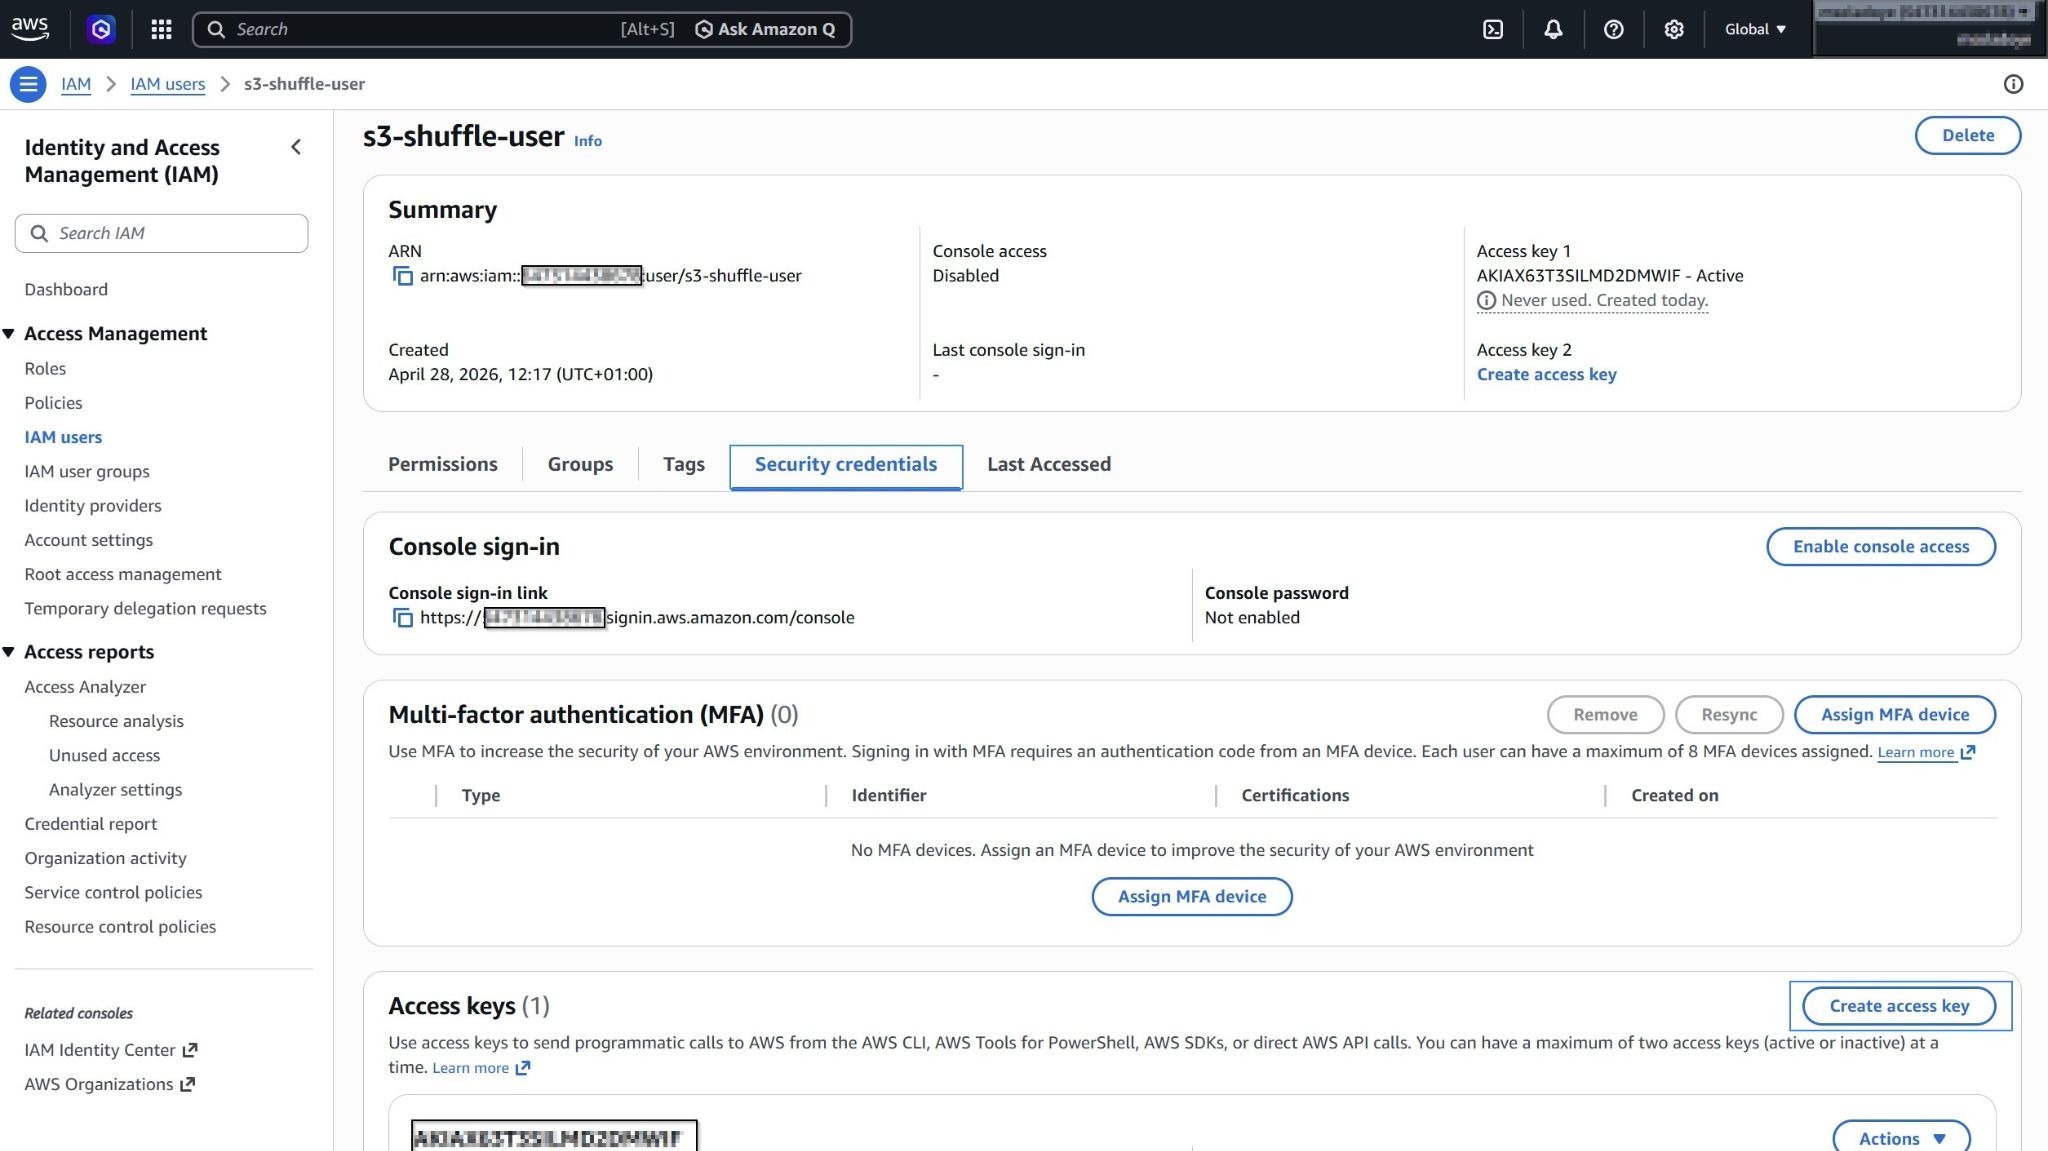
- Select the newly created user, then navigate to Security credentials > Create access key. Choose Command Line Interface (CLI) as the access key type.
- Check I understand the above recommendation and want to proceed to create an access key. Click Next, then click Create access key.
Where:
access_keyis your AWS access key ID used to authenticate API requests.secret_keyis your AWS secret access key used to sign API requests securely.
Note
Save your access_key and secret_key securely, as they will be referenced on Shuffle SOAR.
Configure bucket policy for controlled write access
Perform the following steps to restrict uploads to the evidence bucket and ensure only the automated workflow can write to the secure forensic archive in Amazon S3.
- Go to the search bar at the top left, then type S3, then select S3 from the results. Under General purpose buckets, select the previously created evidence bucket.
- Navigate to Permissions. Select Edit under Bucket policy and add the following policy:
{
"Version": "2012-10-17",
"Statement": [
{
"Sid": "AllowShuffleUserToUpload",
"Effect": "Allow",
"Principal": {
"AWS": "arn:aws:iam::<AWS_ACCOUNT_ID>:user/<AWS_USER>"
},
"Action": "s3:PutObject",
"Resource": "arn:aws:s3:::<AWS_BUCKET_NAME>/*"
},
{
"Sid": "DenyAllExceptShuffleUser",
"Effect": "Deny",
"NotPrincipal": {
"AWS": "arn:aws:iam::<AWS_ACCOUNT_ID>:user/<AWS_USER>"
},
"Action": "s3:PutObject",
"Resource": "arn:aws:s3:::<AWS_BUCKET_NAME>/*"
}
]
}
Replace:
<AWS_ACCOUNT_ID>with your AWS account ID.<AWS_USER>with the IAM user used by Shuffle (e.g.,s3-shuffle-user).<AWS_BUCKET_NAME>with your evidence bucket name.
Note
Only the workflow IAM user is allowed to write to the bucket. Root access is excluded to maintain strict forensic integrity and control.
- Click Save changes to apply the policy.
Shuffle integration
When Wazuh generates an alert with a severity level of 10 or higher, it forwards it to Shuffle via a webhook. This enables automated processing of high-severity events and ensures they are securely archived for forensic use.
In Shuffle, the workflow processes each alert and performs controlled ingestion into Amazon S3. The workflow uses a dedicated IAM user and a restrictive bucket policy, ensuring that only the authorized automation can write to the secure evidence bucket.
The workflow performs the following actions:
- Receives high-severity alerts from Wazuh through a webhook trigger.
- Extracts the full alert payload, preserving all log fields for forensic analysis.
- Stores the alert as an immutable evidence file.
- Uploads the file to the S3 evidence bucket using encrypted storage and restricted write access.
- Verifies evidence bucket integrity by confirming that Block public access is enforced and that Server access logging captures all requests to the encrypted bucket.
- Sends a Slack notification confirming the successful archiving of forensic evidence.
This approach ensures that all high-severity alerts are preserved as immutable evidence, while preventing unauthorized uploads and maintaining full visibility into storage integrity.
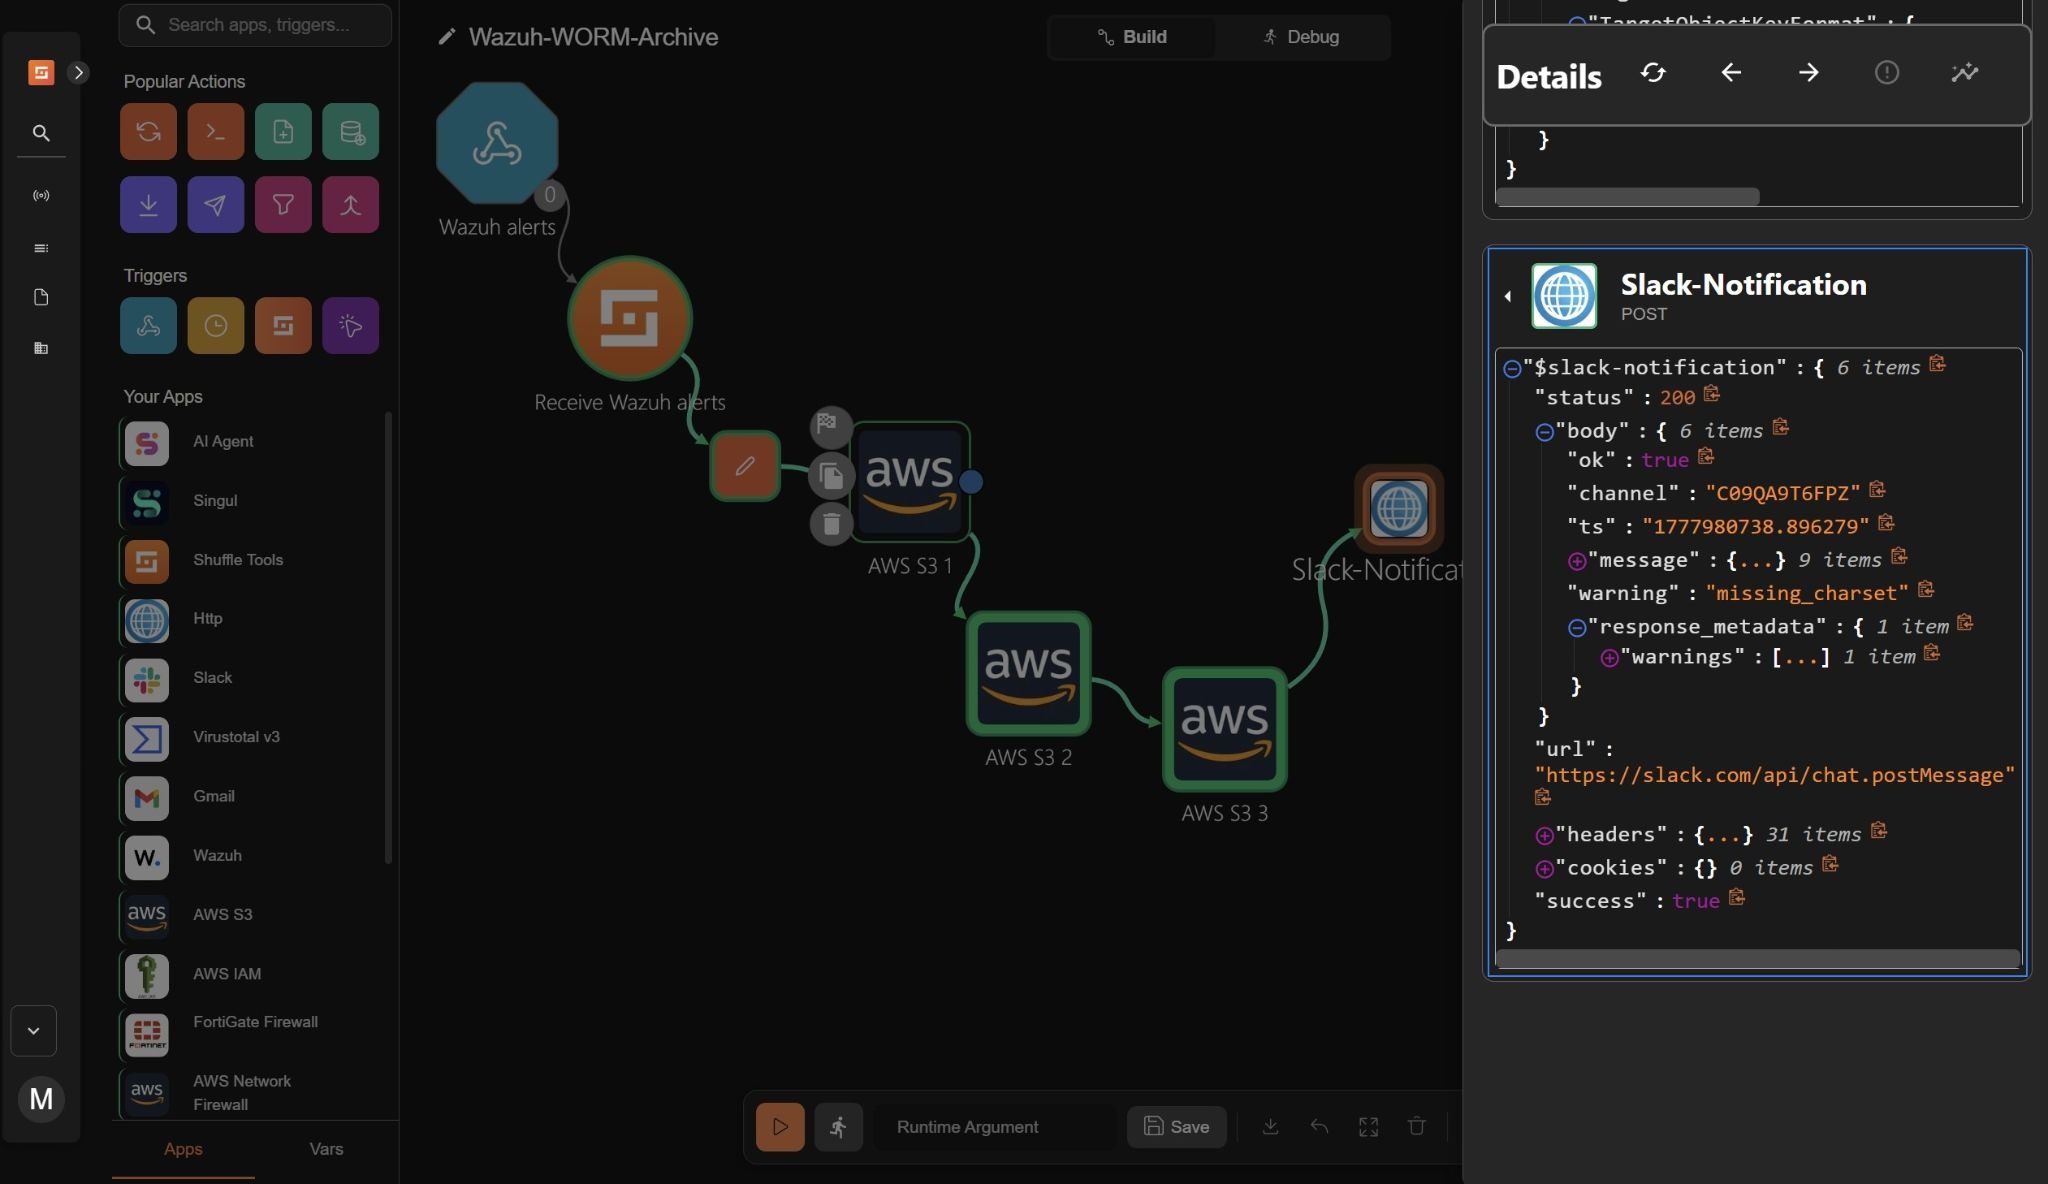
Creating Shuffle workflow
We create a workflow that enforces a secure forensic archive by capturing high-severity Wazuh alerts and storing them as immutable evidence in Amazon S3.
Perform the steps below on the Shuffle dashboard to add the required nodes and create the workflow.
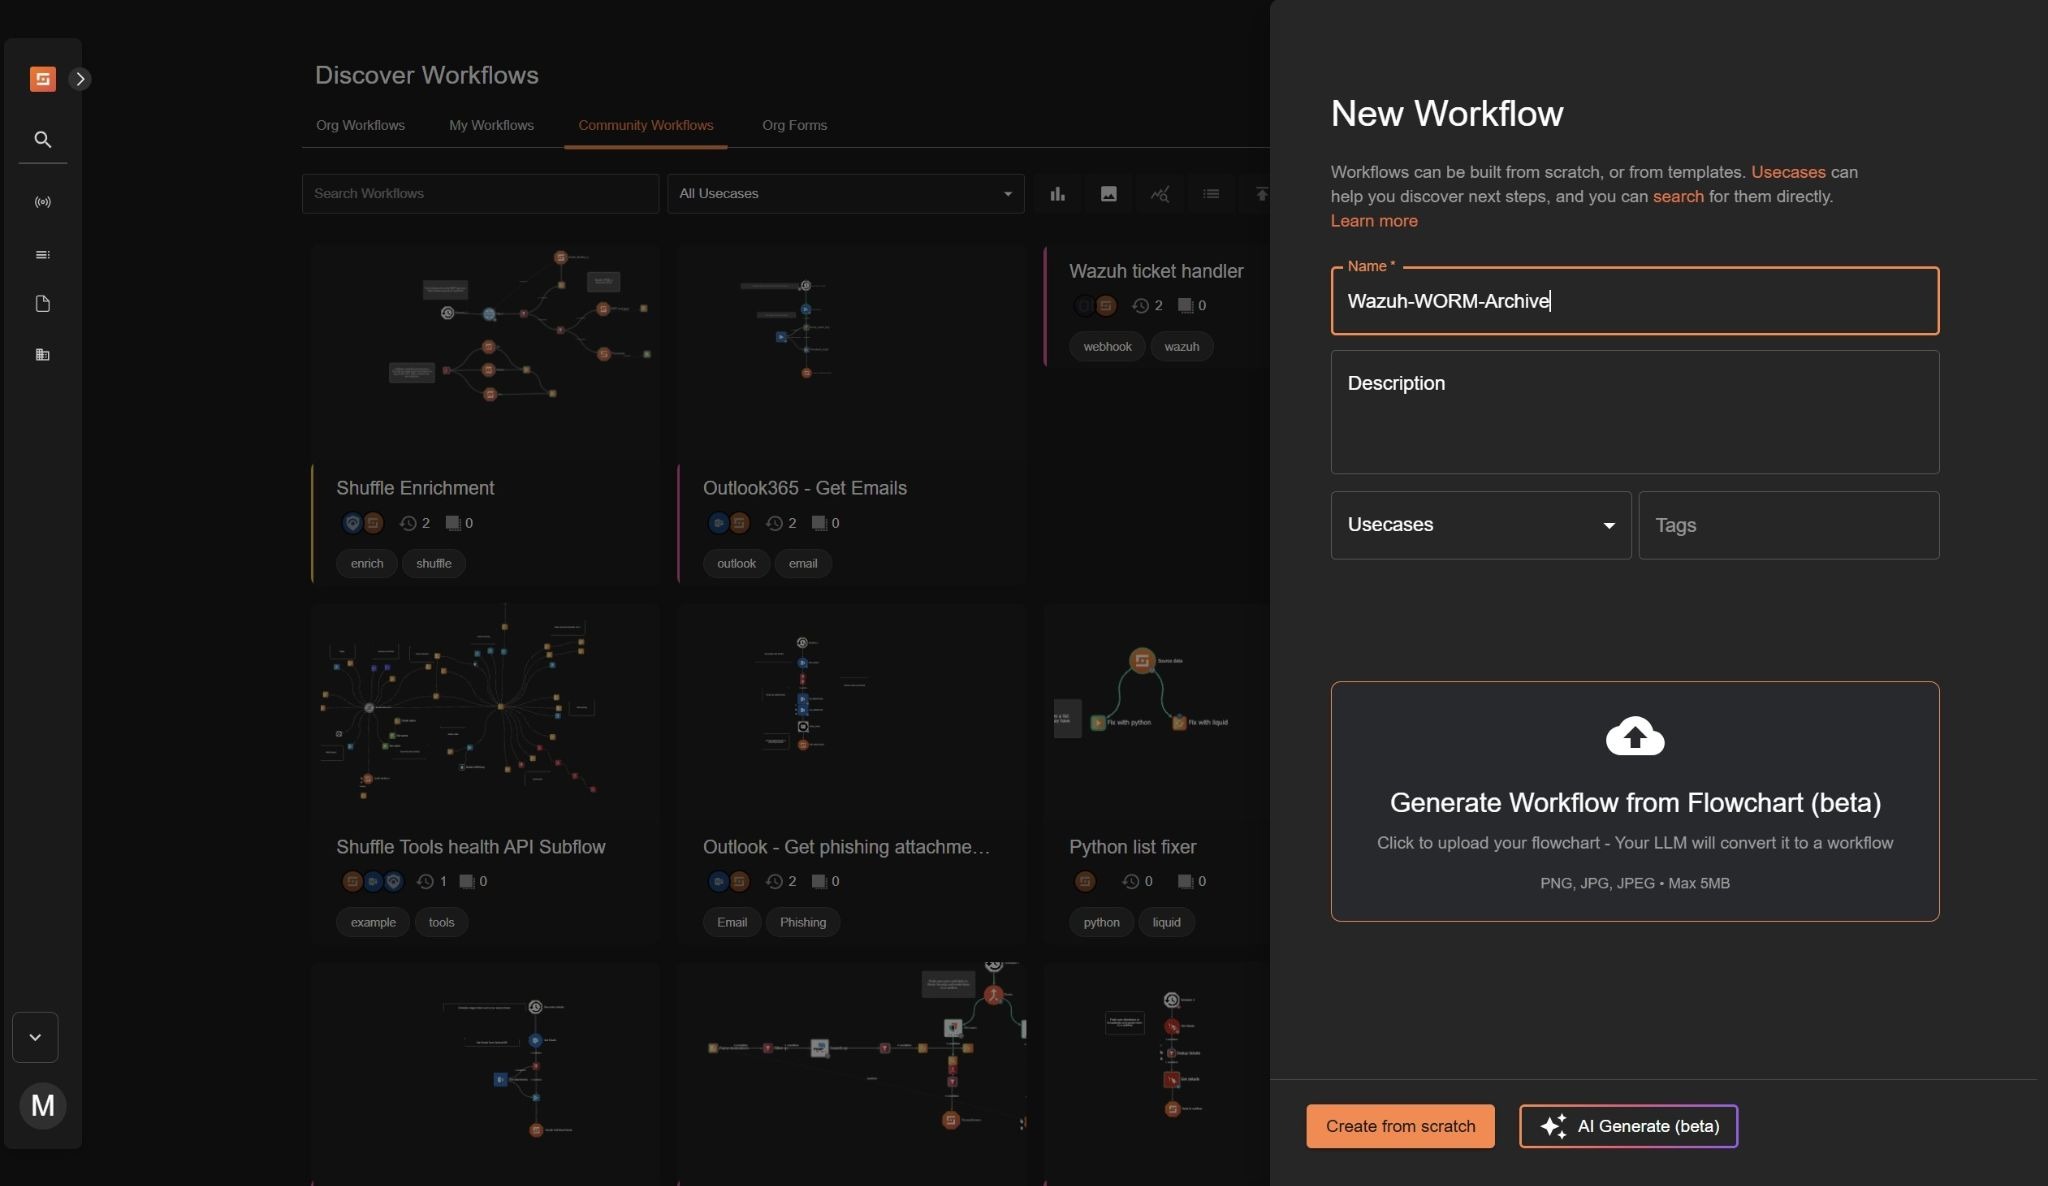
- Navigate to Automate > Workflows and click + Create Workflow. to create a new workflow. Name it as
Wazuh-WORM-Archiveor any name of choice, add an optional description, and click Create from scratch.
- Drag the Webhook node under Triggers to the workspace. The node automatically connects with an existing
Change Menode on the workspace.
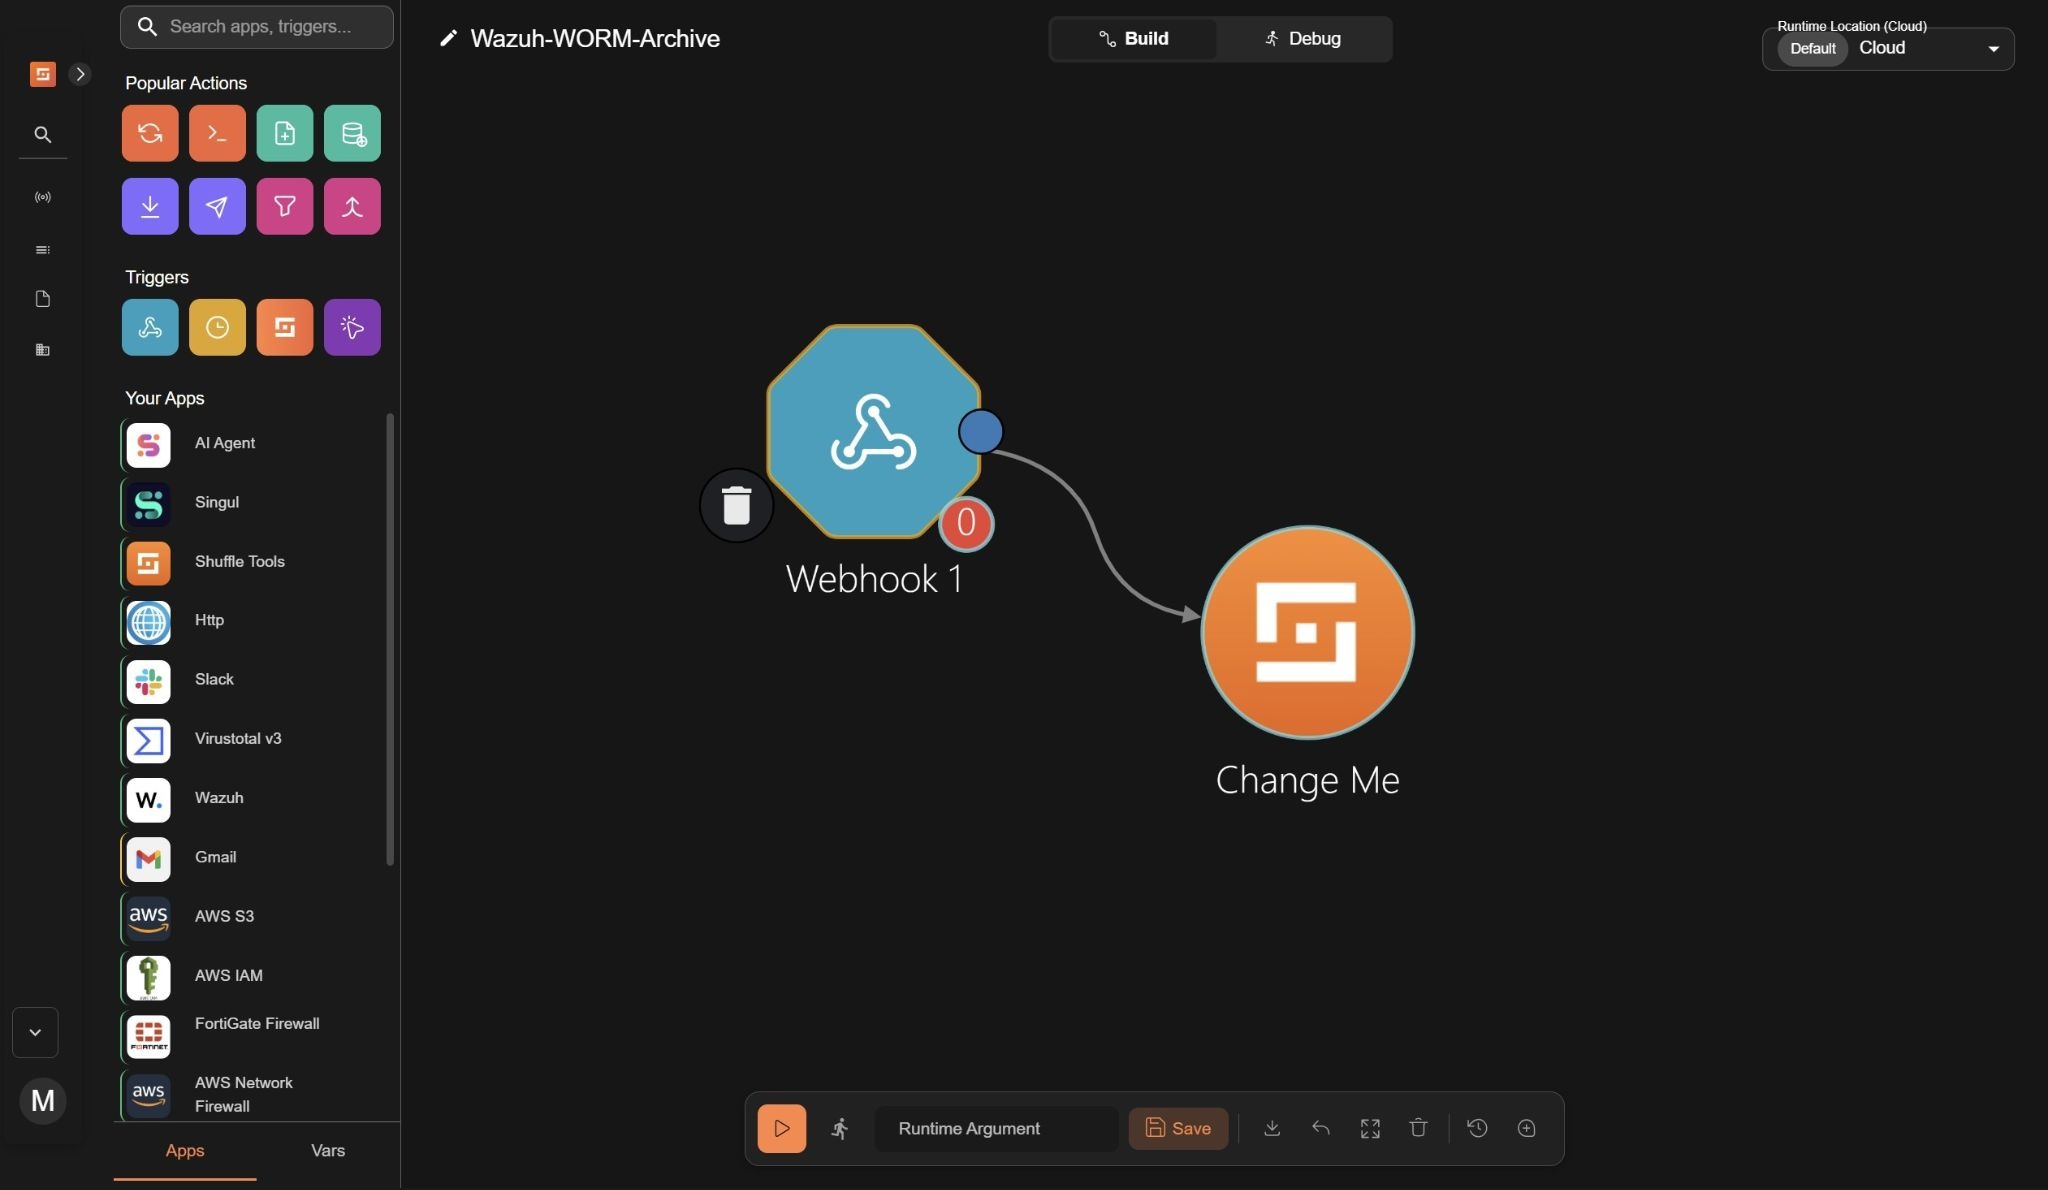
- Click on the
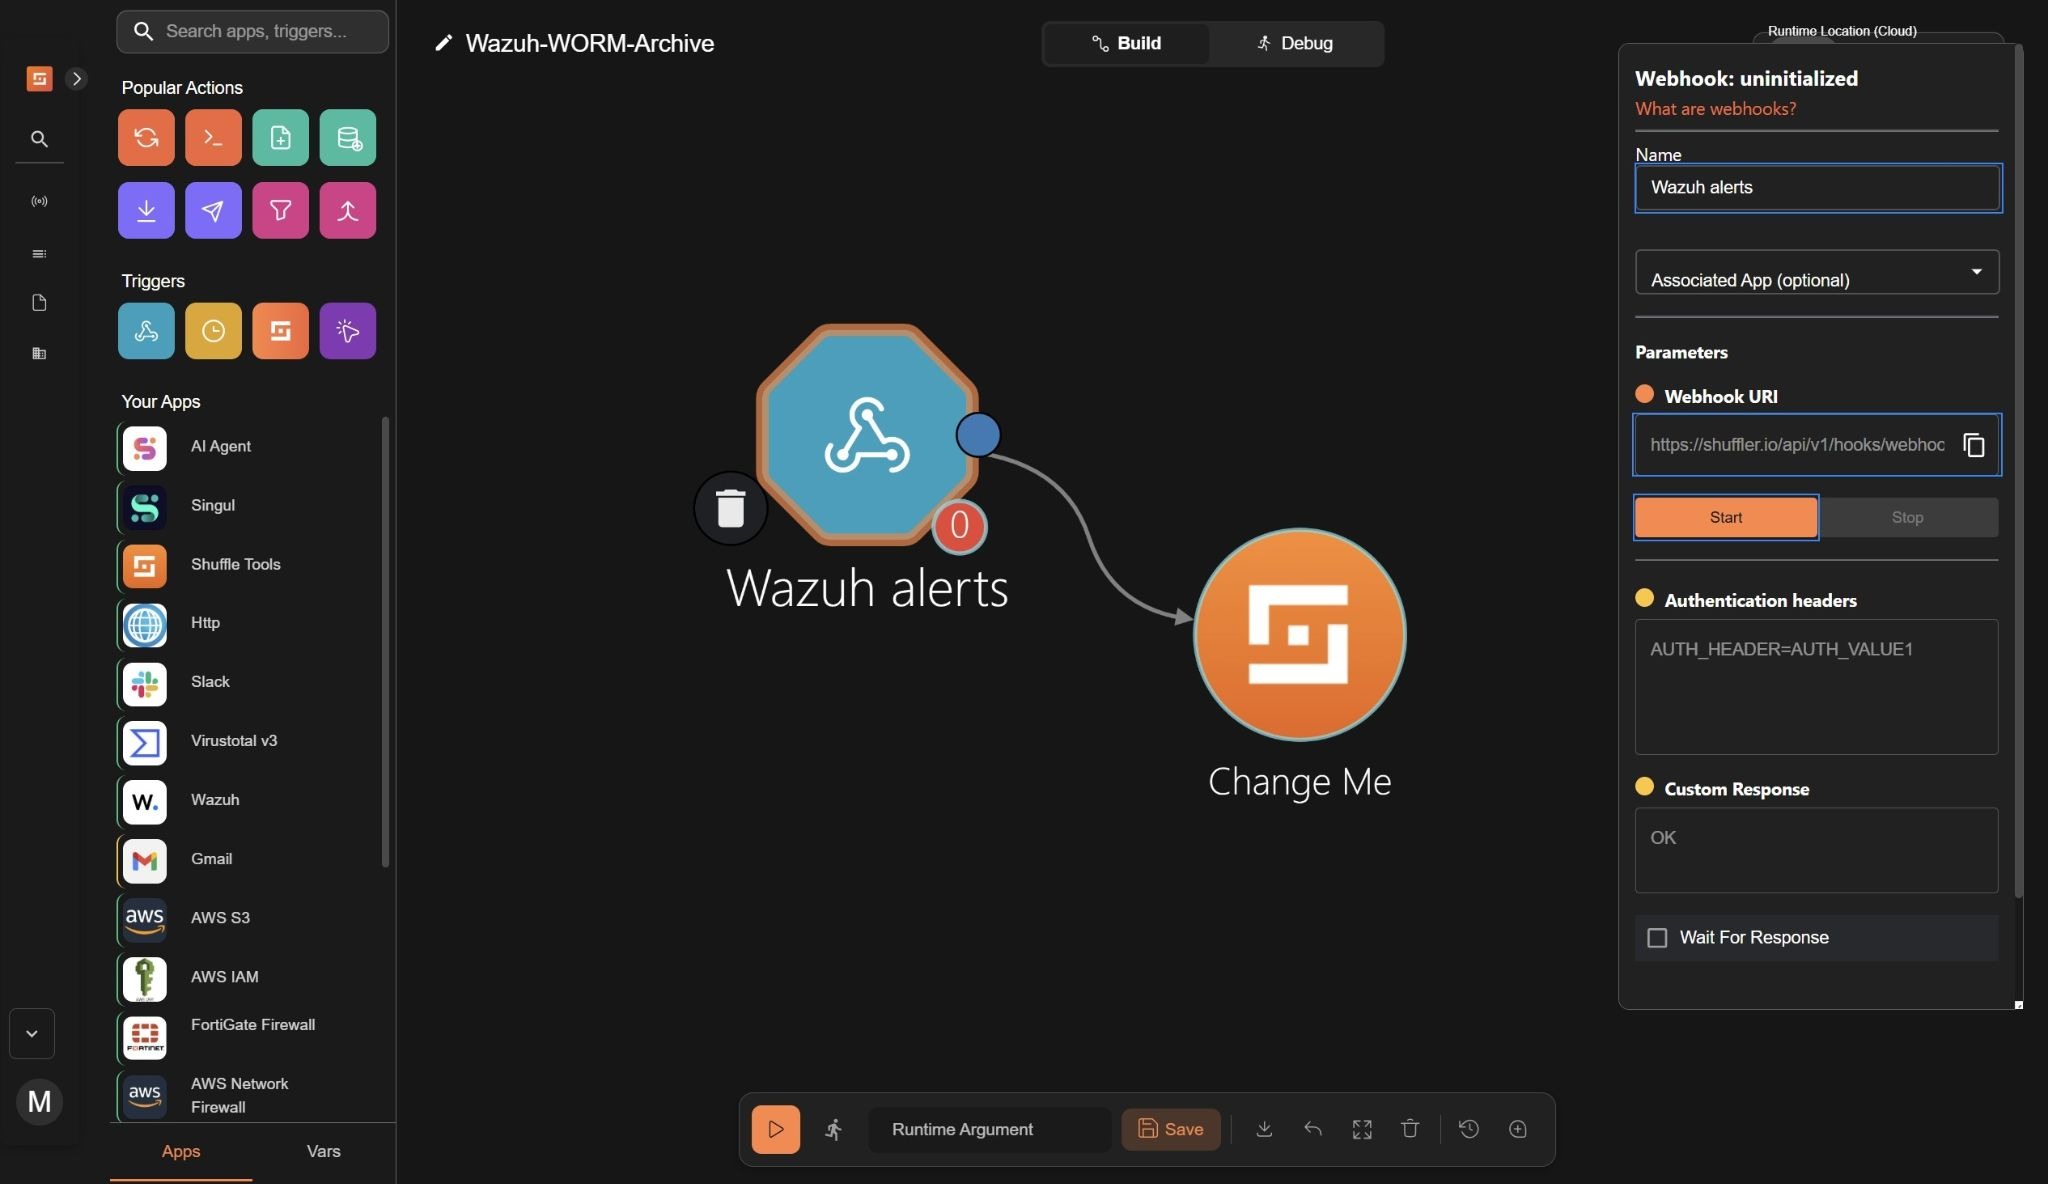
Webhooknode and rename it toWazuh alerts.
- Copy and save the webhook URL to use it when configuring the Wazuh server. The webhook URL looks like
https://shuffler.io/api/v1/hooks/<WEBHOOK>. - Click on Start to run the webhook.
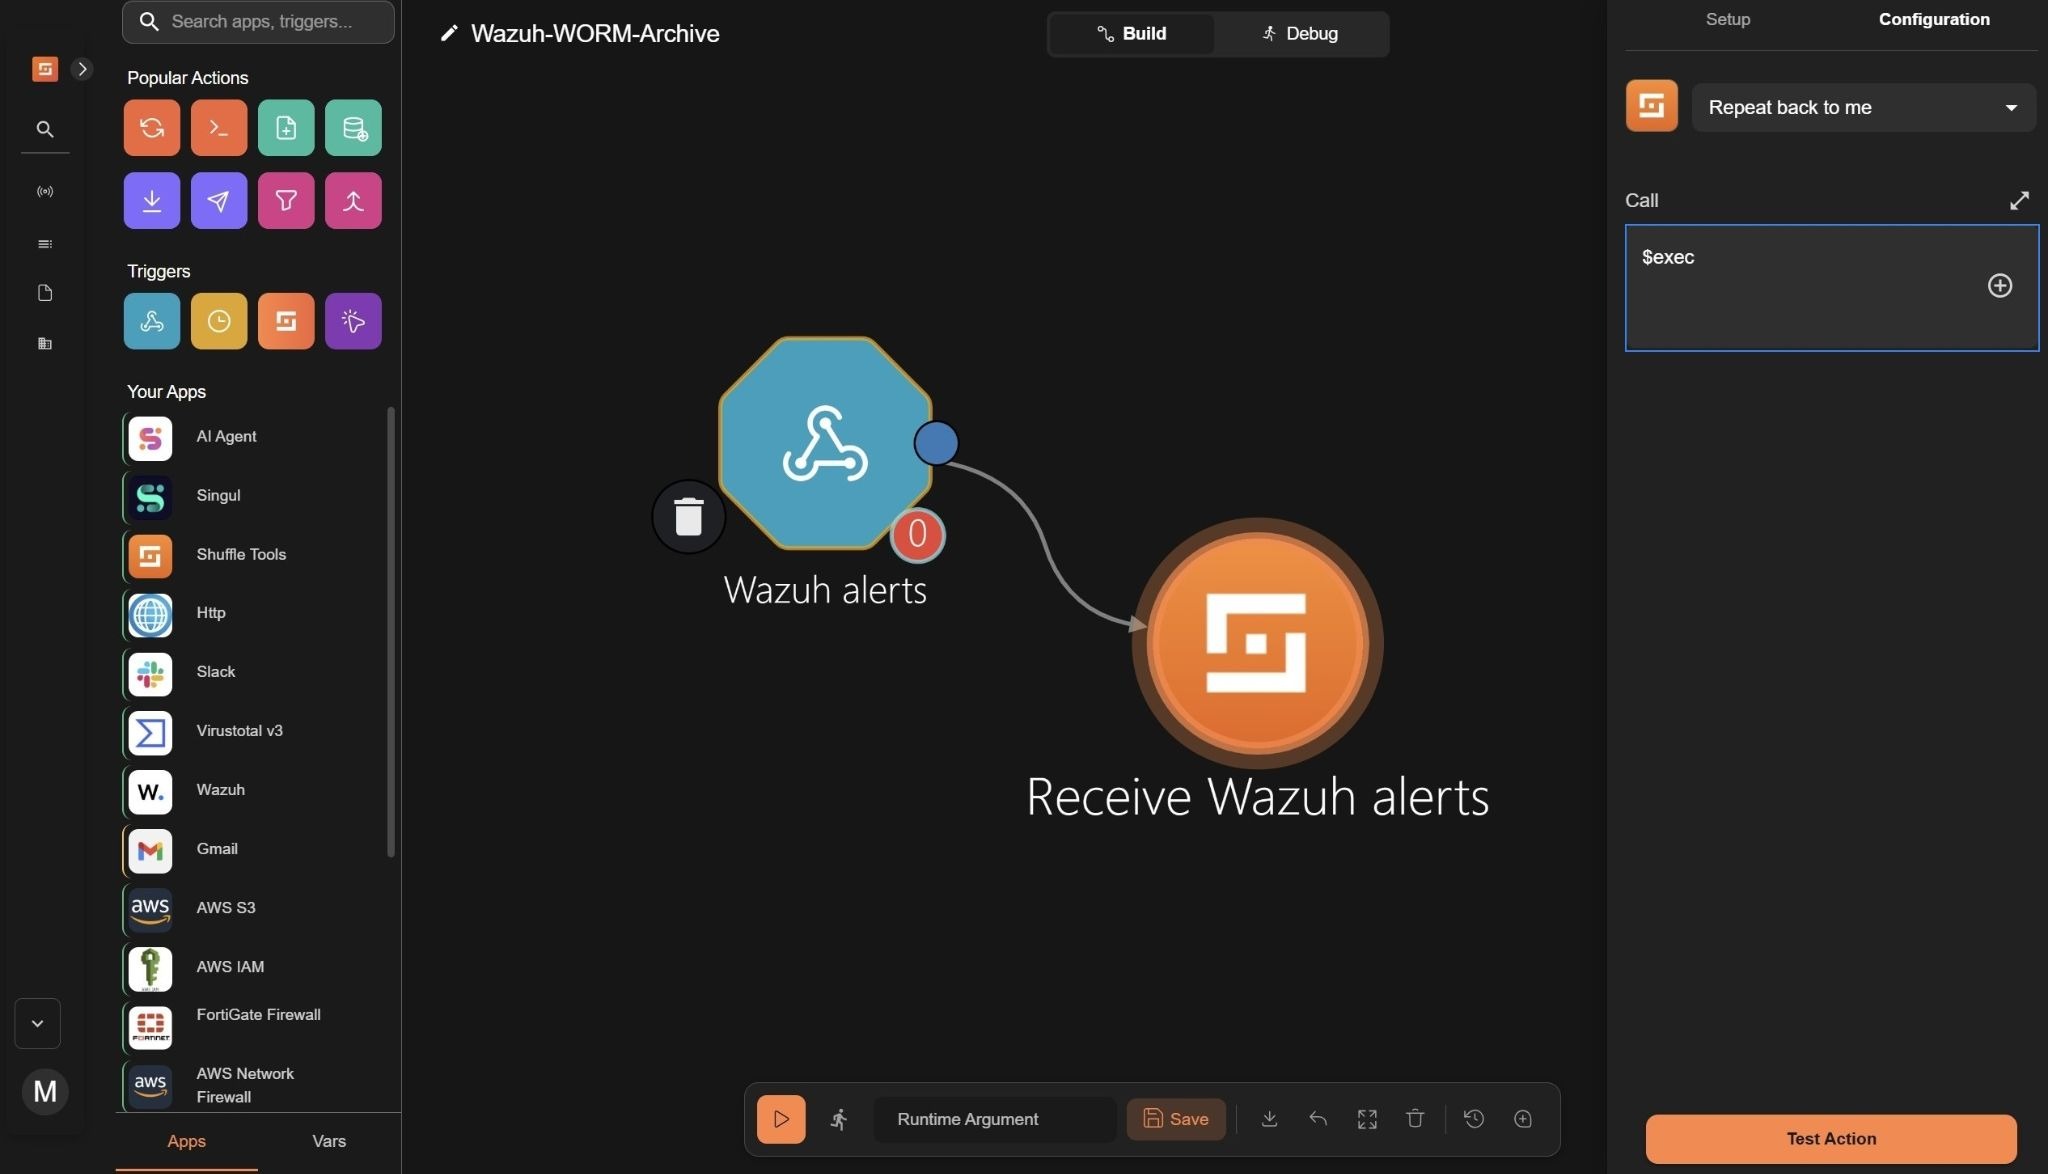
- Click on the Shuffle Tools app named “Change Me”, navigate to Setup and rename it to Receive Wazuh alerts, Select Configuration and set the Call option to
$exec.
File creation
- Drag a Shuffle tools node into the workspace. The node automatically connects with the existing node. Click the node, navigate to Setup, and rename the node to
Fileand set the action to Create File. - Click Configuration and set the following credentials:
- Filename to
$exec.title. This will name each file the title of the Wazuh alert. - Data to
$exec.all_fields. This will capture all contents of the Wazuh alert.
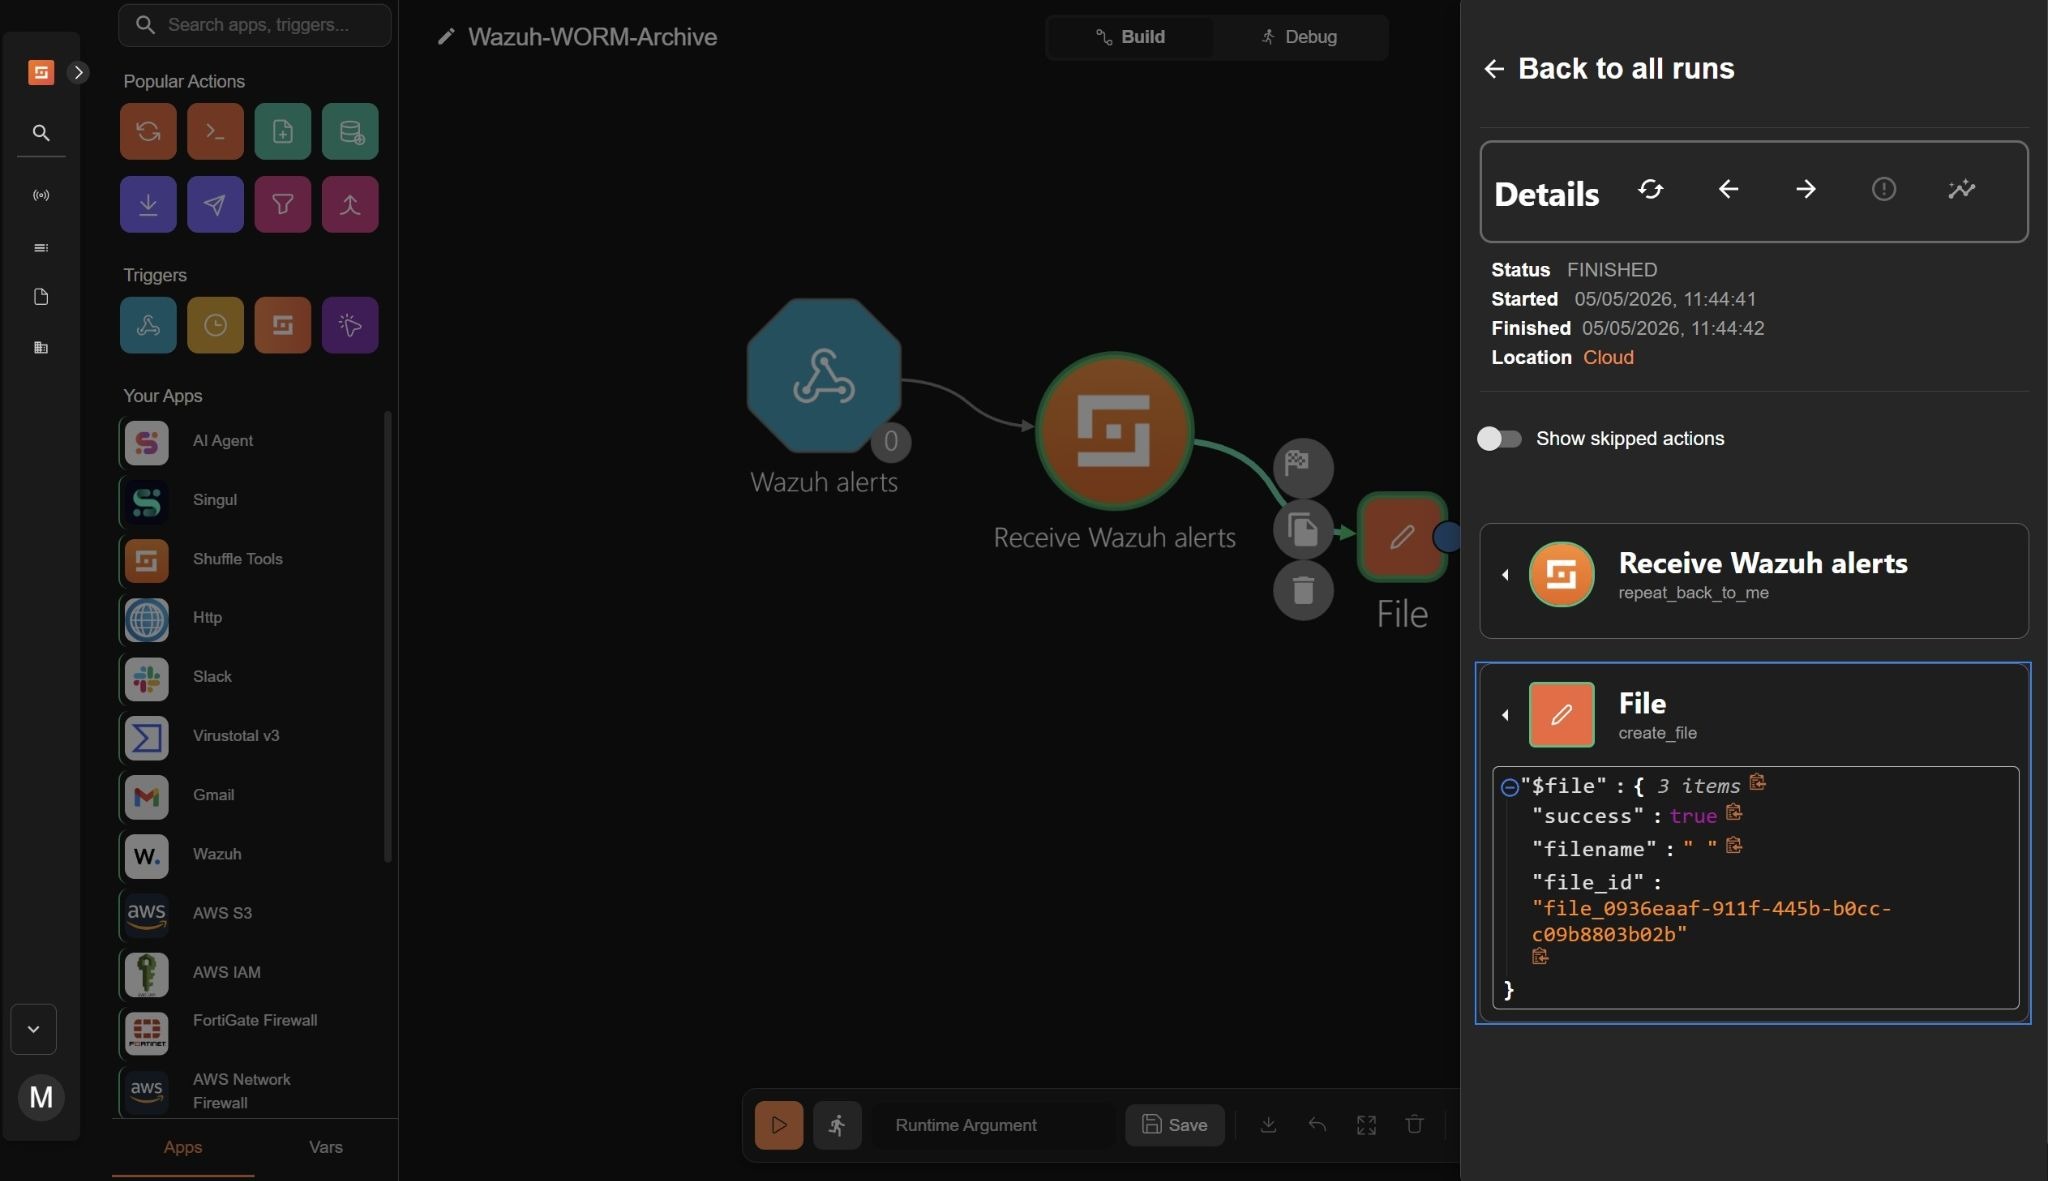
- Trigger the workflow and click Run without runtime argument when prompted. A file is created in Shuffle with a
file_id.
AWS S3 integration
- Drag the AWS S3 node into the workspace, then connect a branch from the File node to the AWS S3 node.
- Click the node, navigate to Setup, and set the action to Upload file to bucket.
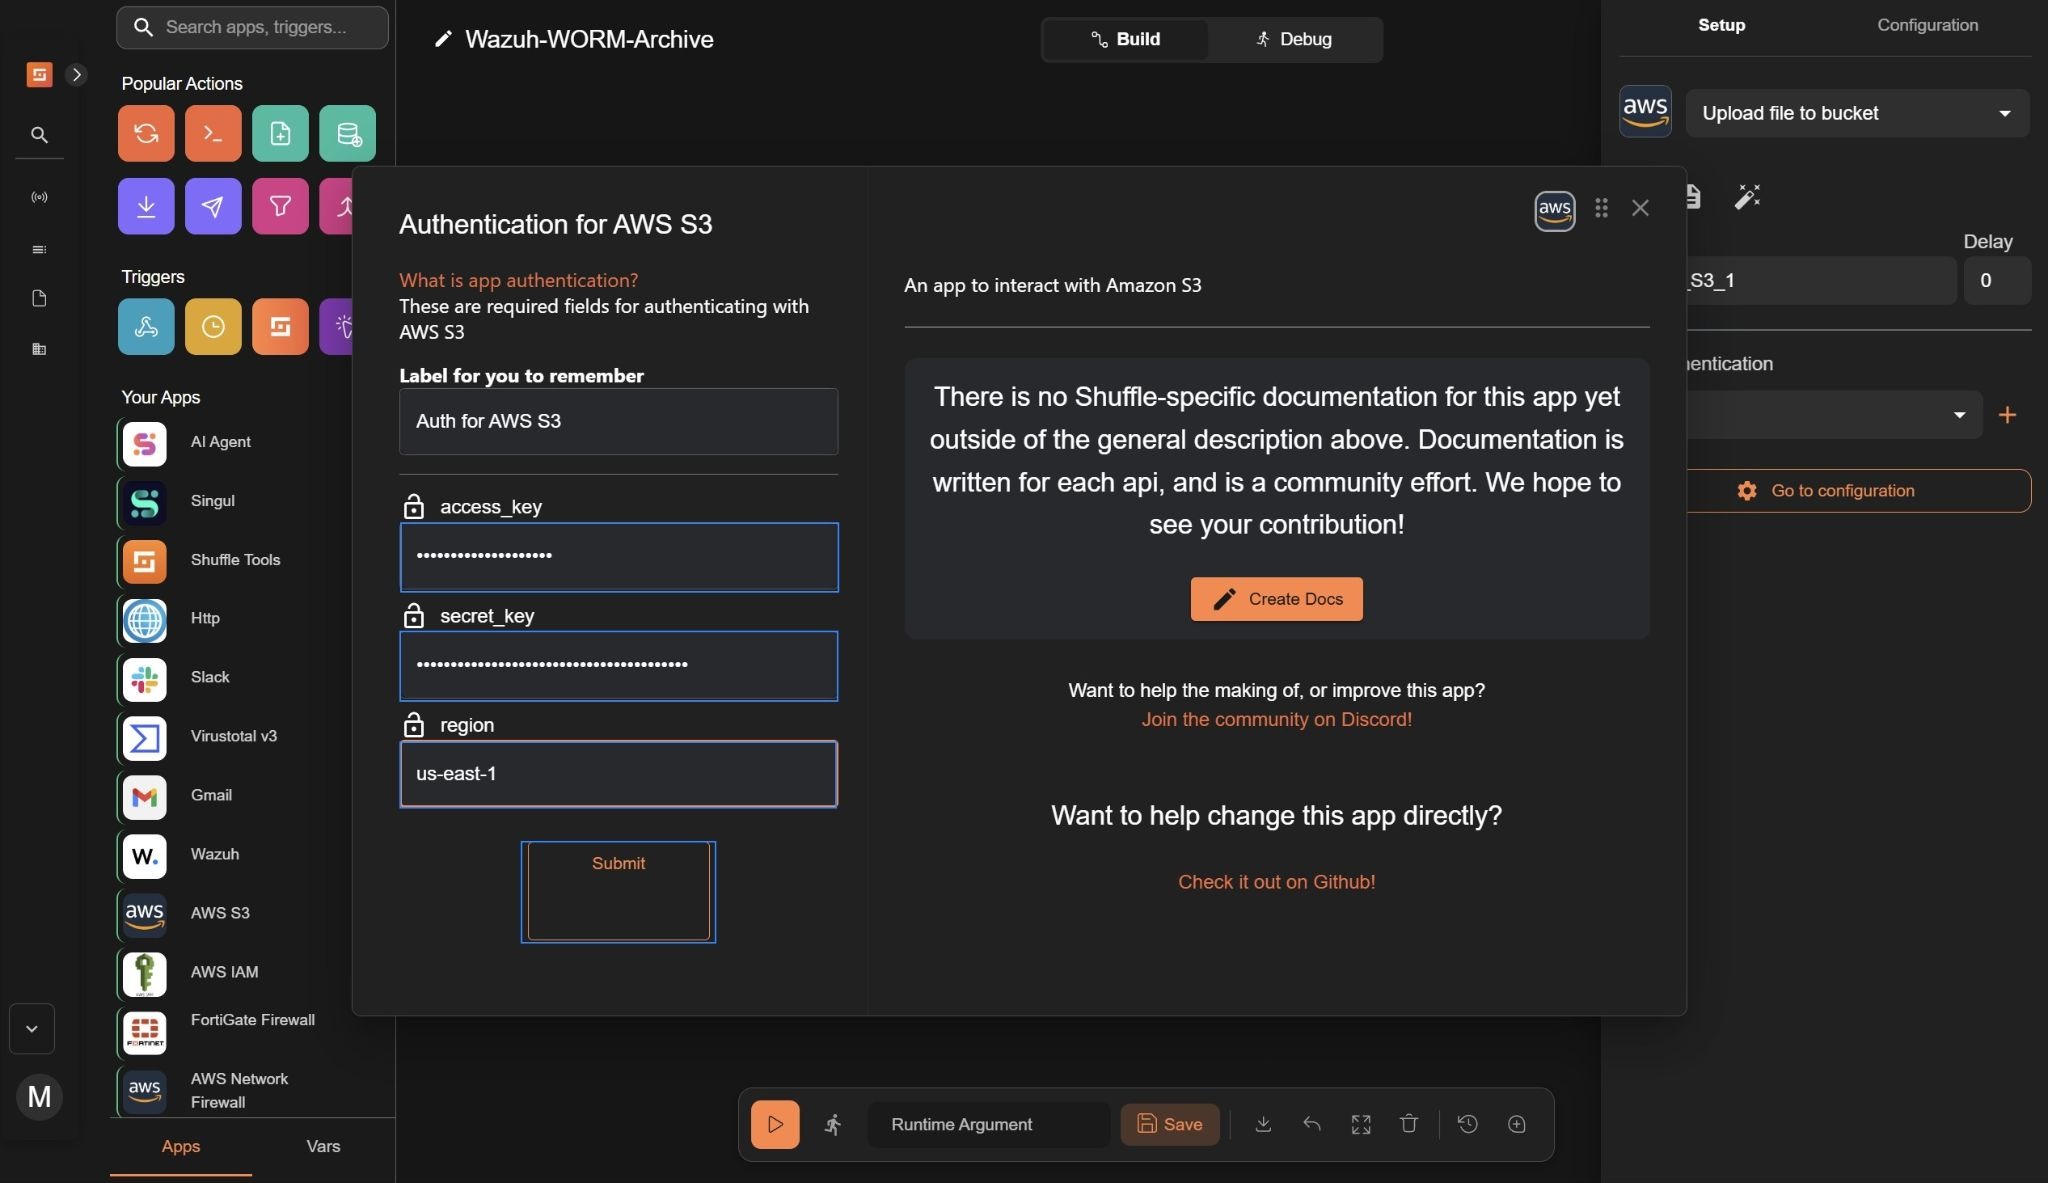
- Navigate to Authentication, click +, and set the following credentials:
- Access key to your AWS
access_keyused to authenticate API requests. - Secret key to your AWS
secret_keyused to sign API requests securely. - Region to the AWS region where your resources are located (e.g.,
us-east-1).
- Click Submit.
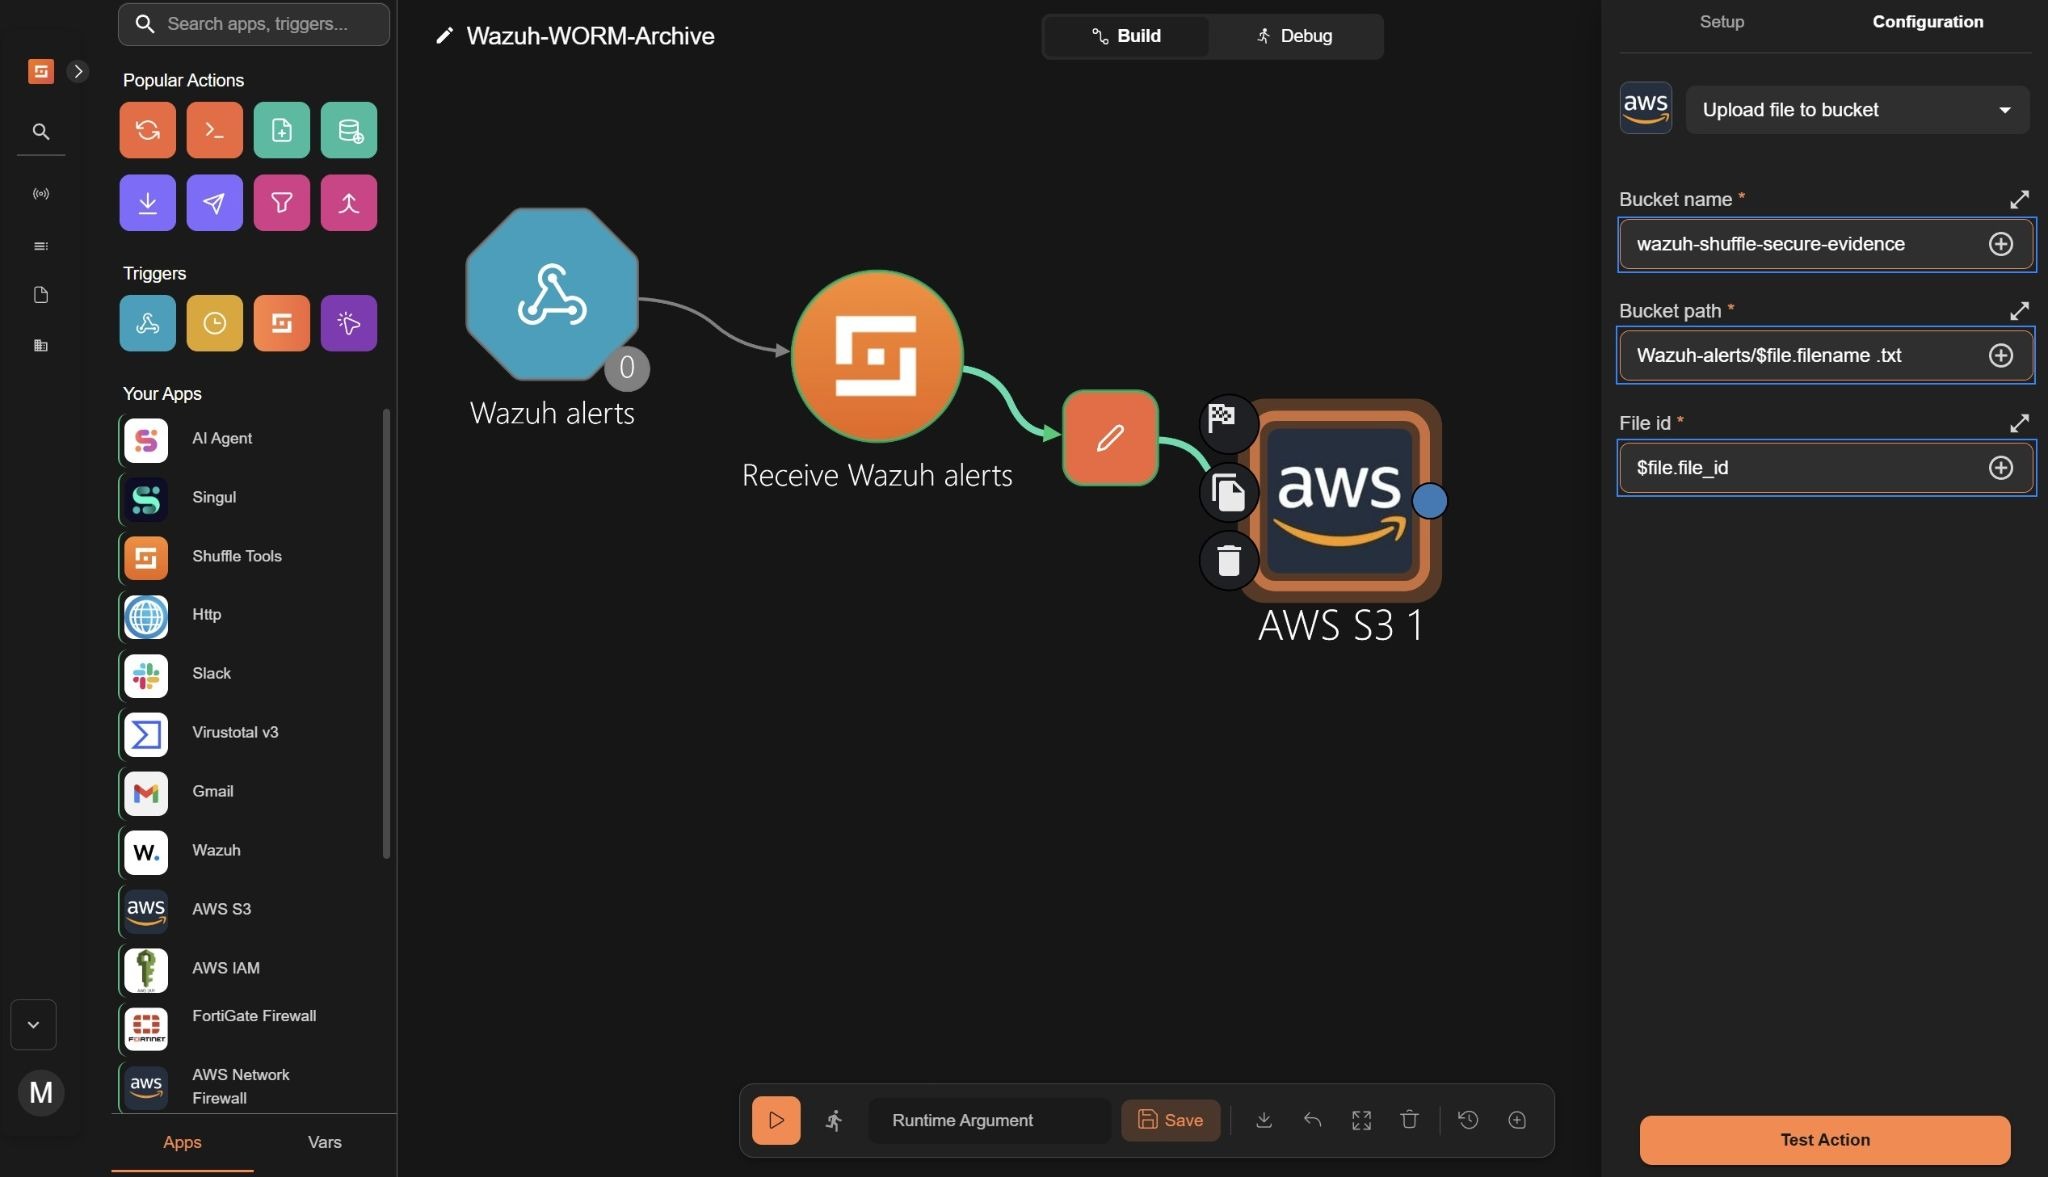
- Click Go to configuration and set the following credentials:
- Bucket name to the S3 created as the evidence bucket(e.g.,
wazuh-shuffle-secure-evidence). This specifies the bucket where the evidence file will be uploaded. - Bucket path to
Wazuh-alerts/$file.filename .txt. This creates a folder namedWazuh-alertsin the S3 bucket and stores each alert as a.txtfile using the generated filename. - File id to
$file.file_id. This assigns a unique identifier to each uploaded evidence file, enabling traceability and reference within the workflow.
- Trigger the workflow and click Run without runtime argument when prompted. Confirm that the action shows
"HTTPStatusCode": 200. This indicates that the alert in the file has been successfully uploaded and stored in the S3 evidence bucket.

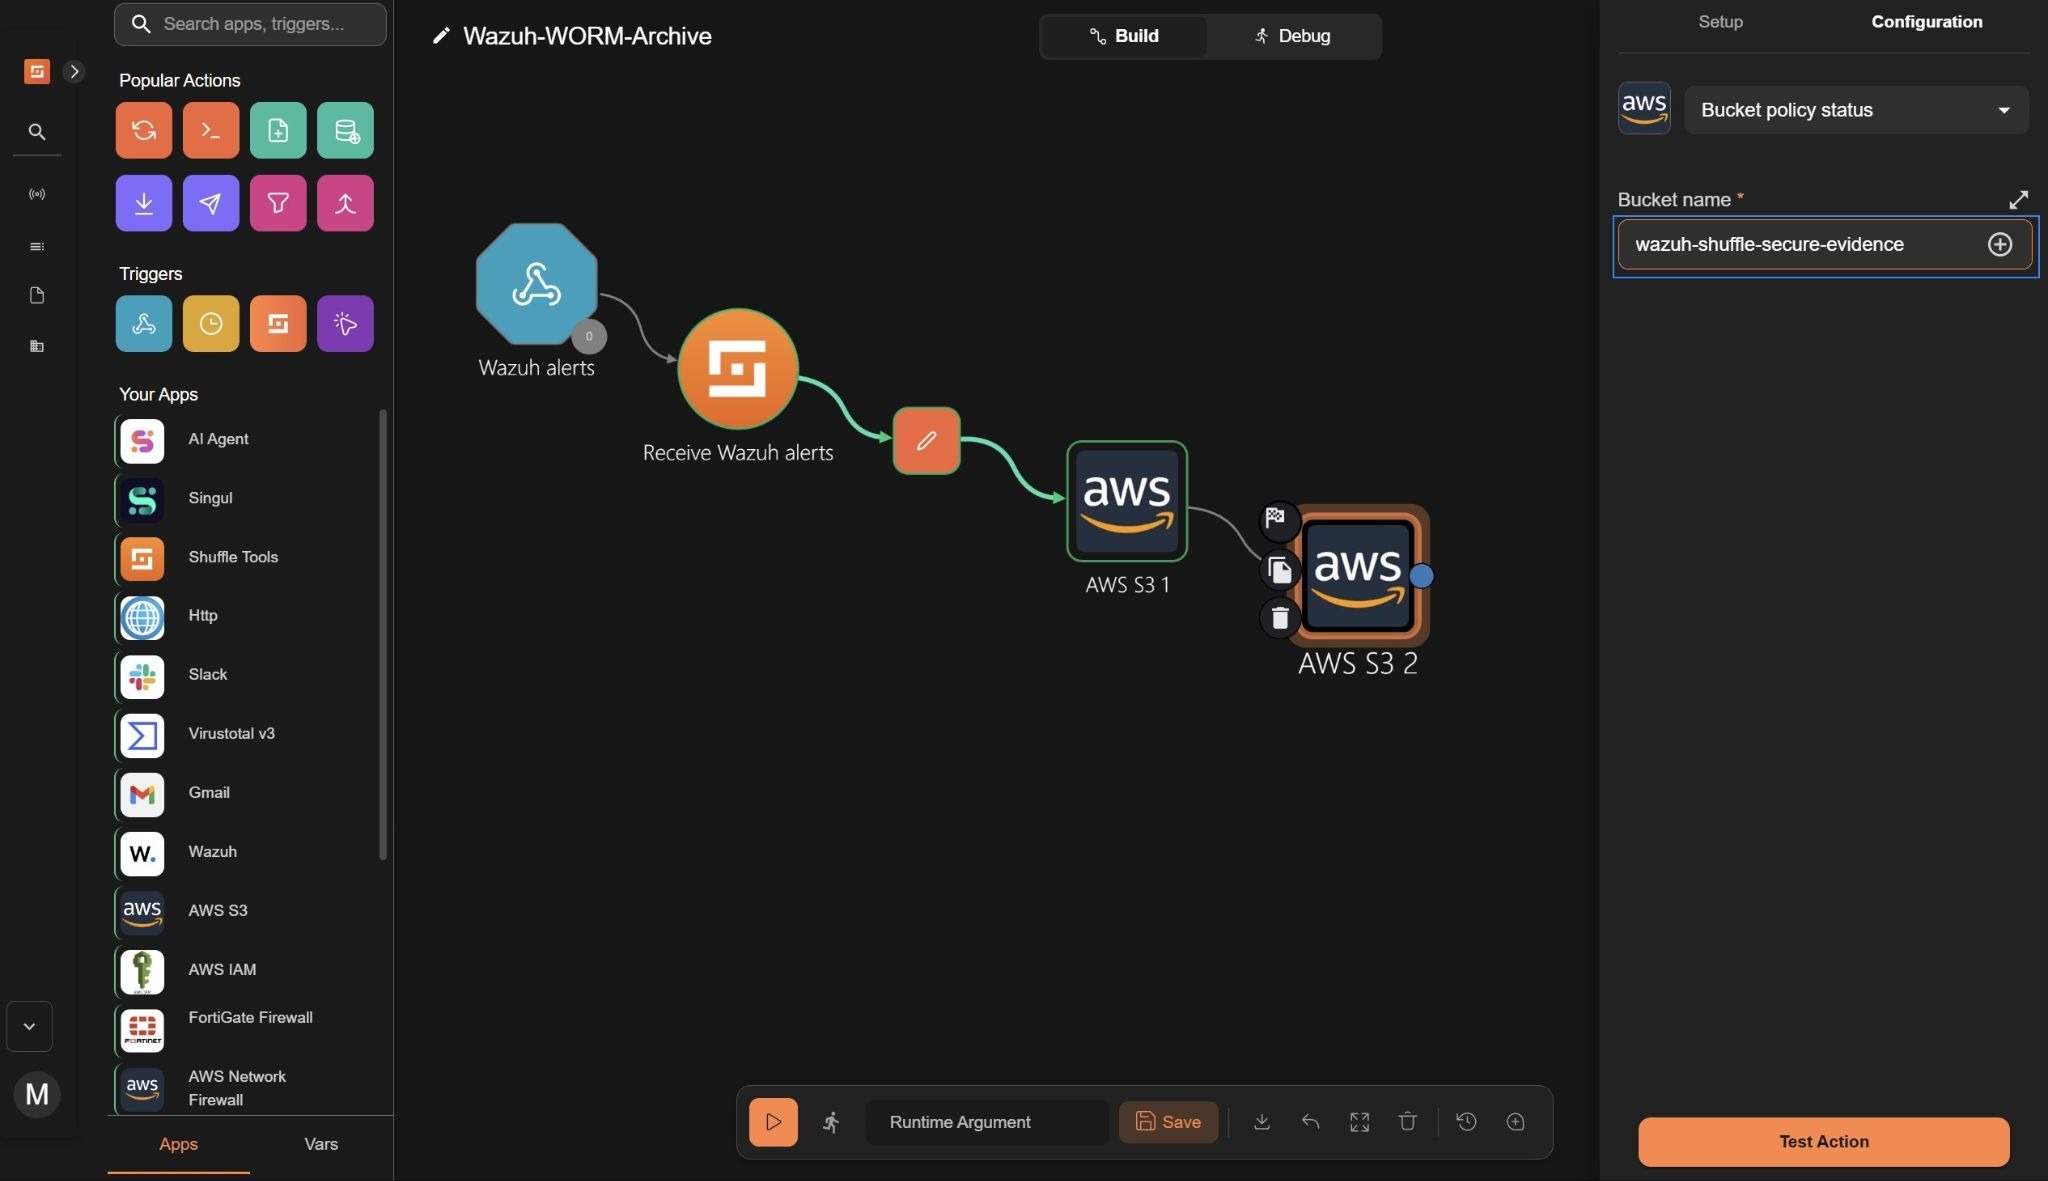
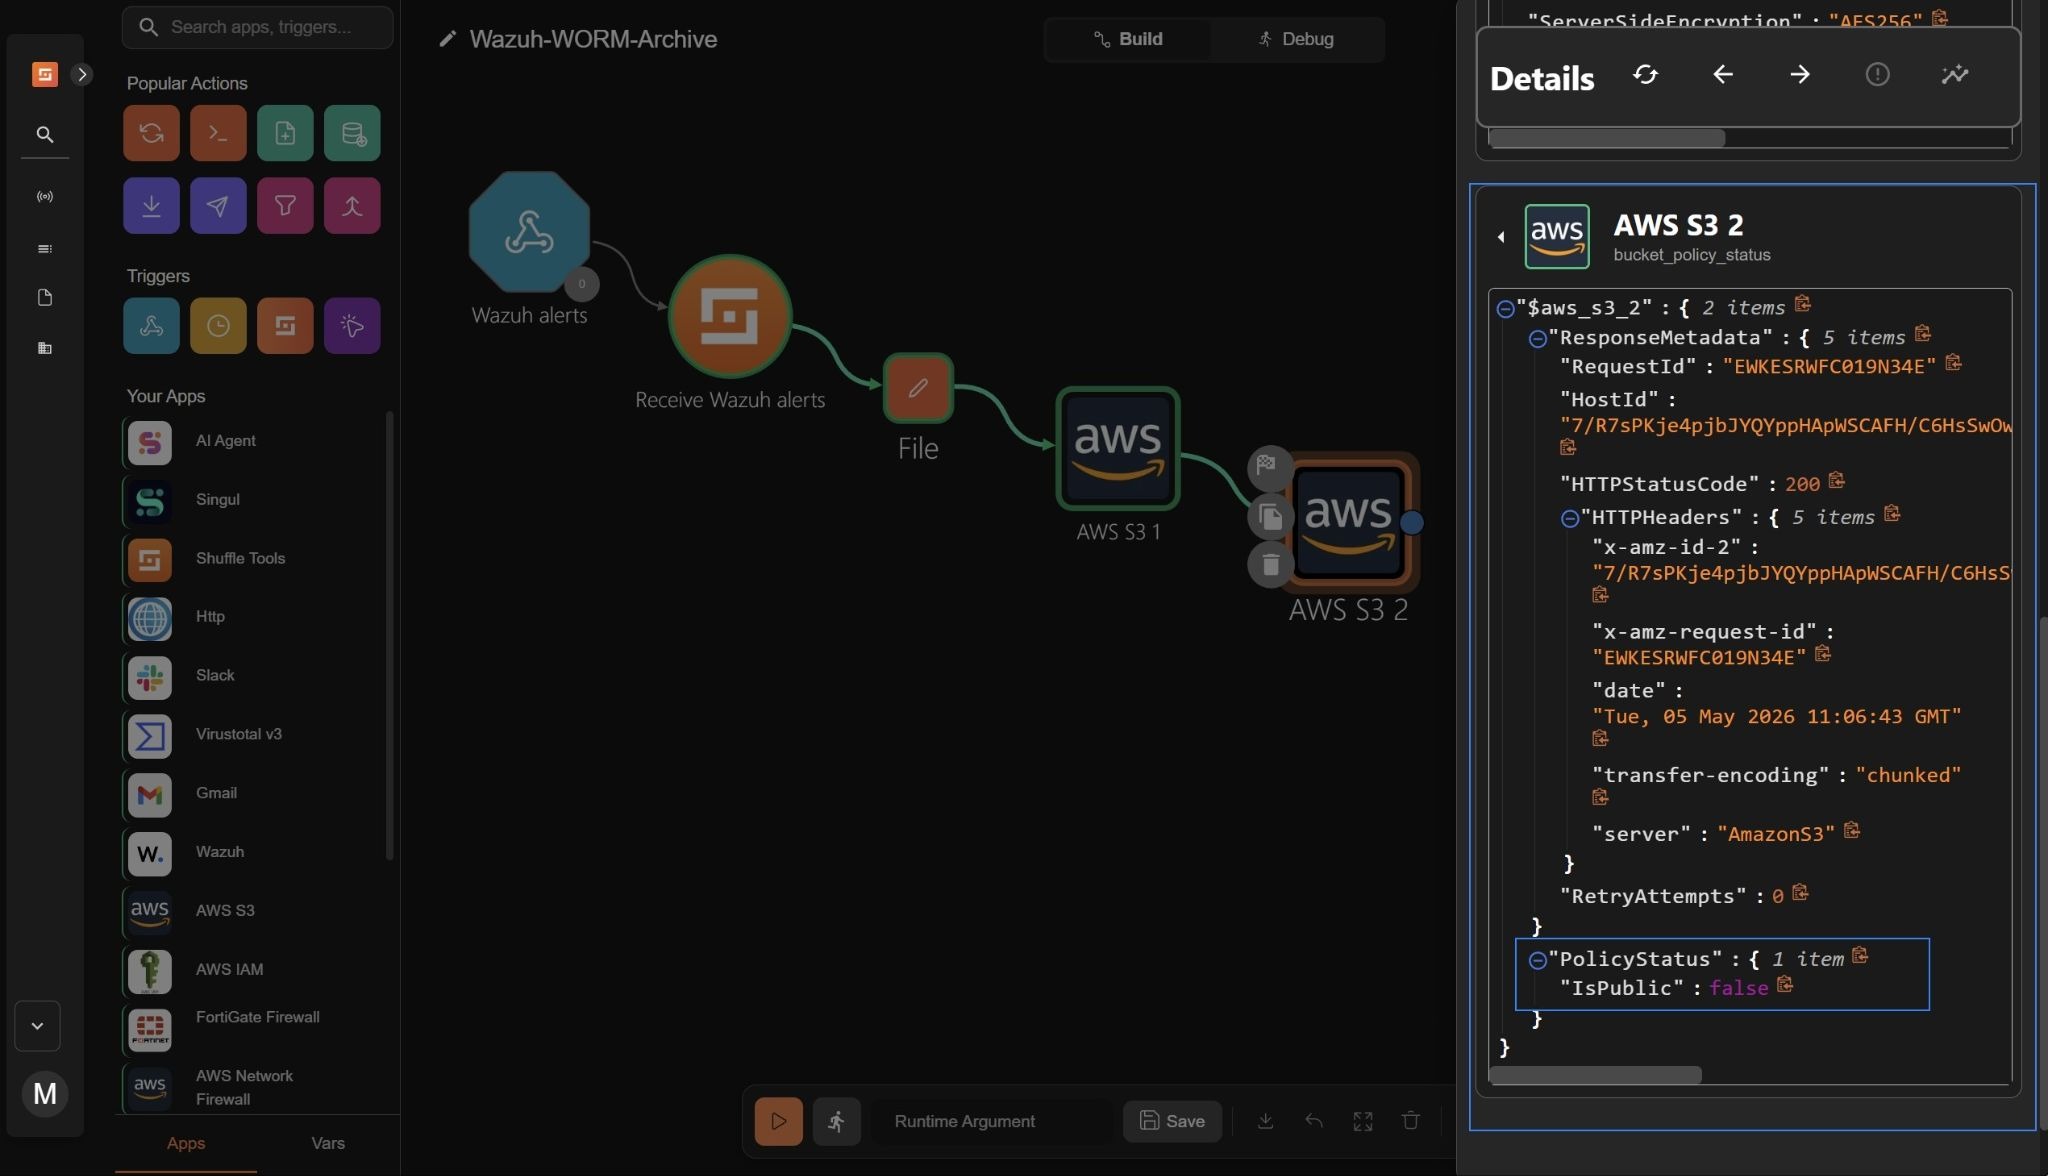
- Drag the AWS S3 node into the workspace, and connect a branch from the AWS S3 1 node to the AWS S3 2 node.
- Click the node, navigate to Setup, and set the action to Bucket policy status
- Navigate to Authentication, click +, and set the following credentials:
- Access key to your AWS
access_keyused to authenticate API requests. - Secret key to your AWS
secret_keyused to sign API requests securely. - Region to the AWS region where your resources are located (e.g.,
us-east-1).
- Click Submit.
- Click Go to configuration and set the following credentials:
- Bucket name to the S3 evidence bucket (e.g.,
wazuh-shuffle-secure-evidence). This checks whether Block Public Access is properly enforced on the bucket.
- Trigger the workflow and click Run without runtime argument when prompted. Confirm that the action shows
"HTTPStatusCode": 200. This indicates that the bucket policy status was successfully checked, confirming that the S3 evidence bucket is publicly accessible.
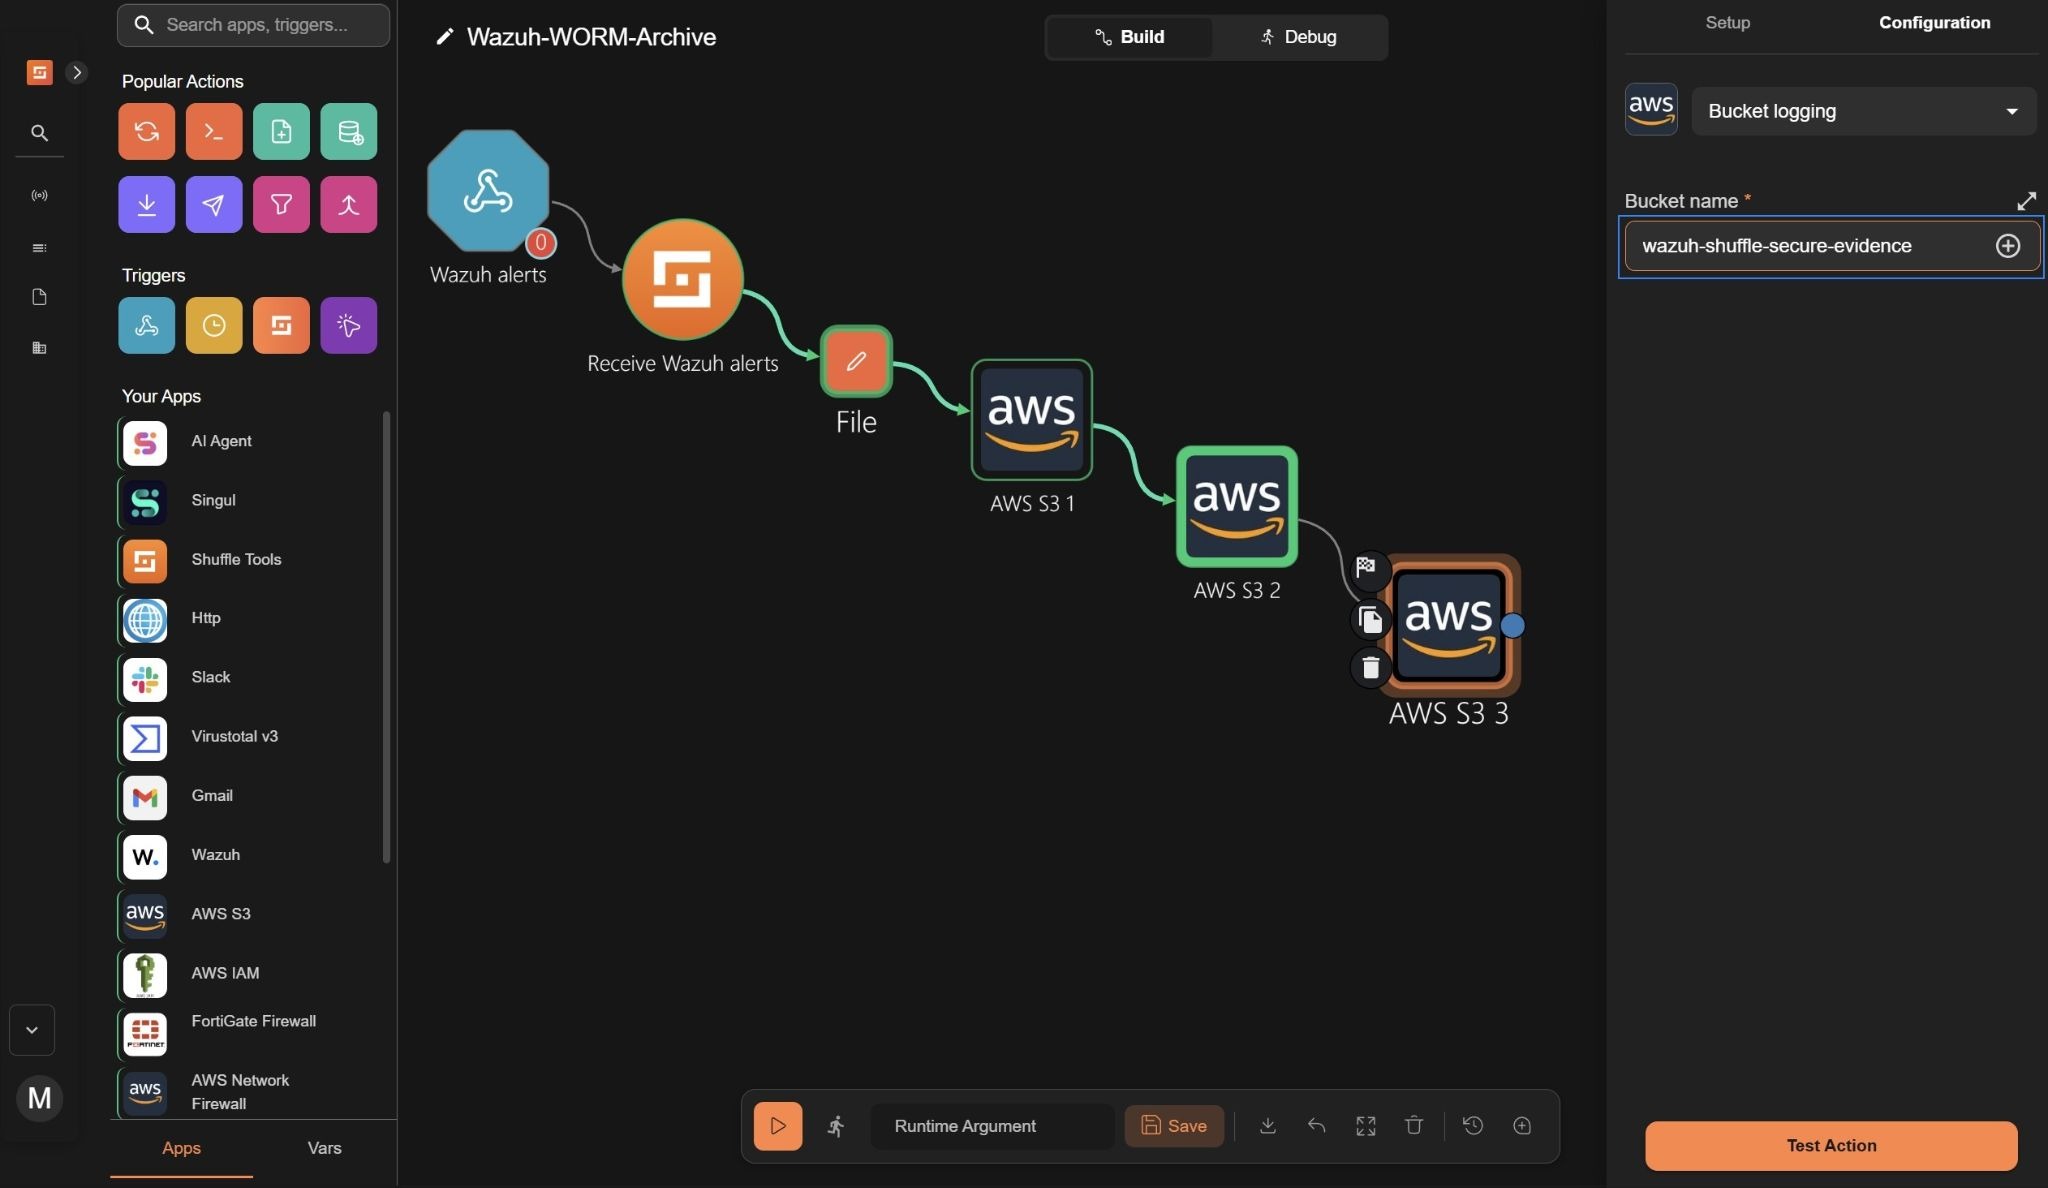
- Drag the AWS S3 node into the workspace, and connect a branch from the AWS S3 2 node to the AWS S3 3 node.
- Click the node, navigate to Setup, and set the action to Bucket logging.
- Navigate to Authentication, click +, and set the following credentials:
- Access key to your AWS
access_keyused to authenticate API requests. - Secret key to your AWS
secret_keyused to sign API requests securely. - Region to the AWS region where your resources are located (e.g.,
us-east-1).
- Click Submit.
- Click Go to configuration and set the following credentials:
- Bucket name to the S3 evidence bucket (e.g.,
wazuh-shuffle-secure-evidence). This verifies that server access logging is enabled to capture all requests made to the evidence bucket.
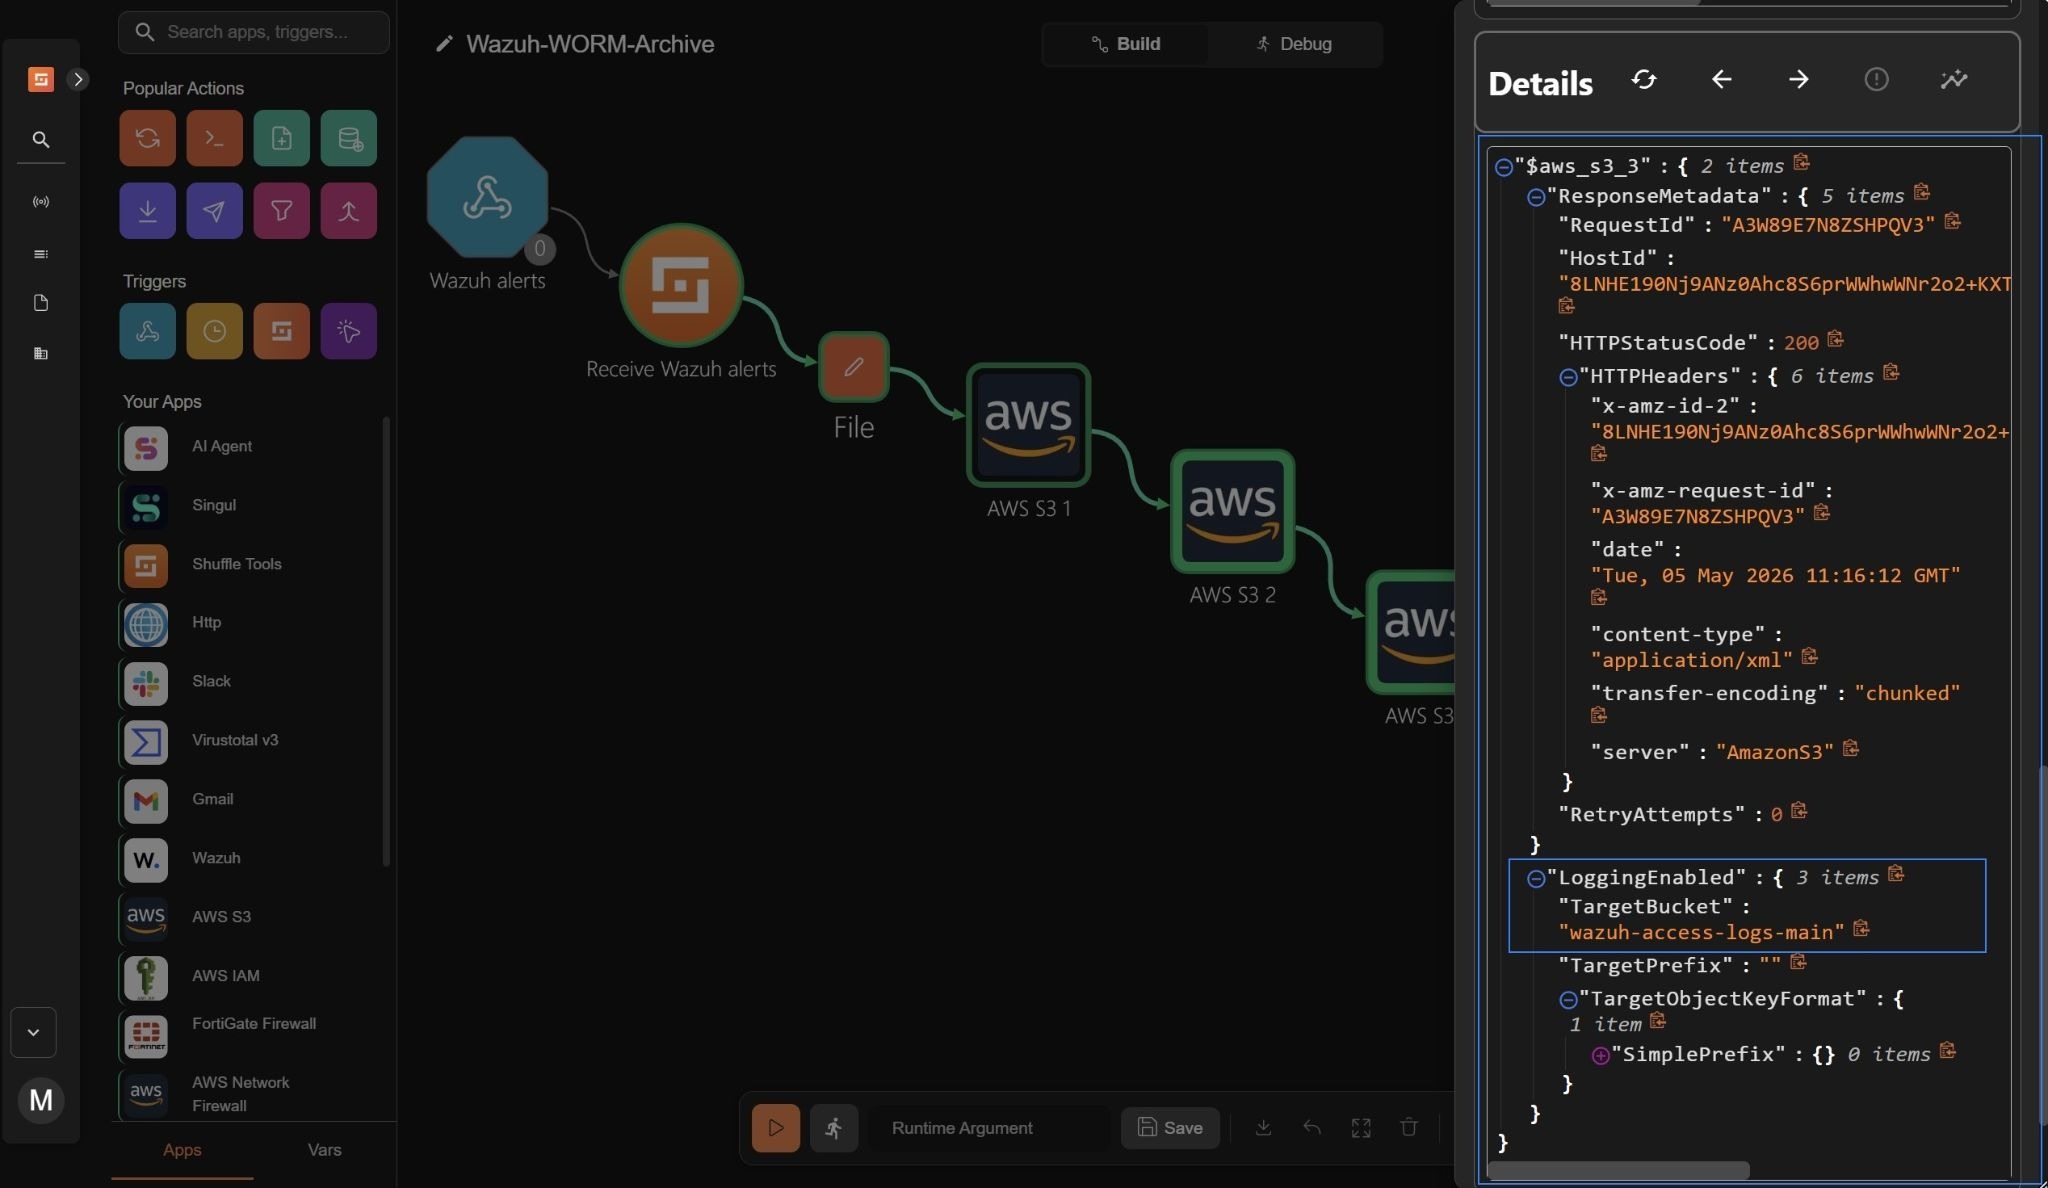
- Trigger the workflow and click Run without runtime argument when prompted. Confirm that the action shows
"HTTPStatusCode": 200. This verifies that server access logging is enabled to capture all requests made to the S3 evidence bucket.
Slack integration
Slack is used to receive notifications from Shuffle, providing a controlled channel for real-time visibility into forensic alert summaries, integrity checks, and evidence archiving status.
Slack web interface
Perform the following steps in Slack to create a Slack channel and a Shuffle alert bot app for integration with Shuffle.
- Go to the left-side menu and click Channels> Create > Create channel. Name the channel as shuffle-alerts and click Create.
- Navigate to Slack API: Applications to create the Slack app bot. Click Create an app > From scratch. Name the app “Shuffle Alert Bot” and pick a workspace to develop it in.
- Select Create App to finalize the Slack app’s creation.
- In the Slack API dashboard, go to Features > OAuth & permissions.
- Navigate to Scopes and click Add an OAuth Scope. Add the following scopes:
chat:write
channels:read
users:read
- Navigate to the OAuth Tokens subsection and click Install to Workspace. Click Allow to approve the installation.
- Copy the Bot User OAuth Token (it starts with
xoxb-). Save it in a secure note. - Right-click on the new channel in Slack, select View channel details > Integrations, click Add an app, and select your Shuffle Alert Bot.
Shuffle Slack node
Perform the following steps in the Shuffle workspace to add and configure the Slack node.
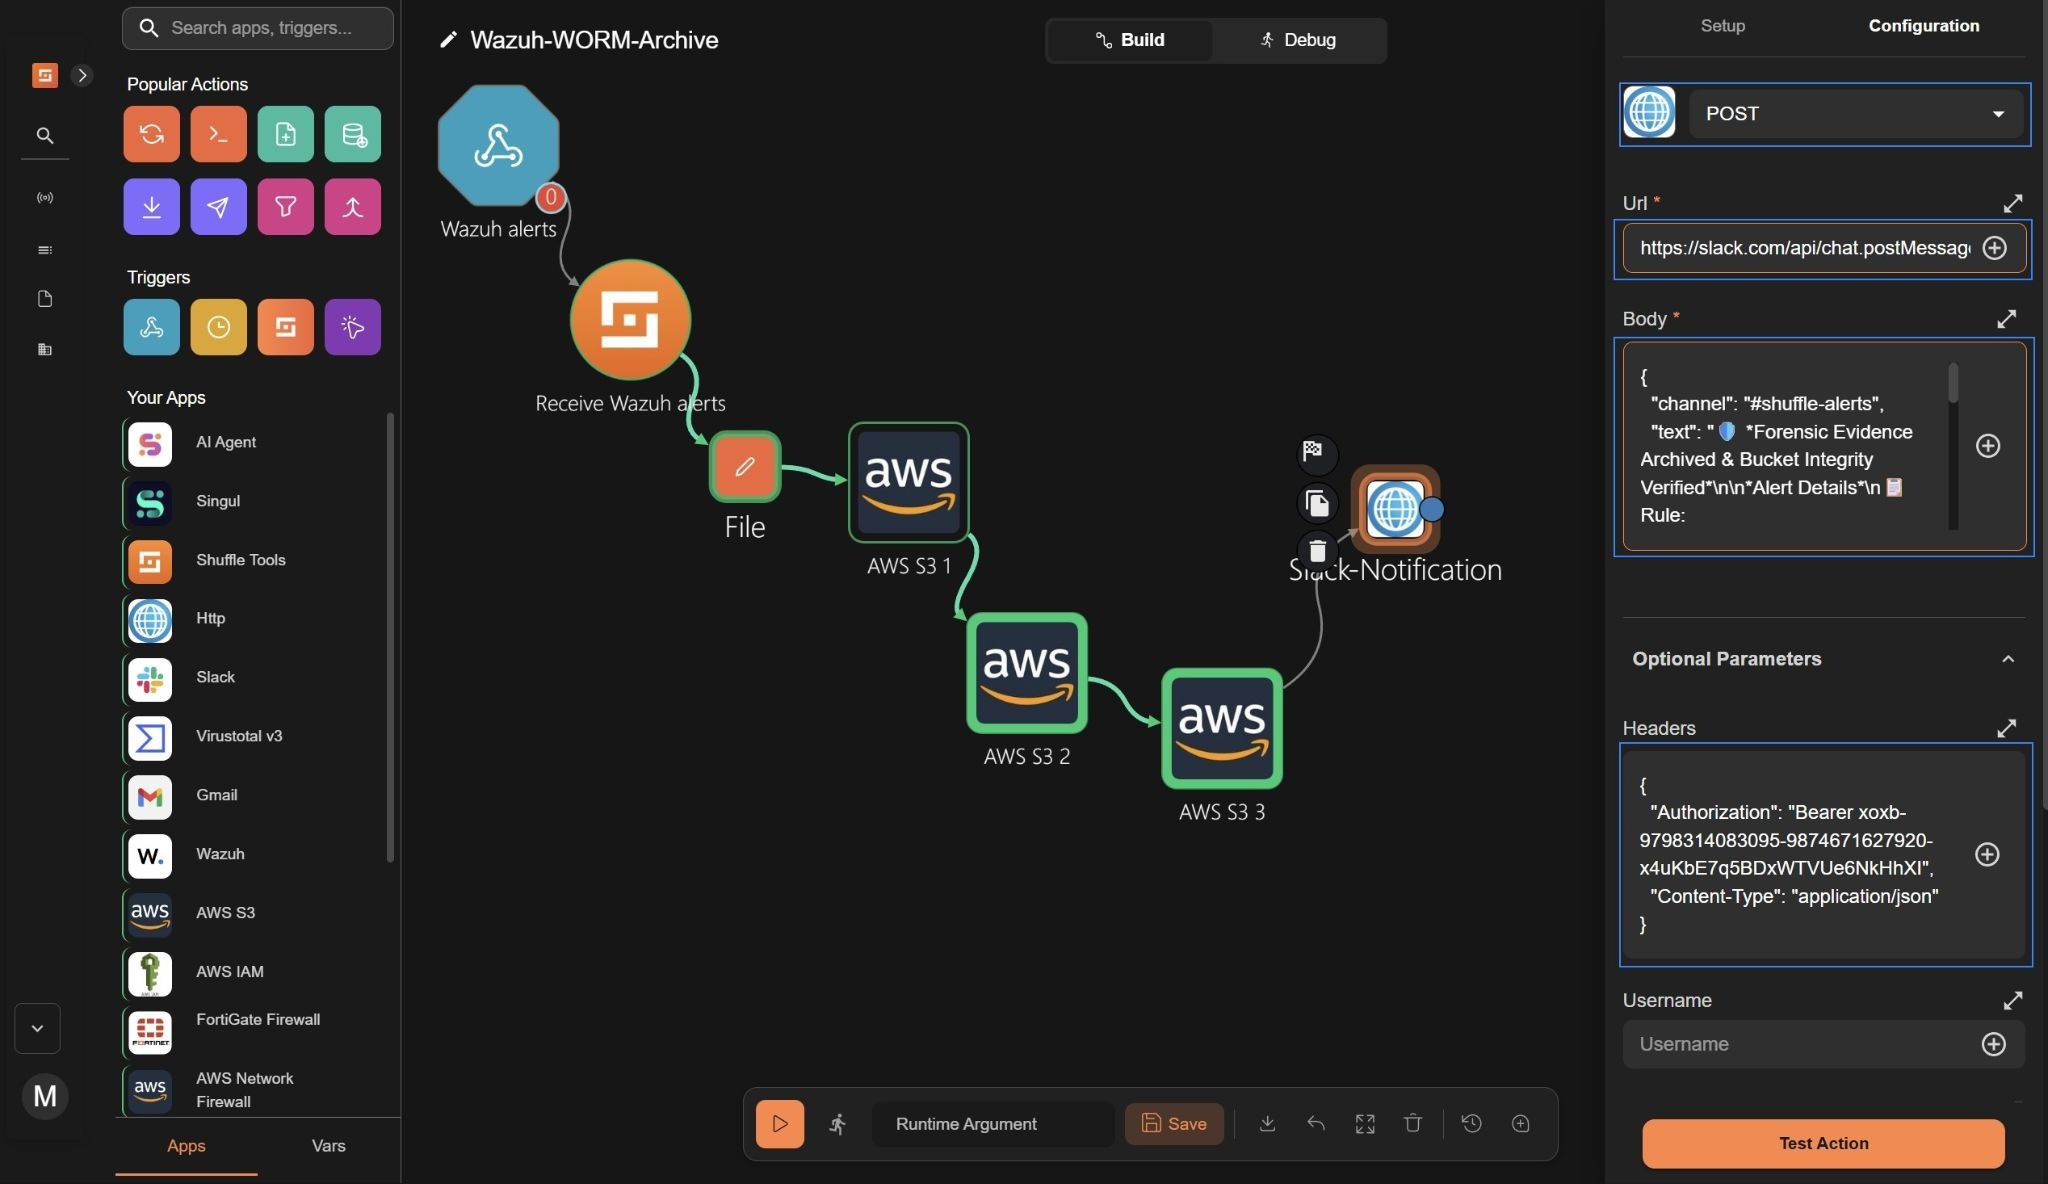
- Drag the HTTP node into the workspace, click the node, navigate to Setup, and rename the node to
Slack-Notification. - Click Go to configuration and set the following credentials:
- Set the action to POST
- Set the Url value to:
https://slack.com/api/chat.postMessage
- Navigate to Advanced and enter the following in the Body field:
{
  "channel": "#shuffle-alerts",
  "text": "🛡️ *Forensic Evidence Archived & Bucket Integrity Verified*\n\n*Alert Details*\n📋 Rule: $exec.all_fields.rule.description\n⚠️ Severity: $exec.all_fields.rule.level\n🖥️ Agent: $exec.all_fields.agent.name\n🕐 Timestamp: $exec.all_fields.timestamp\n\n*Evidence File*\n🔐 Encryption: $aws_s3_1.ServerSideEncryption\n🗂️ Version ID: $aws_s3_1.VersionId\n*Bucket Integrity Checks*\n🔒 Is Publicly Accessible: $aws_s3_2.PolicyStatus.IsPublic\n📝 Logging Target Bucket: $aws_s3_3.LoggingEnabled.TargetBucket\n✅ Evidence successfully written to immutable S3 bucket."
}
- Click the drop-down Optional parameters and enter the following in the Headers field:
{
  "Authorization": "Bearer xoxb-9798314083095-9874671627920-x4uKb**************",
  "Content-Type": "application/json"
}
Where:
xoxb-9798314083095-9874671627920-x4uKb**************is the Bot User OAuth Token.
Note
Replace the Bot User OAuth Token with the one saved in a secure note.
- Trigger the workflow and click Run without runtime argument when prompted. Confirm that the action shows
"HTTPStatusCode": 200.This indicates that the Slack notification was successfully sent, confirming the evidence archiving process.
- Click Save to save the workflow.
Wazuh integration
Wazuh enables centralized configuration of alert forwarding to external systems for automated response and secure forensic archiving. In this setup, Wazuh forwards high-severity alerts directly to Shuffle for secure evidence storage in Amazon S3.
Wazuh dashboard
Perform the steps below on the Wazuh dashboard to configure alert forwarding to Shuffle.
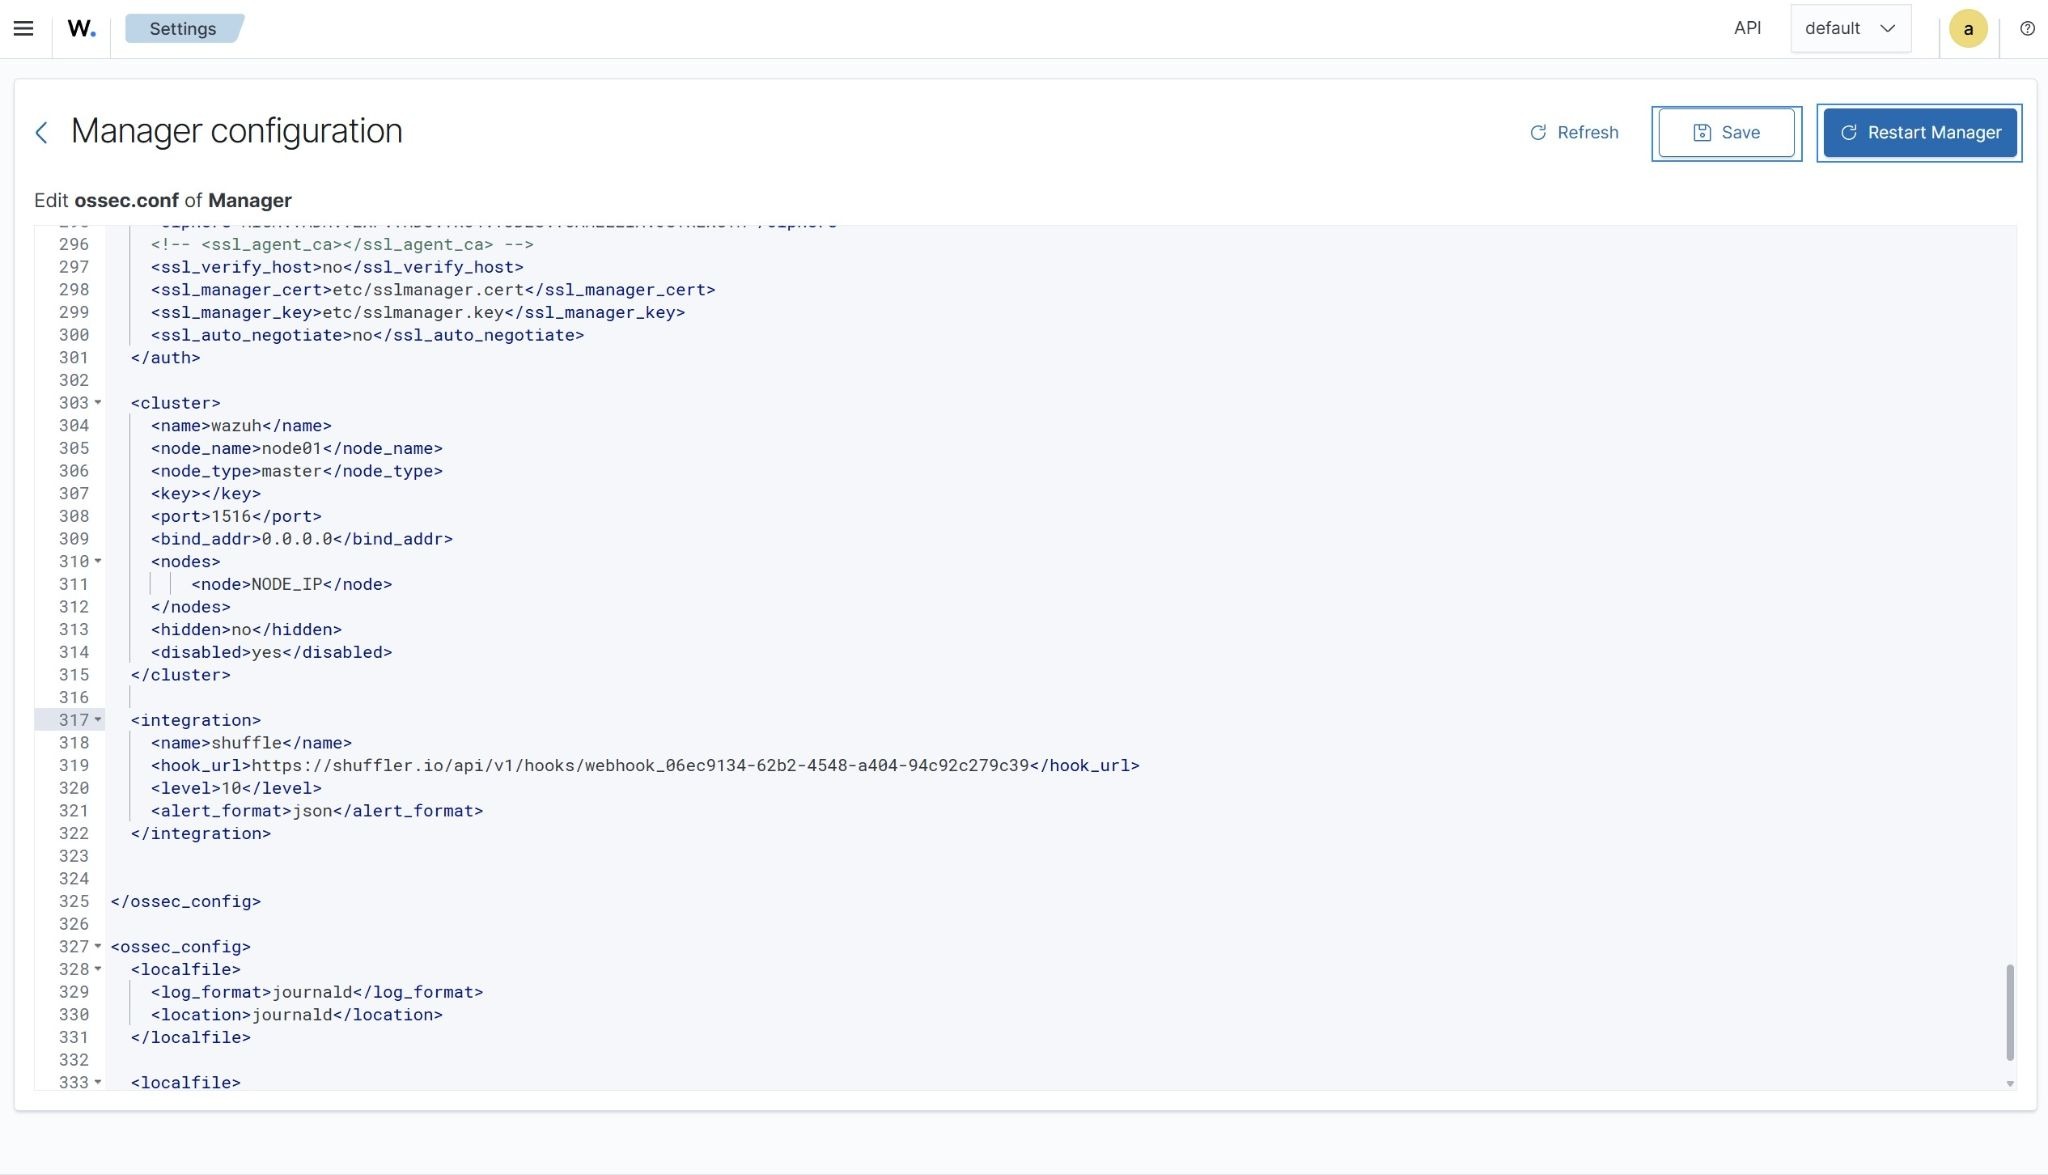
- Click on the upper-left menu ☰, navigate to Server management > Settings, and select Edit configuration.
- Append the following configuration to enable alert forwarding. Replace
<YOUR_SHUFFLE_URL>with your Shuffle webhook URL:
<ossec_config>
  <integration>
    <name>shuffle</name>
    <hook_url><YOUR_SHUFFLE_URL></hook_url>
    <level>10</level>
    <alert_format>json</alert_format>
  </integration>
</ossec_config>
- Click Save and then Restart Manager to apply the changes.
This configuration forwards all alerts with severity level 10 and above to Shuffle for secure forensic processing and archiving. In Wazuh, severity levels define the impact and urgency of security events, and organizations tune these thresholds based on risk and compliance requirements. Level 10 typically represents high-confidence security incidents or potential compromise scenarios that require immediate forensic preservation.
The configuration can also be extended depending on detection requirements:
<rule_id>forwards specific security rules.<group>forwards alerts belonging to a rule group.<event_location>forwards alerts from a specific source or endpoint.
This flexibility enables Wazuh to act as a highly configurable detection engine, ensuring only relevant high-severity events are forwarded for automated processing and secure forensic archiving.
Simulating a high-severity alert
Perform the following steps on the attacker endpoint to simulate repeated SSH authentication failures against a non-existent user on the monitored Ubuntu endpoint. This generates high-severity authentication alerts in Wazuh for workflow testing.
- Install Hydra and prepare the attack toolset:
# sudo apt update
# sudo apt install -y hydra
- Create a text file containing 10 random passwords to use as a password list.
# echo -e "P@ssw0rd1\nQwerty@123\nLetMeIn\!9\nAdmin@2024\nWinter#88\nBlueSky@77\nRootPass\!5\nSecure\$321\nLogin@999\nTestUser#42" > passlist.txt
- Run Hydra from the attacker endpoint to simulate repeated SSH authentication against the Ubuntu endpoint. Replace
<UBUNTU_IP>with the IP address of the target system:
# sudo hydra -l badguy -P passlist.txt <UBUNTU_IP> ssh
This activity initially generates low-severity SSH authentication failure events. However, when repeated multiple times within a short time window, Wazuh correlates the behavior and escalates it to a high-severity authentication attack alert using its out-of-the-box rules.
Visualization
Wazuh dashboard
Wazuh alerts generated from simulated repeated SSH authentication failures can be viewed on the dashboard. Perform these steps to view the events in the Threat Hunting module.
- Navigate to Threat intelligence > Threat Hunting and click the Events tab.
- Click + Add filter. Then filter for
rule.idin the Field field. Selectis one ofin the Operator field. - Add the values
5710and5712in the Values field. - Click Save to apply the filter.
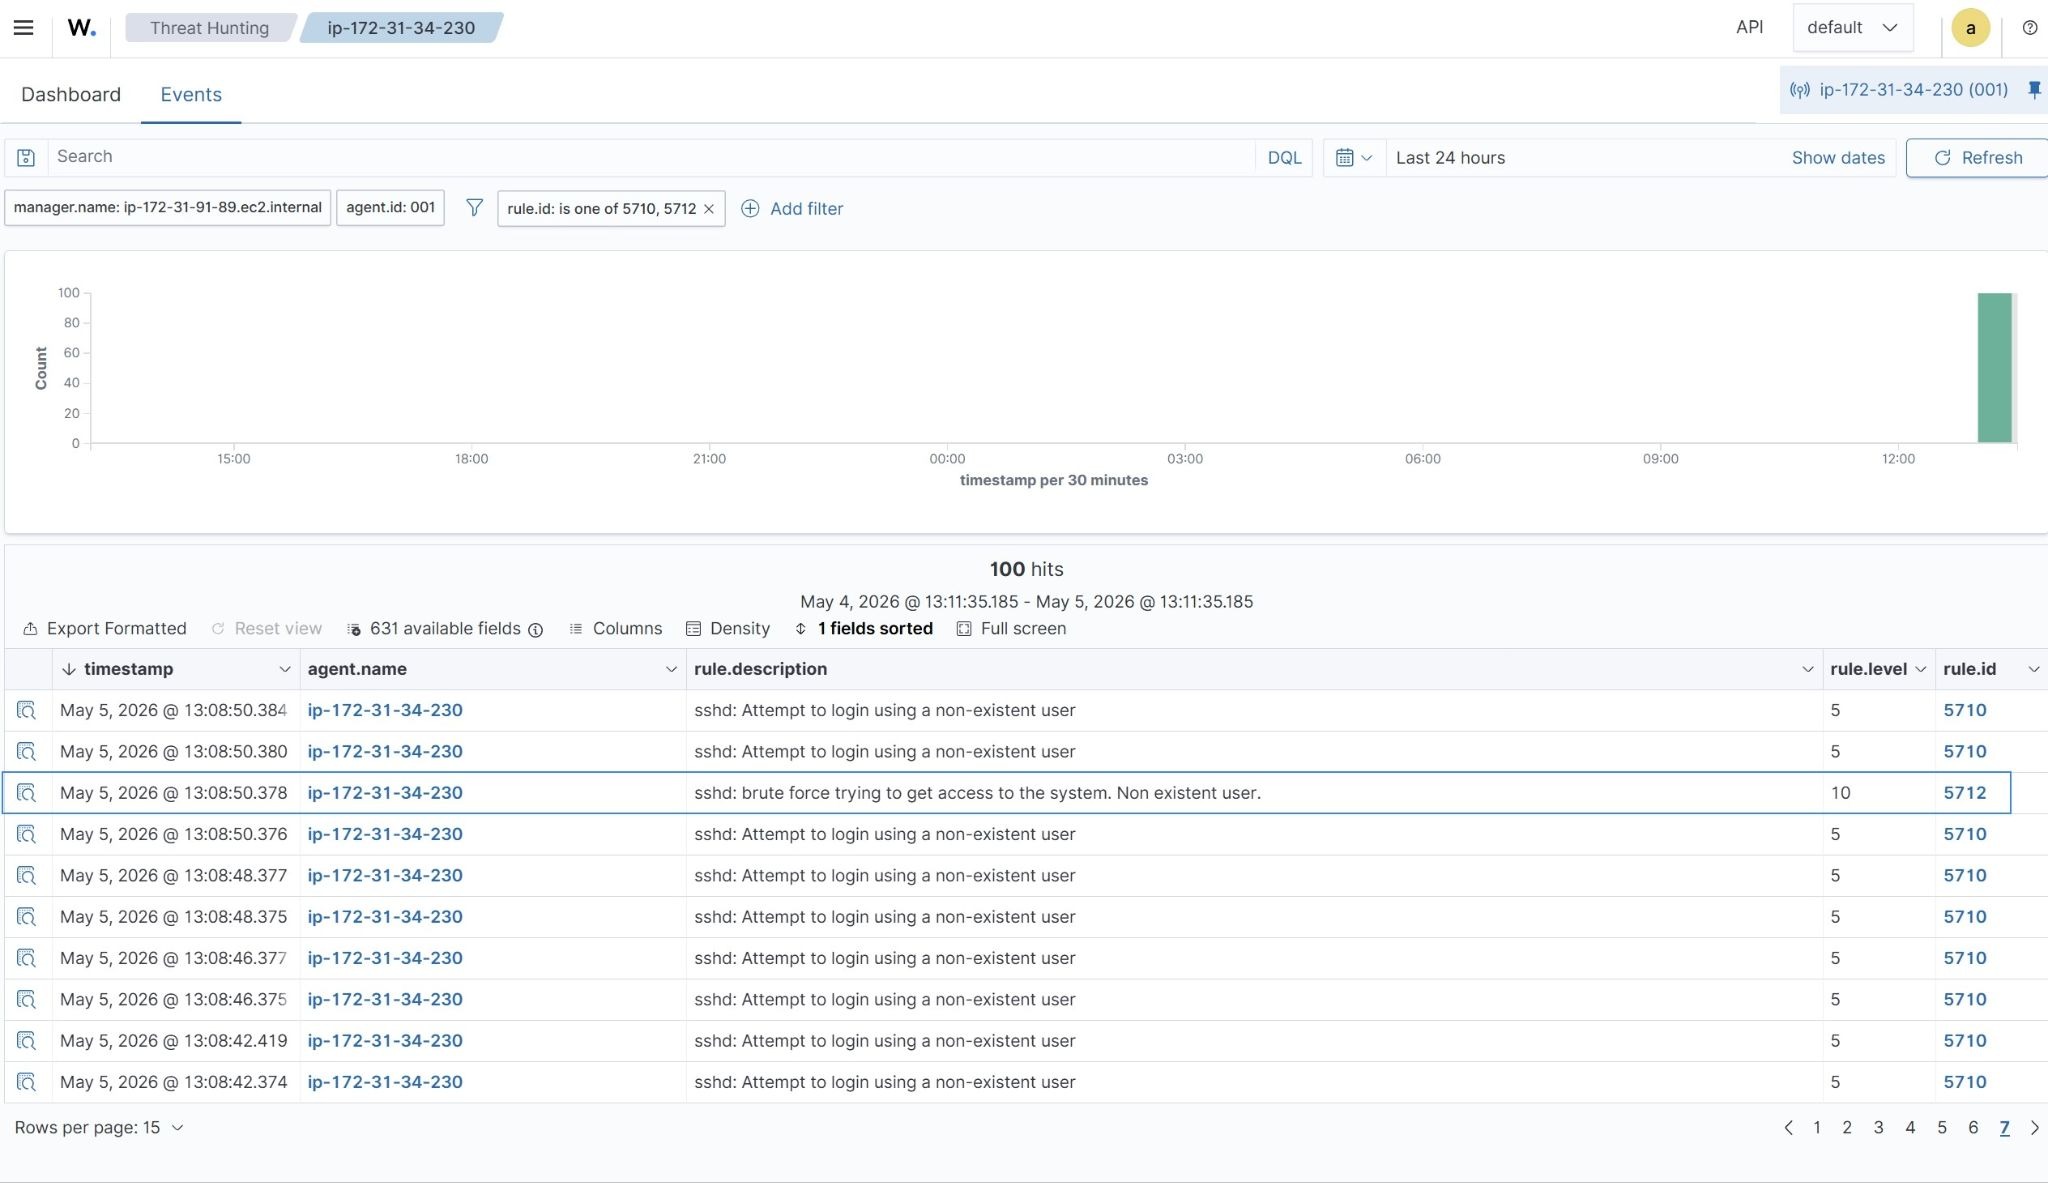
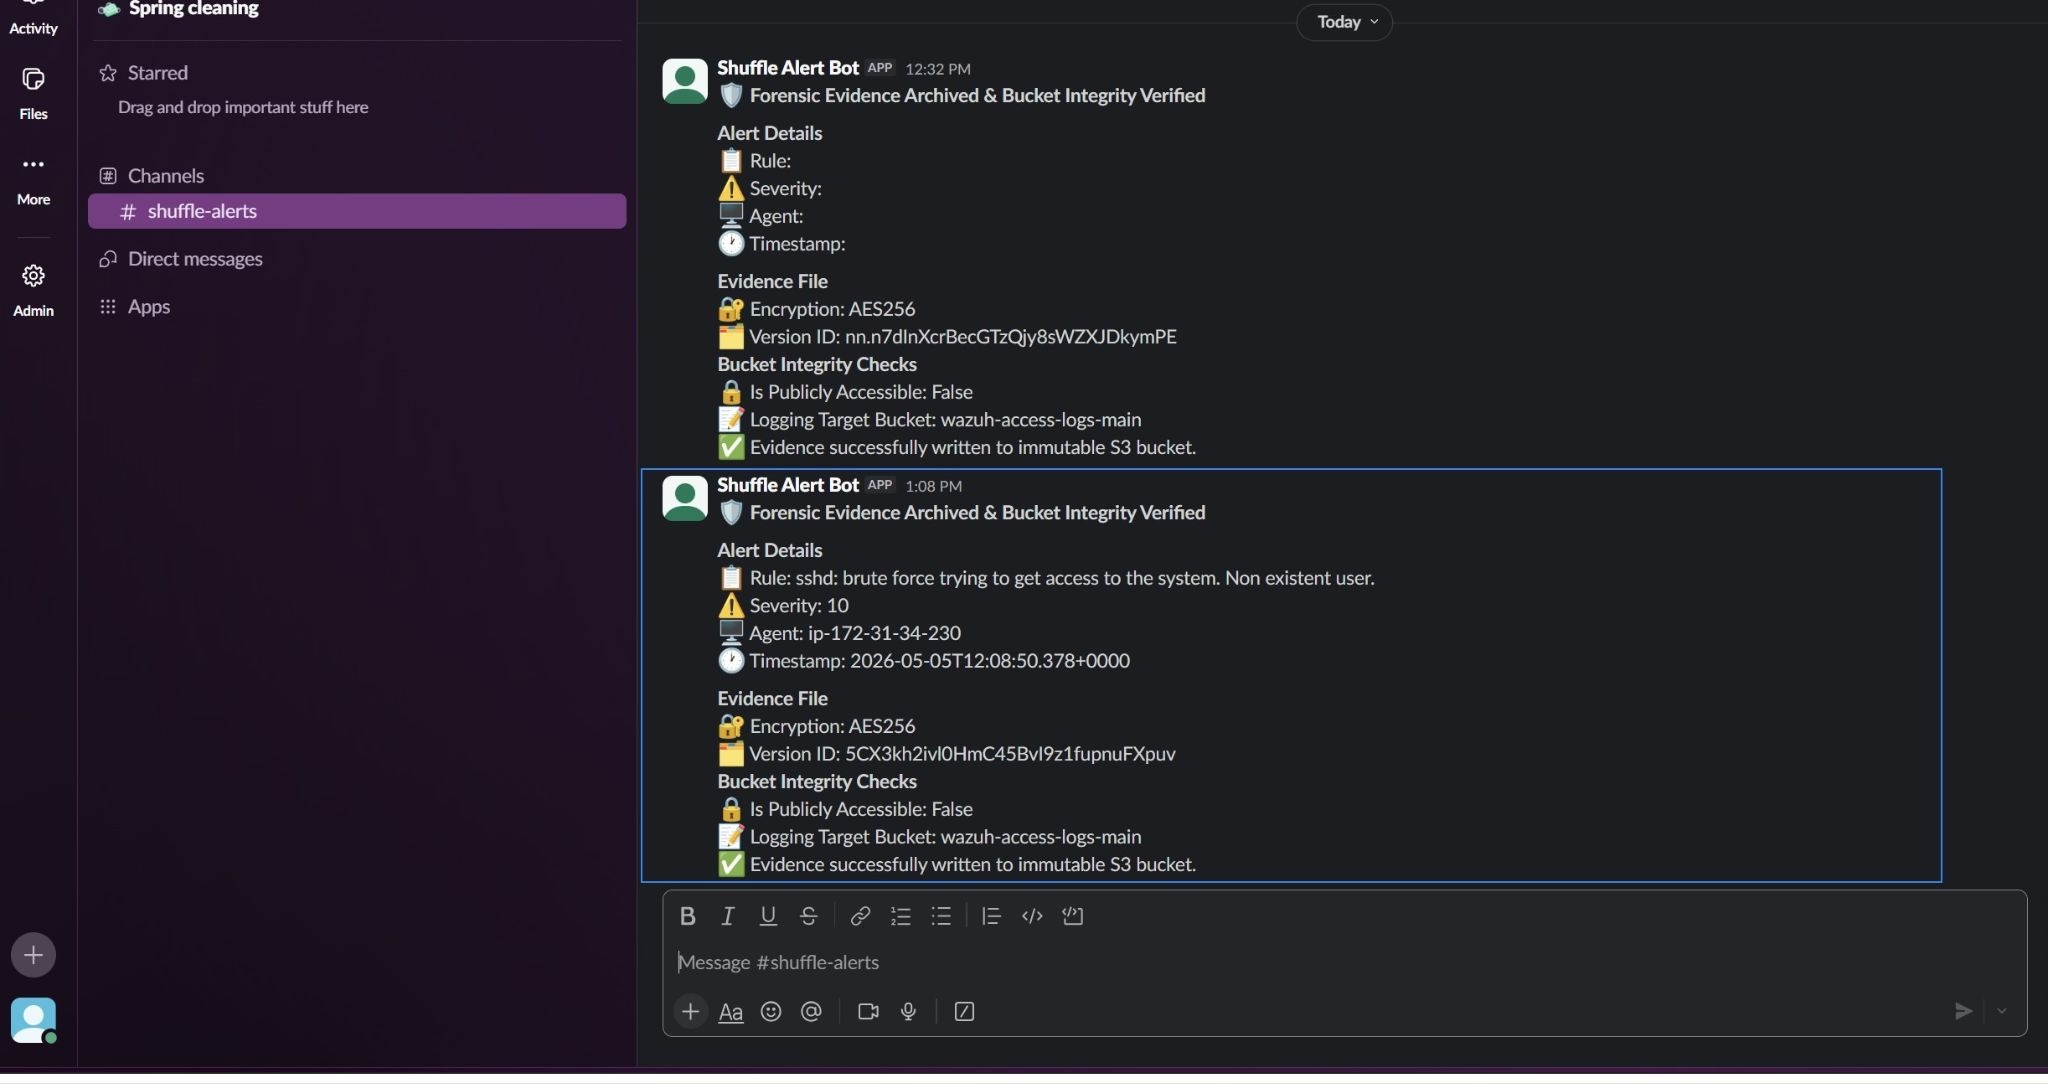
Slack notification
This Slack notification confirms that the Wazuh alert has been processed through the automated workflow. It displays a high-severity authentication attack alert with key details such as rule description, severity level, agent name, and timestamp.
The message also shows that the alert was preserved as an evidence file and securely stored in the S3 bucket using AES256 encryption. Bucket integrity checks confirm that public access is blocked and that server access logging is enabled, with logs written to the designated access logging bucket.
This provides clear confirmation of successful ingestion and storage of evidence, along with visibility into the security controls protecting the archive.
Evidence file in S3
The evidence file is stored in the Amazon S3 evidence bucket as an immutable object. The file reflects the full alert payload without modification, demonstrating secure ingestion, encryption, and version-controlled storage aligned with forensic requirements.
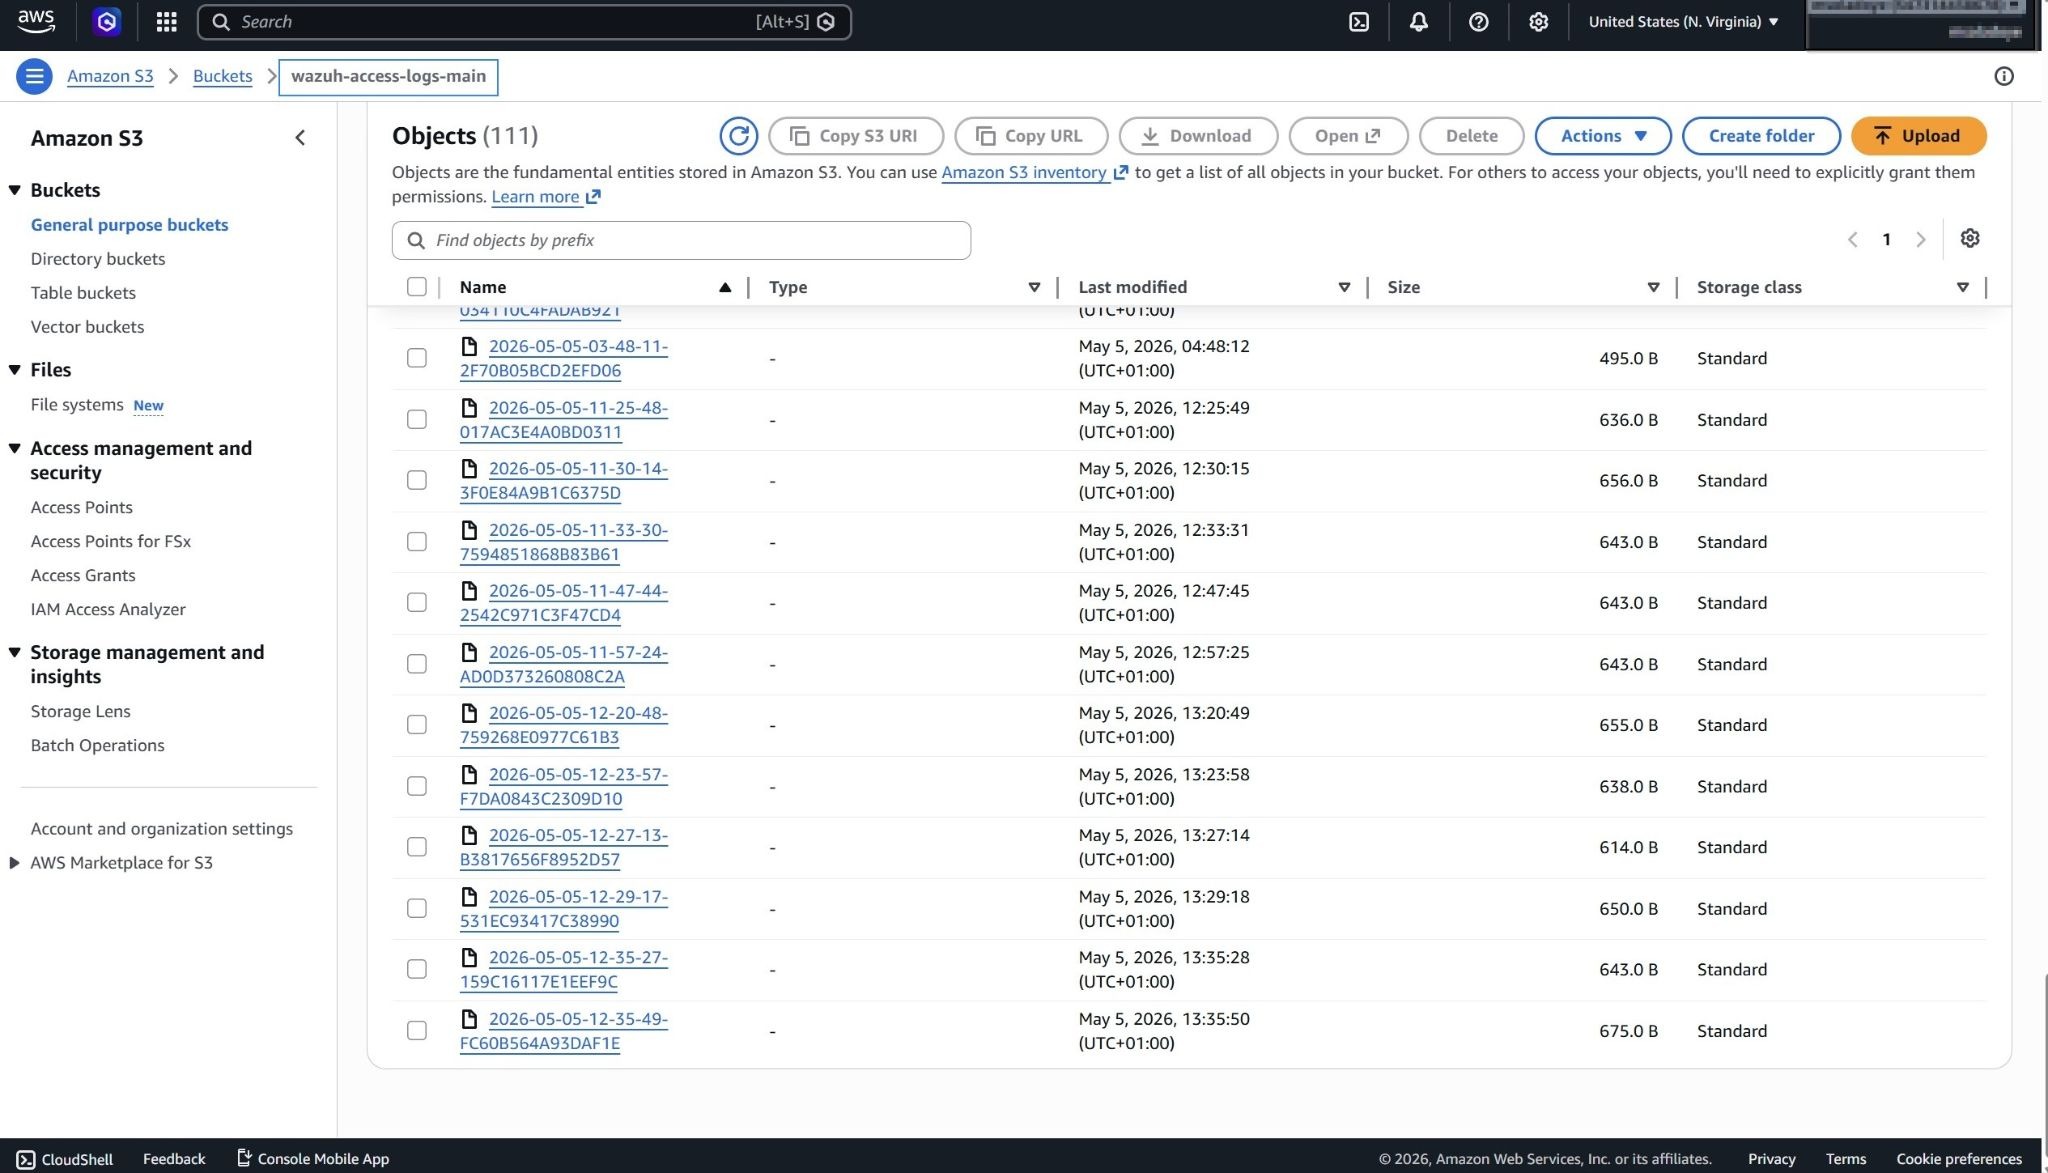
Access logs bucket
The access logging bucket captures all requests made to the evidence bucket. These logs provide a complete audit trail, ensuring visibility into access activity and supporting traceability for forensic investigations and compliance.
Unauthorized upload attempt
A manual upload attempt to the evidence bucket from the AWS Console fails due to the restrictive bucket policy. This confirms that only the designated IAM user for the automated workflow can upload evidence, thereby enforcing strict write control and preventing unauthorized modifications.
Conclusion
In this blog post, we demonstrate how to build an automated forensic archiving pipeline by integrating Wazuh with Shuffle to securely handle evidence in Amazon S3.
Wazuh continuously monitors security events such as repeated authentication failures and applies its out-of-the-box rules to classify and escalate high-severity alerts. These alerts are then forwarded to Shuffle, where automated logic controls the end-to-end response workflow.
Shuffle processes each alert by preserving the full payload, generating a structured evidence file, and securely storing it in an S3 bucket with enforced write restrictions and encryption. The workflow also validates bucket integrity by checking public access settings and confirming that access logging is enabled, ensuring full auditability of evidence storage.
This integration enables organizations to maintain a secure, tamper-resistant forensic archive while reducing manual intervention in incident handling. By combining Wazuh detection capabilities with Shuffle automation and Amazon S3’s storage controls, organizations can enforce consistent evidence integrity and improve forensic readiness. Organizations should also evaluate retention costs, deployment requirements, and compliance considerations when designing long-term forensic storage architectures.
To learn more about Wazuh, explore our other blog posts, and join the growing community.