Security Operations Centers face an escalating challenge in managing the high volume of alerts that require manual triage and verification. Each security event requires analysts to identify associated processes, network connections, file modifications, and actions performed in monitored environments. This time-consuming process becomes increasingly unsustainable as log volumes grow, creating correlation bottlenecks that delay incident identification and response while exposing critical gaps in security posture.
Agentic AI is an approach to artificial intelligence in which systems can autonomously pursue defined goals by planning, making decisions, taking actions, and adapting to changing conditions. AI agents are the practical implementations of this approach, combining reasoning, memory, tool usage, and execution capabilities to perform tasks with limited human intervention. Unlike traditional Large Language Model–based applications that rely on direct prompting for each task, AI agents can independently coordinate multi-step workflows to achieve a defined objective. When integrated with Wazuh, these capabilities enable automated threat hunting, event correlation, and security investigations, helping analysts respond to threats more efficiently.
This blog post demonstrates how to integrate Agentic AI with Wazuh to automate threat hunting tasks, streamline investigations, and improve security operations efficiency.
Requirements
We use the following infrastructure to demonstrate threat hunting with Agentic AI:
- A Wazuh 4.14.5 instance, which includes the central components (Wazuh server, Wazuh indexer, Wazuh dashboard), is installed on an Ubuntu 24.04 server using the quickstart guide. This server also hosts the Agentic AI, based on Ollama, and requires at least 16GB of RAM and 4 CPUs.
- A Windows 11 endpoint with the Wazuh agent installed and enrolled in the Wazuh server. This endpoint will serve to test our setup.
Configuration
We configure the infrastructure for Agentic AI threat hunting using a locally hosted model. Our setup uses Ollama to run the Qwen3 model.
Ollama is an open source tool for running large language models locally. It provides a simple interface and a local REST API for interacting with models. This enables fully offline use without sending data to external services. Such privacy is critical for security deployments where log data must remain on-premises.
We chose Qwen3 as the preferred model for this workflow. Developed by Alibaba Cloud, Qwen3 supports tool calling and agentic workflows. Qwen3 offers sizes from 0.6 billion to 235 billion parameters. The compact 8B model runs well on edge devices with 16GB of RAM. Larger variants provide superior multi-step reasoning for complex scenarios.
Wazuh server
We perform the following operations on the Wazuh server:
Access control configuration
In this implementation, the Qwen3 Agentic AI uses native tool calling to retrieve and analyze security data from Wazuh during an investigation. When the Qwen3 model requires additional context, it can query the Wazuh server API and search the wazuh-alerts-* index for historical security events.
To enable controlled access to Wazuh, the AI agent should be granted only the permissions it actually requires. Following the principle of least privilege, we will create dedicated service accounts with restricted access to specific Wazuh capabilities.
Creating a Wazuh server policy for the AI agent
To perform threat hunting, the AI agent requires access to Wazuh telemetry data. We create a dedicated user account governed by a granular security policy. This policy grants the AI agent read-only access to Wazuh telemetry, including agent metadata (agent:read), File Integrity Monitoring (syscheck:read), and system inventory data (syscollector:read). To create this policy:
- Navigate to Server management > Security > Policies.
- Click Create policy and fill in the entries as follows:
- Policy name:
wazuh_agentic_policy - Actions:
agent:readsyscheck:readsyscollector:read
- Resource:
agent:id - Resource identifier:
* - Select an effect:
Allow
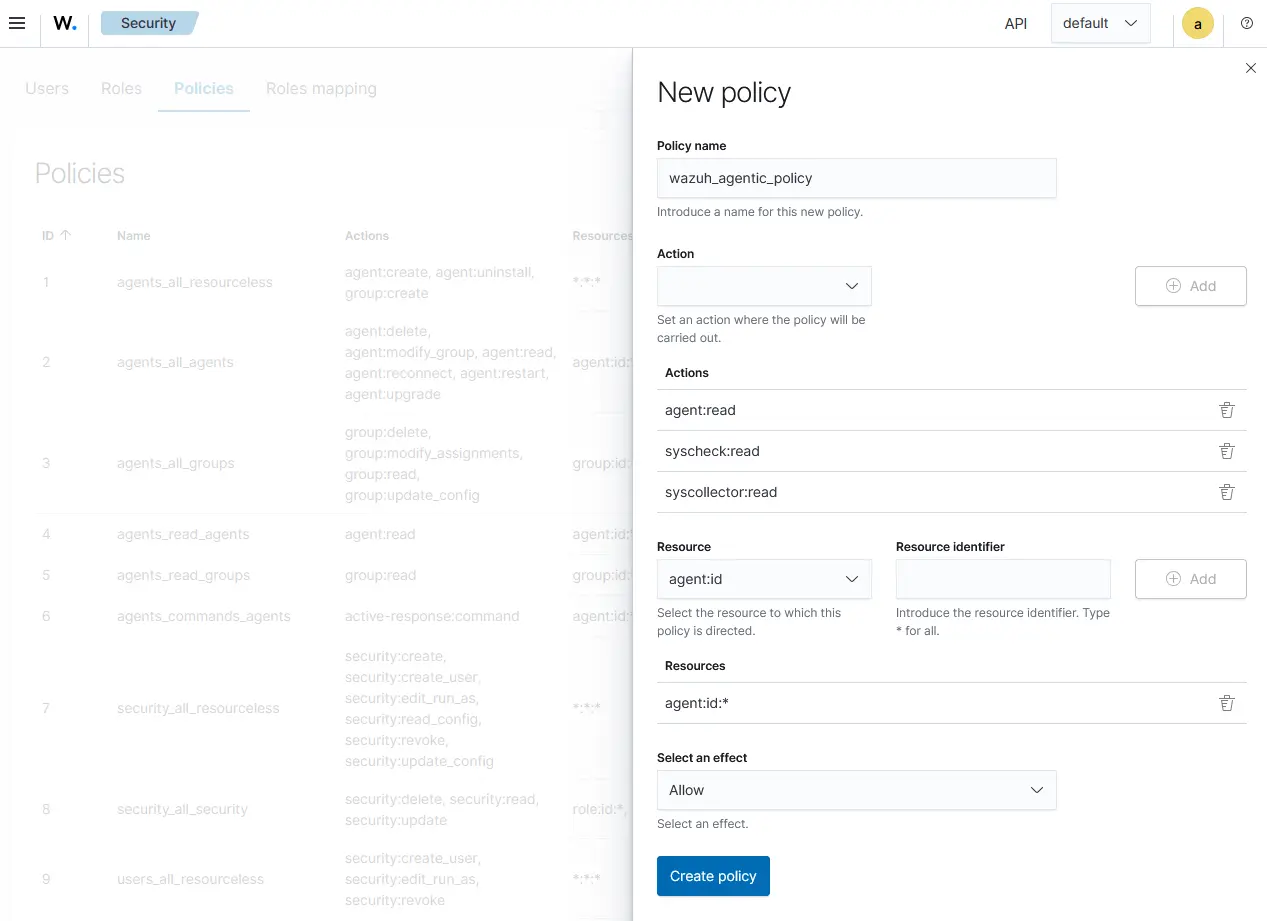
- Click Create policy.
Creating a Wazuh server role for the AI agent
- Navigate to Server management > Security > Roles.
- Click Create role and fill in the entries as follows:
- Role name:
wazuh_agentic_role - Policies:
wazuh_agentic_policy
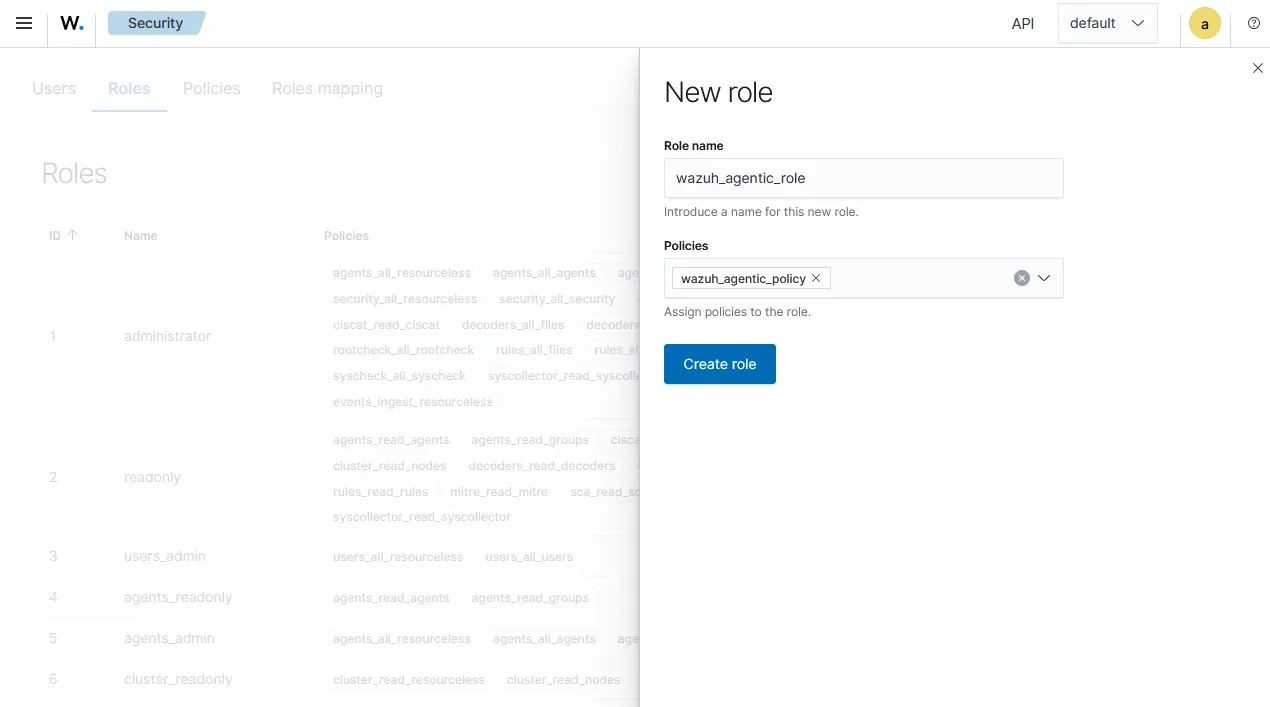
- Click Create role.
Creating a Wazuh server user for the AI agent
- Navigate to Server management > Security > Users.
- Click Create user, then fill in the entries as follows:
- User name:
wazuh_agentic - Password: Fill in a password.
- User roles:
wazuh_agentic_role
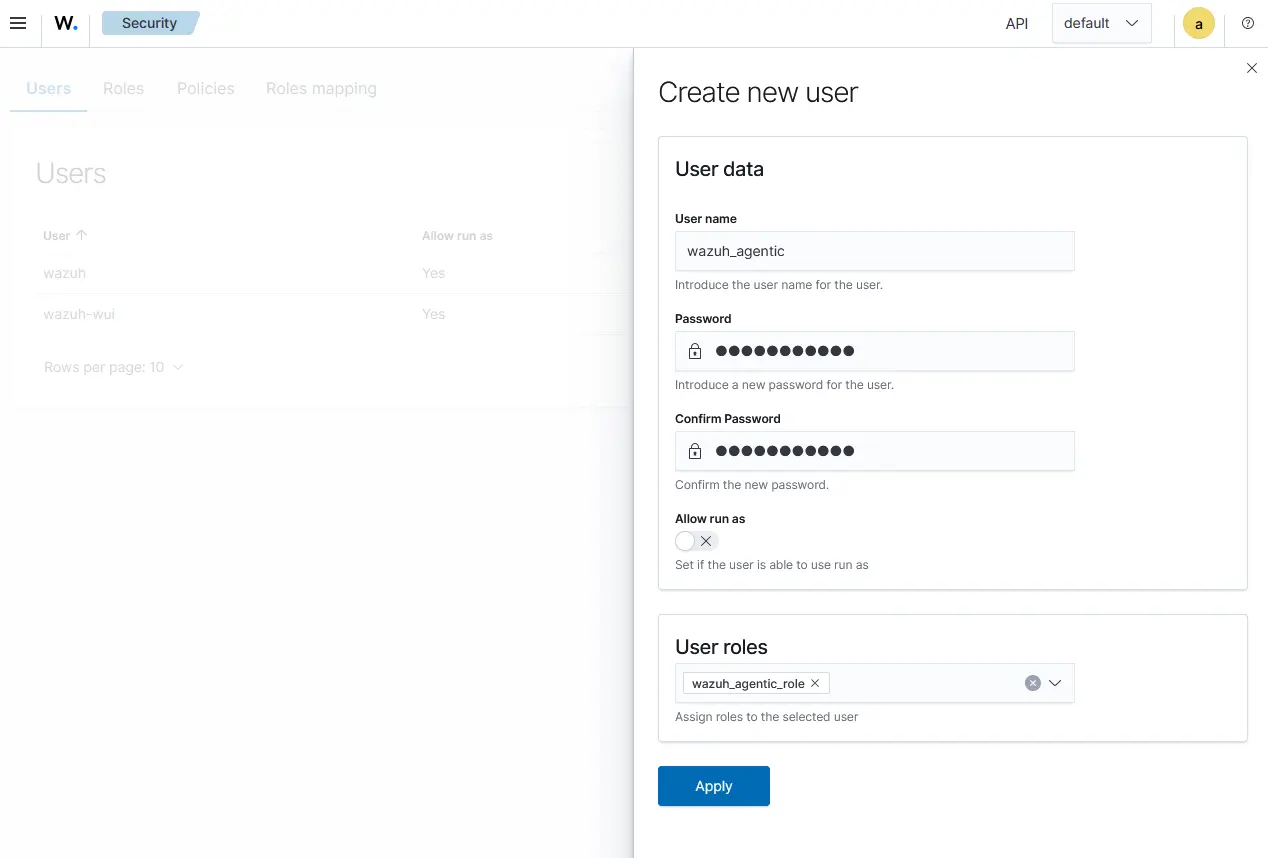
- Click Apply.
Creating a Wazuh indexer user for the AI agent
The AI agent requires read access to the wazuh-alerts-* index to retrieve historical log telemetry. Follow the steps below to create the required indexer user and role:
- Navigate to Indexer management > Security > Internal users.
- Click Create internal user, fill in the fields as follows:
- Username:
indexer_agentic - Password: Fill in a password.
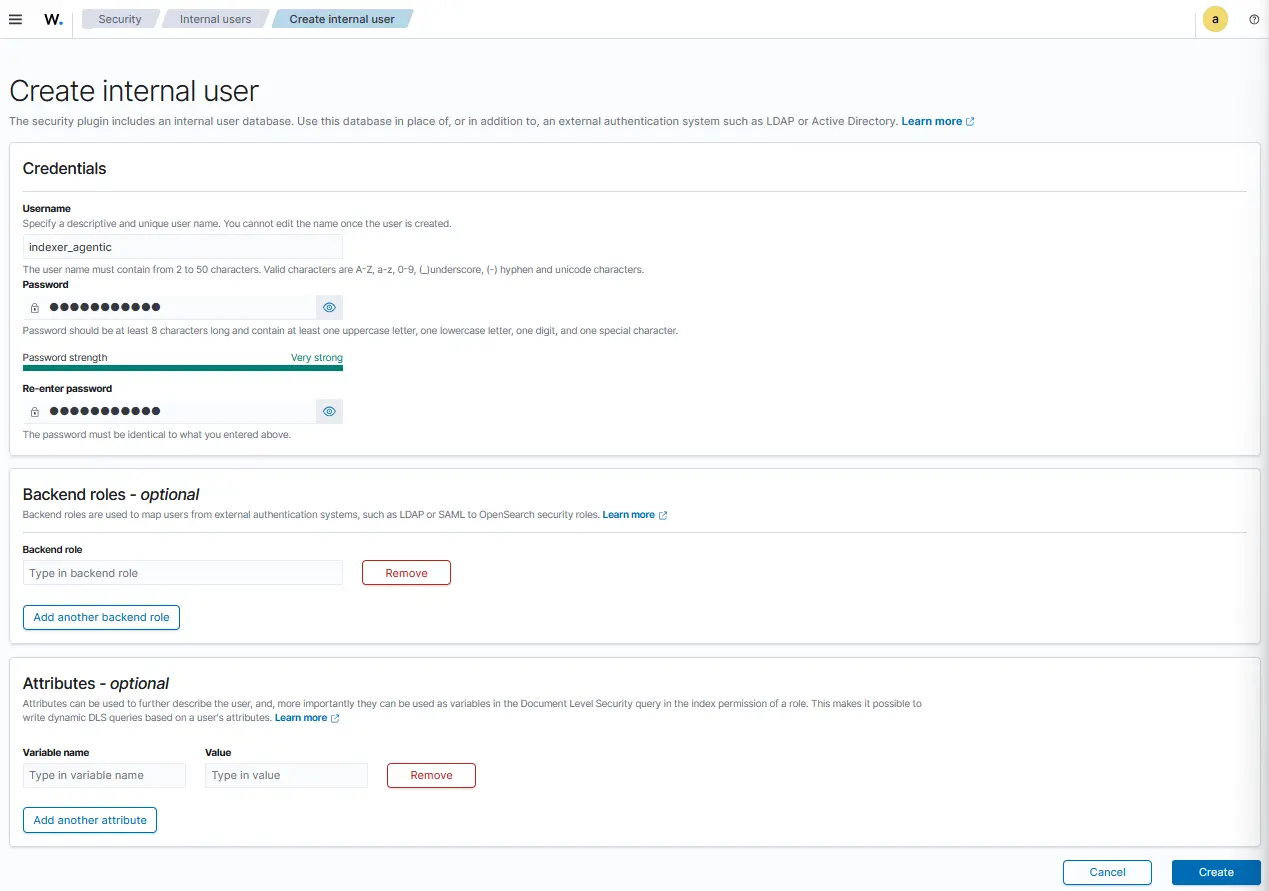
- Click Create
Creating a Wazuh indexer role for the AI agent
- Navigate to Indexer management > Security > Roles.
- Click Create role, then fill in the entries as follows. This role grants the agent the ability to query the
wazuh-alerts-*index to run multi-step log correlation over historical security events:
- Name:
indexer_agentic_role - Cluster permissions:
cluster_composite_ops_ro - Index:
wazuh-alerts-* - Index permissions:
indices:data/read/search*
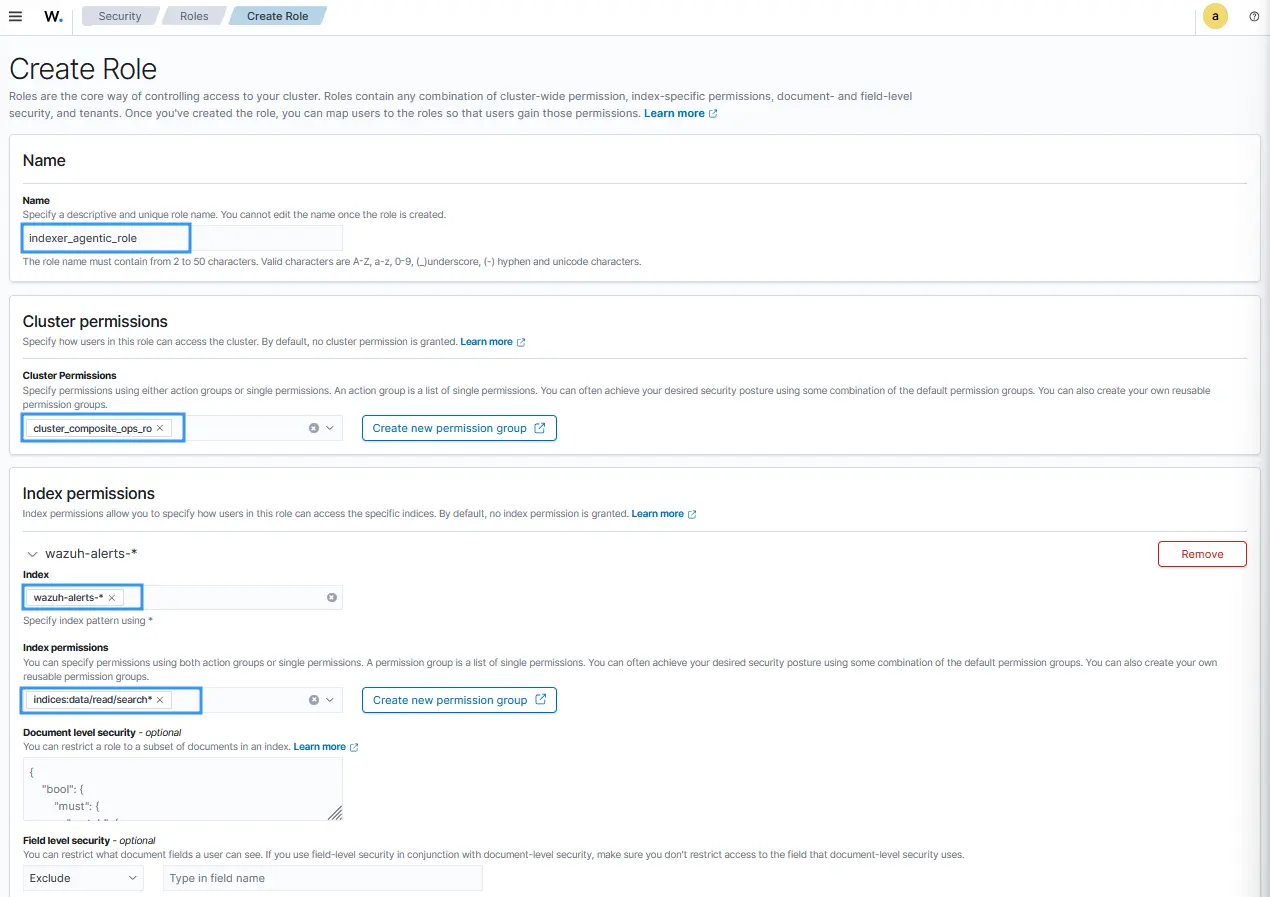
- Click Create.
- Click the Mapped users tab and select Map users. Search for and select the user account
indexer_agentic, as shown below:
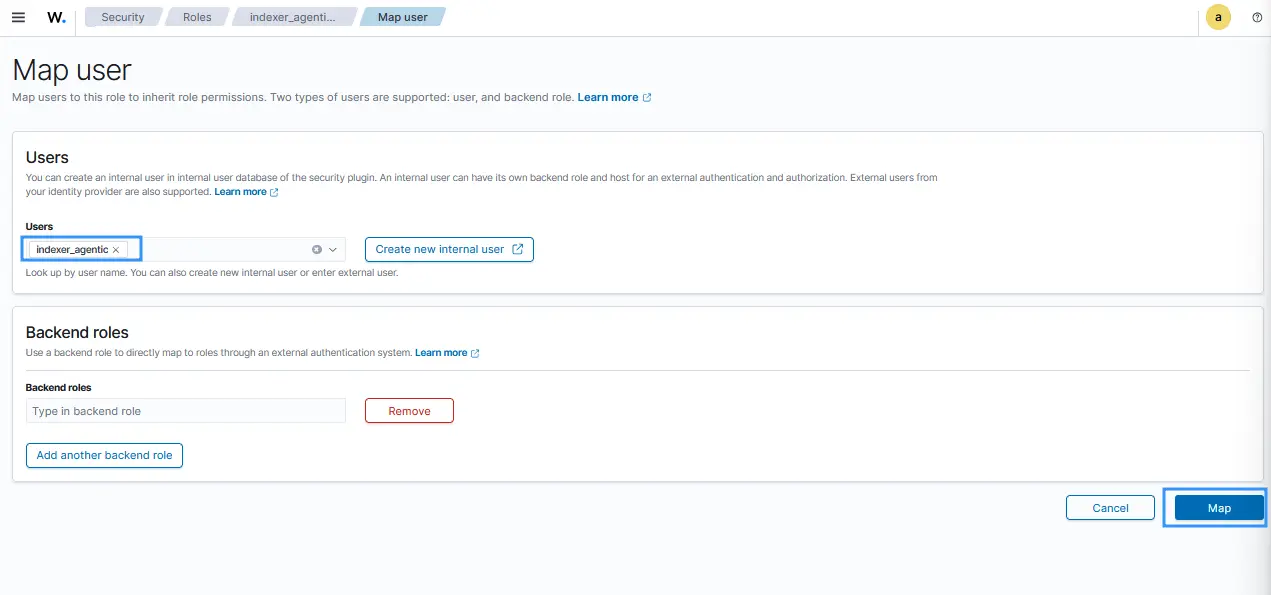
- Click Map.
AI agent setup
In this section, we configure the local runtime environment required to host and execute the AI agent. We clone the source code repository, install Ollama to serve the Qwen3 model locally, download the required Python dependencies, and define the environment variables necessary to run the system. Follow the steps below to configure the environment:
- Clone the agentic AI tool repository on the Wazuh server and navigate into the directory. This repository contains the source code that defines the reasoning logic, tool-calling workflows, and autonomous steps the AI agent must follow to achieve a given objective:
# git clone https://github.com/octopus237/Agentic-AI.git ~/Agentic-AI
# cd ~/Agentic-AI
| Warning: This script is a proof of concept (PoC). Review and validate it to ensure it meets the operational and security requirements of your environment. |
- Run the following command to install
Ollama:
# curl -fsSL https://ollama.com/install.sh | sh
- Install the
Qwen3:8bmodel:
# ollama pull qwen3:8b
- Install
Python3if you do not already have it installed:
# apt install python3 -y
# apt install python3-pip -y
- Install the Python dependencies required to run the AI agent:
# pip install requests urllib3 ollama flask flask-cors python-daemon
- Set the environment variables required to run the AI agent:
# echo OLLAMA_MODEL=qwen3:8b >> ~/Agentic-AI/.env
# echo WAZUH_USER=wazuh_agentic >> ~/Agentic-AI/.env
# echo WAZUH_PASS=<WAZUH_AGENTIC_PASSWORD> >> ~/Agentic-AI/.env
# echo WAZUH_HOST=https://127.0.0.1:55000 >> ~/Agentic-AI/.env
# echo INDEXER_HOST=https://127.0.0.1:9200 >> ~/Agentic-AI/.env
# echo INDEXER_USER=indexer_agentic >> ~/Agentic-AI/.env
# echo INDEXER_PASS=<INDEXER_AGENTIC_PASSWORD> >> ~/Agentic-AI/.env
# echo WAZUH_SSL=false >> ~/Agentic-AI/.env
# echo UI_PORT=5000 >> ~/Agentic-AI/.env
# echo UI_HOST=0.0.0.0 >> ~/Agentic-AI/.env
# chmod 600 ~/Agentic-AI/.env
Replace:
<WAZUH_AGENTIC_PASSWORD>: with the user password entered in step 2.<INDEXER_AGENTIC_PASSWORD>: with the user password entered in step 2.
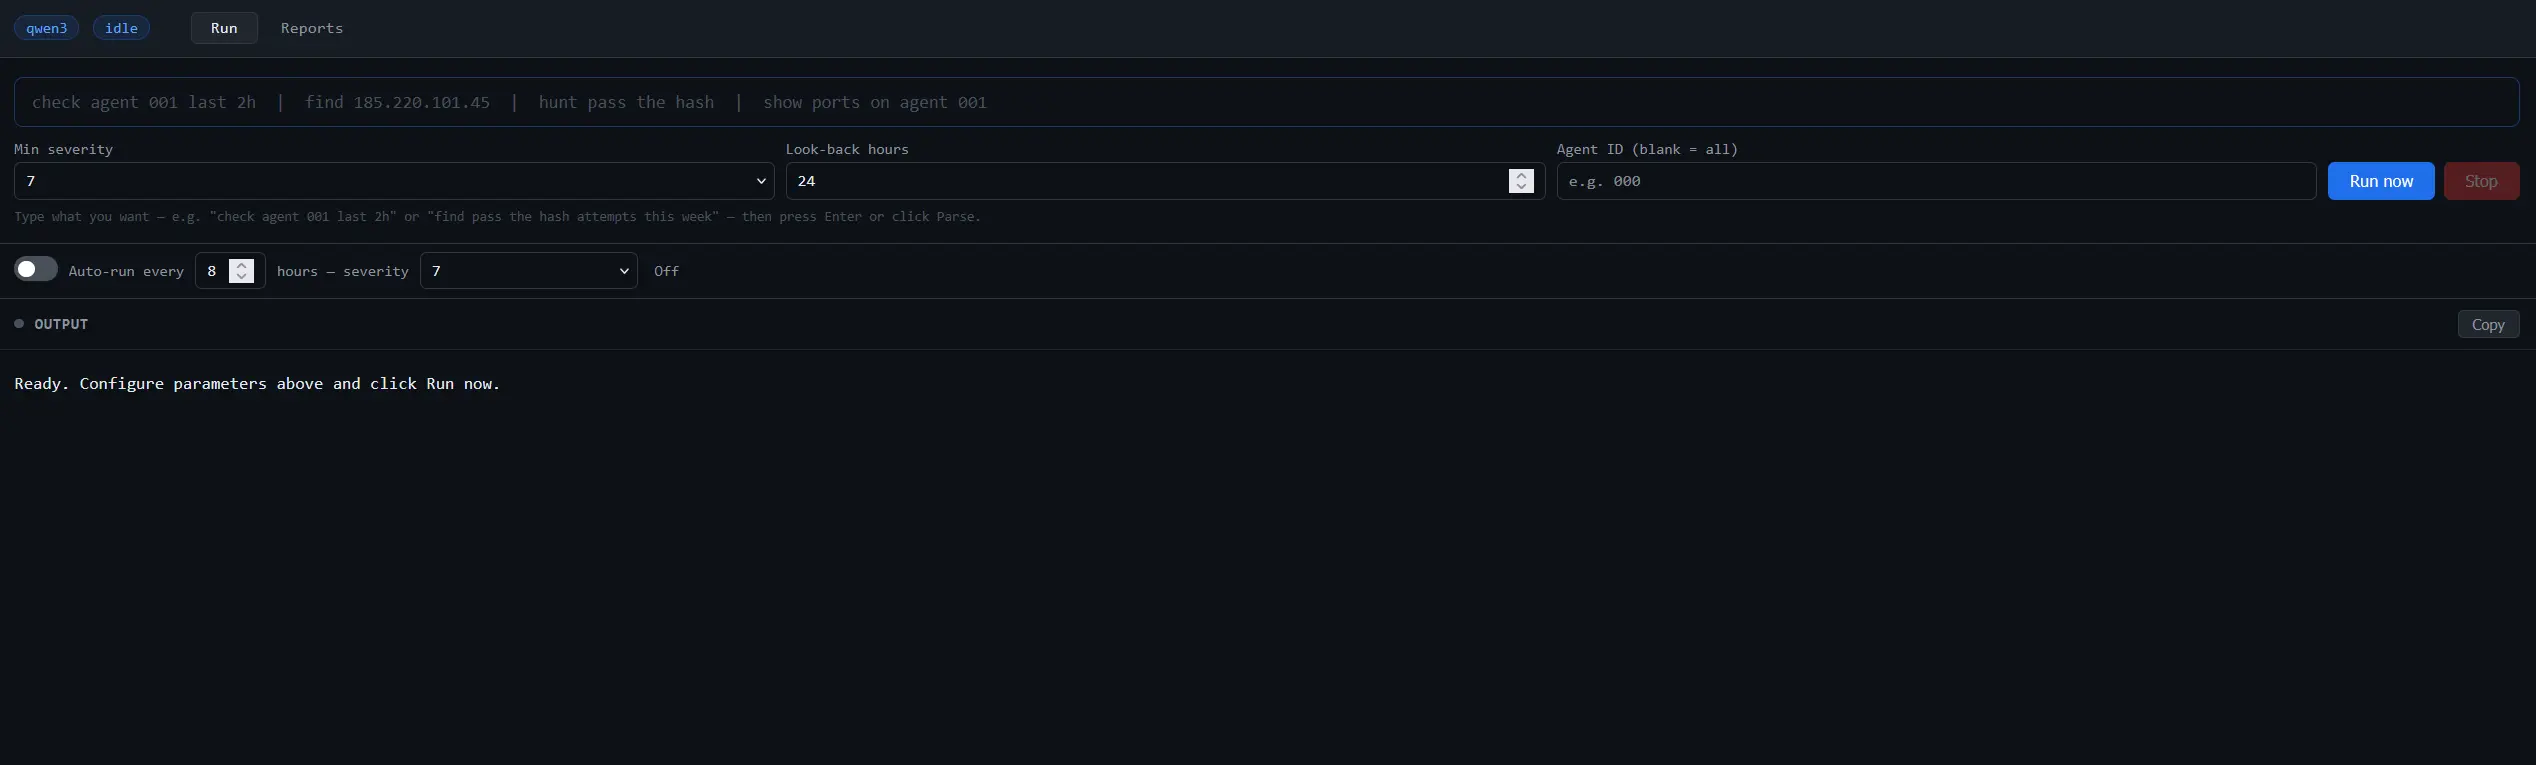
Accessing the AI agent user interface
The agentic AI is accessible via a web browser. Follow the steps below to access it:
- Launch the
~/Agentic-AI/app.pyscript. The script creates a web service on port5000using your Wazuh server IP address:
# python3 ~/Agentic-AI/app.py
Note
The script runs in the foreground by default. It can also run in the background using the nohup tool, i.e., nohup python3 ~/Agentic-AI/app.py > nohup.out &. The script saves the results of all investigations under ~/Agentic-AI/investigations.json file.
- Visit
http://<WAZUH_SERVER_IP>:5000from a browser on an endpoint with network connectivity to the Wazuh server. Replace<WAZUH_SERVER_IP>with the IP of your Wazuh server. The following webpage can be seen.
Note
This implementation uses locally hosted models via Ollama. Running large language models locally requires sufficient compute resources, including CPU, GPU, and memory capacity. Performance will vary depending on the hardware configuration and the size of the selected model.
On lower-resource systems or with larger models, investigation and response times may increase, particularly during multi-step analysis workflows that involve several tool calls and iterations.
Use cases
This section explores how the AI agent autonomously gathers relevant telemetry, analyzes security data, and correlates findings in a monitored environment. To test the configuration, we run the AI agent on the Wazuh server against existing security events.
Note
The prompts provided in these use cases are examples designed to demonstrate the AI agent capabilities. These prompts can be modified directly to suit your investigation requirements.
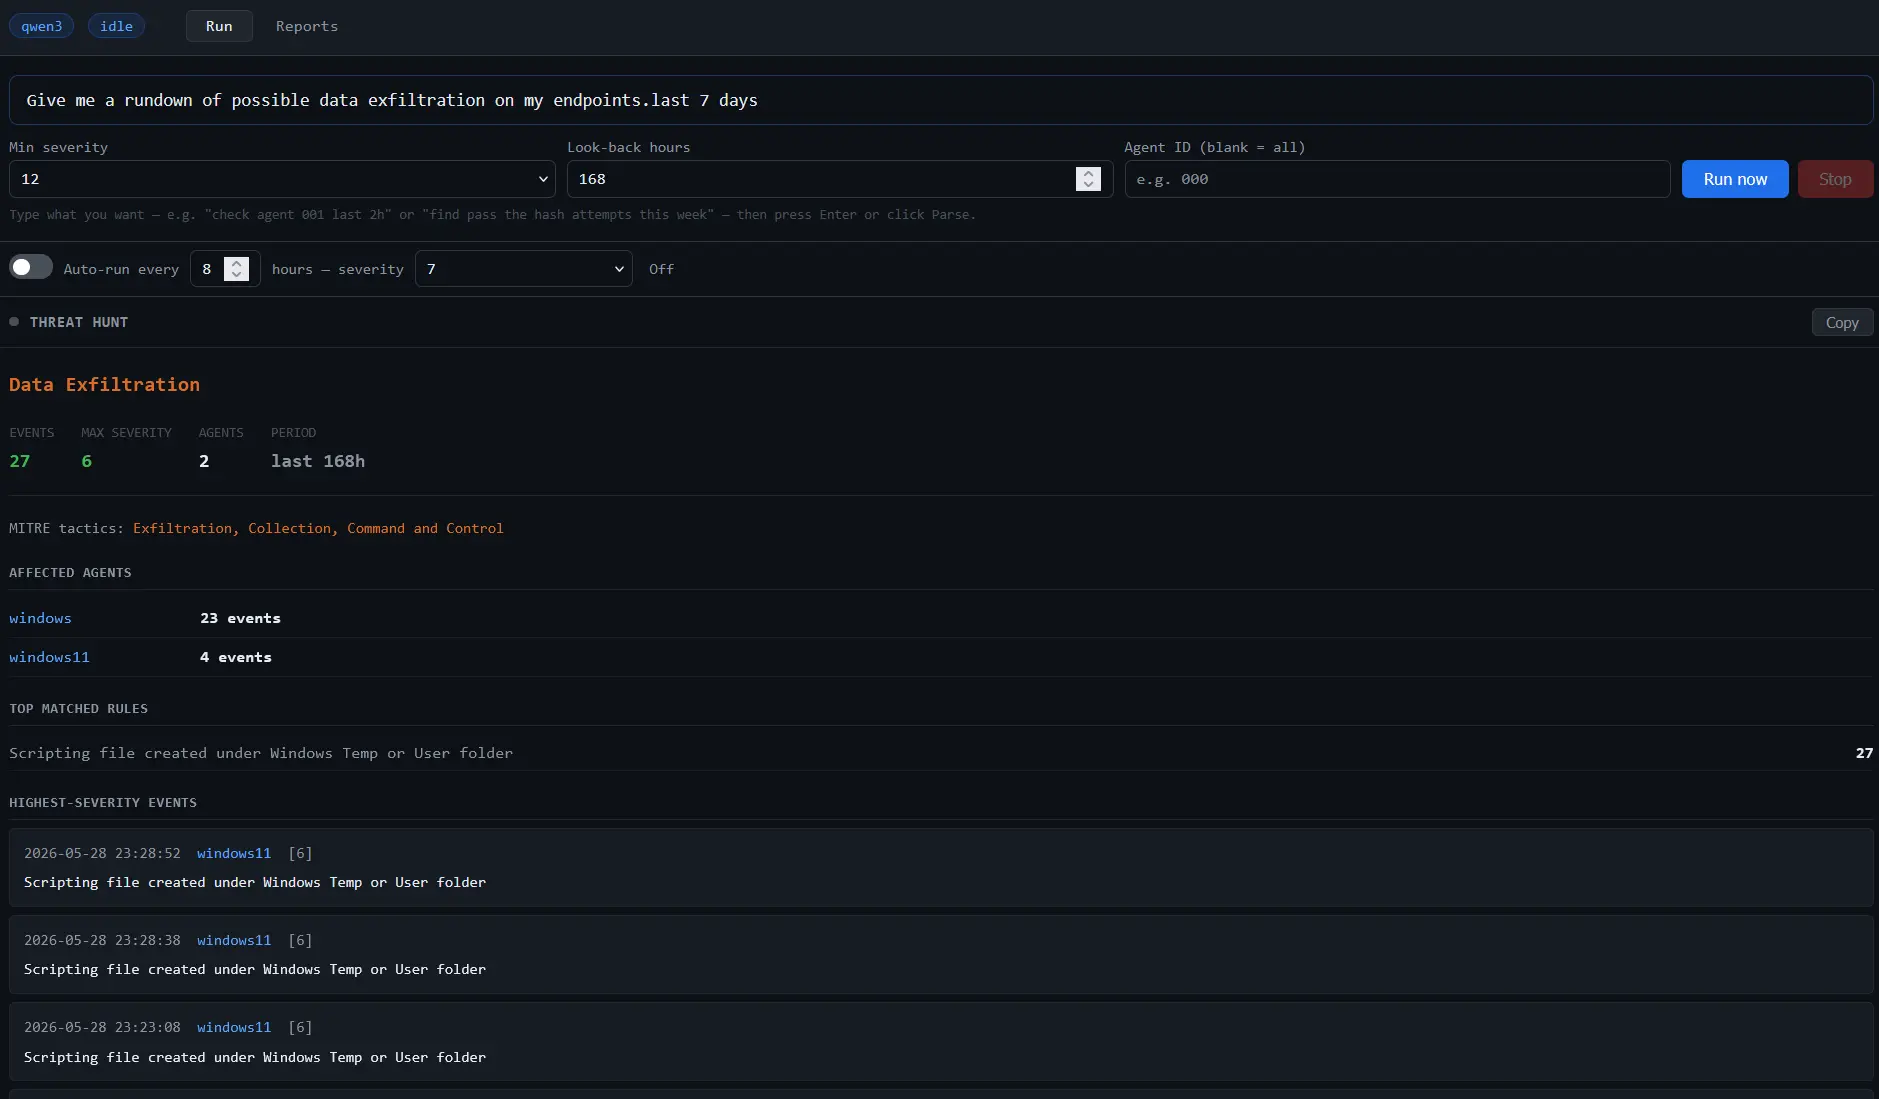
- Enter the following prompt to search for possible data exfiltration events on all Wazuh agents. Click Run now and verify that the correct information is extracted from your prompt, then click Yes, run this:
Give me a rundown of possible data exfiltration on my endpoints in the last 7 days
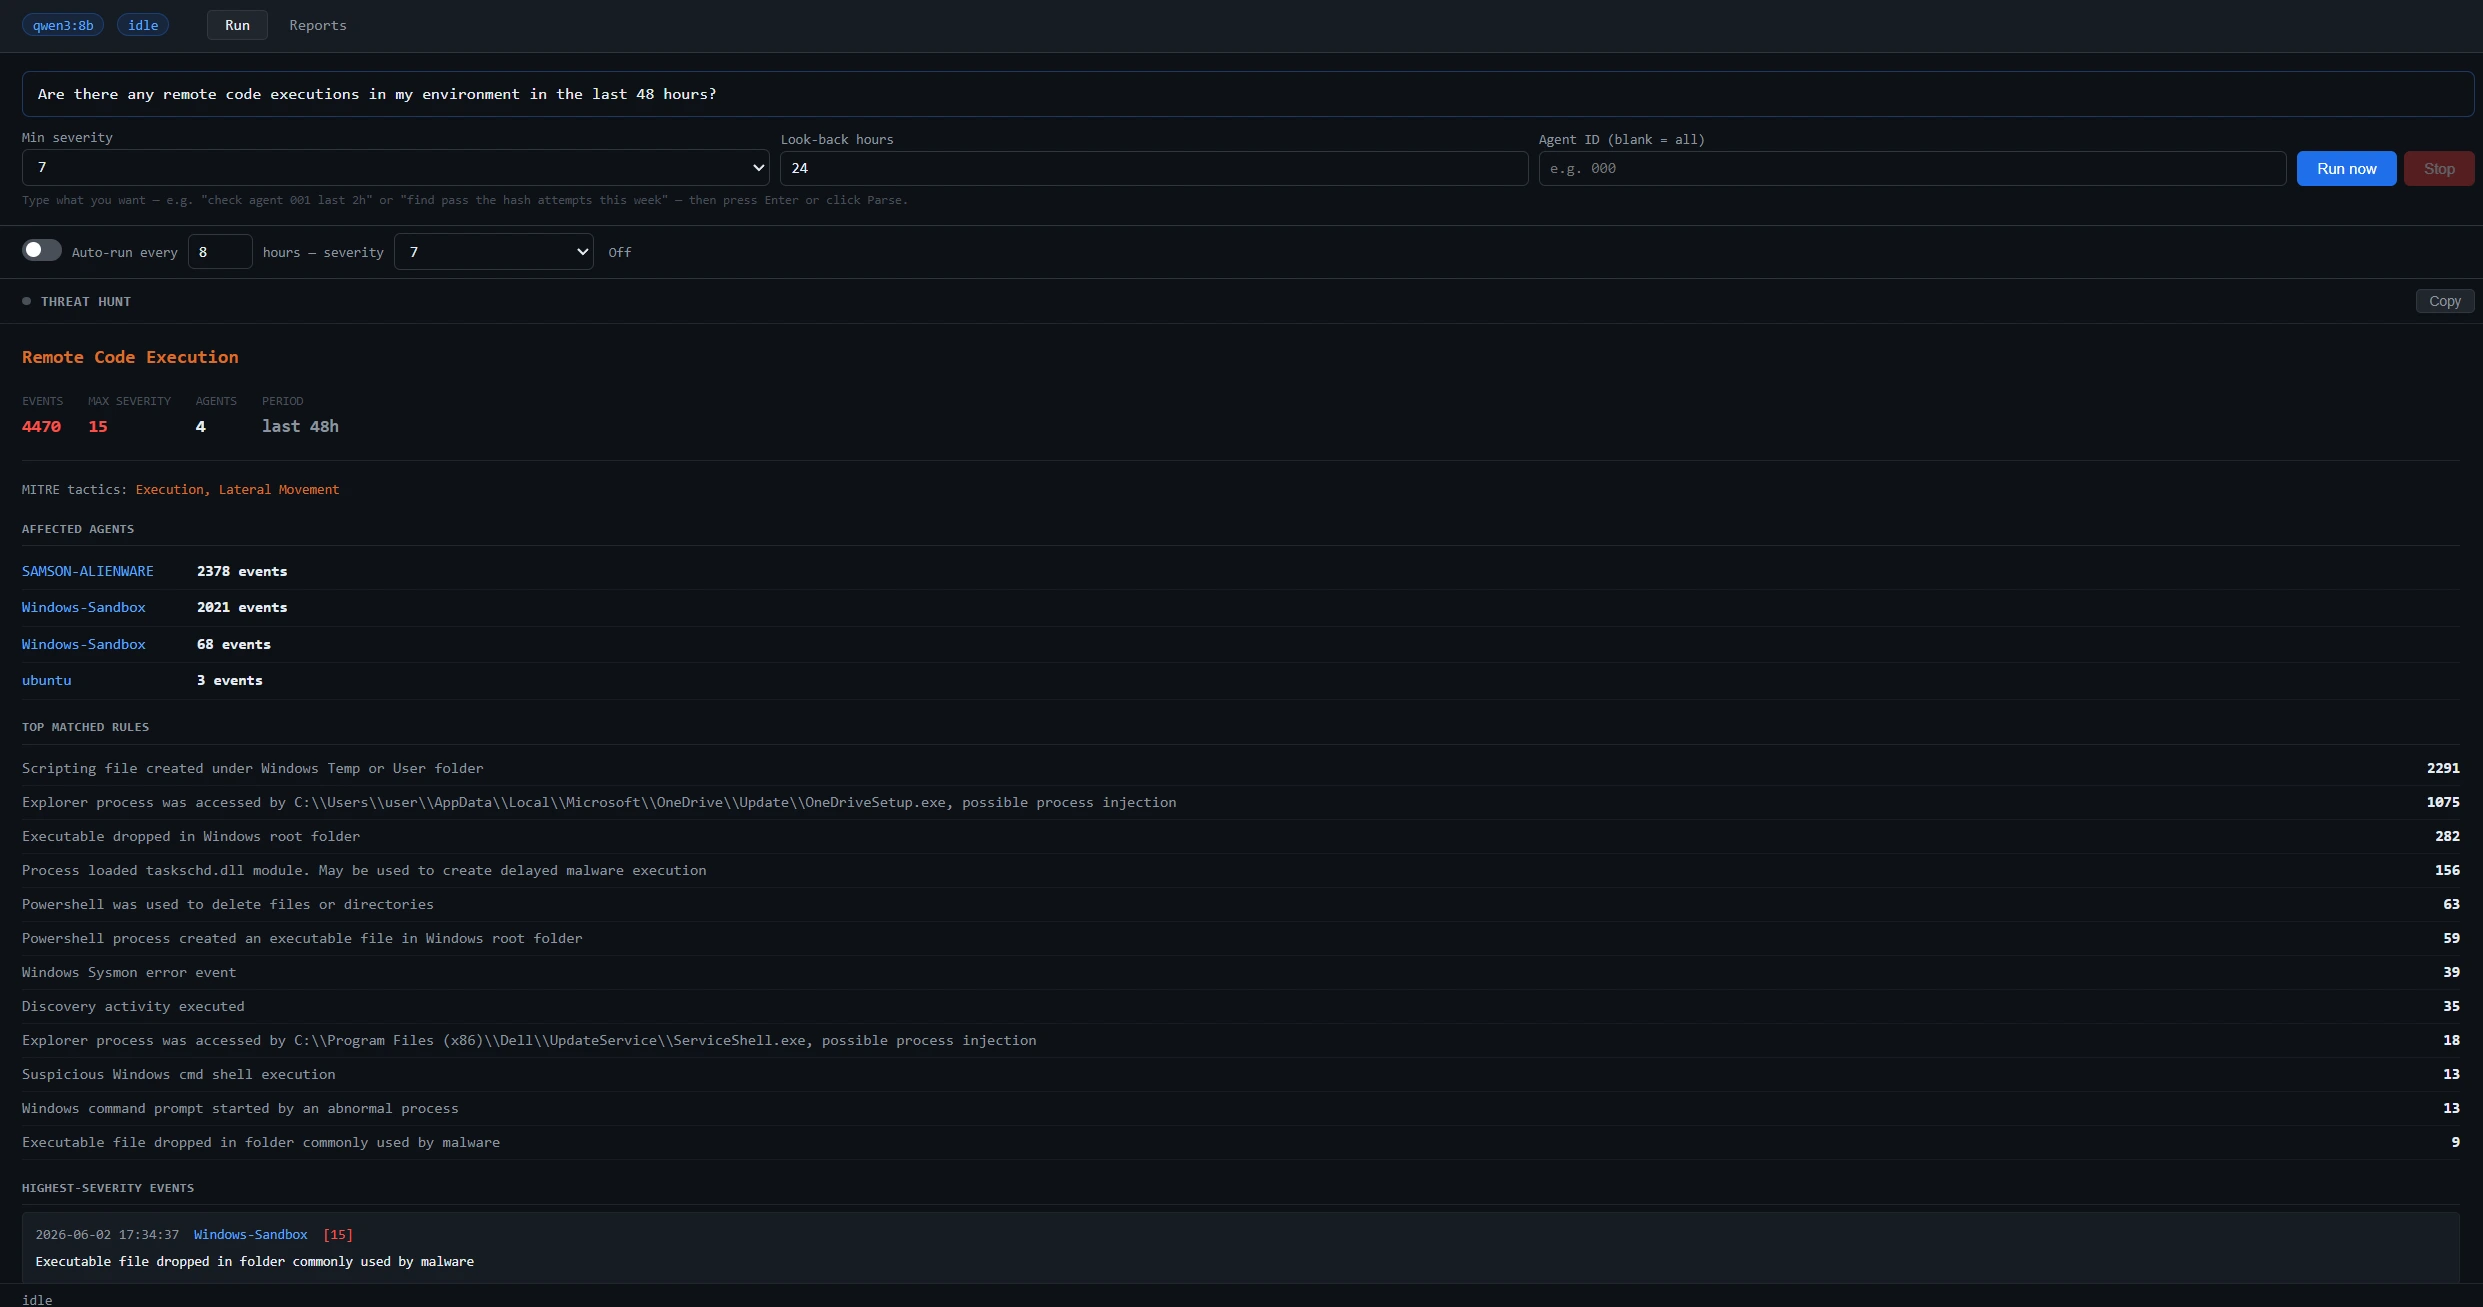
- Enter the following prompt to search for remote code execution in your environment. Click Run now and verify that the correct information is extracted from your prompt, then click Yes, run this:
Are there any remote code executions in my environment in the last 48 hours?
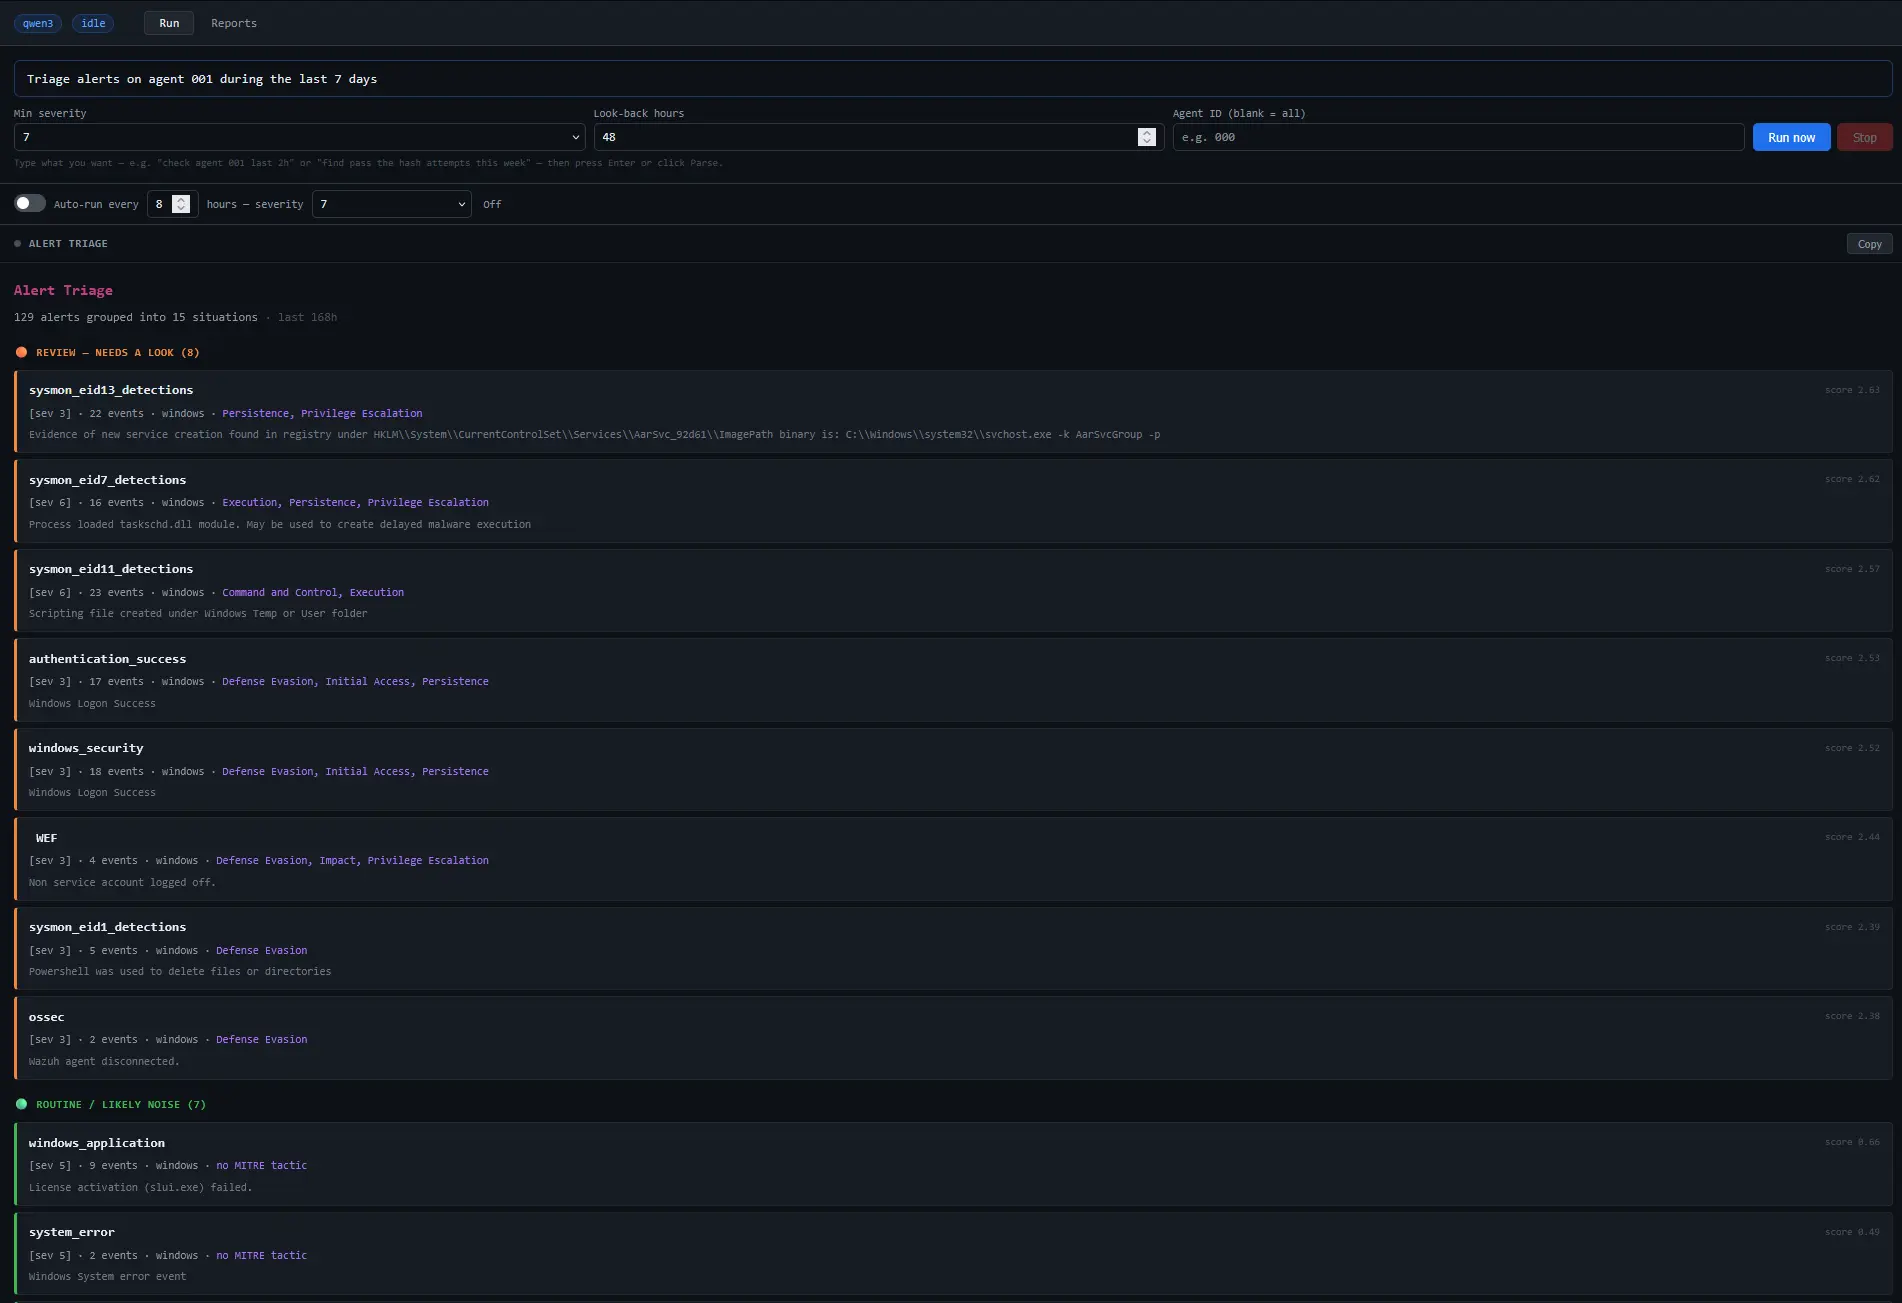
- Enter the following prompt to perform alerts triage for the past 7 days on agent
001. This instructs the AI agent to pull telemetry, cross-reference event logs, and isolate anomalous behaviors that occurred on a specific endpoint during the specified window:
Triage alerts on agent 001 during the last 7 days
- Enter the following prompt to perform alert correlations for severity 12 alerts during the last 24 hours. This prompt instructs the AI agent to search for high-importance security alerts (level 12) and construct an investigation timeline by correlating all system events that occurred within 30 minutes before and after the alert was triggered.
Correlate alerts of severity 12 during the last 24 hours
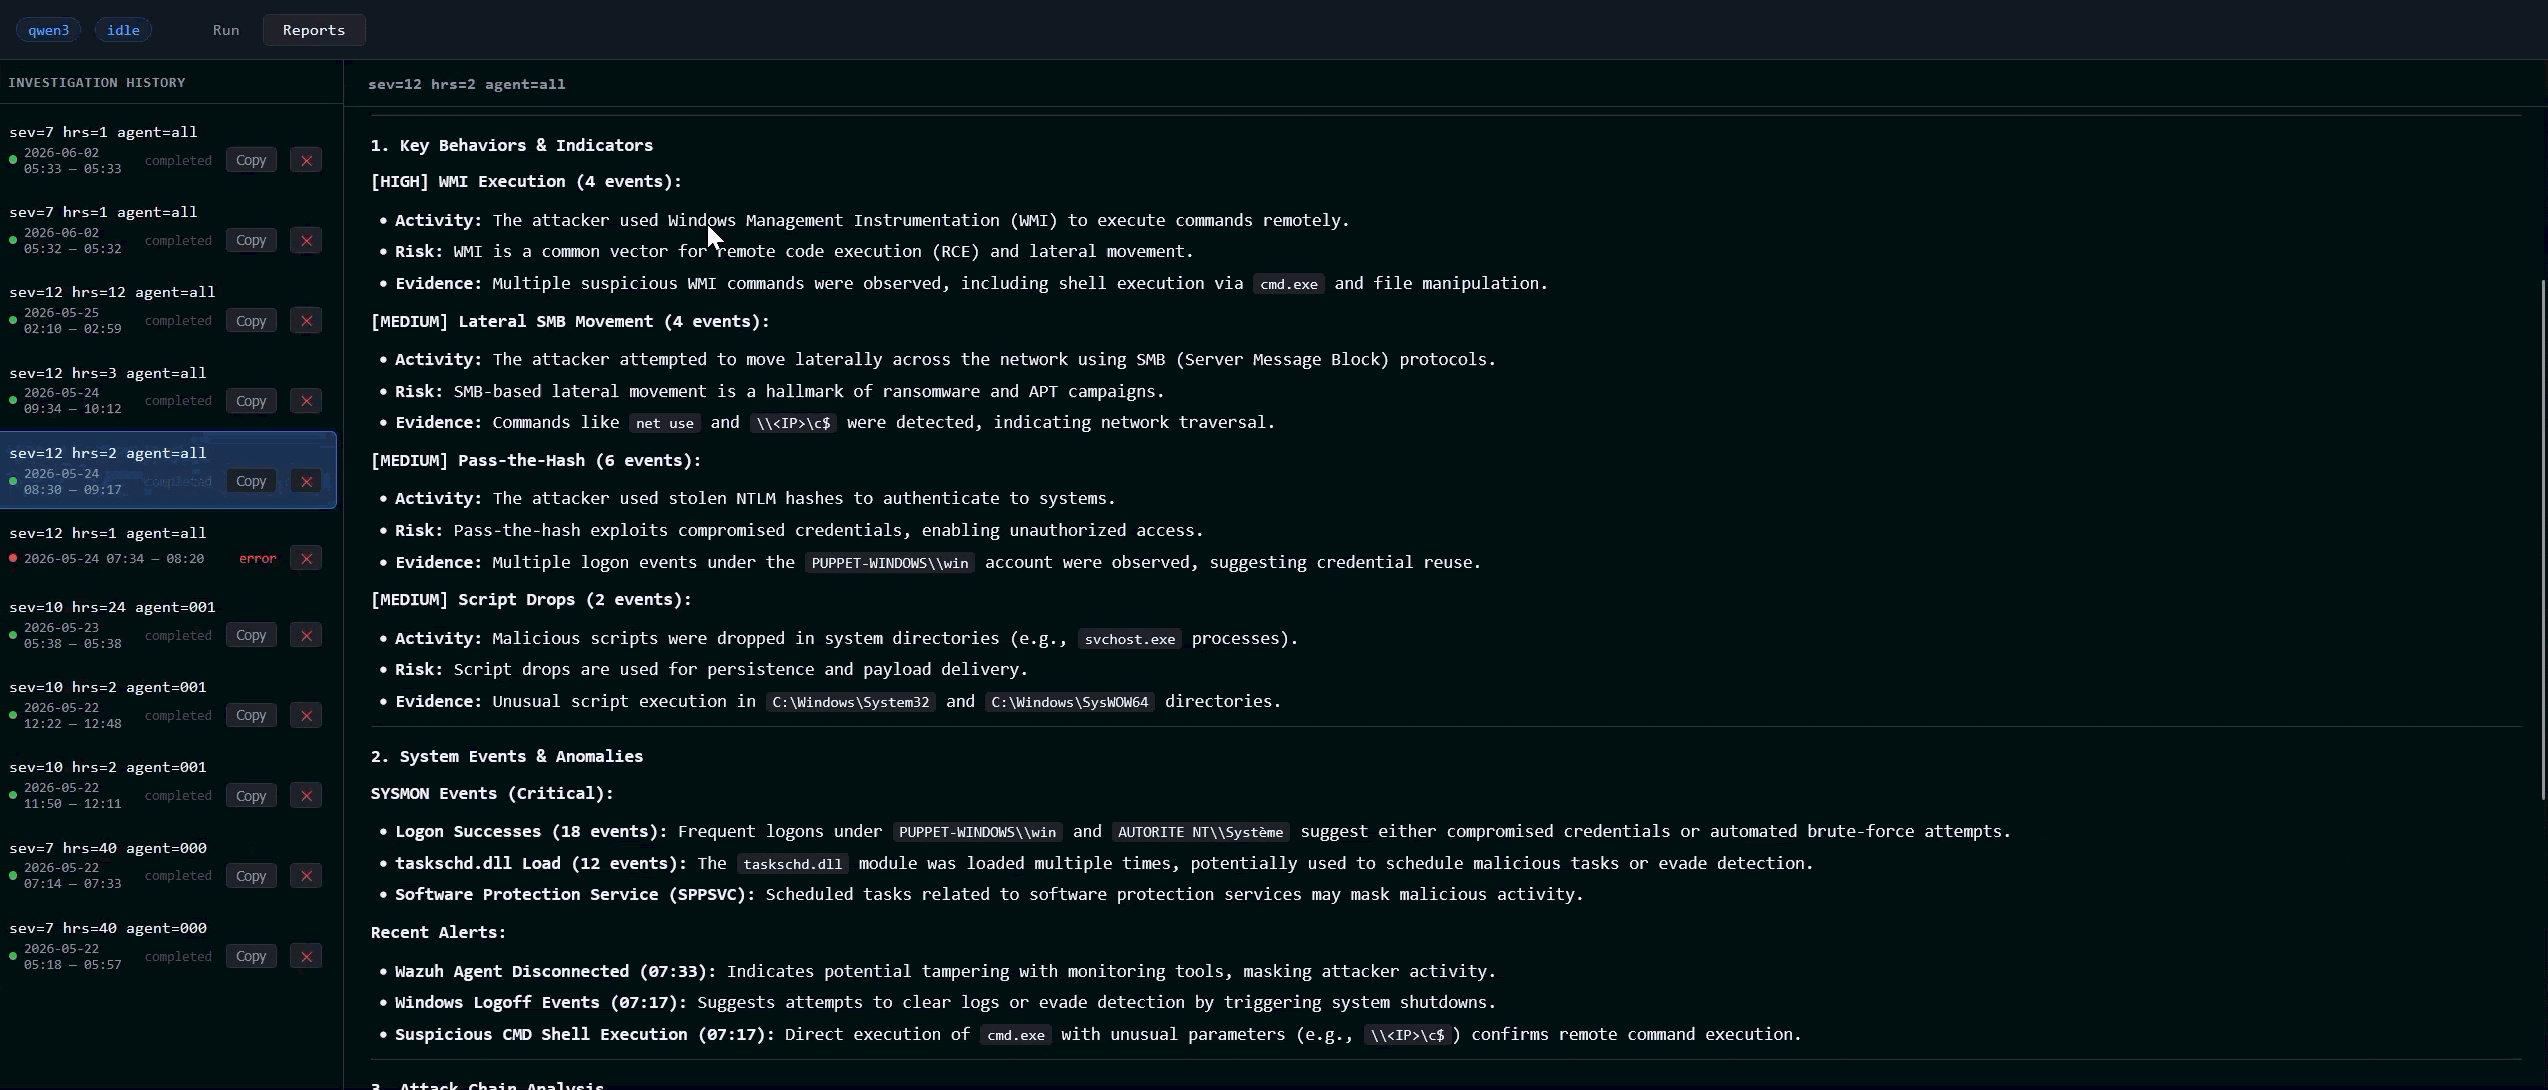
- Navigate through the results. All outputs are stored in the
investigation.jsonfile and can also be viewed on the user interface under the Reports section.
Conclusion
This implementation demonstrates how Agentic AI can support threat hunting by reducing the manual effort required to collect, correlate, and review security data across Wazuh. It focuses on improving the efficiency of investigative workflows involving multiple telemetry sources.
The design prioritizes traceability, ensuring that all results produced during an investigation are derived exclusively from data retrieved through the Wazuh server API and the Wazuh indexer API. This ensures that results are directly linked to recorded security events rather than model-generated content.
This blog post builds on the earlier exploration of Agentic AI in Wazuh, as described in “A Sneak Peek at Agentic AI in Wazuh”. It aligns with an approach in which automated systems assist in processing security data at scale, while maintaining analyst oversight of final interpretation and response.
To learn more about Wazuh, explore our other blog posts, and join the growing community.