
Privilege escalation is the process by which an attacker gains permissions beyond those assigned to their current account. On Linux systems, threat actors who gain initial access as a low-privileged user often exploit misconfigurations or weak security controls to obtain root or other privileged access. With elevated privileges, they can disable security controls, modify system configurations, steal sensitive data, or establish persistent access.
Linux privilege escalation often relies on abusing legitimate operating system features such as sudo, SUID (Set User ID) binaries, privileged groups, ptrace, the dynamic linker, and cron jobs. Because these mechanisms are routinely used for legitimate administration, distinguishing malicious activity from normal system activity can be challenging. Wazuh detects privilege escalation attempts by combining Auditd, File Integrity Monitoring (FIM), and custom detection rules.
This blog post demonstrates how to detect common Linux privilege escalation techniques with Wazuh. We map each technique to the MITRE ATT&CK framework and show the required endpoint and Wazuh server configurations, attack simulations, and the resulting Wazuh alerts.
Infrastructure
We use the following infrastructure to demonstrate the detection of Linux privilege escalation techniques with Wazuh:
- A pre-built, ready-to-use Wazuh OVA 4.14.6, which includes the Wazuh central components (Wazuh server, Wazuh indexer, and Wazuh dashboard). Follow this guide to download and set up the Wazuh virtual machine.
- An Ubuntu 26.04 endpoint with the Wazuh agent 4.14.6 installed and enrolled to the Wazuh server. We simulate privilege escalation attacks against this endpoint.
Auditd configuration
The detection techniques in this post rely on the Linux Audit system (auditd) to monitor system calls. Perform the following steps on the Ubuntu endpoint before proceeding to the individual technique sections:
- Install
auditdand theauditd-pluginspackage:
# apt-get install -y auditd audispd-plugins
- Start and enable the
auditdservice:
# systemctl start auditd
# systemctl enable auditd
- Append the following configuration block to the Wazuh agent configuration file at
/var/ossec/etc/ossec.conf. This tells the Wazuh agent to read the audit log file:
<ossec_config>
  <localfile>
    <log_format>syslog</log_format>
    <location>/var/log/audit/audit.log</location>
  </localfile>
</ossec_config>
- Restart the Wazuh agent to apply the configuration:
# systemctl restart wazuh-agent
Common privilege escalation techniques and detection with Wazuh
The MITRE Adversarial Tactics, Techniques, and Common Knowledge (ATT&CK®) framework provides a curated knowledge base of real-world adversary tactics and techniques. The following MITRE ATT&CK privilege escalation (TA0004) techniques are covered in this post:
- T1548.003 – Abuse elevation control mechanism: Sudo and sudo caching
- T1548.001 – Abuse elevation control mechanism: Setuid and Setgid
- T1098.007 – Account manipulation: Additional local or domain groups
- T1055 – Process injection
- T1574.006 – Hijack execution flow: Dynamic linker hijacking
- T1053.003 – Scheduled task/job: Cron
T1548.003 – Abuse elevation control mechanism: Sudo and sudo caching
sudo (superuser do) is a standard Linux utility that allows a permitted user to run commands as root or another user. These permissions are defined in the /etc/sudoers configuration file. Threat actors who compromise an account with a misconfigured /etc/sudoers file can abuse these permissions to escalate privileges. For example, a NOPASSWD entry or permission to execute a privileged binary via sudo can allow an attacker to obtain a root shell without supplying any credentials.
A common attacker workflow is:
- Run
sudo -lto enumerate which commands the compromised account can execute throughsudo. - Identify a binary that the
sudoersfile allows to be executed without a password, and that can be leveraged to spawn a shell. Examples include bash, find, vim, or python3. - Execute the binary in a way that escapes to a root shell (techniques for each binary are catalogued at GTFOBins).
Detection
We use the following methods to detect this technique:
- Auditd: Monitor
execvesystem calls to capture everysudoinvocation. - Detection rules: Raise a base alert on any sudo execution, and escalate to critical severity when the executed binary is known to enable privilege escalation. These binaries are documented by the GTFOBins project.
Ubuntu endpoint configuration
- Run the following commands to add an audit rule to monitor sudo invocations.
# SUDO_PATH=$(readlink -f $(which sudo))
# sudo bash -c "echo \"-a always,exit -F arch=b64 -S execve -F path=${SUDO_PATH} -k priv_esc_sudo\" >> /etc/audit/rules.d/audit.rules"
- Reload the audit rules to apply the change:
# augenrules --load
- Confirm the rule is active:
# sudo auditctl -l | grep priv_esc_sudo
# -a always,exit -F arch=b64 -S execve -F path=/usr/lib/cargo/bin/sudo -F key=priv_esc_sudo
Wazuh server configuration
Perform the following steps from the Wazuh dashboard to create detection rules:
- Navigate to Server management > Rules and click + Add new rules file
- Copy and paste the rules below and name the file
linux_privesc.xml. Click Save, then Reload to apply the changes.
<group name="linux_privilege_escalation,">

  <!-- T1548.003 — Sudo and Sudo Caching -->

  <rule id="100201" level="14">
    <if_sid>80700</if_sid>
    <field name="audit.execve.a0">sudo</field>
    <match type="pcre2">a[123]="(?:[^"]*\/)?(?:bash|sh|dash|zsh|python\d*|perl|ruby|lua|php|node|find|awk|sed|vi|vim|nvim|less|more|man|tar|cp|mv|chmod|chown|tee|env|gdb|nmap|docker|podman|rsync|scp|socat)"</match>
    <description>Possible privilege escalation: sudo used to run a sensitive binary - "$(audit.execve.a1)"</description>
    <mitre>
      <id>T1548.003</id>
    </mitre>
  </rule>

</group>
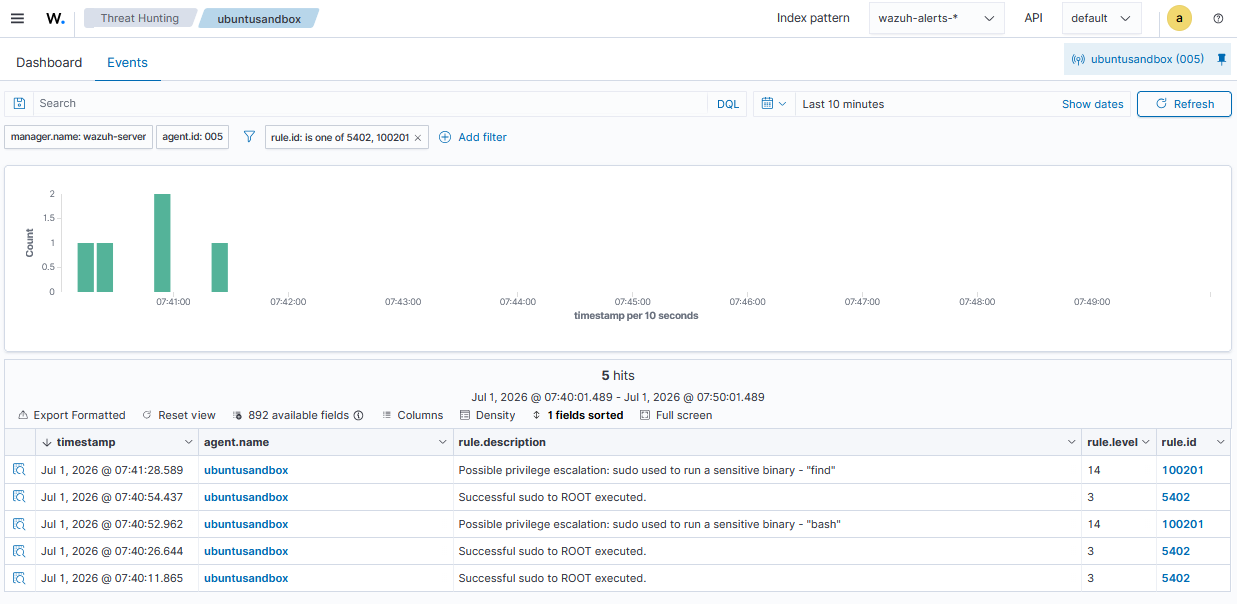
Rule ID 100201 is triggered when sudo is used to execute a binary listed in the GTFOBins project.
Attack simulation
Perform the following steps on the Ubuntu endpoint to simulate the privilege escalation.
- Create a low-privileged test user:
# sudo useradd testuser
# sudo passwd testuser
- Add a
NOPASSWDentry to the/etc/sudoersfile to create the misconfiguration:
# sudo bash -c 'echo "testuser ALL=(ALL) NOPASSWD: /usr/bin/find" >> /etc/sudoers'
- Switch to the test user and escalate to root via the
findcommand:
# su - testuser
# sudo find . -exec /bin/bash \; -quit
- Verify the current user:
# whoami
root
- Navigate to Threat Hunting > Events, then apply the filter
rule.id: is one of 5402,100201to view the alerts on the Wazuh dashboard.
Note
Wazuh provides the built-in rule 5402 that is triggered upon successful execution of the sudo command
- Clean up the misconfigured sudoers entry after testing:
# sudo sed -i '/testuser ALL=(ALL) NOPASSWD: \/usr\/bin\/find/d' /etc/sudoers
T1548.001 – Abuse elevation control mechanism: Setuid and Setgid
On Linux, the Set User ID (SUID) and Set Group ID (SGID) permission bits allow an executable to run with the permissions of the file’s owner (usually root) rather than the user who launches it. This design is intentional for programs like passwd, which must write to root-owned files. However, when a non-essential binary has the SUID bit set or when an attacker sets the SUID bit on a copy of a shell, a low-privileged user can execute that binary with root-level privileges.
A common attacker workflow is:
- Search for SUID binaries using
find / -perm -u=s -type f 2>/dev/null. - Cross-reference the results against GTFOBins to identify exploitable binaries.
- Use the identified binary to spawn a privileged shell or read sensitive files.
- Alternatively, copy
/bin/bashto a writable directory and set the SUID bit directly.
Detection
We use the following methods to detect this technique:
- Wazuh File Integrity Monitoring (FIM): Monitor the filesystem for new SUID/SGID binaries or changes to the permission bits of existing files.
- Auditd: Detect the use of the
chmodcommand to set the SUID or SGID permission bits on a file. - Wazuh detection rules: Alert when FIM detects a new SUID binary or a permission change that enables the SUID bit.
Ubuntu endpoint configuration
- Run the following commands to add audit rules to the auditd configuration file at
/etc/audit/rules.d/audit.rules. These rules monitorchmodsystem calls that set special permission bits:
# sudo bash -c 'cat >> /etc/audit/rules.d/audit.rules << "EOF"
-a always,exit -F arch=b64 -S chmod,fchmod -F a1&06000 -k priv_esc_setuid
-a always,exit -F arch=b64 -S fchmodat -F a2&06000 -k priv_esc_setuid
EOF'
- Reload the audit rules to apply the changes:
# augenrules --load
- Append the following configuration to the Wazuh agent file at
/var/ossec/etc/ossec.conf. This configuration monitors common directories for new SUID files and tracks permission changes:
<ossec_config>
  <syscheck>
    <directories check_all="yes" realtime="yes" report_changes="yes">/usr/local/bin</directories>
    <directories check_all="yes" realtime="yes" report_changes="yes">/tmp</directories>
    <directories check_all="yes" realtime="yes" report_changes="yes">/var/tmp</directories>
    <directories check_all="yes" realtime="yes" report_changes="yes">/home</directories>
  </syscheck>
</ossec_config>
- Restart the Wazuh agent to apply the changes:
# sudo systemctl restart wazuh-agent
Wazuh server configuration
Perform the following steps from the Wazuh dashboard to create detection rules:
- Navigate to Server management > Rules, click Manage rules files, then Custom rules.
- Click the edit button next to the
linux_privesc.xmlfile. - Add the rules below within the
<group>block of the file. Click Save, then Reload to apply the changes:
  <!-- T1548.001 — Setuid and Setgid -->

  <rule id="100202" level="12">
    <if_sid>80700</if_sid>
    <field name="audit.key">priv_esc_setuid</field>
    <description>Possible privilege escalation: SUID or SGID bit set via chmod syscall</description>
    <mitre>
      <id>T1548.001</id>
    </mitre>
  </rule>

  <rule id="100203" level="14">
    <if_sid>550</if_sid>
    <field name="file" type="pcre2">^\/(?:tmp|var\/tmp|home\/[^\/]+)\/.+</field>
    <field name="perm" type="pcre2">s</field>
    <description>Possible privilege escalation: FIM detected SUID or SGID permission bit set on $(file)</description>
    <mitre>
      <id>T1548.001</id>
    </mitre>
  </rule>
Where:
- Rule ID
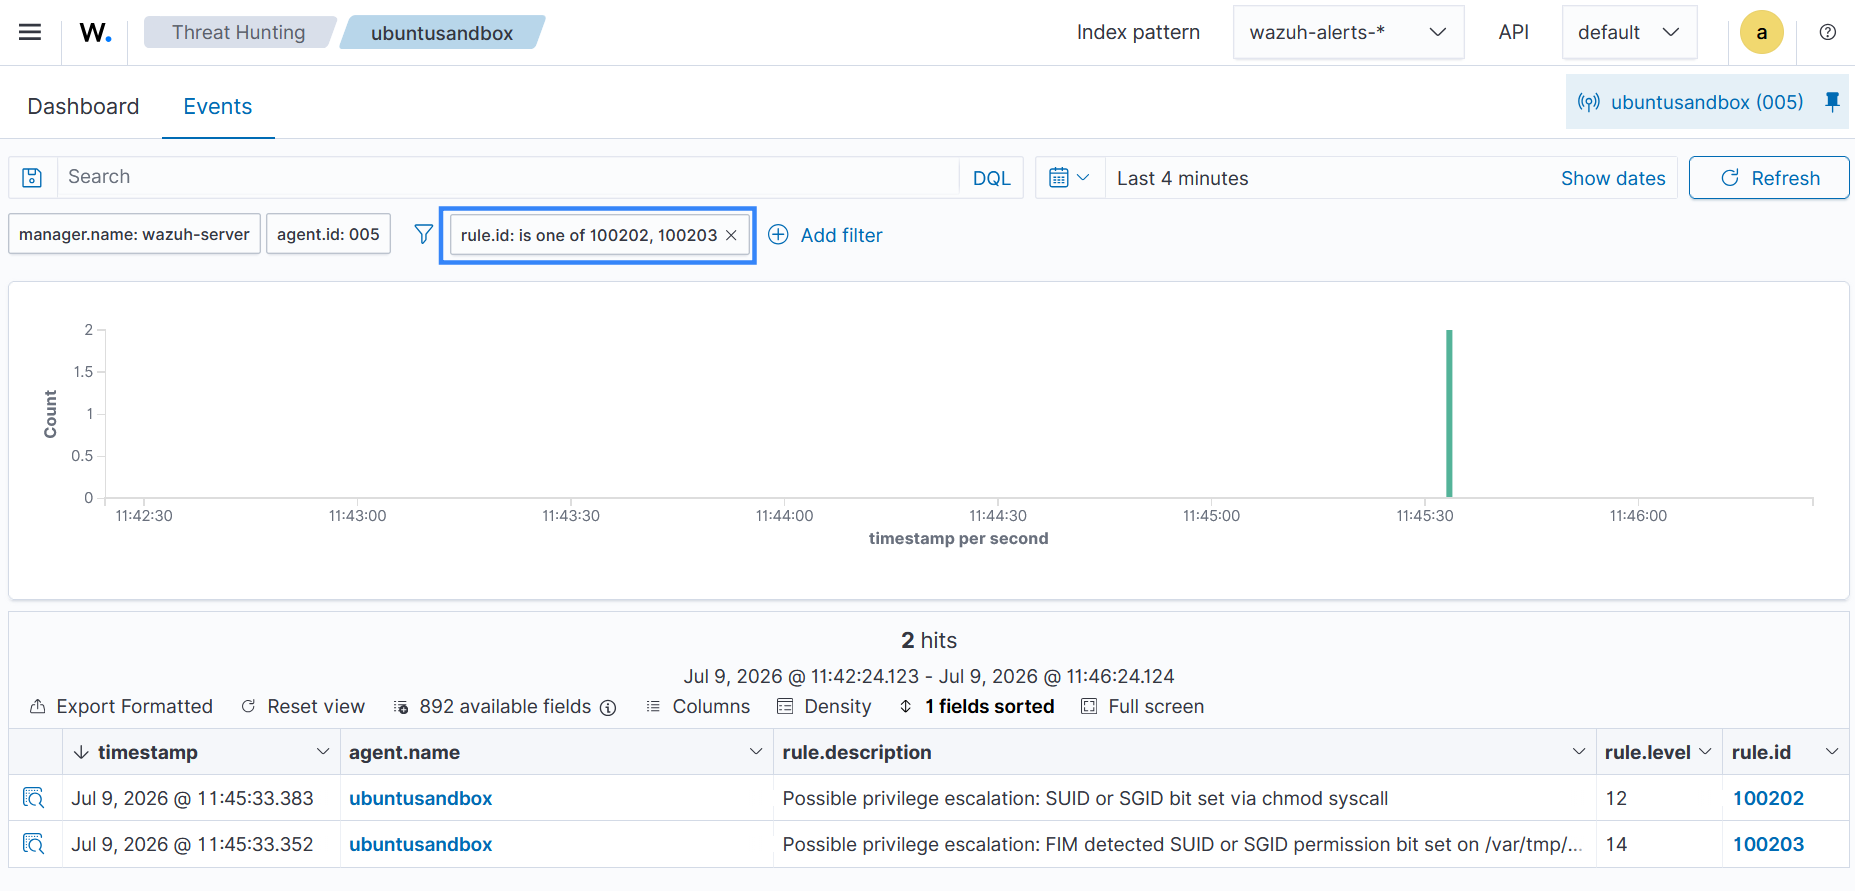
100202is triggered whenchmodis used to set theSUIDorSGIDpermission bit on a file. - Rule ID
100203is triggered when Wazuh FIM detects that a file in a user-writable directory has been assigned theSUIDorSGIDpermission bit.
Attack simulation
Perform the following steps on the Ubuntu endpoint to simulate the privilege escalation.
- Copy bash to a location accessible to all users (for example,
/var/tmp) and set the SUID bit so it runs asroot. This simulates the misconfiguration an attacker would create after gaining initial root access:
# sudo cp /bin/bash /var/tmp/rootbash
# sudo chmod u+s /var/tmp/rootbash
- Execute the binary with the SUID bit to gain a root shell as a low-privileged user:
# /var/tmp/rootbash -p
- Verify the current user:
# whoami
root
- Navigate to Threat Hunting > Events, then apply the filter
rule.id: is one of 100202,100203to view the alerts on the Wazuh dashboard.
- Clean up after testing:
# sudo rm /var/tmp/rootbash
T1098.007 – Account manipulation: Additional local or domain groups
Attackers with a foothold on a compromised Linux system may add their controlled account to a privileged group to gain elevated access. On Ubuntu and Debian-based systems, members of the sudo group can run any command as root. On Red Hat-based distributions, the equivalent group is wheel. Adding a low-privileged user to one of these groups achieves the same result as a NOPASSWD entry in /etc/sudoers. The attacker gains root access on the next login. This technique is subtle because usermod and adduser are standard administration tools.
A common attacker workflow is:
- Gain initial access as a low-privileged user.
- Exploit a secondary vulnerability or misconfiguration to run a user management command as root.
- Execute
usermod -aG sudo <USERNAME>to add the account to thesudogroup. The account now has fullsudoaccess.
Detection
We use the following methods to detect this technique:
- Wazuh File Integrity Monitoring (FIM): Monitor
/etc/groupand/etc/gshadowfor modifications. - Auditd: Detect the use of the
usermodandgroupmodcommands that affect privileged groups. - Wazuh detection rules: Alert when a user is added to a privileged group such as sudo, wheel, adm, or root.
Ubuntu endpoint configuration
- Run the following command to add audit rules to /
etc/audit/rules.d/audit.rules file. These rules track the execution of group-modification commands:
# sudo bash -c 'cat >> /etc/audit/rules.d/audit.rules << EOF
-a always,exit -F arch=b64 -S execve -F path=/usr/sbin/usermod -k priv_esc_group
-a always,exit -F arch=b64 -S execve -F path=/usr/sbin/groupmod -k priv_esc_group
EOF'
- Reload the audit rules to apply the changes:
# sudo augenrules --load
- Append the following configuration to the Wazuh agent file at
/var/ossec/etc/ossec.conf.
<ossec_config>
  <syscheck>
    <directories check_all="yes" realtime="yes" report_changes="yes">/etc/group</directories>
    <directories check_all="yes" realtime="yes" report_changes="yes">/etc/gshadow</directories>
    <directories check_all="yes" realtime="yes" report_changes="yes">/etc/sudoers</directories>
    <directories check_all="yes" realtime="yes" report_changes="yes">/etc/sudoers.d</directories>
  </syscheck>
</ossec_config>
- Restart the Wazuh agent to apply the changes:
# sudo systemctl restart wazuh-agent
Wazuh server configuration
Perform the following steps from the Wazuh dashboard to create detection rules:
- Navigate to Server management > Rules, click Manage rules files, then Custom rules.
- Click the edit button next to the
linux_privesc.xmlfile. - Add the rules below within the
<group>block of the file. Click Save, then Reload to apply the changes:
<!-- T1098.007 — Additional Local or Domain Groups -->

  <rule id="100204" level="10">
    <if_sid>80700</if_sid>
    <field name="audit.key">priv_esc_group</field>
    <description>Possible privilege escalation: privileged group or sudoers file write detected</description>
    <mitre>
      <id>T1098.007</id>
    </mitre>
  </rule>

  <rule id="100205" level="14">
    <if_sid>80700</if_sid>
    <match type="pcre2">a0="(?:usermod|groupmod)"</match>
    <field name="audit.execve.a2" type="pcre2">^(sudo|wheel|adm|root|shadow|disk)$</field>
    <description>Possible privilege escalation: privileged group referenced in user management command — "$(audit.execve.a2)"</description>
    <mitre>
      <id>T1098.007</id>
    </mitre>
  </rule>

  <rule id="100206" level="12">
    <if_sid>550</if_sid>
    <field name="file" type="pcre2">^\/etc\/(?:group|gshadow|sudoers(?:\.d\/.+)?)$</field>
    <description>Possible privilege escalation: FIM detected a change to a group membership or sudoers file — $(file)</description>
    <mitre>
      <id>T1098.007</id>
    </mitre>
  </rule>
Where:
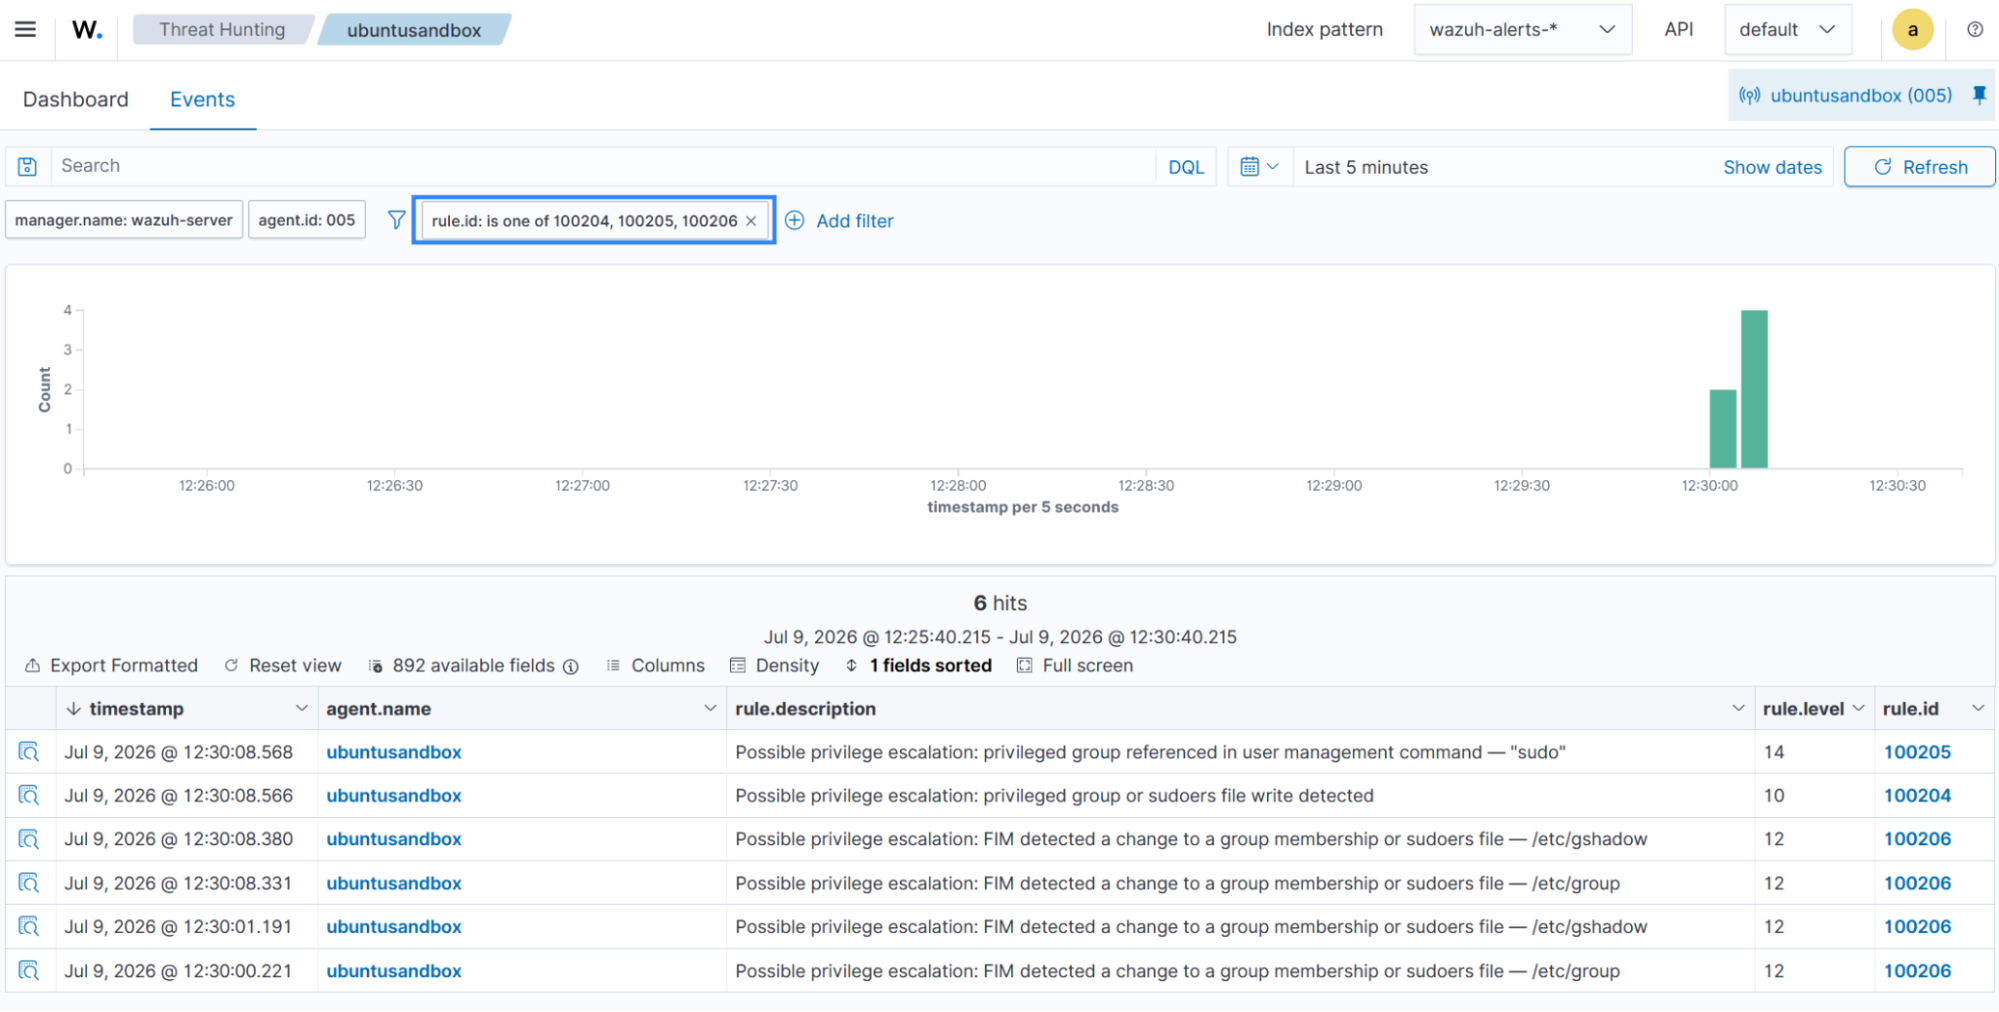
- Rule ID
100204is triggered when a user-management command such as usermod or groupmod is executed. - Rule ID
100205is triggered when a user-management command, such as usermod or groupmod, targets monitored privileged groups. - Rule ID
100206is triggered when Wazuh FIM detects changes to group membership or sudo configuration files.
Attack simulation
Perform the following steps on the Ubuntu endpoint to simulate the privilege escalation:
- Create a low-privileged test user:
# sudo useradd -m -s /bin/bash testuser2
- Add the user to the sudo group:
# sudo usermod -aG sudo testuser2
- Navigate to Threat Hunting > Events, then apply the filter
rule.id: is one of 100204,100205,100206to view the alerts on the Wazuh dashboard.
- Clean up after testing:
# sudo deluser testuser2 sudo
# sudo userdel -r testuser2
T1055 – Process injection
Process injection is a technique in which an attacker executes arbitrary code within the address space of a separate, live process. On Linux, the primary mechanism for this is the ptrace system call, which the kernel provides for debugging purposes. Ptrace allows one process (the tracer) to inspect and modify the memory and registers of another process (the tracee). When a low-privileged attacker injects code into a process that runs with elevated privileges, such as a root-owned service, the injected code inherits those elevated privileges.
Linux ptrace-based injection is used in the wild by malware families and post-exploitation frameworks. It is also the underlying mechanism used by tools such as gdb and strace. Key steps in a ptrace injection attack are:
- Identify a target process running as root or with elevated capabilities using
ps auxor/procenumeration. - Attach to the process with
ptrace(PTRACE_ATTACH, ...) - Inject shellcode or a shared library path into the process’s memory.
- Redirect execution to the injected code.
- Detach and let the injected code execute in the privileged context.
Detection
We use the following methods to detect this technique:
- Auditd: Monitor the
ptracesystem call, specificallyPTRACE_ATTACHrequests where the calling process targets a process owned by a different user. - Wazuh detection rules: Alerts when a non-root process renders a
ptraceattach request against a process it does not own.
Ubuntu endpoint configuration
- Run the following command to add audit rules to the
/etc/audit/rules.d/audit.rulesfile. This audit rule capturesptracesystem call events, specificallyPTRACE_ATTACHrequests (this is conditioned by the filter-F a0=16):
# sudo bash -c 'cat >> /etc/audit/rules.d/audit.rules << EOF
-a always,exit -F arch=b64 -S ptrace -F a0=16 -k priv_esc_ptrace
EOF'
- Reload the audit rules to apply the changes:
# sudo augenrules --load
Wazuh server configuration
Perform the following steps from the Wazuh dashboard to create detection rules:
- Navigate to Server management > Rules, click Manage rules files, then Custom rules.
- Click the edit button next to the
linux_privesc.xmlfile. - Add the rules below within the
<group>block of the file. Click Save, then Reload to apply the changes:
<!-- T1055 — Process Injection -->

  <rule id="100207" level="12">
    <if_sid>80700</if_sid>
    <field name="audit.key">priv_esc_ptrace</field>
    <description>Possible privilege escalation: ptrace PTRACE_ATTACH syscall detected — possible process injection</description>
    <mitre>
      <id>T1055</id>
    </mitre>
  </rule>

  <rule id="100208" level="12">
    <if_sid>100207</if_sid>
    <field name="audit.uid" type="pcre2">^(?!0$)\d+$</field>
    <field name="audit.command" negate="yes" type="pcre2">^(gdb|strace|ltrace|lldb|gdbserver)$</field>
    <description>Possible privilege escalation: non-root process used PTRACE_ATTACH — possible process injection attempt (UID: $(audit.uid))</description>
    <mitre>
      <id>T1055</id>
    </mitre>
  </rule>
Where:
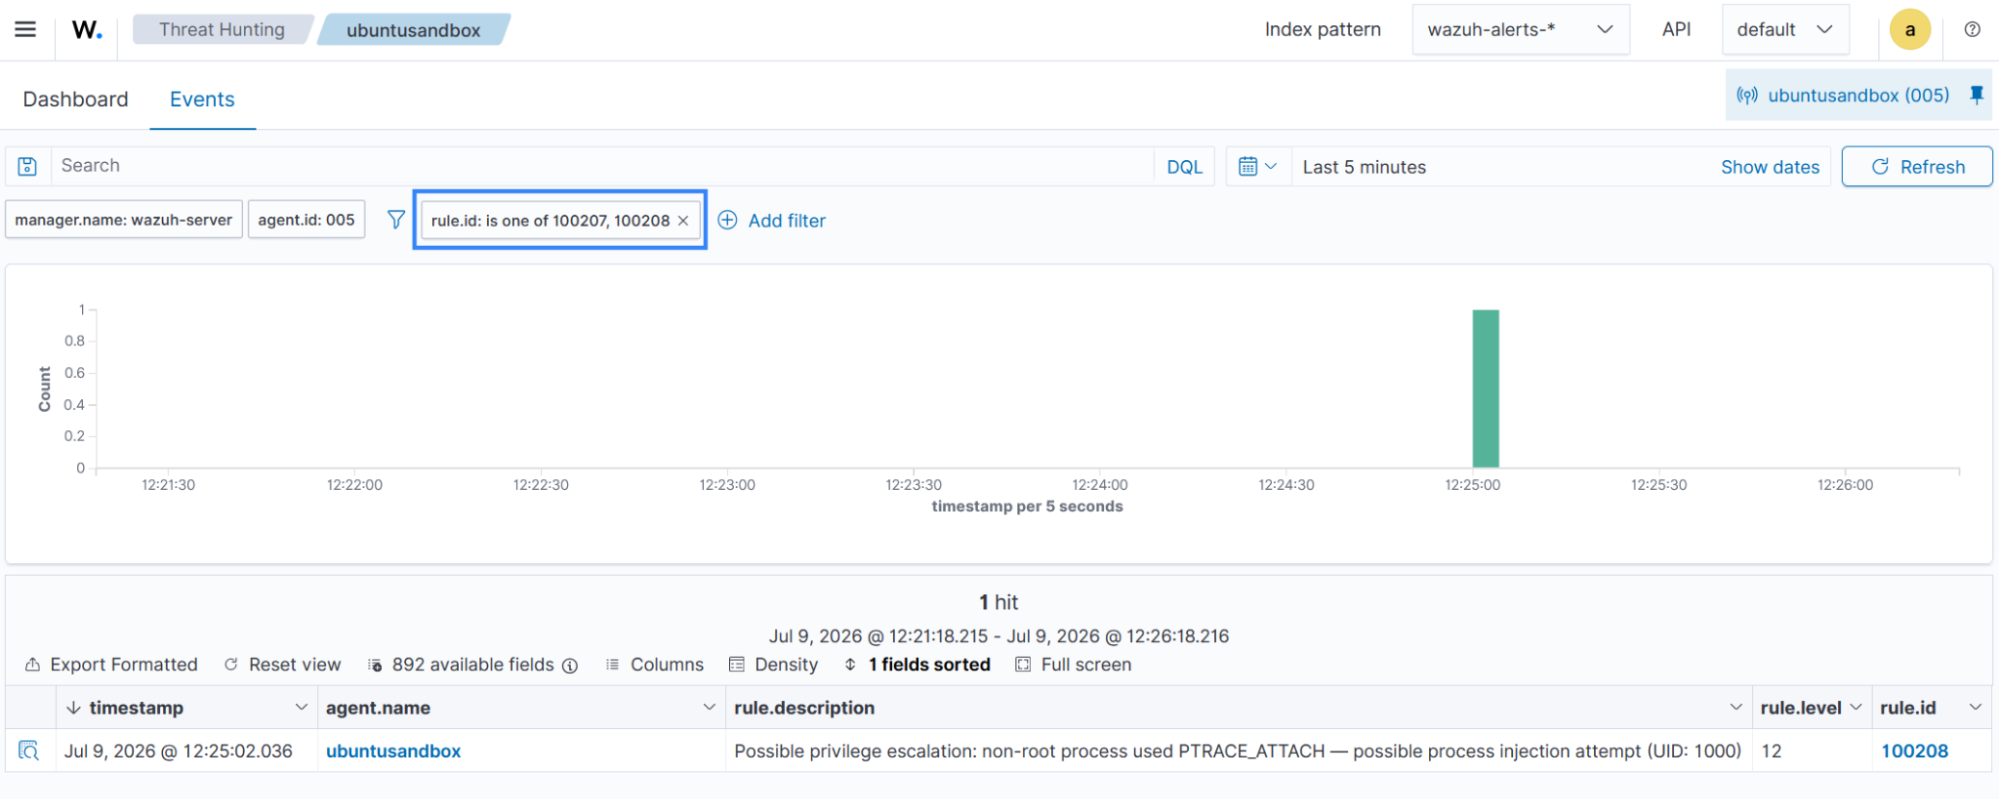
- Rule ID
100207is triggered when thePTRACE_ATTACHsystem call is used to attach to another process. - Rule ID
100208is triggered when a non-root process usesPTRACE_ATTACHoutside known debugging tools, which may indicate process injection or privilege escalation activity.
Attack simulation
Perform the following steps on the Ubuntu endpoint to simulate a process injection attack.
- Create the file
/tmp/ptrace_test.cand insert the following. This C program simulates attempts to attach to the systemd process (PID 1). The call is expected to fail with EPERM on a hardened system (where/proc/sys/kernel/yama/ptrace_scopeis set to 1 or higher).
#include <stdio.h>
#include <errno.h>
#include <sys/ptrace.h>
#include <sys/types.h>

int main() {
    pid_t target = 1;
    long ret = ptrace(PTRACE_ATTACH, target, NULL, NULL);
    printf("ptrace result: %ld (errno: %d — EPERM expected on hardened systems)\n", ret, errno);
    return 0;
}
- Install the necessary tools to compile the C program:
# sudo apt-get install -y build-essential
- Compile the C program and execute it:
# gcc -o /tmp/ptrace_test /tmp/ptrace_test.c
# /tmp/ptrace_test
- Navigate to Threat Hunting > Events, then apply the filter
rule.id: is one of 100207,100208to view the alerts on the Wazuh dashboard.
- Clean up after testing:
# rm -f /tmp/ptrace_test /tmp/ptrace_test.c
T1574.006 – Hijack execution flow: Dynamic linker hijacking
The Linux dynamic linker (ld.so) resolves and loads shared libraries (.so files) required by executables at runtime. The search order for libraries is influenced by several mechanisms, including the LD_PRELOAD environment variable and the /etc/ld.so.preload file. These mechanisms allow a user to inject a custom shared library that is loaded before any other library when a program starts.
Threat actors abuse this behaviour to escalate privileges. If a root-owned SUID binary is executed and LD_PRELOAD is set to a malicious shared library, the library is loaded with the process’s elevated permissions. Similarly, if an attacker can write to /etc/ld.so.preload, every dynamically linked executable on the system will load the malicious library.
Key attack vectors include:
LD_PRELOADinjection: Requires either thatsudo NOPASSWDis configured (sincesudocan be configured to preserveLD_PRELOAD) or that the targeted SUID binary does not strip theLD_PRELOADvariable.- /
etc/ld.so.preloadmodification: Requires write access to this file (typically via another vulnerability or misconfiguration).
Detection
We use the following methods to detect this technique:
- Wazuh FIM: Monitor
/etc/ld.so.preloadfor creation or modification. - Auditd: Detect write access to
/etc/ld.so.preloadand the creation of new .so files in writable directories. - Wazuh detection rules: Alert on any modification to the dynamic linker preload configuration file.
Ubuntu endpoint configuration
- Run the following command to add audit rules to the
/etc/audit/rules.d/audit.rulesfile.
# sudo bash -c 'cat >> /etc/audit/rules.d/audit.rules << EOF
-w /etc/ld.so.preload -p wa -k priv_esc_dynlinker
-w /etc/ld.so.conf -p wa -k priv_esc_dynlinker
-w /etc/ld.so.conf.d/ -p wa -k priv_esc_dynlinker
-a always,exit -F arch=b64 -S open,openat -F path=/etc/ld.so.preload -F perm=w -k priv_esc_dynlinker
EOF'
- Reload the audit rules to apply the changes:
# sudo augenrules --load
- Add FIM monitoring for the dynamic linker configuration to the Wazuh agent configuration at
/var/ossec/etc/ossec.conf:
<ossec_config>
  <syscheck>
    <directories check_all="yes" realtime="yes" restrict="ld.so">/etc</directories>
    <directories check_all="yes" realtime="yes" report_changes="yes">/etc/ld.so.conf.d</directories>
  </syscheck>
</ossec_config>
- Restart the Wazuh agent to apply the changes:
# sudo systemctl restart wazuh-agent
Wazuh server configuration
Perform the following steps from the Wazuh dashboard to create detection rules:
- Navigate to Server management > Rules, click Manage rules files, then Custom rules.
- Click the edit button next to the
linux_privesc.xmlfile. - Add the rules below within the
<group>block of the file. Click Save, then Reload to apply the changes
<!-- T1574.006 — Dynamic Linker Hijacking -->

  <rule id="100209" level="14">
    <if_sid>80700</if_sid>
    <field name="audit.key">priv_esc_dynlinker</field>
    <description>Possible privilege escalation: dynamic linker config file was written by $(audit.exe) (AUID: $(audit.auid)) — possible LD_PRELOAD hijacking</description>
    <mitre>
      <id>T1574.006</id>
    </mitre>
  </rule>

  <rule id="100210" level="14">
    <if_sid>554</if_sid>
    <field name="file" type="pcre2">^\/etc\/ld\.so(?:\.preload|\.conf(?:\.d\/.+)?)$</field>
    <description>Possible privilege escalation: FIM detected a new dynamic linker config file — $(file)</description>
    <mitre>
      <id>T1574.006</id>
    </mitre>
  </rule>

  <rule id="100211" level="14">
    <if_sid>550</if_sid>
    <field name="file" type="pcre2">^\/etc\/ld\.so(?:\.preload|\.conf(?:\.d\/.+)?)$</field>
    <description>Possible privilege escalation: FIM detected a change to a dynamic linker config file — $(file)</description>
    <mitre>
      <id>T1574.006</id>
    </mitre>
  </rule>
Where:
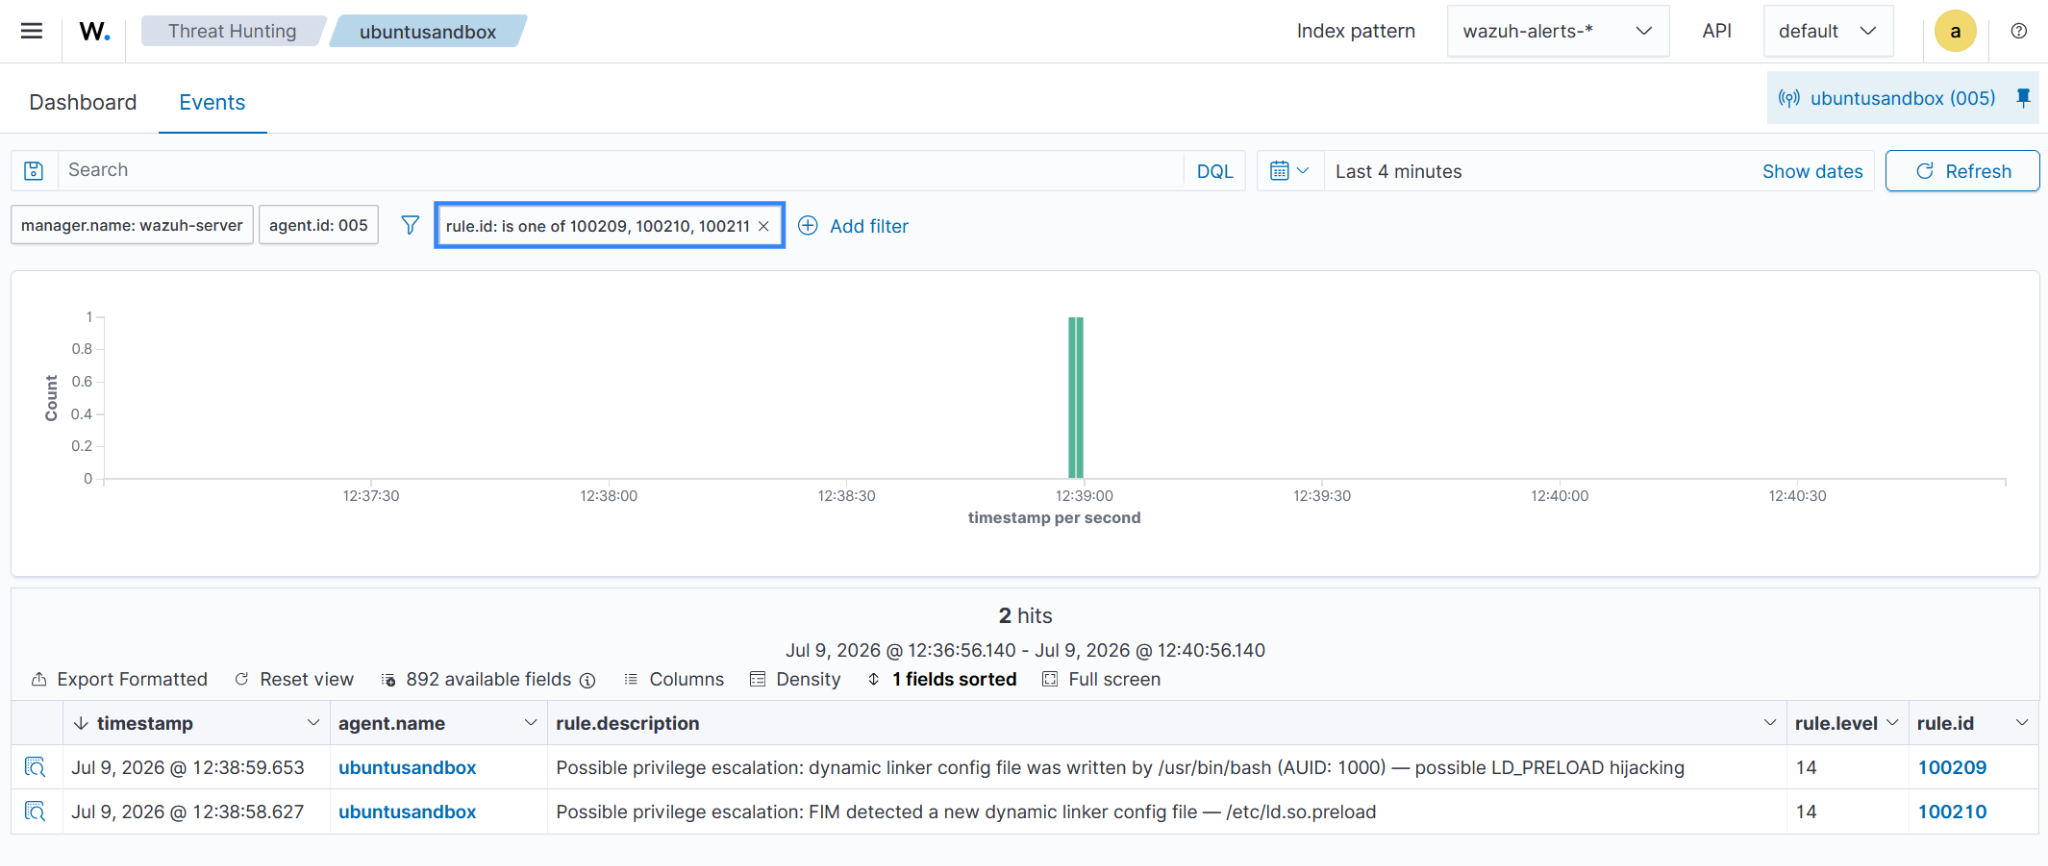
- Rule ID
100209is triggered when a process modifies dynamic linker configuration files, potentially indicating an attempt to hijack shared libraries. - Rule ID
100210is triggered when FIM detects the creation of a dynamic linker configuration file that may be used for shared library hijacking. - Rule ID
100211is triggered when FIM detects the modification of a dynamic linker configuration file that may be used for shared library hijacking.
Attack simulation
Perform the following steps on the Ubuntu endpoint to simulate dynamic linker hijacking.
Warning: In a real attack, the injected library’s constructor may call setuid(0) and spawn a root shell. Because /etc/ld.so.preload affects all dynamically linked processes, the malicious library loads whenever a new process starts and remains loaded until the file is removed. This can severely impact system stability and may break interactive sessions. The simulation below uses a benign constructor that only prints to stderr. This behaviour is sufficient to trigger Wazuh detections without disrupting the system. |
- Create the benign shared library file
/tmp/evil.cand insert the following:
#include <stdio.h>

void __attribute__((constructor)) init() {
    fprintf(stderr, "[POC] evil.so loaded — privilege escalation payload would execute here\n");
}
- Compile the library:
# gcc -shared -fPIC -o /tmp/evil.so /tmp/evil.c
- Write the path to the library into
/etc/ld.so.preload:
# sudo bash -c 'echo "/tmp/evil.so" > /etc/ld.so.preload'
- Navigate to Threat Hunting > Events, then apply the filter
rule.id: is one of 100209,100210,100211to view the alerts on the Wazuh dashboard.
- Clean up after testing:
# sudo rm /tmp/evil.so /tmp/evil.c
# sudo rm /etc/ld.so.preload
T1053.003 – Scheduled task/job: Cron
Cron is a time-based job scheduler built into Linux that executes commands or scripts at defined intervals. System administrators use it for routine maintenance tasks. Threat actors abuse cron to achieve privilege escalation by exploiting insecure cron job configurations.
Common attack paths include:
- Cron configuration modification: An attacker with momentary write access to
/etc/cron.d/,/etc/crontab, or the user crontab directories drops or edits a cron job entry that runs a payload as root. - PATH hijacking in cron: A root-owned cron job calls a command without specifying its absolute path. If the cron PATH variable includes a directory that an attacker can write to, the attacker can place a malicious binary with the same name in that directory. When the cron job runs, it may instead execute the attacker-controlled binary.
- Logrotate configuration injection:
logrotatecommonly runs as root on a daily cron schedule. If an attacker can write a file to/etc/logrotate.d/, they can inject a postrotate script directive. The directive can execute arbitrary commands with root privileges when logrotate next processes the configuration.
Detection
We use the following methods to detect this technique:
- Wazuh FIM: Monitor the cron and logrotate directories and files for unauthorised modifications.
- Auditd: Monitor write access to scripts executed by root cron jobs.
- Wazuh detection rules: Alerts on modifications to cron directories and on write events to root-owned scripts.
Ubuntu endpoint configuration
- Run the following command to add audit rules to the
/etc/audit/rules.d/audit.rulesfile. These rules monitor writes to the main cron directories and track modifications to scripts called by root cron jobs:
# sudo bash -c 'cat >> /etc/audit/rules.d/audit.rules << EOF
-w /etc/crontab -p wa -k priv_esc_cron
-w /etc/cron.d/ -p wa -k priv_esc_cron
-w /etc/cron.daily/ -p wa -k priv_esc_cron
-w /etc/cron.hourly/ -p wa -k priv_esc_cron
-w /etc/cron.weekly/ -p wa -k priv_esc_cron
-w /etc/cron.monthly/ -p wa -k priv_esc_cron
-w /var/spool/cron/crontabs/ -p wa -k priv_esc_cron
-w /etc/logrotate.d/ -p wa -k priv_esc_cron

-a always,exit -F arch=b64 -S execve -F euid=0 -F dir=/tmp -k priv_esc_cron_path
-a always,exit -F arch=b64 -S execve -F euid=0 -F dir=/var/tmp -k priv_esc_cron_path
-a always,exit -F arch=b64 -S execve -F euid=0 -F dir=/dev/shm -k priv_esc_cron_path
EOF'
- Reload the audit rules to apply the changes:
# sudo augenrules --load
- Add FIM monitoring for cron paths in the Wazuh agent configuration at
/var/ossec/etc/ossec.conf:
<ossec_config>
  <syscheck>
    <directories check_all="yes" realtime="yes" report_changes="yes">/etc/cron.d</directories>
    <directories check_all="yes" realtime="yes" report_changes="yes">/etc/cron.daily</directories>
    <directories check_all="yes" realtime="yes" report_changes="yes">/etc/cron.hourly</directories>
    <directories check_all="yes" realtime="yes" report_changes="yes">/etc/cron.weekly</directories>
    <directories check_all="yes" realtime="yes" report_changes="yes">/etc/cron.monthly</directories>
    <directories check_all="yes" realtime="yes" report_changes="yes">/var/spool/cron/crontabs</directories>
    <file>/etc/crontab</file>
  </syscheck>
</ossec_config>
- Restart the Wazuh agent to apply the changes:
# sudo systemctl restart wazuh-agent
Wazuh server configuration
Perform the following steps from the Wazuh dashboard to create detection rules:
- Navigate to Server management > Rules, click Manage rules files, then Custom rules.
- Click the edit button next to the
linux_privesc.xmlfile. - Add the rules below within the
<group>block of the file. Click Save, then Reload to apply the changes
<!-- T1053.003 — Scheduled Task/Job: Cron -->

  <rule id="100212" level="10">
    <if_sid>80700</if_sid>
    <field name="audit.key">priv_esc_cron</field>
    <description>Possible privilege escalation: monitored cron or logrotate path was modified</description>
    <mitre>
      <id>T1053.003</id>
    </mitre>
  </rule>

  <rule id="100213" level="12">
    <if_sid>554</if_sid>
    <field name="file" type="pcre2">^\/(?:etc\/crontab|etc\/cron\.(?:d|daily|hourly|weekly|monthly)\/.+|var\/spool\/cron\/crontabs\/.+)$</field>
    <description>Possible privilege escalation: FIM detected a new cron configuration file — $(file)</description>
    <mitre>
      <id>T1053.003</id>
    </mitre>
  </rule>

  <rule id="100214" level="12">
    <if_sid>550</if_sid>
    <field name="file" type="pcre2">^\/(?:etc\/crontab|etc\/cron\.(?:d|daily|hourly|weekly|monthly)\/.+|var\/spool\/cron\/crontabs\/.+)$</field>
    <description>Possible privilege escalation: FIM detected a modified cron configuration — $(file)</description>
    <mitre>
      <id>T1053.003</id>
    </mitre>
  </rule>

  <rule id="100215" level="12">
    <if_sid>554</if_sid>
    <field name="file" type="pcre2">^\/etc\/logrotate\.d\/.+$</field>
    <description>Possible privilege escalation: FIM detected a new logrotate configuration file — $(file)</description>
    <mitre>
      <id>T1053.003</id>
    </mitre>
  </rule>

  <rule id="100216" level="12">
    <if_sid>550</if_sid>
    <field name="file" type="pcre2">^\/etc\/logrotate\.d\/.+$</field>
    <description>Possible privilege escalation: FIM detected a modified logrotate configuration file — $(file)</description>
    <mitre>
      <id>T1053.003</id>
    </mitre>
  </rule>

  <rule id="100217" level="14">
    <if_sid>80700</if_sid>
    <field name="audit.key">priv_esc_cron_path</field>
    <description>Possible privilege escalation: root-privileged execution from a directory writable by all users</description>
    <mitre>
      <id>T1053.003</id>
    </mitre>
  </rule>
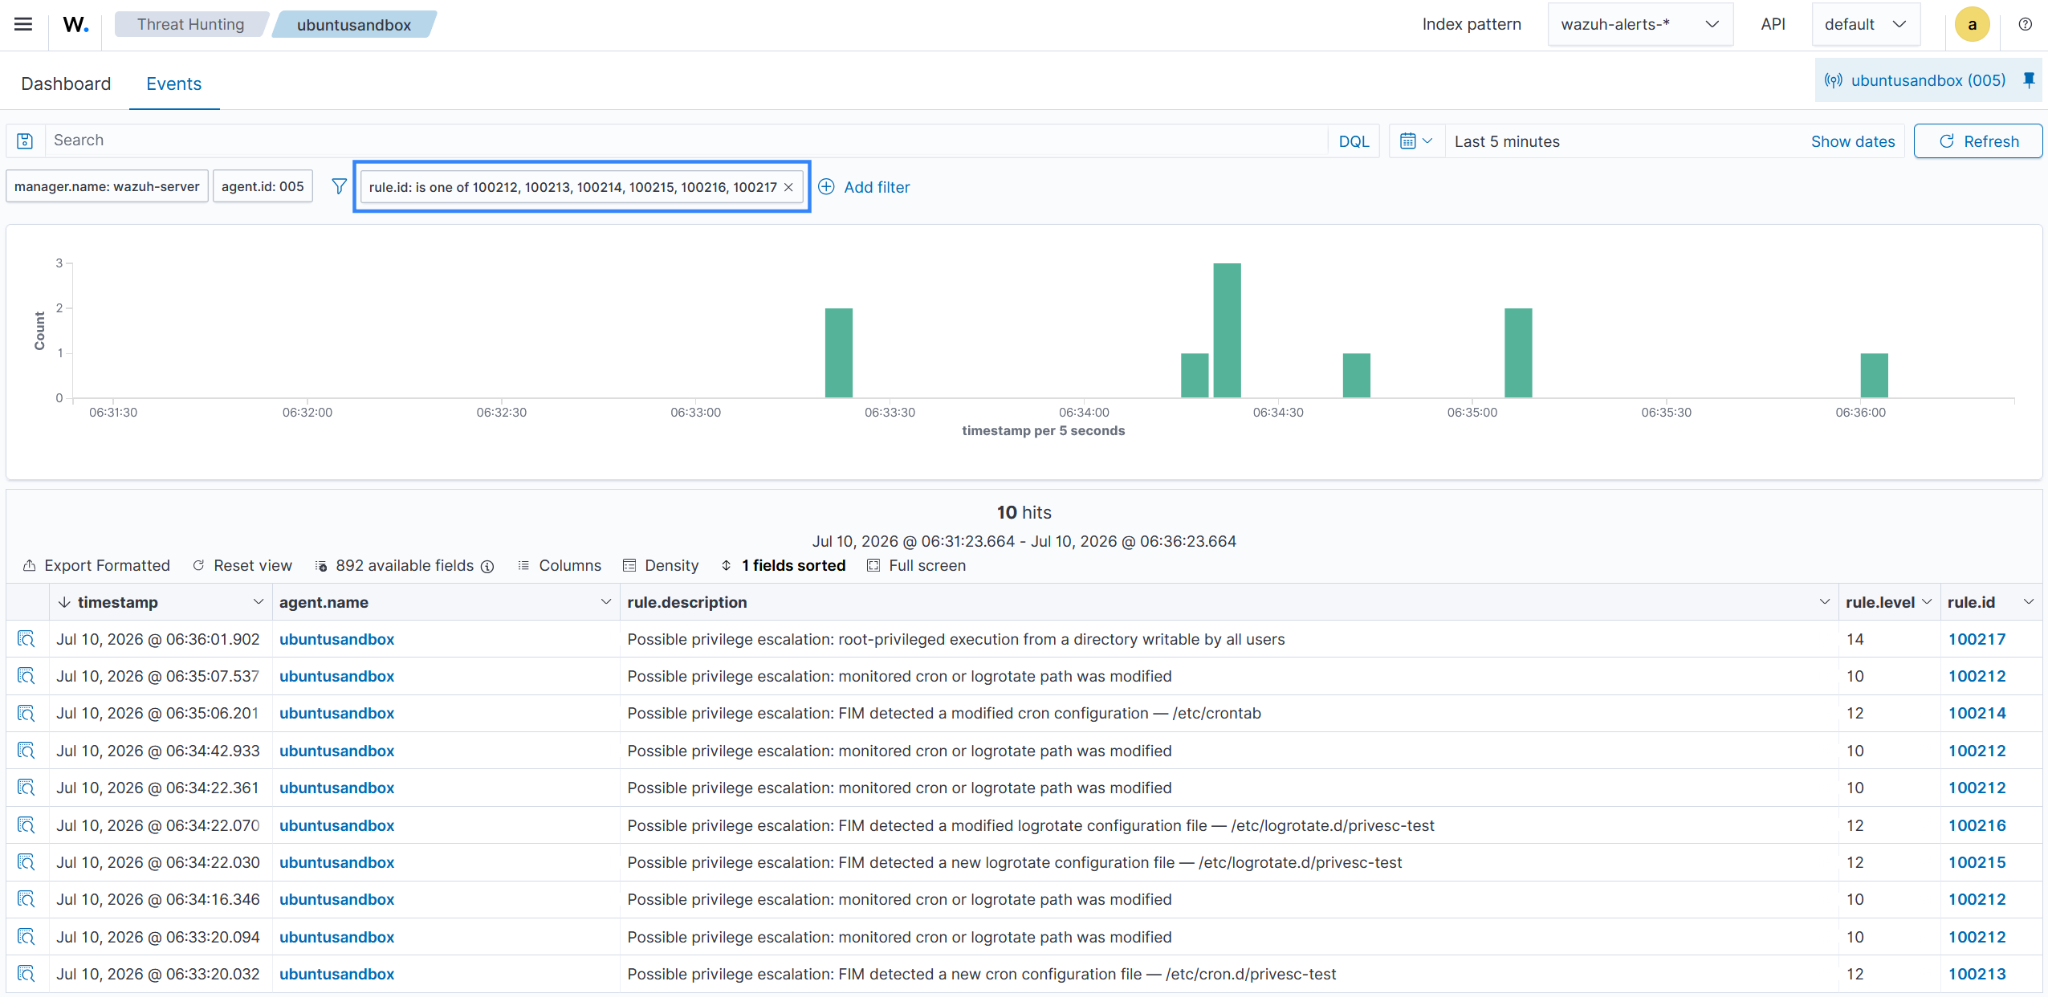
Where:
- Rule ID
100212is triggered when a cron file or directory is modified, potentially indicating scheduled task abuse. - Rule ID
100213is triggered when FIM detects the creation of a new cron configuration file. - Rule ID
100214is triggered when FIM detects modifications to an existing cron configuration file. - Rule ID
100215is triggered when FIM detects the creation of a new logrotate configuration file. - Rule ID
100216is triggered when FIM detects modifications to a logrotate configuration file. - Rule ID
100217is triggered when a root-privileged process executes from a directory writable by all users, which may indicate PATH hijacking.
Attack simulation
Perform the following steps on the Ubuntu endpoint to simulate the cron privilege escalation.
- Run the command below to create a malicious cron job in the
/etc/cron.d/directory. This directory is checked by cron every minute, and any file placed there with a correct syntax is executed:
# sudo bash -c 'echo "* * * * * root /bin/cp /bin/bash /var/tmp/escalated && /bin/chmod u+s /var/tmp/escalated" > /etc/cron.d/privesc-test'
- Wait up to one minute for cron to execute the job, then confirm privilege escalation:
# /var/tmp/escalated -p
# whoami
root
- Drop a malicious logrotate configuration.
logrotateruns as root on a scheduled basis and can execute attacker-controlled commands through a maliciouspostrotatedirective placed in/etc/logrotate.d/:
sudo bash -c 'cat > /etc/logrotate.d/privesc-test << EOF
/var/log/app/*.log {
    daily
    postrotate
        /bin/cp /bin/bash /var/tmp/escalated && /bin/chmod u+s /var/tmp/escalated
    endscript
}
EOF'
- Create a test binary in a directory accessible by all users to simulate PATH hijacking, where a root cron job may execute an attacker-controlled binary:
# cat > /var/tmp/cron_path_test << 'EOF'
  #!/bin/bash
  echo "PATH hijack test: $(id) at $(date)" >>      /var/tmp/cron_path_test.log
EOF
# chmod +x /var/tmp/cron_path_test
- Add a root cron entry with
/var/tmpprioritized in PATH to simulate a misconfigured cron environment vulnerable to PATH hijacking. Wait up to one minute for cron to execute the test binary:
# sudo bash -c 'printf "\nPATH=/var/tmp:/usr/local/sbin:/usr/local/bin:/sbin:/bin:/usr/sbin:/usr/bin\n* * * * * root cron_path_test\n" >> /etc/crontab'
- Navigate to Threat Hunting > Events, then apply the filter
rule.id: is one of 100212,100213,100214,100215,100216,100217to view the alerts on the Wazuh dashboard.
- Clean up after testing:
# sudo rm /etc/cron.d/privesc-test /var/tmp/escalated
# sudo rm /etc/logrotate.d/privesc-test
# sudo sed -i '/PATH=\/var\/tmp/d; /cron_path_test/d' /etc/crontab
# sudo rm -f /var/tmp/cron_path_test /var/tmp/cron_path_test.log
Results
Perform the following steps to view all the generated alerts on the Wazuh dashboard.
View privilege escalation alerts
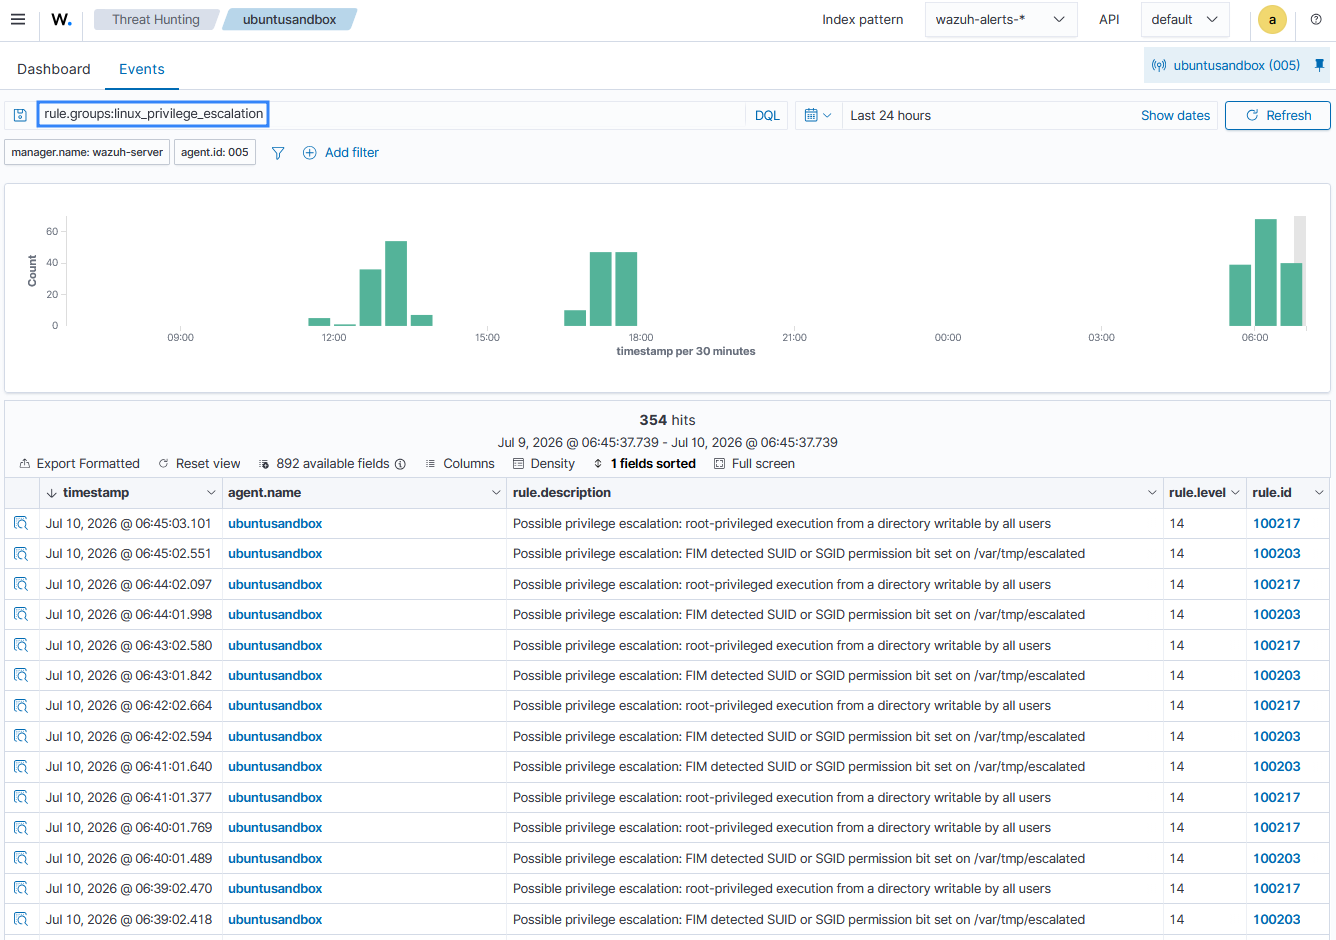
- Navigate to Threat intelligence > Threat Hunting > Events.
- In the search bar, type
rule.groups:linux_privilege_escalation. - Click Update. The dashboard displays alerts generated by rules assigned to the
linux_privilege_escalationgroup.
View alerts mapped to MITRE ATT&CK
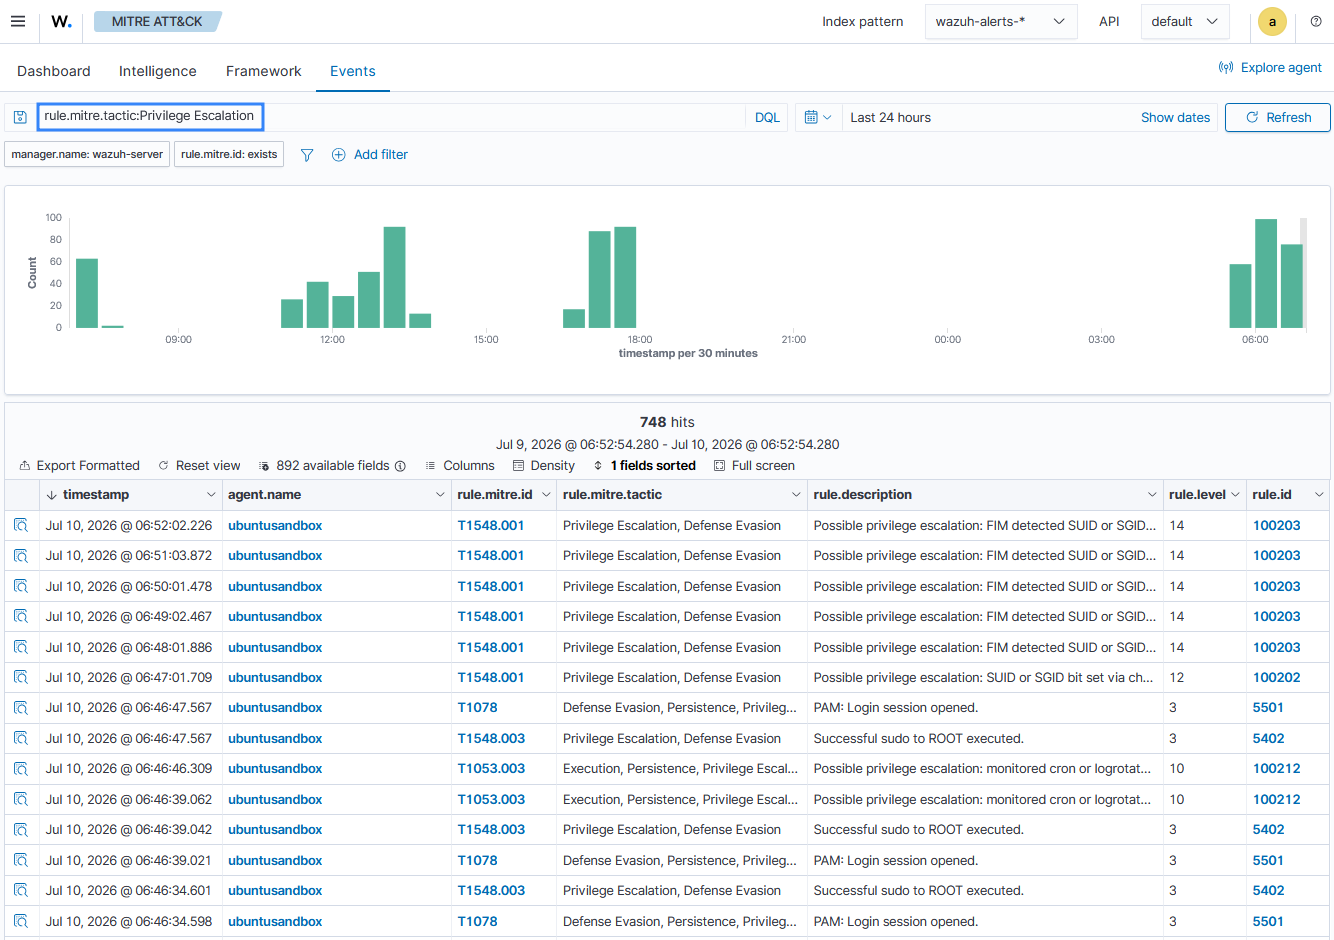
- Navigate to Threat intelligence > MITRE ATT&CK > Events.
- In the search bar, type
rule.mitre.tactic:Privilege Escalation. - Click Update. The dashboard displays alerts associated with the Privilege Escalation tactic in the MITRE ATT&CK framework.
Conclusion
This blog post shows several techniques that threat actors use to escalate privileges on compromised Linux endpoints. Following the MITRE ATT&CK framework, we covered how adversaries abuse features such as sudo, cron, privileged groups, ptrace, and the dynamic linker to gain elevated access.
We detected these privilege escalation attempts using the Wazuh File Integrity Monitoring and custom detection rules. Additionally, we integrated the Linux auditing system, auditd, to monitor specific command and system call events. Together, these capabilities give security teams the visibility to detect privilege escalation activity on their endpoints.
Discover more about Wazuh by exploring our other blog posts and joining our growing community.