
SUID (Set User ID) and SGID (Set Group ID) are special Linux file permission bits. They allow a program to run with the privileges of the file owner or group rather than the user who launches it. Legitimate binaries such as passwd, sudo, and chage rely on these bits to perform privileged operations safely. Attackers abuse the same mechanism to establish persistence and regain elevated access. After an attacker compromises an endpoint and obtains root privileges, they can create an SUID root binary or set the SUID bit on an existing root-owned executable. This modification leaves a reliable path back to root access.
A single unexpected SUID root binary can undermine the security of an entire system. Monitoring the privileged binaries on your endpoints is therefore an important detection control. The MITRE ATT&CK framework classifies this behavior under Privilege Escalation and Defense Evasion as T1548.001: Abuse Elevation Control Mechanism: Setuid and Setgid.
In this blog post, we demonstrate how to detect unauthorized SUID and SGID binaries using the Wazuh command monitoring capability. We compare the privileged binaries on a monitored endpoint against an approved baseline and generate an alert whenever a binary appears that is not part of it. We also run the same audit as a Security Configuration Assessment (SCA) check and show how the two methods work together as complementary controls.
How SUID and SGID permissions work
When a user runs a program, the process normally executes with that user’s privileges. The SUID bit changes this behavior: the Linux kernel runs the program with the privileges of the file’s owner instead of the user who launched it. The SGID bit behaves the same way for the file’s group. When the owner is root, any user who runs an SUID root binary obtains a process that executes with root privileges for the duration of that program.
You can identify a file with the SUID bit set by the s that replaces the owner’s execute permission in a long listing. For example, the SUID bit on the passwd binary appears as follows:
$ ls -l /usr/bin/passwd
-rwsr-xr-x 1 root root 64152 May 30 2024 /usr/bin/passwd
The s in the owner’s permission field (rws) indicates the SUID bit. An SGID file shows the s in the group’s permission field instead. This mechanism lets unprivileged users perform tightly controlled privileged actions, such as changing their own password. The risk arises when the SUID or SGID bit is present on a binary that can perform broad actions as root.
How attackers abuse SUID and SGID binaries
Attackers abuse these permission bits in multiple ways to escalate privileges or maintain access on a compromised endpoint:
- Creating a new SUID root binary: An attacker copies a shell or a general-purpose utility, sets its owner to root, and enables the SUID bit. Any user who runs the binary then acts with root privileges.
- Adding the SUID bit to an existing executable: An attacker sets the SUID bit on a legitimate but broadly capable binary, turning a standard utility into a privilege escalation vector.
- Abusing misconfigured SUID binaries: An attacker abuses a legitimate SUID binary that can spawn a shell, read protected files, or write to sensitive locations. Public references such as GTFOBins catalog the binaries that are exploitable in this way.
A regular user cannot escalate to root simply by setting an SUID bit. The kernel only allows users to change permissions on files they own. An SUID file runs as its owner, not as the user who launched it. Only root can transfer a file’s ownership to root. An SUID root binary therefore requires root privileges to create in the first place. This is why an unauthorized SUID root binary is a high-confidence post-compromise indicator. It means someone already obtained root and used it to plant a durable way back.
Infrastructure
We use the following infrastructure to detect unauthorized SUID and SGID binaries with Wazuh:
- A prebuilt, ready-to-use Wazuh OVA 4.14.7, which includes the Wazuh central components (Wazuh server, Wazuh indexer, and Wazuh dashboard). Follow this guide to download and set up the Wazuh virtual machine.
- An Ubuntu 24.04 endpoint with the Wazuh agent 4.14.7 installed and enrolled in the Wazuh server.
Detection with Wazuh
Wazuh provides two capabilities that detect unauthorized SUID and SGID binaries.
- Command monitoring compares privileged binaries against a baseline and generates an alert with the name of the unauthorized binary. Use it when you need the specific binary path for incident response.
- Security Configuration Assessment (SCA) runs the same audit as a scheduled compliance check that returns a pass or fail verdict with remediation guidance. Use it for recurring posture reporting.
You can enable both methods simultaneously. SCA provides the ongoing compliance status, while command monitoring generates actionable alerts that identify the offending binary. The following sections describe how to configure each method.
Command monitoring
We configure the Command module locally on the monitored endpoint to enumerate its SUID and SGID binaries and compare them against an approved baseline. The monitored endpoint reports only the binaries that are not in the baseline. We then create a custom decoder and rules on the Wazuh server to extract the binary path and generate an alert.
Ubuntu endpoint
Follow the steps below to create the baseline, add the comparison script, and configure the Command module on the monitored endpoint.
Note
You need administrative privileges to run all the commands below.
- Generate the approved baseline with the command below. The command lists every SUID and SGID binary on the endpoint and writes it in the
/var/ossec/etc/suid-baseline.txtfile. Review the baseline file to confirm that it contains only legitimate binaries.
# find / \( -path /proc -o -path /sys -o -path /dev -o -path /run \) -prune -o -type f \( -perm -4000 -o -perm -2000 \) -print 2>/dev/null | sort > /var/ossec/etc/suid-baseline.txt
Where:
- The
-perm -4000test matches files with the SUID bit set, and-perm -2000matches files with the SGID bit set. - The
-pruneclause excludes the/proc,/sys,/dev, and/runpseudo-filesystems. These do not contain persistent binaries and only add noise. - The
2>/dev/nullredirection discards permission-denied errors from directories the scan cannot enter.
- Create a script named
suid-check.shin the/var/ossec/bin/directory:
# touch /var/ossec/bin/suid-check.sh
- Add the following content to the
/var/ossec/bin/suid-check.shscript. The script compares the current set of privileged binaries against the baseline and reports only the binaries that are not part of it:
#!/bin/bash
BASELINE="/var/ossec/etc/suid-baseline.txt"

if [ ! -f "$BASELINE" ]; then
    echo "suid-check: ERROR baseline file not found"
    exit 1
fi

find_suid() {
    find / \( -path /proc -o -path /sys -o -path /dev -o -path /run \) -prune \
        -o -type f \( -perm -4000 -o -perm -2000 \) -print 2>/dev/null | sort
}

comm -23 <(find_suid) <(sort "$BASELINE") | while read -r binary; do
    echo "suid-check: WARNING unauthorized SUID/SGID binary: $binary"
done
Where:
- The
comm -23command compares the live scan against the baseline and outputs only the lines unique to the live scan, that is, binaries present now but absent from the baseline. - The script prints a
suid-check: WARNINGline for each unauthorized binary and produces no output when the endpoint matches the baseline. This keeps events small and generates an alert only when there is something to report.
- Make the
/var/ossec/bin/suid-check.shscript executable:
# chmod +x /var/ossec/bin/suid-check.sh
- Get the SHA256 hash of the
/var/ossec/bin/suid-check.shscript. You need this value in the next step:
# sha256sum /var/ossec/bin/suid-check.sh
- Append the configuration below to the Wazuh agent
/var/ossec/etc/ossec.conffile. Replace<SHA256_HASH>with the SHA256 hash of the script.
<ossec_config>
  <wodle name="command">
    <disabled>no</disabled>
    <tag>suid-check</tag>
    <command>/var/ossec/bin/suid-check.sh</command>
    <interval>1d</interval>
    <run_on_start>yes</run_on_start>
    <timeout>300</timeout>
    <verify_sha256><SHA256_HASH></verify_sha256>
  </wodle>
</ossec_config>
Where:
- The
<command>option runs thesuid-check.shscript. - The
<interval>option runs the check once a day. SUID and SGID changes are infrequent, and a full filesystem scan is resource-intensive, so a daily interval balances detection speed against endpoint load. - The
<timeout>option stops the scan if it runs for longer than 300 seconds. Increase this value on endpoints with large filesystems. - The
<verify_sha256>option verifies the integrity of thesuid-check.shscript before execution.
- Restart the Wazuh agent to apply the changes:
# systemctl restart wazuh-agent
Wazuh dashboard
Perform the following steps on the Wazuh dashboard to create the custom decoder and rules that process the command output.
- Click the upper-left menu icon, then navigate to Server management > Decoders.
- Click + Add new decoders file. Name the file
suid_sgid_decoder.xmland add the content below. The decoder matches the command output and extracts the path of the unauthorized binary into abinary_pathfield:
<decoder name="suid-check">
  <prematch>^suid-check: </prematch>
  <regex offset="after_prematch">WARNING unauthorized SUID/SGID binary: (\S+)</regex>
  <order>binary_path</order>
</decoder>
- Click Save and Reload when prompted to apply the changes.
- Navigate to Server management > Rules.
- Click + Add new rules file. Name the file
suid_sgid_rules.xmland add the following content:
<group name="command_monitoring,suid_detection,">
  <rule id="100600" level="0">
    <decoded_as>suid-check</decoded_as>
    <description>SUID/SGID binary check output.</description>
  </rule>

  <rule id="100601" level="12">
    <if_sid>100600</if_sid>
    <field name="binary_path">\.+</field>
    <description>Unauthorized SUID/SGID binary detected: $(binary_path).</description>
    <mitre>
      <id>T1548.001</id>
    </mitre>
  </rule>

  <rule id="100602" level="5">
    <if_sid>100600</if_sid>
    <match>ERROR baseline file not found</match>
    <description>SUID/SGID baseline file is missing on the endpoint.</description>
  </rule>
Where:
- Rule
100600is a base rule with level 0. It matches the command output but does not generate an alert on its own. - Rule
100601is triggered when an unauthorized SUID or SGID binary is detected. It generates a high-severity alert that includes the path of the unauthorized binary, and maps the detection to MITRE ATT&CK techniqueT1548.001. - Rule
100602is triggered when the baseline file is missing, so a misconfigured endpoint surfaces as its own finding rather than failing silently.
- Click Save and Reload when prompted to apply the changes.
Security Configuration Assessment
Auditing SUID and SGID binaries against an approved list is a configuration-assessment task, so the Wazuh SCA capability performs the same audit as a scheduled compliance check. Wazuh SCA runs policy files made of individual checks. It evaluates each check against the endpoint on a schedule, and reports a pass or fail result on the Wazuh dashboard with rationale and remediation guidance.
The difference from command monitoring is what the result contains. A Wazuh SCA check returns a pass or fail verdict, while command monitoring identifies the specific unauthorized binaries. Running both gives you a recurring compliance verdict from the Wazuh SCA and an actionable, binary-level alert from the Wazuh command monitoring.
Ubuntu endpoint
The following SCA policy checks the SUID and SGID binaries on a Linux endpoint against the baseline /var/ossec/etc/suid-baseline.txt file.
- Create a directory
/var/ossec/etc/custom-sca-filesand a policy filesuid_sgid_audit.ymlin it:
# mkdir /var/ossec/etc/custom-sca-files
# touch /var/ossec/etc/custom-sca-files/suid_sgid_audit.yml
- Add the content below to the
/var/ossec/etc/custom-sca-files/suid_sgid_audit.ymlfile to audit SUID and SGID binaries:
policy:
  id: "suid_sgid_audit"
  file: "suid_sgid_audit.yml"
  name: "Unauthorized SUID/SGID binary audit"
  description: "Checks for SUID and SGID binaries that are not in the approved baseline."

requirements:
  title: "Baseline file must exist"
  description: "The approved SUID/SGID baseline must be present on the endpoint."
  condition: all
  rules:
    - 'f:/var/ossec/etc/suid-baseline.txt'

checks:
  - id: 10001
    title: "No unauthorized SUID or SGID binaries are present"
    description: "Verifies that every SUID/SGID binary is in the approved baseline."
    rationale: "An unexpected SUID root binary is a common privilege-escalation and persistence mechanism."
    remediation: "Investigate any listed binary. Remove the SUID/SGID bit with chmod, or add it to the baseline if it is legitimate."
    compliance:
      - cis: ["6.1.13"]
      - pci_dss: ["2.2.4"]
      - nist_800_53: ["CM.6", "AC.6"]
      - tsc: ["CC6.1", "CC6.8"]
    condition: none
    rules:
      - 'c:/var/ossec/bin/suid-check.sh -> r:WARNING'
Where:
- The
requirementsblock ensures the policy runs only when the baseline file exists. If the baseline is missing, SCA skips the policy instead of reporting a false result. - The
condition: nonesetting inverts the check result, so the check passes when no rule matches and fails as soon as a rule matches. - The
c:/var/ossec/bin/suid-check.sh -> r:WARNINGrule runs the comparison script and matches its output against the regular expressionWARNING. The script prints aWARNINGline only for binaries that are not in the baseline, so the rule matches only when an unauthorized binary is found.
Note
- The check uses the same
/var/ossec/bin/suid-check.shscript in the command monitoring section. - If the baseline file is missing, SCA skips the policy rather than failing it. Monitor the baseline file with the File Integrity Monitoring capability so that its removal or modification is detected.
- Add the configuration below within the
<sca>block of the Wazuh agent/var/ossec/etc/ossec.conffile to execute the policy:
<policies>
  <policy>etc/custom-sca-files/suid_sgid_audit.yml</policy>
</policies>
- Restart the Wazuh agent to apply the changes:
# systemctl restart wazuh-agent
Wazuh dashboard
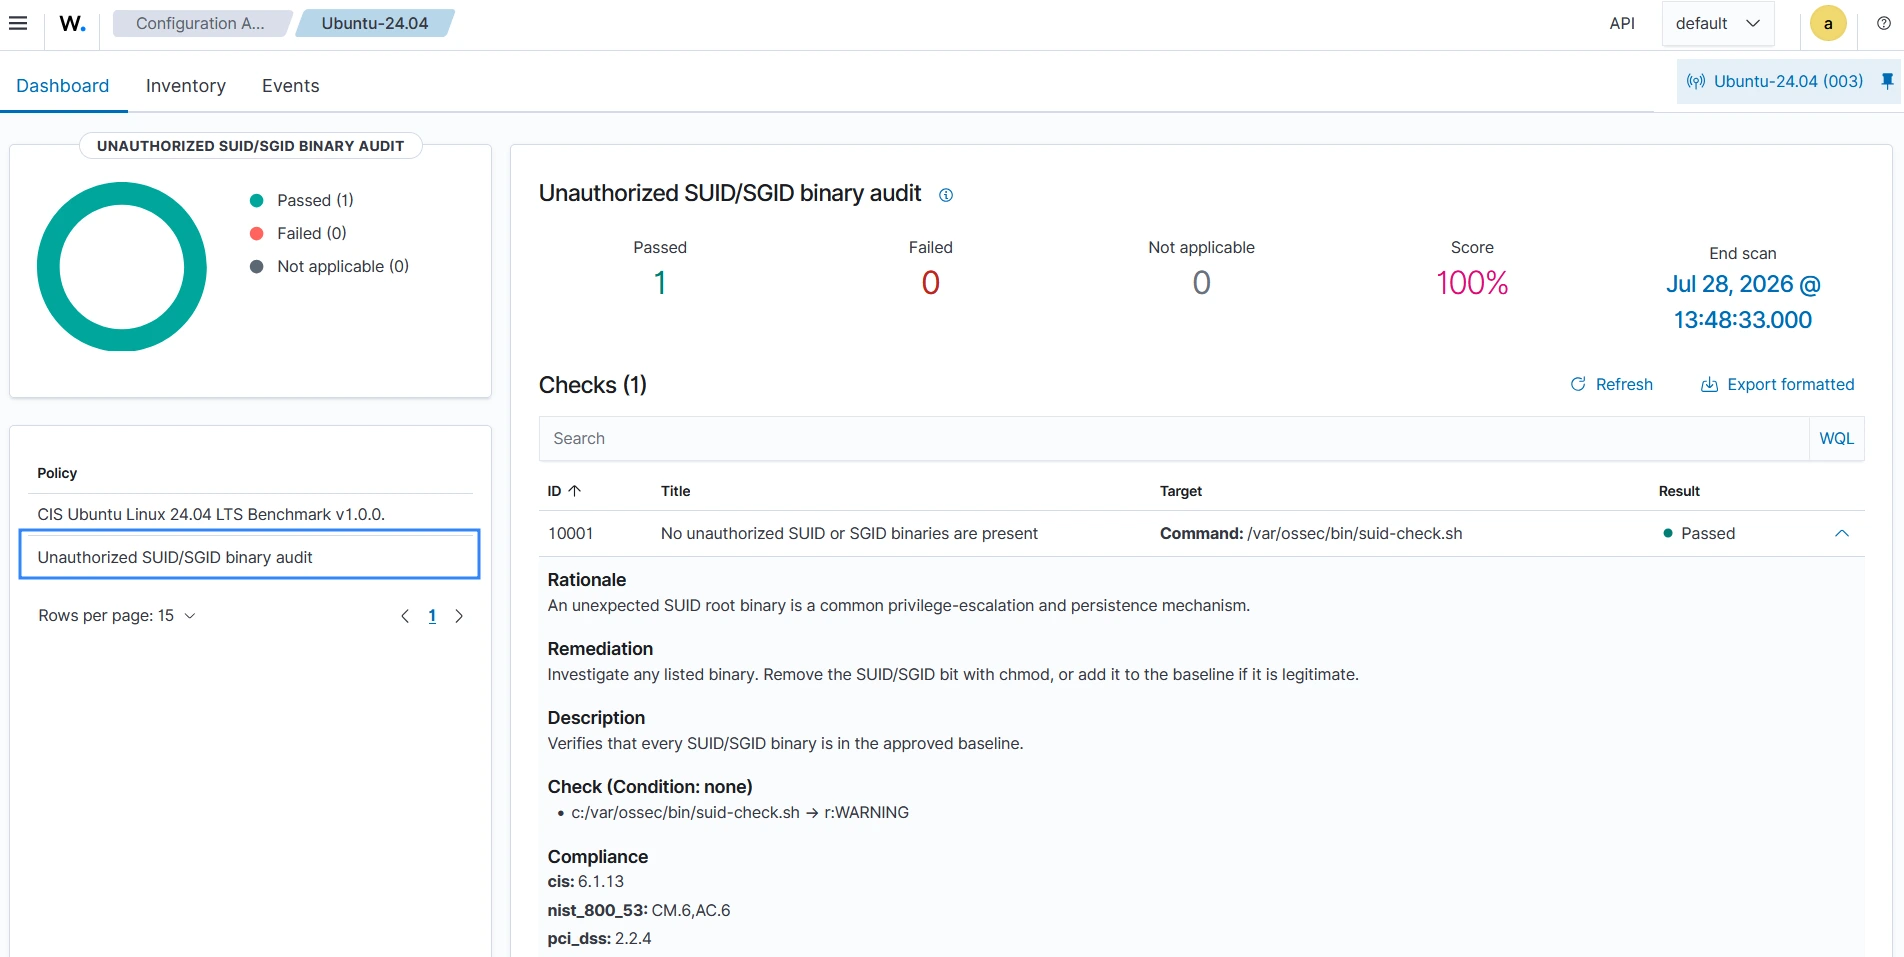
Navigate to Endpoint security > Configuration Assessment on the Wazuh dashboard and select the Ubuntu endpoint to view the results of the initial SCA check. The check passes, which confirms that every SUID and SGID binary on the monitored Ubuntu endpoint is in the baseline.
Attack emulation
To confirm that the detection works, we emulate an attacker creating an SUID root binary on the monitored Ubuntu endpoint. This safely reproduces the condition that command monitoring detects without performing any actual privilege escalation. Perform the following steps as the root user.
- Create a copy of the
cpbinary and set the SUID bit to simulate a rogue privileged binary:
# cp /bin/cp /usr/local/bin/rootshell
# chmod u+s /usr/local/bin/rootshell
This file only simulates an unauthorized SUID binary.
- Trigger the check immediately by restarting the Wazuh agent, or wait for the next scheduled execution:
# systemctl restart wazuh-agent
Visualizing the alerts
The Wazuh dashboard displays the detection results from both methods. The following sections show the command monitoring alert and the SCA check result.
Command monitoring result
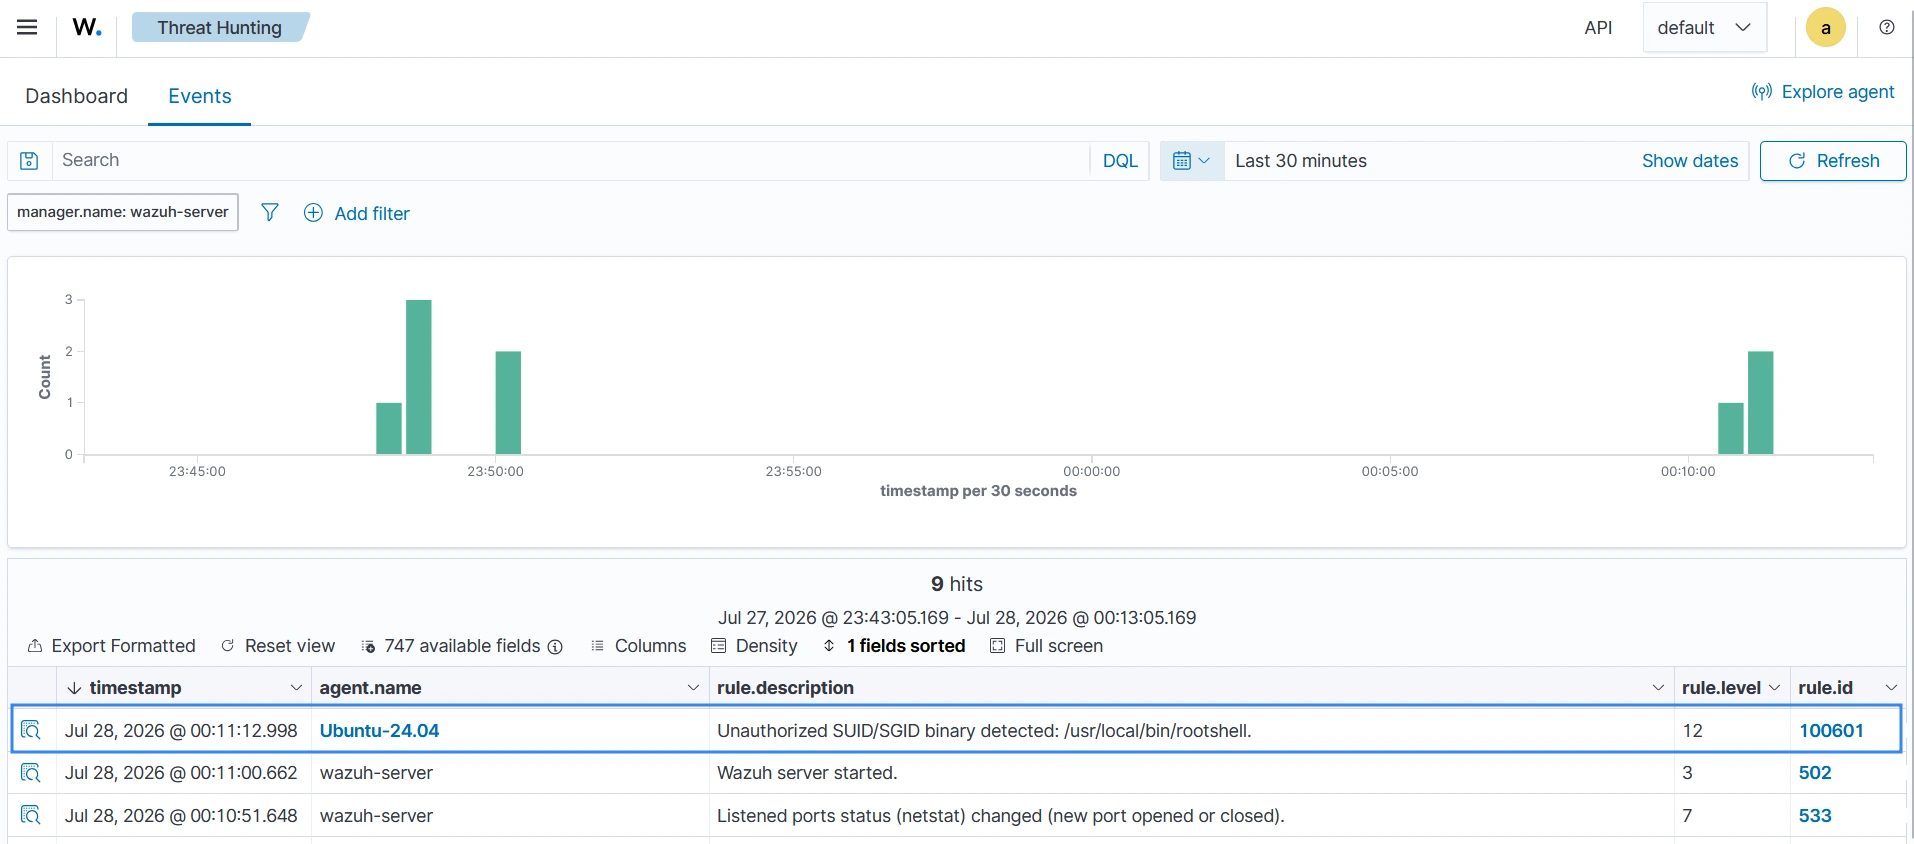
Navigate to Threat intelligence > Threat Hunting on the Wazuh dashboard to view the alerts generated when the endpoint reports an SUID or SGID binary that is not in the baseline. The alert includes the path of the unauthorized binary and the associated MITRE ATT&CK technique.
SCA result
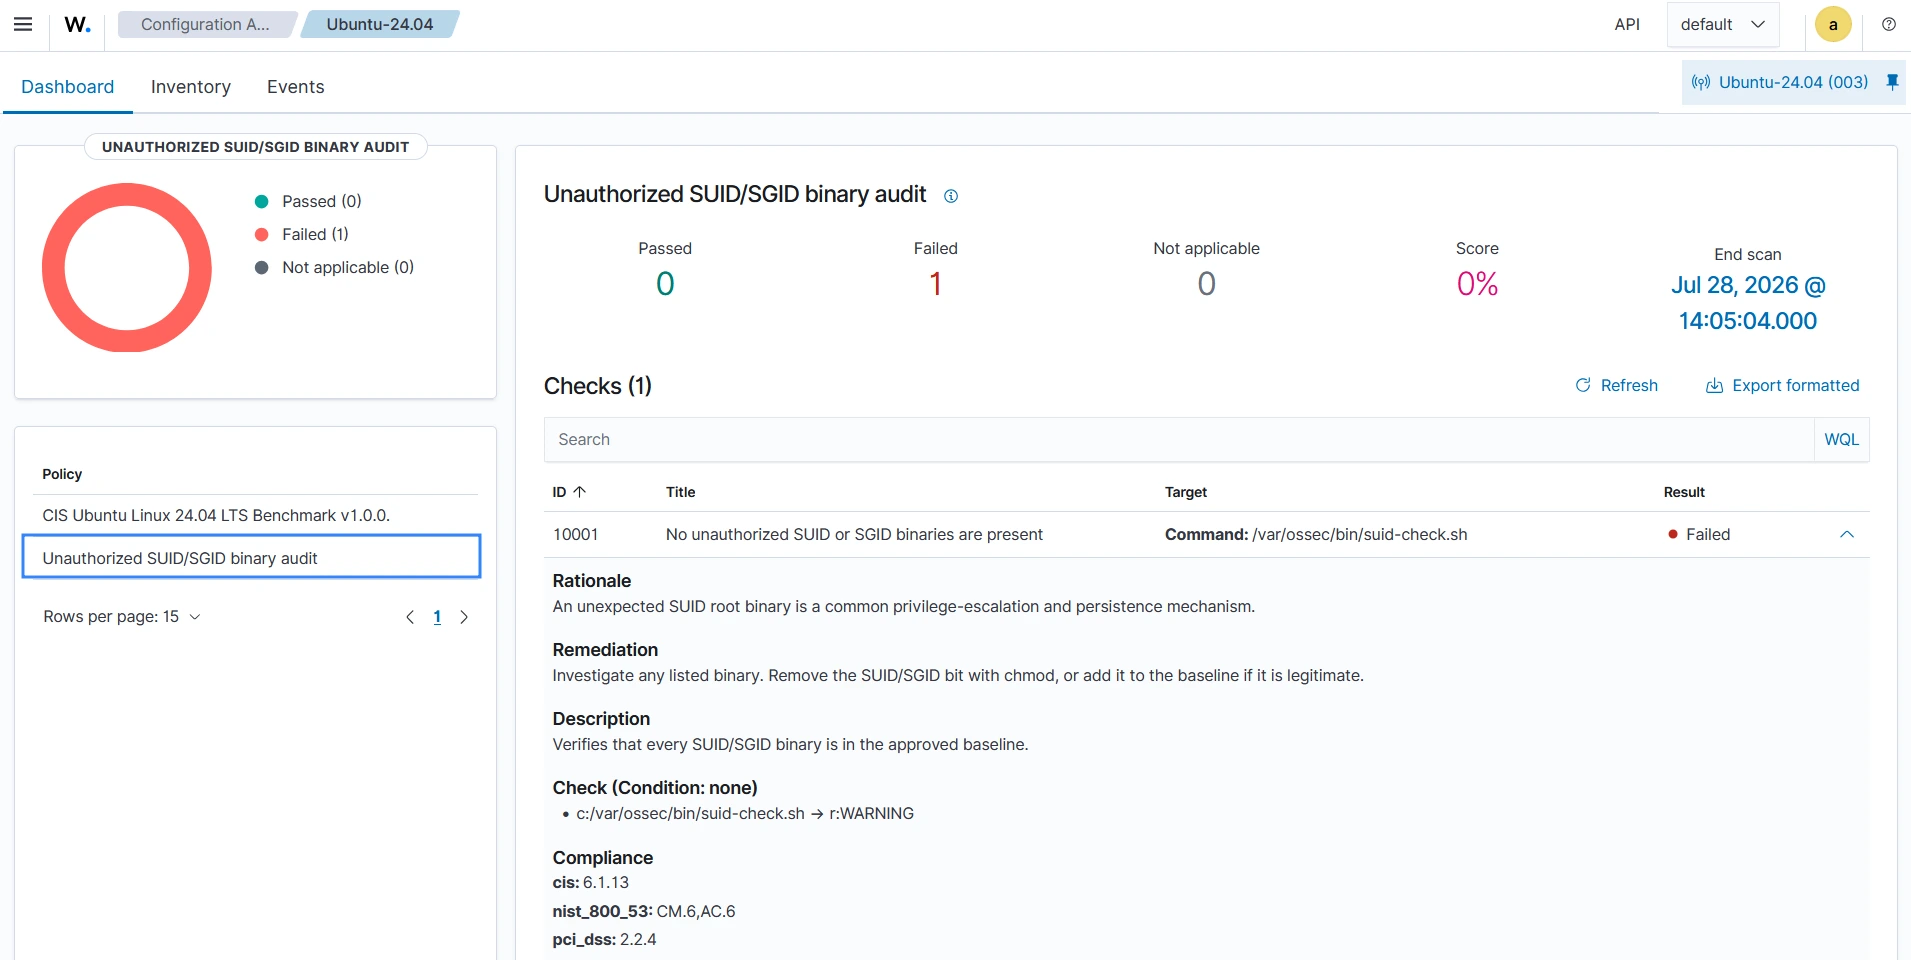
Navigate to Endpoint security > Configuration Assessment on the Wazuh dashboard and select the monitored Ubuntu endpoint to view the results of the custom SCA check. The check fails, which shows that the endpoint has at least one SUID or SGID binary that is not in the baseline, along with the rationale and remediation guidance.
Note
Remove the /usr/local/bin/rootshell test binary to restore the endpoint to its baseline state using the command: rm -f /usr/local/bin/rootshell.
Conclusion
SUID and SGID binaries are a legitimate and necessary part of Linux, but they are also a well-established privilege escalation and persistence vector. By baselining the privileged binaries on your endpoints and alerting on any deviation, you gain early visibility into one of the most common post-compromise techniques.
In this blog post, we use the Wazuh command monitoring capability to enumerate SUID and SGID binaries, compare them against an approved baseline, and generate high-severity alerts. These alerts identify the unauthorized binary and map it to MITRE ATT&CK. We also show how the same audit can run as an SCA check for compliance reporting. These two methods complement each other as part of a layered detection strategy: SCA for posture and command monitoring for inventory.
Wazuh is a free and open source security platform. Check out our documentation to learn more, and join our community for help and discussion.