
Panchan is a new botnet written in Golang. It leverages built-in Golang goroutines features for flexibility in the malware infection and execution within Linux distributions. It infects Linux endpoints on a network by performing dictionary attacks against SSH credentials. The Panchan botnet also spreads across a network and maintains persistence upon gaining access.
In this blog post, we identify Panchan related Indicators of Compromise (IoC), detect the activity of the malware, and mitigate the botnet using Wazuh.
Panchan botnet behavior
- This botnet malware gains initial access to a Linux endpoint via SSH. A typical trait of a botnet is the ability to carry out brute force and dictionary attacks against randomized target IP addresses. Panchan uses a simple predetermined username and password list to execute a dictionary attack.
root@ubuntu-2204:/home/ubuntu# netstat -nputw | grep ':22'
tcp  	0  	1 10.0.2.4:59690      	34.33.32.108:22     SYN_SENT	52081/./panchan
tcp  	0  	1 10.0.2.4:57278      	88.26.22.124:22     SYN_SENT	52081/./panchan
tcp  	0  	1 10.0.2.4:37304      	93.152.230.182:22   SYN_SENT	52081/./panchan
tcp  	0  	1 10.0.2.4:47462      	145.26.50.55:22     SYN_SENT	52081/./panchan
tcp  	0  	1 10.0.2.4:55254      	131.32.64.212:22    SYN_SENT	52081/./panchan
tcp  	0  	1 10.0.2.4:55878      	145.22.248.128:22   SYN_SENT	52081/./panchan
tcp  	0  	1 10.0.2.4:47592      	53.230.253.224:22   SYN_SENT	52081/./panchan
tcp  	0  	1 10.0.2.4:44692      	52.128.150.50:22    SYN_SENT	52081/./panchan
tcp  	0  	1 10.0.2.4:50224      	46.155.136.193:22   SYN_SENT	52081/./panchan
- Panchan botnet is capable of harvesting SSH keys on a host. The malware reads the private key at
~/.ssh/id_rsaand uses it for authentication to IP addresses in the~/.ssh/known_hostsfile. - Once Panchan successfully authenticates to a target endpoint, it creates a randomly named hidden folder in the
root(/)directory. Then, it copies itself using SFTP to the newly created folder and renames the copied binary toxinetd.
root@ubuntu-2204:/home/ubuntu# find /.* -maxdepth 1 -name xinetd -type f
/.1894748289466578011/xinetd
- The Panchan botnet executes the copied binary on the target machine and creates a rule to allow peer to peer communication over the TCP port
1919. The command used to create the rule is below:
sh -c "iptables -D INPUT -p tcp --dport 1919 -j ACCEPT"
sh -c "iptables -A INPUT -p tcp --dport 1919 -j ACCEPT"
- The botnet makes an HTTPS POST operation to a Discord webhook. This request is used for monitoring the compromised endpoints.
- Panchan maintains persistence by copying itself into the
/bindirectory assystemd-worker. It also poses as a legitimatesystemdservice/lib/systemd/system/systemd-worker.serviceto evade suspicion. This service runs upon system restart to maintain persistence of the Panchan botnet.
root@ubuntu-2204:/home/ubuntu# find /lib/ /bin/ -name systemd-worker* -type f
/lib/systemd/system/systemd-worker.service
/bin/systemd-worker
- The botnet then installs cryptocurrency miners as memory-mapped files on an infected endpoint in order to evade detection. Panchan is also able to detect process monitoring by constantly looking for top and htop processes. Once such monitoring is detected, Panchan kills its crypto mining processes.
The hashes of some known Panchan samples and crypto miners installed by Panchan are indexed below:
| Filename | SHA256 |
|---|---|
| xinetd – main malware | 00411a05a7374d64ce8be4ef85999c1434d867cd8db46c38cd03f76072c91460 b9e643a8e78d2ce745fbe73eb505c8a0cc49842803077809b2267817979d10b0 |
| extracted crypto miners | a819b4a95f386ae3bd8f0edc64e8e10fae0c21c9ae713b73dfc64033e5a845a1 6f445252494a0908ab51d526e09134cebc33a199384771acd58c4a87f1ffc063 |
Detection with Wazuh
To understand the Panchan botnet and create detection mechanisms, we simulated its activities in our lab environment.
The following infrastructure was used:
- Wazuh server 4.3.7: For more information, see the installation guide.
- Ubuntu 22.04 endpoint with Wazuh agent installed and enrolled to the Wazuh server. A Wazuh agent can be installed by following the Deploying Wazuh agents guide.
The Wazuh capabilities we will utilize in detecting Panchan are the Wazuh command monitoring module and the YARA integration.
Command monitoring
The Wazuh command monitoring module executes specified commands on monitored endpoints, and processes the command output as log data. This Wazuh module will be used to detect the identified Panchan IoCs on the Linux endpoints.
Use the following steps to configure the Wazuh command monitoring module:
On the monitored endpoint
1. Edit the /var/ossec/etc/local_internal_options.conf file and add the line below:
logcollector.remote_commands=1
This will allow the endpoint to accept remote commands from the Wazuh server.
2. Run apt-get install net-tools if the net-tools utility is not already installed on the endpoint. This allows the use of the netstat command required within this blog post.
3. Restart the Wazuh agent to apply this change:
systemctl restart wazuh-agent
Note
Wazuh command monitoring is only able to execute commands of utilities that are installed on the monitored endpoint.
On the Wazuh server
1. Edit the shared configuration file at /var/ossec/etc/shared/default/agent.conf and add the following command monitoring configuration:
<agent_config os="linux">
<!-- Panchan outbound SSH brute force -->
  <localfile>
    <log_format>full_command</log_format>
    <command>ss -nputw | grep -c ':22 ' | awk -F: '$0 > 4'</command>
    <alias>Checking outbound SSH</alias>
    <frequency>60</frequency>
  </localfile>

<!-- Panchan listening on port 1919 -->
  <localfile>
    <log_format>full_command</log_format>
    <command>netstat -lno | grep ':1919 '</command>
    <alias>Detecting possible botnet communication</alias>
    <frequency>60</frequency>
  </localfile>

<!-- Panchan binary path -->
  <localfile>
    <log_format>full_command</log_format>
    <command>find /.* -maxdepth 1 -type f -name xinetd</command>
    <alias>Finding Panchan binary path</alias>
    <frequency>43200</frequency>
  </localfile>

<!-- Panchan persistence -->
  <localfile>
    <log_format>full_command</log_format>
    <command>systemctl list-units --full -all | grep "systemd-worker.service"</command>
    <alias>Detecting Panchan persistence service</alias>
    <frequency>60</frequency>
  </localfile>
</agent_config>
2. Create rules to detect Panchan botnet IoCs in the logs from the command monitoring module. The rules are added to the custom rules file /var/ossec/etc/rules/local_rules.xml on the Wazuh server:
<group name="panchan,">
<!-- Panchan outbound SSH brute force -->
    <rule id="100022" level="12" ignore="600">
        <if_sid>530</if_sid>
        <match>ossec: output: 'Checking outbound SSH'</match>
        <description>Multiple outbound SSH connections detected. Possible outbound SSH port Scanning.</description>
    </rule>

<!-- Panchan listening on port 1919 -->
    <rule id="100024" level="12" ignore="600">
        <if_sid>530</if_sid>
        <match>ossec: output: 'Detecting possible botnet communication'</match>
        <description>Detected port 1919 listening. Possible Panchan botnet activity.</description>
    </rule>

<!-- Panchan binary path detected -->
    <rule id="100026" level="15" ignore="600">
        <if_sid>530</if_sid>
        <match>ossec: output: 'Finding Panchan binary path'</match>
        <regex type="pcre2">xinetd</regex>
        <description>Detected xinetd binary outside /bin or /sbin. Possible Panchan malware infection.</description>
    </rule>

<!-- Panchan persistence detected -->
    <rule id="100027" level="15" ignore="600">
        <if_sid>530</if_sid>
        <match>ossec: output: 'Detecting Panchan persistence service'</match>
        <regex type="pcre2">systemd-worker\.service</regex>
        <description>Panchan persistence service detected.</description>
    </rule>
</group>
Where:
rule id 530is the base rule which captures the output of the command monitoring module.
rule id 100022is triggered when multiple outbound SSH connections are detected.rule id 100024is triggered when port1919is open on the monitored endpoint.rule id 100026is triggered when an illegitimatexinetdbinary is found in a hidden file within the root (/) directory.rule id 100027is triggered when an illegitimatesystemd-worker.serviceis found.
3. Restart the Wazuh manager to apply these changes:
systemctl restart wazuh-manager
Testing the configuration
To test that the rules are working correctly, we trigger an alert by executing the Panchan binary within our sandboxed Ubuntu 22.04 endpoint:
root@ubuntu-2204:~# ./panchan
The screenshot below shows the alerts triggered by the malicious Panchan binary:

YARA integration
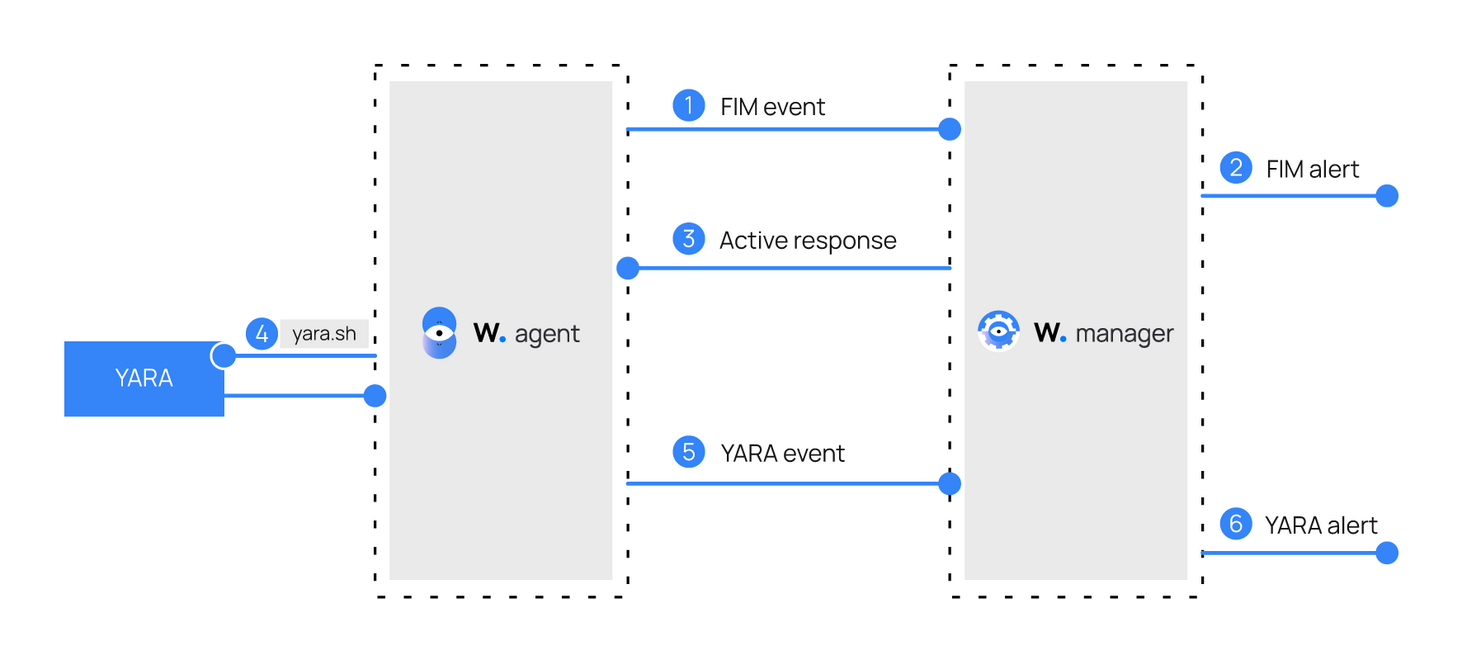
There are various ways Wazuh can integrate with YARA. We will focus on utilizing Wazuh FIM, Wazuh active response and YARA:
- Wazuh file integrity monitoring(FIM) module detects and alerts when files are created, modified, or deleted. In this blog post, Wazuh FIM will be enabled for a directory within the Linux filesystem and FIM alerts will be generated for any activity in the FIM enabled directory.
- Wazuh active response is a script that is configured to execute when certain alerts occur, such as FIM alerts. The FIM alerts will trigger the Wazuh active response script which will then execute YARA scans on the file added to the FIM enabled directory.
- YARA is an open source pattern-matching tool used to identify malware samples. When there is a positive YARA match, a YARA alert will be generated, the file will be marked as malicious and the active response script will immediately delete the file.
The diagram below illustrates the flow of events between the different components:
The Panchan binary
Panchan peer to peer(p2p) botnet communication over TCP port 1919 occurs in plaintext. Every sent message starts with the string “pan-chan's mining rig hi!”, accompanied by shared configuration commands, and ends with the string “finish”. The known configuration options of the botnet are sharepeer subsequently followed by an IP address, and sharerigconfig accompanied by a base64-encoded string.
The botnet contains an embedded public key for verifying a provided private key which is required to access Panchan godmode admin panel. Panchan godmode panel is used by the attacker to carry out edits on the mining configuration and also orchestrate communication of updates to the peers within the botnet.
We use a YARA rule from Stiv Kupchik to perform the YARA scans. The rule uses the above-mentioned strings unique to the botnet for the identification of Panchan binaries. In order to use YARA with Wazuh to scan for the Panchan binary, do the following:
On the monitored endpoint
1. Download, compile and install YARA:
apt update
apt install -y make gcc autoconf libtool libssl-dev pkg-config jq
curl -LO https://github.com/VirusTotal/yara/archive/v4.2.2.tar.gz
tar -xvzf v4.2.2.tar.gz -C /usr/local/bin/ && rm -f v4.2.2.tar.gz
cd /usr/local/bin/yara-4.2.2
./bootstrap.sh && ./configure && make && sudo make install && make check
2. Download YARA rules:
mkdir -p /tmp/yara/rules
curl 'https://valhalla.nextron-systems.com/api/v1/get' \
-H 'Accept: text/html,application/xhtml+xml,application/xml;q=0.9,*/*;q=0.8' \
-H 'Accept-Language: en-US,en;q=0.5' \
--compressed \
-H 'Referer: https://valhalla.nextron-systems.com/' \
-H 'Content-Type: application/x-www-form-urlencoded' \
-H 'DNT: 1' -H 'Connection: keep-alive' -H 'Upgrade-Insecure-Requests: 1' \
--data 'demo=demo&apikey=1111111111111111111111111111111111111111111111111111111111111111&format=text' \
-o /tmp/yara/rules/yara_rules.yar
3. Verify that YARA has been configured successfully with the EICAR test file:
root@ubuntu-2204:~# wget http://www.eicar.org/download/eicar.com -P /root
root@ubuntu-2204:~# /usr/local/bin/yara /tmp/yara/rules/yara_rules.yar /root/eicar.com
SUSP_Just_EICAR_RID2C24 /root/eicar.com
In a situation where you get an error like this:
yara: error while loading shared libraries: libyara.so.2: cannot open shared
object file: No such file or directory
This signifies that the libyara library usually located in /usr/local/lib was not found by the loader. Add the /usr/local/lib path to the /etc/ld.so.conf loader configuration file to solve this:
sh -c 'echo "/usr/local/lib" >> /etc/ld.so.conf'
ldconfig
4. Edit /tmp/yara/rules/yara_rules.yar and add the following Panchan YARA rule:
rule panchan_P2P_Linux_BOTNET {
	meta:
    	author = "Stiv Kupchik"
    	filetype = "ELF"
    	version = "1.0"
    	reference = ""

	strings:
    	$go_magic = "\xFF Go buildinf:" ascii // All Go binaries have this magic header - we use this to verify we have a Go binary
    	$str_p2p_header = "pan-chan's mining rig hi!" ascii
    	$str_sharepeer = "sharepeer" ascii
    	$str_sharerigconfig = "sharerigconfig" ascii
    	$str_godmode_login = "(*゚ー゚)/)/\" ascii
    	$public_key = "MIIBIjANBgkqhkiG9w0BAQEFAAOCAQ8AMIIBCgKCAQEAwaZwxk7A5U7cejo/8STO\x0a6TjEArLaG+EXhWQxjg2jwgtmNfYTOHg5Ss9e3vHdZCTEo/OIdJQC6If7POa+NbbR\x0a9HkagE0ZYjTXTWNP0PgUxEmcboYkO38fxMpI7Gp+331xzaYT4VY8t5Ko01lvkIoV\x0amxjDKJhSiUbCnFkz76qbjZHpLa0hcpXgO1sXx1IciwaVqlLpzncbmK7Ok3ymS3Ee\x0aG3KWQ/NEm4x8yHx07NI6b/cV/z5YOja9jul7POK8Owo17HuFIhfICgFk8Goc1VnM\x0aiypx91Thqz7IWaF5fTFdBp+0p/cUajcA6vDd3TM0FDzT4HafWppjsofOSoLvTwnq\x0aCwIDAQAB"

	condition:
    	$go_magic and (all of ($str*) or $public_key)
}
5. Create the following active response script at /var/ossec/active-response/bin/yara_remove_threat.sh . The Wazuh active response script will scan new or modified files using YARA, and delete any file which is detected as malicious:
#!/bin/bash
# Wazuh - Yara active response
# Copyright (C) 2015-2022, Wazuh Inc.
#
# This program is free software; you can redistribute it
# and/or modify it under the terms of the GNU General Public
# License (version 2) as published by the FSF - Free Software
# Foundation.


#------------------------- Gather parameters -------------------------#

# Extra arguments
read INPUT_JSON
YARA_PATH=$(echo $INPUT_JSON | jq -r .parameters.extra_args[1])
YARA_RULES=$(echo $INPUT_JSON | jq -r .parameters.extra_args[3])
FILENAME=$(echo $INPUT_JSON | jq -r .parameters.alert.syscheck.path)


# Set LOG_FILE path
LOG_FILE="logs/active-responses.log"

size=0
actual_size=$(stat -c %s ${FILENAME})
while [ ${size} -ne ${actual_size} ]; do
    sleep 1
    size=${actual_size}
    actual_size=$(stat -c %s ${FILENAME})
done

#----------------------- Analyze parameters -----------------------#

if [[ ! $YARA_PATH ]] || [[ ! $YARA_RULES ]]
then
   echo "wazuh-yara: ERROR_Remove threat active response aborted. Yara active response. Yara path and rules parameters are mandatory." >> ${LOG_FILE}
	exit 1
fi

#------------------------- Main workflow --------------------------#

# Execute Yara scan on the specified filename
yara_output="$("${YARA_PATH}"/yara -w -r "$YARA_RULES" "$FILENAME")"

if [[ $yara_output != "" ]]
then
	# Iterate every detected rule and append it to the LOG_FILE
	while read -r line; do
    	    echo "wazuh-yara: INFO - Scan result: $line" >> ${LOG_FILE}
      sleep 3
	# Removing file with a positive YARA match
    	    rm -f $FILENAME
    	    echo "wazuh-yara: INFO - Successfully removed threat: $line" >> ${LOG_FILE}
	done <<< "$yara_output"
fi

exit 0;
6. Change the ownership and the permissions of the yara_remove_threat.sh script for Wazuh to execute it:
chmod 750 /var/ossec/active-response/bin/yara_remove_threat.sh
chown root:wazuh /var/ossec/active-response/bin/yara_remove_threat.sh
7. Configure the Wazuh file integrity monitoring (FIM) module to monitor the /root directory where the malware sample is downloaded. Add the directories for monitoring within the <syscheck> block in the agent configuration file /var/ossec/etc/ossec.conf:
<directories realtime="yes">/root</directories>
8. Restart the Wazuh agent to apply the changes:
systemctl restart wazuh-agent
On the Wazuh server
1. Create custom rules in the /var/ossec/etc/rules/local_rules.xml file. These rules will provide alerts about files that are added or modified in the /root directory on the monitored endpoint:
<group name="syscheck,">
    <rule id="100030" level="7">
        <if_sid>550</if_sid>
        <field name="file">/root/</field>
        <description>File modified in /root directory.</description>
    </rule>

    <rule id="100031" level="7">
        <if_sid>554</if_sid>
        <field name="file">/root/</field>
        <description>File added to /root directory.</description>
    </rule>
</group>
Where:
rule id 100030is triggered when a file is modified in the/rootdirectory.rule id 100031is triggered when a file is added into the/rootdirectory.
2. Edit the /var/ossec/etc/ossec.conf configuration file and append the following blocks:
<ossec_config>
    <command>
        <name>yara_remove_threat</name>
    	  <executable>yara_remove_threat.sh</executable>
    	  <extra_args>-yara_path /usr/local/bin -yara_rules /tmp/yara/rules/yara_rules.yar</extra_args>
        <timeout_allowed>no</timeout_allowed>
    </command>

    <active-response>
        <command>yara_remove_threat</command>
        <location>local</location>
        <rules_id>100030,100031</rules_id>
    </active-response>
</ossec_config>
Where:
<name>specifies the name of the command being called in the active response section.<executable>specifies the executable file to run.- The
<active response>block calls the<command>block when the rule ID100030or100031triggers an alert. <location>specifies where the active response script is executed.
3. Add the following decoders to /var/ossec/etc/decoders/local_decoder.xml in order to decode the logs generated by the active response script:
<decoder name="yara_decoder">
	<prematch>wazuh-yara:</prematch>
</decoder>

<decoder name="yara_decoder1">
	<parent>yara_decoder</parent>
	<regex>wazuh-yara: (\S+) - Scan result: (\S+) (\S+)</regex>
	<order>log_type, yara_rule, yara_scanned_file</order>
</decoder>

<decoder name="yara_decoder1">
	<parent>yara_decoder</parent>
	<regex>wazuh-yara: (\S+) - Successfully removed threat: (\S+) (\S+)</regex>
	<order>log_type, yara_rule, yara_scanned_file</order>
</decoder>
4. Create custom rules in the /var/ossec/etc/rules/local_rules.xml to alert when there is a YARA active response action:
<group name="yara,">
    <rule id="100033" level="0">
        <decoded_as>yara_decoder</decoded_as>
        <description>Yara grouping rule</description>
    </rule>

    <rule id="100034" level="12">
        <if_sid>100033</if_sid>
        <match>wazuh-yara: INFO - Scan result: </match>
        <description>Malicious file "$(yara_scanned_file)" has been detected. YARA rule: $(yara_rule)</description>
    </rule>

    <rule id="100035" level="12">
        <if_sid>100033</if_sid>
        <match>wazuh-yara: INFO - Successfully removed threat: </match>
        <description>Successfully removed malicious "$(yara_scanned_file)" file. YARA rule: $(yara_rule)</description>
    </rule>
</group>
Where:
rule id 100033is the base rule for detecting YARA events.rule id 100034is triggered when YARA scans and detects a malicious file.rule id 100035is triggered when the detected file has been successfully removed by Wazuh active response.
5. Restart the Wazuh manager to apply the changes:
systemctl restart wazuh-manager
Testing the configuration
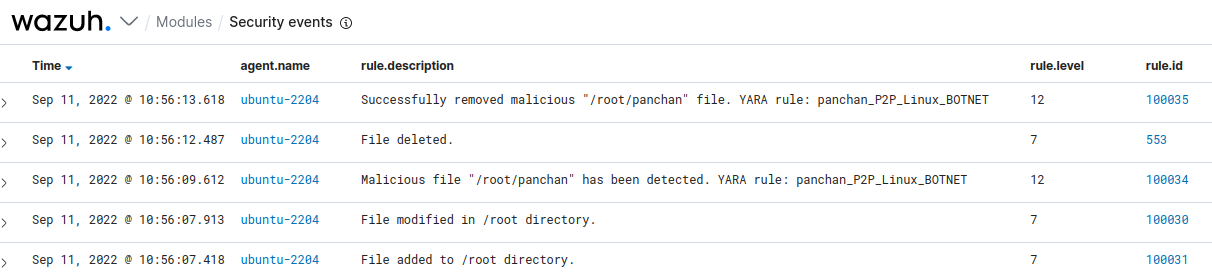
To test that the rules are working correctly, we download the malware file to the /root directory. The expected outcome is that the file is detected as malicious and removed automatically by Wazuh active response.
This confirms that the YARA integration and the active response script works as expected:
root@ubuntu-2204:~# ls
panchan
root@ubuntu-2204:~# ls
root@ubuntu-2204:~#
The screenshot below shows the alerts generated on the Wazuh dashboard:
Once YARA rules are properly updated, the YARA configuration used above can be used in detection and mitigation of other malware samples.
Conclusion
The Panchan malware leverages on security misconfigurations within a Linux environment, particularly weak SSH credentials. Wazuh has many modules that can be used in detecting and mitigating the Panchan botnet. In this article, we have demonstrated how to detect and mitigate the Panchan botnet using both the Wazuh command monitoring module and the YARA integration.
References
- Panchan’s Mining Rig: New Golang Peer-to-Peer Botnet Says “Hi!”
- Akamai Pachan security research.
- Wazuh documentation: How to integrate Wazuh with YARA
If you have any questions about this, join our Slack community channel! Our team and other contributors will assist you.