
AWS access keys are credentials that applications, users, and automation tools use to authenticate to AWS services through APIs. Each key consists of an access key ID and a secret access key. The associated IAM identity determines which AWS resources and operations the credentials can access. When access keys are exposed through public repositories, build pipelines, credential files, or compromised devices, attackers can use them to authenticate as the associated IAM identity. Attackers can then perform any action within the identity’s assigned permissions, making malicious activity difficult to distinguish from legitimate API activity.
Detecting compromised access keys requires visibility into the API activity performed with them. AWS CloudTrail records API activity, while Amazon GuardDuty identifies suspicious behavior involving AWS resources and credentials. Wazuh collects this telemetry through its AWS module, decodes it, and evaluates it against detection rules. By correlating related events, Wazuh identifies activity indicating an ongoing attack rather than isolated suspicious actions.
In this blog post, we demonstrate how Wazuh detects an AWS access key compromise using native AWS telemetry. We walk through an attack scenario, examine the events generated during the attack, and show how Wazuh correlates related activity. The resulting alert provides security teams with the context needed to investigate the compromise and understand the associated attack activity.
The AWS access key compromise attack chain
An AWS access key compromise progresses through four stages, and each one leaves a distinct record in AWS. The following table maps each stage to the CloudTrail events and GuardDuty findings it produces. Each stage corresponds to one of the detection rules that we create later in this post.
| Attack stage | Native AWS signal |
| Validation | CloudTrail records sts:GetCallerIdentity and sts:GetSessionToken calls. The calls often come from an unfamiliar IP address or carry a scanner user agent. |
| Enumeration | CloudTrail records a burst of read-only discovery calls, such as iam:ListUsers, iam:ListRoles, s3:ListBuckets, and ec2:DescribeInstances. CloudTrail also records the AccessDenied errors that the attacker collects while probing permissions. Calls from an unfamiliar IP address can be a serious indicator of compromise. |
| Persistence | CloudTrail records iam:CreateAccessKey, iam:CreateUser, or iam:AttachUserPolicy as the attacker creates backup credentials. |
| Exfiltration | GuardDuty raises findings such as Exfiltration:S3/AnomalousBehavior. CloudTrail records heavy s3:GetObject activity. |
The first three stages consist of discrete API calls. You can detect these stages and reproduce them on demand. The exfiltration stage works differently: GuardDuty derives exfiltration findings by baselining normal account behavior, and a brief lab session may not produce such a baseline. The attack emulation later in this post covers the first three stages with real API calls. The emulation then validates the exfiltration rule with a GuardDuty sample finding.
Native AWS services
The detection in this post rests on telemetry that AWS already produces. We use the following AWS services.
- AWS CloudTrail: CloudTrail records every AWS API call. It provides the who, what, and when of identity activity, and it is the primary data source for the rules in this blog post.
- Amazon GuardDuty: GuardDuty is a managed threat detection service. It reads CloudTrail, VPC Flow Logs, and DNS logs to raise findings such as credential exfiltration and anomalous API usage.
- AWS KMS: AWS Key Management Service (KMS) encrypts the GuardDuty findings written to Amazon S3. GuardDuty exports to Amazon S3 only with a customer-managed key.
- Amazon S3: Amazon S3 holds the CloudTrail and GuardDuty logs. The Wazuh AWS module pulls the bucket at fixed intervals.
Infrastructure
We use the following infrastructure to detect AWS access key compromise with Wazuh.
- Wazuh 4.14.7 central components installed on an Amazon EC2 Ubuntu 24 instance. The components are the Wazuh server, the Wazuh indexer, and the Wazuh dashboard. Follow the Quickstart guide to deploy them.
- An AWS account with CloudTrail, and Amazon GuardDuty enabled. The CloudTrail trail delivers to an S3 bucket.
- An IAM user for Wazuh with read access to the log bucket and decrypt access to the GuardDuty KMS key.
- An Ubuntu 24.04 endpoint to serve as the attacker endpoint.
- A disposable IAM user for the compromised identity. We create the user in the attack emulation section.
Configuration
We configure the AWS services that generate the telemetry, then configure Wazuh to ingest it and detect the compromise chain.
Configuring the AWS services
Perform the following steps on the AWS console to prepare the telemetry that Wazuh ingests.
Create the log bucket
- Open the Amazon S3 console, then click Create bucket.
- Select General purpose as the bucket type.
- Enter a bucket name, and keep it as the value for
<LOG_BUCKET>. - Confirm that the region matches the region you chose for this deployment.
- Confirm that Block all public access remains selected.
- Select Server-side encryption with Amazon S3 managed keys (SSE-S3) under Default encryption.
- Click Create bucket.
Note
SSE-S3 keeps the read path simple. A bucket encrypted with a customer-managed key needs a second kms:Decrypt grant in the Wazuh policy. The policy at the end of this section grants Decrypt on the GuardDuty key alone.
Create the CloudTrail trail
- Open the CloudTrail console, then click Create trail.
- Enter a trail name.
- Select Use existing S3 bucket, then choose the bucket you created.
- Clear the Log file SSE-KMS encryption checkbox.
Note
The console enables it by default and creates a second KMS key for the trail. The Wazuh policy in this section grants kms:Decrypt on the GuardDuty key alone, so a trail encrypted with that second key delivers logs Wazuh cannot read. The module then logs a decryption error on every polling cycle. To keep SSE-KMS instead, add the trail key to the WazuhDecryptGuardDutyFindings statement.
CloudTrail adds the delivery permissions it needs to the bucket policy when you select an existing bucket. Leave those statements in place. The next two tasks add to that policy rather than replace it.
- Ensure that the Log file validation checkbox is selected under Additional settings.
- Leave the CloudWatch Logs option cleared, then click Next.
- Select Management events, then select both Read and Write.
- Click Next, review the summary, then click Create trail.
Enable GuardDuty and set the publishing frequency
- Open the Amazon GuardDuty console in the region of your log bucket.
- Click Get started, then click Enable GuardDuty.
- Click Settings in the navigation pane.
- Select the 15-minute option under the Findings export options to set the publishing frequency, then click Save changes.
Create the KMS key for the findings export
The KMS key is used to encrypt the GuardDuty findings.
- Open the AWS KMS console, click Customer managed keys, then click Create a key.
- Confirm that the region matches your log bucket’s region.
- Select Symmetric, then select Encrypt and decrypt, then click Next.
- Enter an alias, such as
wazuh-guardduty-findings, then click Next. - Select your administrator role or User under Key administrators, then click Next.
- Click Next on the Define key usage permissions page without adding a key user.
- Review the generated key policy and click Next, then click Finish.
- Click the new key, click Switch to policy view on the Key policy tab, then click Edit.
- Add the following statement to the existing
Statementarray of the existing policy, then click Save changes:
		{
            "Sid": "AllowGuardDutyToUseTheKey",
			"Effect": "Allow",
			"Principal": { "Service": "guardduty.amazonaws.com" },
			"Action": "kms:GenerateDataKey",
			"Resource": "*",
			"Condition": {
			"StringEquals": { "aws:SourceAccount": "<ACCOUNT_ID>" }
			}
		}
Replace <ACCOUNT_ID> with your AWS account ID.
- Copy the key ID from the key details page as the value for
<KMS_KEY_ID>.
| Warning |
| Add the statement rather than replace the policy. The generated policy holds an Enable IAM User Permissions statement that lets IAM policies grant access to this key. Without it, Wazuh identity cannot decrypt the findings, regardless of what its IAM policy allows. |
Enable GuardDuty write to the log bucket
- Open the Amazon S3 console, then click your log bucket.
- Click the Permissions tab.
- Click Edit under Bucket policy.
- Add the following two statements to the existing
Statementarray, below the CloudTrail statements already there:
		{
            "Sid": "AllowGuardDutyGetBucketLocation",
            "Effect": "Allow",
            "Principal": { "Service": "guardduty.amazonaws.com" },
            "Action": "s3:GetBucketLocation",
            "Resource": "arn:aws:s3:::<LOG_BUCKET>",
            "Condition": {
            "StringEquals": { "aws:SourceAccount": "<ACCOUNT_ID>" }
            }
        },
        {
            "Sid": "AllowGuardDutyPutFindings",
            "Effect": "Allow",
            "Principal": { "Service": "guardduty.amazonaws.com" },
            "Action": "s3:PutObject",
            "Resource": "arn:aws:s3:::<LOG_BUCKET>/guardduty/*",
            "Condition": {
            "StringEquals": { "aws:SourceAccount": "<ACCOUNT_ID>" }
            }
        }
Replace <ACCOUNT_ID> with your AWS account ID, and <LOG_BUCKET> with your S3 bucket name.
- Click Save changes.
- Click the Objects tab, then click Create folder.
- Enter
guarddutyas the folder name, select Specify an encryption key, and ensure that Use bucket settings for default encryption is selected. - Click Create folder.
Export GuardDuty findings to the log bucket
- Open the GuardDuty console, then click Settings.
- Click Configure now under the findings export options.
- Enter
arn:aws:s3:::<LOG_BUCKET>/guarddutyin S3 bucket ARN. - Enter
arn:aws:kms:<REGION>:<ACCOUNT_ID>:key/<KMS_KEY_ID>in KMS key ARN. - Click View policy for S3 bucket, and View policy for KMS key to review the policies.
- Click Save.
Create a Wazuh IAM integration user
This user is used to integrate Wazuh with AWS.
- Open the IAM console, click IAM users, then click Create user.
- Enter a username, and keep it as the value for
<WAZUH_INTEGRATION_USER>. For example,testUser. - Confirm that console access stays cleared, then click Next.
- Click Next again on the Set permissions page, because the policy does not exist yet.
- Click Create user.
Create and attach the Wazuh policy
This policy is used by Wazuh to read the logs.
- Open the IAM console, click Policies, then click Create policy.
- Click the JSON tab, then replace the editor contents with the policy below:
{
  "Version": "2012-10-17",
  "Statement": [
    {
      "Sid": "WazuhReadLogs",
      "Effect": "Allow",
      "Action": ["s3:GetObject", "s3:ListBucket"],
      "Resource": [
        "arn:aws:s3:::<LOG_BUCKET>",
        "arn:aws:s3:::<LOG_BUCKET>/*"
      ]
    },
    {
      "Sid": "WazuhDecryptGuardDutyFindings",
      "Effect": "Allow",
      "Action": "kms:Decrypt",
      "Resource": "arn:aws:kms:<REGION>:<ACCOUNT_ID>:key/<KMS_KEY_ID>"
    }
  ]
}
Replace:
<LOG_BUCKET>with the name of your log bucket.<ACCOUNT_ID>and<REGION>with your AWS account ID and region, respectively.<KMS_KEY_ID>with the GuardDuty key ID.
- Click Next, enter a policy name such as
wazuh-aws-iam-compromise, then click Create policy. - Click IAM Users, then click the
testUsercreated earlier. - Click Add permissions on the Permissions tab.
- Select Attach policies directly, select
wazuh-aws-iam-compromise, click Next, then click Add permissions. - Click the Security credentials tab, then click Create access key.
- Select the Command Line Interface (CLI) use case.
- Select the Confirmation checkbox, click Next, then click Create access key.
- Copy the access key ID and the secret access key, because the Wazuh server needs both in the next section.
Configuring the Wazuh server
Perform the following steps on the Wazuh server to ingest the AWS telemetry and create the correlation rules. Ensure that the AWS Python dependencies are installed on the Wazuh server.
Store the AWS user access key
- Create the
/root/.aws/credentialsfile to store the AWS user access key for Wazuh in the directory:
# mkdir -p /root/.aws
# touch /root/.aws/credentials
- Add the following profile to the
/root/.aws/credentialsfile:
[wazuh]
aws_access_key_id = <WAZUH_ACCESS_KEY_ID>
aws_secret_access_key = <WAZUH_SECRET_ACCESS_KEY>
Replace <WAZUH_ACCESS_KEY_ID> and <WAZUH_SECRET_ACCESS_KEY> with the access key and secret key of the IAM user you created earlier.
Create the trusted-IP and service-identity CDB lists
- Create a trusted IP address list. The list is a Wazuh constant database (CDB) list, so it matches every entry as an exact string. Create a
trusted_aws_ipsfile in the/var/ossec/etc/lists/directory:
# touch /var/ossec/etc/lists/trusted_aws_ips
- Add the Wazuh public IP addresses to the
/var/ossec/etc/lists/trusted_aws_ipsfile, one per line, inkey:valueformat. The rules treat any source IP address outside a trusted list as suspicious.
<WAZUH_SERVER_PUBLIC_IP>:trusted
- Set the ownership of the
/var/ossec/etc/lists/trusted_aws_ipsfile:
# chown root:wazuh /var/ossec/etc/lists/trusted_aws_ips
# chmod 660 /var/ossec/etc/lists/trusted_aws_ips
- Create a second CDB list for the IAM entities that Wazuh must never treat as compromised. Add the Wazuh integration user to the list:
# echo '<WAZUH_INTEGRATION_USER>:service' >> /var/ossec/etc/lists/aws_service_identities
Note
Without the exclusion, every polling cycle raises an alert on your own integration user, and real alerts drown in it.
- Set the ownership of the
/var/ossec/etc/lists/aws_service_identitiesfile:
# chown root:wazuh /var/ossec/etc/lists/aws_service_identities
# chmod 660 /var/ossec/etc/lists/aws_service_identities
- Reference both CDB lists inside the
<ruleset>block of the/var/ossec/etc/ossec.conffile:
 <ruleset>
    <list>etc/lists/trusted_aws_ips</list>
    <list>etc/lists/aws_service_identities</list>
  </ruleset>
Collect the CloudTrail and GuardDuty logs
- Append the following to the
/var/ossec/etc/ossec.conffile. The Wazuh AWS module then pulls CloudTrail and GuardDuty logs from the S3 bucket:
<ossec_config>
  <wodle name="aws-s3">
    <disabled>no</disabled>
    <interval>5m</interval>
    <run_on_start>yes</run_on_start>
    <skip_on_error>yes</skip_on_error>
    <bucket type="cloudtrail">
      <name><LOG_BUCKET></name>
      <aws_profile>wazuh</aws_profile>
      <only_logs_after><SETUP_COMPLETION_DATE></only_logs_after>
    </bucket>
    <bucket type="guardduty">
      <name><LOG_BUCKET></name>
      <path>guardduty</path>
      <aws_profile>wazuh</aws_profile>
      <only_logs_after><SETUP_COMPLETION_DATE></only_logs_after>
    </bucket>
  </wodle>
</ossec_config>
Set <SETUP_COMPLETION_DATE> to the day you finished the AWS configuration, in YYYY-MMM-DD format, for example, 2026-AUG-03. The <path> element on the GuardDuty bucket is required . The element must match the guardduty/ prefix that the console export writes to. Without the element, the module polls the bucket root while GuardDuty writes one level down. The whole exfiltration stage then stays silent, and every polling cycle logs a normal bucket analysis.
Create the correlation rules
- Create a custom rule file
aws_iam_compromise_rules.xmlin the/var/ossec/etc/rules/directory:
# touch /var/ossec/etc/rules/aws_iam_compromise_rules.xml
- Add the following rules to the
/var/ossec/etc/rules/aws_iam_compromise_rules.xmlfile to detect the AWS access key compromise:
<group name="amazon,aws_iam_compromise,">

  <!-- STAGE 1: Key validation from an unrecognized source IP -->
  <rule id="101600" level="8">
    <if_sid>80200,80202,80203,80250</if_sid>
    <field name="aws.eventName" type="pcre2">GetCallerIdentity|GetSessionToken</field>
    <list field="aws.sourceIPAddress" lookup="not_match_key">etc/lists/trusted_aws_ips</list>
    <list field="aws.userIdentity.userName" lookup="not_match_key">etc/lists/aws_service_identities</list>
    <description>AWS IAM: Access key validated ($(aws.eventName)) from unrecognized IP $(aws.sourceIPAddress) by $(aws.userIdentity.userName) - [Possible stolen key].</description>
    <mitre>
      <id>T1078.004</id>
    </mitre>
  </rule>

  <!-- STAGE 2: Enumeration - repeated AccessDenied from the same identity -->
  <rule id="101601" level="10" frequency="6" timeframe="900">
    <if_matched_sid>80250</if_matched_sid>
    <same_field>aws.userIdentity.userName</same_field>
    <description>AWS IAM: Repeated AccessDenied errors from $(aws.userIdentity.userName) - [Possible permission enumeration].</description>
    <mitre>
      <id>T1580</id>
      <id>T1087.004</id>
      <id>T1069.003</id>
    </mitre>
  </rule>

  <!-- STAGE 3: Persistence - new credential or identity from an unrecognized IP -->
  <rule id="101602" level="12">
    <if_sid>80200,80202,80203,80250</if_sid>
    <field name="aws.eventName" type="pcre2">CreateAccessKey|CreateUser|AttachUserPolicy</field>
    <list field="aws.sourceIPAddress" lookup="not_match_key">etc/lists/trusted_aws_ips</list>
    <list field="aws.userIdentity.userName" lookup="not_match_key">etc/lists/aws_service_identities</list>
    <description>AWS IAM: Persistence action $(aws.eventName) attempted by $(aws.userIdentity.userName) from unrecognized IP $(aws.sourceIPAddress).</description>
    <mitre>
      <id>T1098.001</id>
    </mitre>
  </rule>

  <!-- GuardDuty flags credential exfiltration or anomalous use -->
  <rule id="101603" level="12">
    <if_sid>80300,80301,80302,80303</if_sid>
    <field name="aws.type" type="pcre2">(?i)(InstanceCredentialExfiltration|AnomalousBehavior|Exfiltration:S3)</field>
    <description>AWS GuardDuty: Credential exfiltration or anomalous behavior detected - $(aws.type).</description>
    <mitre>
      <id>T1552</id>
    </mitre>
  </rule>

  <!-- CORRELATION: validation processed before persistence -->
  <rule id="101604" level="15">
    <if_sid>101602</if_sid>
    <if_matched_sid>101600</if_matched_sid>
    <same_field>aws.userIdentity.userName</same_field>
    <description>CRITICAL: IAM identity $(aws.userIdentity.userName) shows a full compromise chain (validation processed before persistence) - High-confidence access key compromise!</description>
    <mitre>
      <id>T1078.004</id>
      <id>T1098.001</id>
    </mitre>
  </rule>

  <!-- CORRELATION, REVERSE ORDER: persistence processed before validation -->
  <rule id="101605" level="15">
    <if_sid>101600</if_sid>
    <if_matched_sid>101602</if_matched_sid>
    <same_field>aws.userIdentity.userName</same_field>
    <description>CRITICAL: IAM identity $(aws.userIdentity.userName) shows a full compromise chain (persistence processed before validation) - High-confidence access key compromise!</description>
    <mitre>
      <id>T1078.004</id>
      <id>T1098.001</id>
    </mitre>
  </rule>

</group>
The following table lists the rules that the AWS access key compromise chain triggers, with the condition for each rule.
| Rule ID | Trigger condition |
101600 | An access key validation through sts:GetCallerIdentity or sts:GetSessionToken arrives from an untrusted source IP address. The calling identity is also absent from the service identity list. |
101601 | The same IAM identity produces 6 or more AccessDenied errors within 900 seconds, indicating permission enumeration. The window spans three polling cycles because arrival time, rather than AWS event time, drives the count. |
101602 | A CreateAccessKey, CreateUser, or AttachUserPolicy call arrives from an untrusted source IP address by an identity outside the service identity list. |
101603 | GuardDuty reports credential exfiltration or anomalous behavior for an IAM identity. |
101604 | The same identity matches the validation rule 101600 and then the persistence rule 101602. The pair forms a high-confidence compromise chain. |
101605 | The same pair matches, and Wazuh processes the persistence event before the validation event. Rules 101604 and 101605 together make the correlation independent of processing order. |
Rules 101604 and 101605 set a 900-second timeframe. Wazuh pairs the two stages only when both events reach the manager inside that window. Arrival time drives the window, not the AWS eventTime. CloudTrail batches deliveries and the module polls every 5 minutes, so the window covers roughly three polling cycles.
Note
Rules 101602, 101604, and 101605 ignore aws.errorCode deliberately. A denied persistence attempt therefore completes the correlation and raises the level 15 alert. An attempt to mint a second credential deserves an alert either way. To alert only on successful persistence, add <field name="aws.errorCode" negate="yes" type="pcre2">\S+</field> to rule 101602.
Restart and verify
- Restart the Wazuh manager to load the new rules:
# systemctl restart wazuh-manager
- Confirm that the AWS module executes successfully through the
/var/ossec/logs/ossec.logfile:
# grep -i 'wazuh-modulesd:aws' /var/ossec/logs/ossec.log | tail -n 5
2026/09/01 08:46:11 wazuh-modulesd:aws-s3: INFO: Module AWS started
2026/09/01 08:46:11 wazuh-modulesd:aws-s3: INFO: Starting fetching of logs.
2026/09/01 08:46:11 wazuh-modulesd:aws-s3: INFO: Executing Bucket Analysis: (Bucket: s3-iam-logbucket, Type: cloudtrail, Profile: wazuh)
2026/09/01 08:46:13 wazuh-modulesd:aws-s3: INFO: Executing Bucket Analysis: (Bucket: s3-iam-logbucket, Path: guardduty, Type: guardduty, Profile: wazuh)
2026/09/01 08:46:15 wazuh-modulesd:aws-s3: INFO: Fetching logs finished.
Attack emulation
We emulate a compromise chain from the Ubuntu endpoint using the AWS CLI, targeting a public IP address that falls outside trusted_aws_ips. The endpoint acts as an attacker with unauthorized keys in an unrecognized location.
Creating the attacker identity
Perform the following steps on the AWS console.
- Sign in to the AWS console with your administrator identity.
- Open the IAM console, click IAM users, then click Create user.
- Enter
iam-compromise-victim-testas the username. - Ensure that console access stays unchecked, then click Next.
- Click Next on the Set permissions page without adding a group or attaching a policy.
- Review the summary, then click Create user.
- Click the new user, then click the Security credentials tab.
- Click Create access key under Access keys.
- Select Command Line Interface (CLI), select the Confirmation checkbox, then click Next.
- Click Create access key, then copy the access key ID and the secret access key.
Emulating the attack
Perform the following steps on the attacker endpoint.
- Install the AWS CLI:
# apt-get install -y unzip
# curl -s 'https://awscli.amazonaws.com/awscli-exe-linux-x86_64.zip' -o awscliv2.zip
# unzip -q awscliv2.zip
# ./aws/install
- Set up an AWS CLI profile with the access key from the
iam-compromise-victim-testuser created in the previous step:
# aws configure --profile compromised
- Stage 1, validation. Validate the stolen key. Rule
101600detects the call:
# aws sts get-caller-identity --profile compromised
- Stage 2, enumeration. Send a burst of denied API calls to imitate permission probing. Rule
101601needs 6 matches within 900 seconds, so send a few more than the minimum:
# for i in $(seq 1 11); do aws iam list-users --profile compromised; done
- Stage 3, persistence. Create a backup access key. AWS refuses the call, and rule
101602fires on the attempt:
# aws iam create-access-key --user-name iam-compromise-victim-test --profile compromised
Note
Stages 2 and 3 return AccessDenied, and that is the expected result. The test user carries no policies, so AWS refuses both calls. CloudTrail records each attempt either way. Rule 101601 counts the denials, and rule 101602 ignores the outcome entirely.
Verify the GuardDuty rule
Wazuh processes GuardDuty findings through built-in rules that assign severity and correlate them with related CloudTrail activity. Rule 101603 raises matching findings to level 12 and groups them with the other CloudTrail alerts in a unified dashboard view.
GuardDuty generates these findings independently, while Wazuh automatically matches supported finding types without manual intervention. Because anomaly findings require GuardDuty to learn account behavior, we inject a sample finding to test that the logs are saved into the S3 bucket.
- Using your AWS administrator account, read the detector ID, then inject a sample finding:
# aws guardduty list-detectors
# aws guardduty create-sample-findings --detector-id <DETECTOR_ID> --finding-types 'Persistence:IAMUser/AnomalousBehavior'
Replace <DETECTOR_ID> with the ID from the first command. A sample finding takes the same export path as a real one, so allow one export cycle for ingestion. With the 15-minute publishing frequency set earlier, the cycle is short. The check confirms that rule 101603 matches the finding type, and it does not exercise the detection logic inside GuardDuty.
The following table maps each emulation step to the rule that it triggers.
| Rule ID | Test command |
101600 | aws sts get-caller-identity --profile compromised |
101601 | for i in $(seq 1 11); do aws iam list-users --profile compromised; done |
101602 | aws iam create-access-key --user-name iam-compromise-victim-test --profile compromised |
101603 | aws guardduty create-sample-findings --detector-id <DETECTOR_ID> --finding-types 'Persistence:IAMUser/AnomalousBehavior' |
101604 / 101605 | No command triggers these rules directly. Rules 101600 and 101602 match the same identity, and the second event completes the chain and raises the correlation alert. |
View the compromise alerts on the Wazuh dashboard
Perform the following steps to view the AWS access key compromise alerts on the Wazuh dashboard.
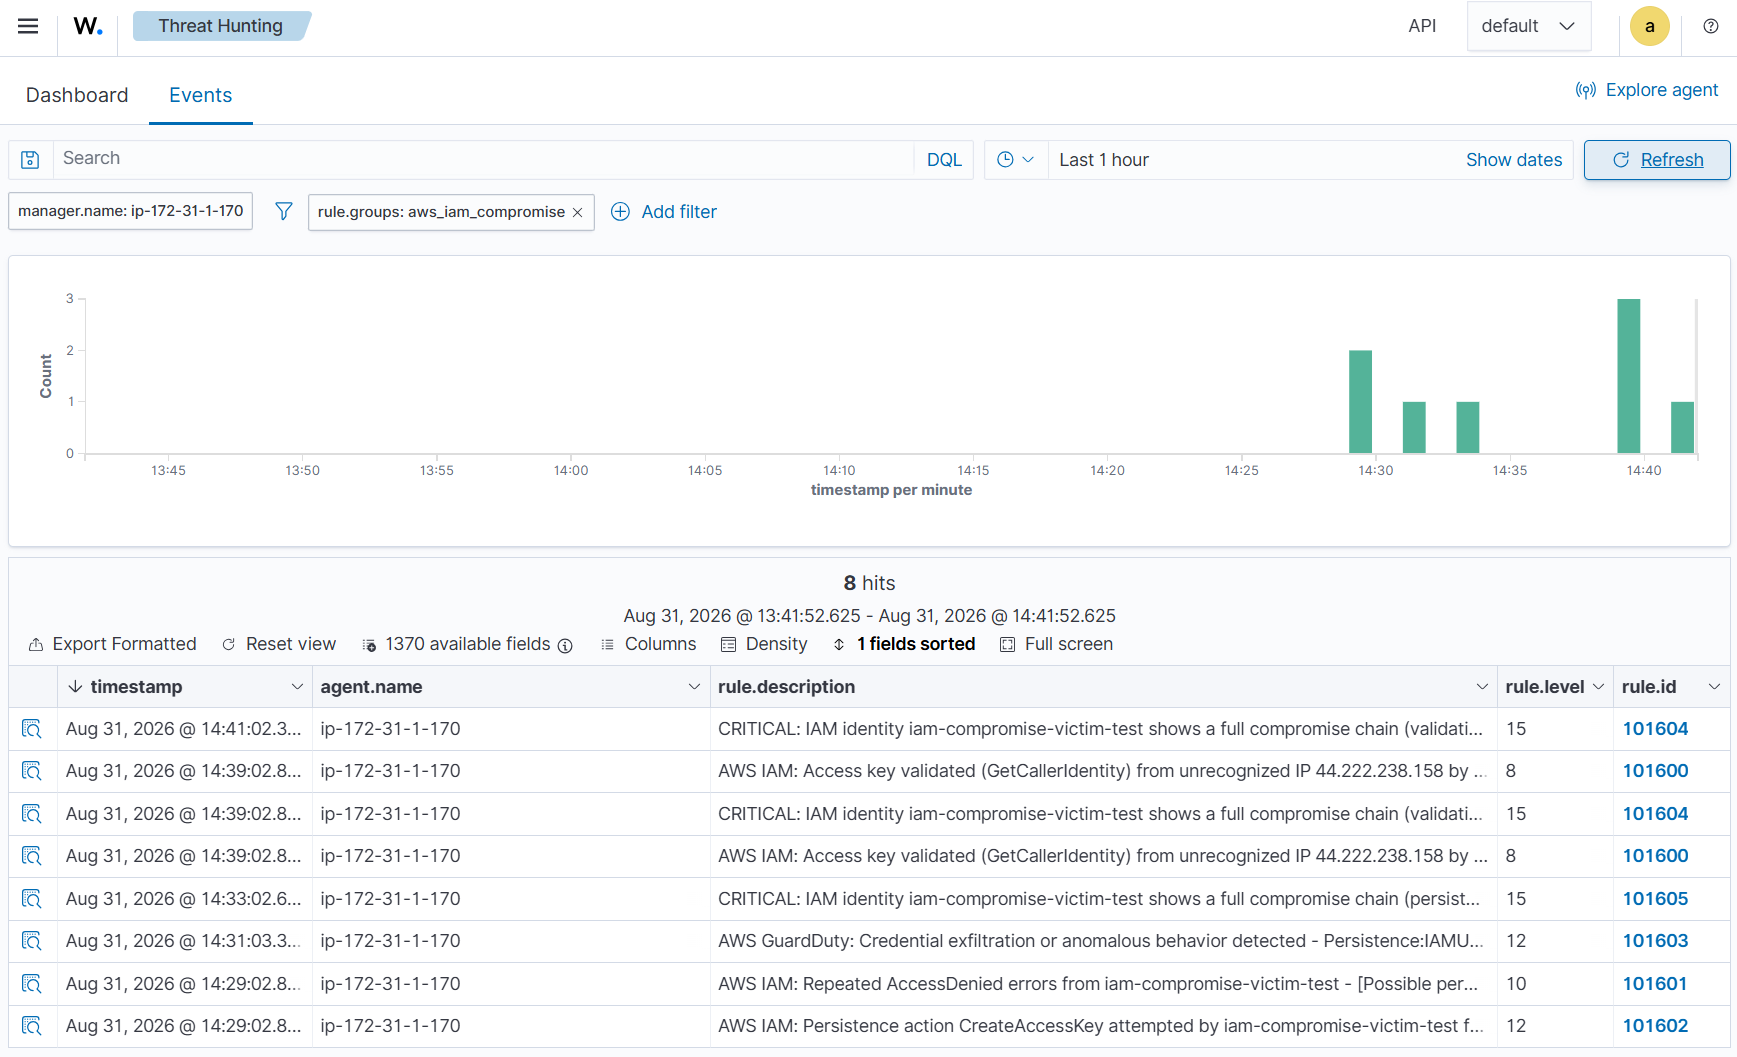
- Click the menu icon, then navigate to Threat intelligence > Threat Hunting.
- Switch to the Events tab.
- Click + Add filter, then filter by
rule.groups. - Select is in the Operator field.
- Search for
aws_iam_compromiseand select it in the Values field. - Click Save.
The image below shows the compromise chain that the Wazuh server reconstructed from CloudTrail and GuardDuty telemetry. The chain ends with the critical correlation alert.
Recommendations
Detection works best alongside preventive AWS controls that reduce the value of a stolen key. We recommend the following controls.
- Use IAM roles and short-lived credentials in place of long-term access keys wherever possible.
- Collect CloudTrail through the SQS-based configuration of the Wazuh AWS module in any account where detection completeness matters. Interval polling of Amazon S3 drops delivery files that arrive out of order.
- Apply a service control policy (SCP) or a resource control policy that denies credential use outside your corporate CIDR ranges or expected VPCs. The policy draws a network perimeter around your identities.
- Turn on CloudTrail log file integrity validation and restrict the log bucket with a bucket policy. An attacker then cannot tamper quietly with the evidence that Wazuh depends on.
- Rotate access keys on a schedule, and scan repositories and CI/CD configuration for committed secrets before they reach production.
- Revisit the trusted IP address list and the service identity list whenever your egress addresses change. A stale list either swallows real detections or fires on your own infrastructure.
- Make use of the AWS IAM managed policy
AWSCompromisedKeyQuarantineV2to automatically deactivate use of the stolen access key. - Enable IAM Access Analyzer to identify excessive permissions and unintended access, helping enforce least privilege across IAM identities and resources.
Conclusion
In this post, we demonstrate how Wazuh detects AWS access key compromise using native AWS telemetry. Wazuh pulls CloudTrail and GuardDuty logs from Amazon S3. Wazuh correlates the validation, enumeration, persistence, and exfiltration stages to generate a high-confidence alert. Reconstructing the complete attack chain, rather than reacting to isolated events, identifies a stolen key early enough to revoke it before the incident becomes a full account takeover.
Wazuh is a free and open-source security platform with a range of capabilities to monitor and safeguard your infrastructure against malicious activity. If you have questions about this blog post or about Wazuh, join our community to connect with the team.
References
- Wazuh AWS module documentation
- Wazuh AWS module supported services and SQS setup
- Wazuh rules syntax
- Exporting Amazon GuardDuty findings to Amazon S3
- AWS compromised IAM credentials guidance
- MITRE ATT&CK T1078.004 – Valid Accounts: Cloud Accounts
- MITRE ATT&CK T1098.001 – Account Manipulation: Additional Cloud Credentials